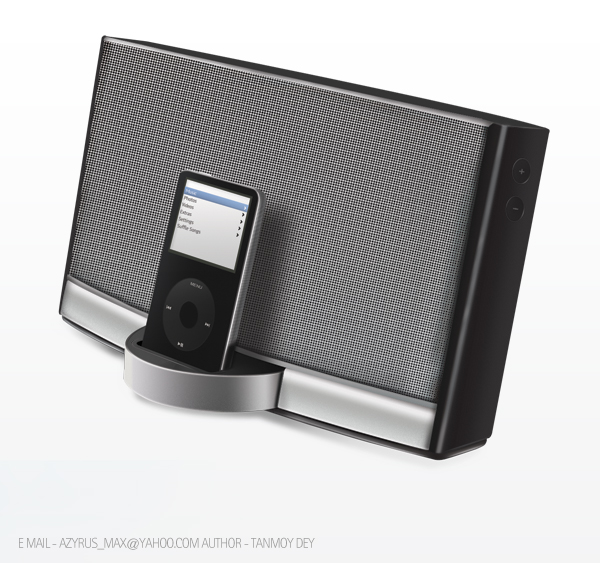
Final Product What You'll Be Creating
In today’s tutorial we will demonstrate how to draw a Sound Dock System with Photoshop.
Let’s get started!
Let’s get started!
Step 1
Start with a new document. Width: 2000px, height: 2000px, color mode: CMYK. Take a look at
the layer setup.
the layer setup.

Step 2
Create a new layer, use Pen tool and start drawing as shown. After that, apply the layer style to this shape.

Step 3
Create a shape like this using pen tool. Hit Cmd/Ctrl + enter to make selection, fill it with white color.
Go to Filter > Blur > Gaussian Blur, Radius: 20px. Now erase highlighted areas using a
feathered brush. Set layer blending mode to overlay. Do this step 4 times creating new layers. Make
changes on layer blending mode and opacity. See next image. Don’t use Gaussian blur every time.
Go to Filter > Blur > Gaussian Blur, Radius: 20px. Now erase highlighted areas using a
feathered brush. Set layer blending mode to overlay. Do this step 4 times creating new layers. Make
changes on layer blending mode and opacity. See next image. Don’t use Gaussian blur every time.

Step 4
Create next shape using pen tool. After that, apply a layer style.

Step 5
Create the corner and upper portion for the dock system. Use pen tool to create this. After that apply
Layer style. Make some changes in Gradient Overlay angle.
Layer style. Make some changes in Gradient Overlay angle.

Step 6
Next, create following shape and apply the layer style.

Step 7
Time to create the lower portion of the dock. Create the shape shown in next image and apply
a layer style.
a layer style.

Step 8
Start with pen tool, create the shape shown below and apply a layer style.

Step 9
Time to create the iPod base, use the pen tool to create the shape. Use Direct Selection tool to
modify it. Now apply a layer style.
modify it. Now apply a layer style.

Step 10
Create the following shape using pen tool and apply a layer style.

Step 11
Create the bottom of the dock system.

Step 12
Create the following shape using the pen tool. After that, apply the following layer styles.

Step 13
Create the side of iPod. See following image.

Step 14
Create the screen.

Step 15
Create the button base. Use the Elliptical Marquee tool to draw this. After that apply a layer style.
Draw another small shape inside the circle and press delete.
Draw another small shape inside the circle and press delete.

Step 16
Create the Dock system’s speaker net. Create the following pattern using Rectangular Marquee
tool and Elliptical Marquee tool. First create the square area using Rectangular Marquee tool then
create small circles between it & press delete. Follow next image.
tool and Elliptical Marquee tool. First create the square area using Rectangular Marquee tool then
create small circles between it & press delete. Follow next image.

Step 17
Now scale down it and place it as shown on image. Select Move tool (M) and press alt + drag to
make copies of it. After this step is done, select all of this pattern layer and press Cmd/Ctrl + E to
merge them. Name this layer to ‘Net’. While selecting this layer, Cmd/Ctrl + click on the layer
thumbnail which shown on image. Click on Add Layer Mask icon in Layer palette. Now Create a
new layer above the ‘Net’ layer and select both of them and press Cmd/Ctrl + E to merge them.
Now apply the layer style.

Step 18
Select Burn tool and drag on highlighted areas. See the result.

Step 19
Cmd/Ctrl + click on the layer thumbnail which shown on next image, Now use a feathered brush,
take white color and paint as shown on image. Repeat the same step using Black color as well.
take white color and paint as shown on image. Repeat the same step using Black color as well.

Step 20
Repeat the same step on following areas using Black color and decrease this layer’s opacity.

Step 21
Add more detail to the dock.

Step 22
Time for upper portion.

Step 23
Now Cmd/Ctrl + click on the iPod base area, go to Edit > Stroke, Width- 3px, color- White,
Location- Inside. Go to Filter > Blur > Gaussian Blur, Radius- 2px. Now take feathered
eraser tool and erase the highlighted areas. See the result.
Location- Inside. Go to Filter > Blur > Gaussian Blur, Radius- 2px. Now take feathered
eraser tool and erase the highlighted areas. See the result.

Step 24
Take a feathered brush, black color, and paint on highlighted portion. Erase unwanted portion.

Step 25
Create another shape using pen tool and apply a layer style. Using the same technique, I added
another line in the corner. Now fill the blank area with Black.
another line in the corner. Now fill the blank area with Black.

Step 26
Take a feathered brush and use the colors as shown on the next image and also decrease the opacity.
Erase unwanted portion. See next image.
Erase unwanted portion. See next image.

Step 27
Add reflection of iPod on base. Use pen tool to draw it. See next image. Use black and white color. Erase the edges of them.

Step 28
Select the layers shown on next image, fill with black, now go to Filter > Noise > Add Noise,
On Gaussian and Monochromatic, Amount: 15px. Change layer blending mode to Overlay, now erase
highlighted areas using a feathered eraser brush.
On Gaussian and Monochromatic, Amount: 15px. Change layer blending mode to Overlay, now erase
highlighted areas using a feathered eraser brush.

Step 29
Add a little glow to the corner of the body, repeat this step for upper portion as well.

Step 30
Create the buttons of the dock system. Use Elliptical Marquee tool to do so. After that apply layer styles.

Step 31
Repeat Step 23.

Step 32
Cmd/Ctrl + Click on the base button, now go to Select > Modify > Contract, Contract by -
1px. Fill it with any color, apply a layer style.
1px. Fill it with any color, apply a layer style.

Step 33
Time to add detail to iPod. Try to create the button and screen yourself.

Step 34
Add light and reflection to iPod body. Take a closer look to next image. You can create this yourself
using previous techniques.
using previous techniques.

Step 35
Creating the shadow of iPod on the Dock. Grab Pen tool and create the shape shown in the next image,
fill it with black. Now go to Filter > Blur > Gaussian Blur, Radius: 12px, Set layer opacity to 67%.
fill it with black. Now go to Filter > Blur > Gaussian Blur, Radius: 12px, Set layer opacity to 67%.

Step 36
Duplicate the net layer, place it above iPod. See next image.

Step 37
Last stage of the tutorial, create a shape as shown on next image, using pen tool, fill it with black,
then grab Smudge tool and follow next image.
then grab Smudge tool and follow next image.

Step 38
Add shadow of the dock.


0 comments:
Post a Comment