In this tutorial we will be covering some very interesting topics on Matte Painting and Photo Manipulation such as planning a concept, pre-visualizing, and using images as references. This tutorial not only shows some techniques but also helps in improving logical thinking while creating a fantasy scene.
Step 1
Create a new canvas in Photoshop with the resolution of Width=2560px and Height=1485px.

Step 2
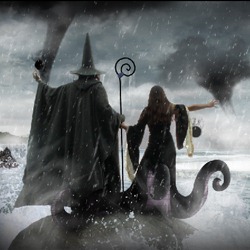
Before getting into the tutorial lets sketch a rough outline of the concept we are going to create. In this scene a master wizard will be teaching his student witch about how to create monster tornados and huge whirlpool at the same time. In the mean while he creates dark energy balls to protect themselves if anything goes out of control.

Step 3
Since the characters are in contrast with the background, mask out only the characters leaving the stick in between them using the Magic Wand Tool(W) and import them on to the working canvas.


Step 4
To create a dull and rainy environment in the scene, import the image with thick grey sky and place it on the canvas as shown.

Step 5
To make the scene more intense we need to create much more thick clouds. So import the clouds image and place it above the 'rainy clouds' layer.

To match the blue clouds to the scene, we need to desaturate the 'clouds 2' layer. With the 'clouds 2' layer selected Desaturate it to -61 using Hue/Saturation (Image > Adjustments > Hue/Saturation).

Since we need only the clouds, using the Soft Eraser (E) erase the base of 'clouds 2' layer as shown.

Step 6
Now import the image of the river that we are going to manipulate into an ocean in the scene. Make sure to place it on the 'clouds 2' layer.

Erase the sky from the 'ocean water' layer using the Eraser Tool(E).

Step 7
In this step we will be creating distant hills. In the below reference image you can observe how the hills are fading with the increase in distance.

Hence to create the same natural depth in our scene, import the image of the hills that suites perfectly to our scene and place it on the canvas as shown.

Now mask out the sky leaving only the hills. Then desaturate the hills and water color to -61 using Hue/Saturation.


Step 8
Now by using the Stamp Tool (S) clone the stick in the 'ocean' layer that is creating a distraction.

Step 9
Since we are creating a stormy environment, we need to create water splashing against the rock on which our characters are standing. Import the water splash image into Photoshop and select the Red layer from the Channels pallet.

Then select Calculations (Image>Calculations) and select Red from the Channels dropdown list.

Once the Calculation is checked OK an Alpha 1 layer will be created in the channels pallet. With the 'Alpha 1' layer selected set the Levels as shown to create maximum contrast between the water splash and the background that are to be separated.

Now go to 'Select>Load Selection' and select Alpha 1 from the Channel dropdown list and check OK to create mask around the splash.

Separate the water splash into a new layer by holding Ctrl+J. Then import the splash onto the working canvas and place it before the rock as shown.


Step 10
Following the previous step create water splashes around the rock.

Step 11
In this step we will be adding few rocks that we often find near a shore. Import the image of the shore rocks on to the working canvas and place it on the left side of the canvas as shown.

Now by using the soft Eraser Tool(E) erase the sky and the unwanted part of the image. Then desaturate the shore rocks layer to -61 to match the color of the environment we are creating.

Step 12
In this step we will be creating a green hill located a bit closer than the previously placed hills. Before creating this hill lets refer the reference image of a village and hills covered with fog. Here we can observe how the bases of the hills are being covered by fog and mist. Hence we need to create the same effect to get the natural depth.

Import the image of the hill and place it on the left side as shown and resize it to required proportions using Move Tool(V).

Using the soft Eraser Tool erase the sky from the 'hill 2' image and desaturate it to -61 using Hue/Saturation.

To get the same effect of the reference image, paint the base of the hill with white color using the fog brushes.

Step 13
Following the same procedure that we used in placing the elements of the scene, create the water falling from a plane that is slightly above the sea level on the left side of the scene.

Step 14
In this scene we are focusing on the characters hence the other elements away from the characters appear to be out focused. With the waterfalls layer selected go to Filter>Blur>Gaussian Blur and add a Gaussian blur of Radius=0.8px.

Similarly select the shore rocks layer and add a Gaussian blur of Radius=0.8px.

Step 15
Now by using the Clouds brush paint some random white clouds in the sky as shown to create a perfect intense stormy sky.

Step 16
Fantasy scene never completes without a witch with fantasy body. In this step we will create tentacles to the student witch. This is inspired from Morticia Addams(Adams Family) and Ursula (Little Mermaid). Using the Brush Tool(B) draw the shape of the tentacles as shown to the student witch.

Then color the outer skin of the tentacles with black color and the bottom grip of the tentacles with the color #725e72.

Now by using the Soft Mechanical Brush(B) paint the shadows to the tentacles as shown.

Now draw lines using the Pen Tool(P) on the base of the tentacles to represent the grip. Â

Step 17
In this step we will be creating a wand in between the characters. Using the Pen Tool(P) create the shape of the wand as shown, then right click on the canvas and select Stroke Path from the properties list. Then select the Brush from the Tool drop down list. Make sure to set the size of the brush tool to 3px before selecting the Stroke Path.


Add some shades and shadows to the wand to create a natural depth to the wand.

Step 18
Usually in many comic stories we find magicians having lots of hamlets with them, which contain some kind of magical power in them. So here we will digitally paint a ribbon coiled to the wand which represents the hamlet here. Draw the outline of the hamlet to the wand as shown.

Now put your creative juices to test in coloring the hamlet.

Step 19
In this step we will create a whirlpool in the water. First create a basic shape of the whirlpool with respect to the prospective of the scene we are creating.

Import the image of the Niagara falls and cut it into the basic shape of the whirlpool.

Now we need to add water flowing into the whirlpool from all the directions. Hence again import the image of the Niagara fall (another image shot from side angle, and place it on the right side of the whirlpool as shown.

Step 20
When a whirlpool is created in water the surrounding waves will also get rough, hence in this step we will create some rough waves around the whirlpool. Import the image of the rough waves onto the canvas and place it near the whirlpool as shown.

Since the front side of the whirlpool appears a bit closer to the characters the waves should appear slightly bigger than the previous waves. Import the image of the waves and place them around whirlpool as shown.

Since the right end of the whirlpool is curved transform the wave layer along the curve using Move Tool(V).

Step 21
Now our scene contains heavy rainy clouds and raging water waves. Usually when the weather is in such conditions we will find huge amount of fog in the surrounding areas. Hence using the fog brushes paint some fog around the characters and the whirlpool as shown.

Step 22
Now by using the Tornado brushes paint the tornados with black color as per the concept we outlined earlier in the beginning.

Step 23
In this step we will be creating the Dark Energy Balls surrounding the area. Using the Elliptical Marquee Tool(M) make a sphere on the left corner of the scene and fill it with black color.

Now by using the smoke brushes paint black smoke on the sphere as shown to represent the energy from the sphere.

In order to maintain the Depth Of Field of the scene we need to blur the energy ball since it is much closer to the lens. With the energy ball layer selected add a Gaussian blur of radius 4.3px.

Similarly create few more energy balls around the characters as shown. Since these energy balls are closer to the characters, they don’t appear blurred much. But since they are slowly moving energy balls add a Gaussian blur of radius 0.3px.

Step 24
Now we will be creating a 3D Title. Give a title to our scene(Magic School) using the font 'Ring bearer'.

Open the Layer Properties of the Title layer and select Bevel and Emboss from the Styles list. Then set the values to Depth=1000%, Size=202px, Soften=1px and leave the rest of the values as default.

Then select the Contour and set its Range=100% to get the following result.


Step 25
Now since we created a perfect stormy weather,it's time to create some heavy rain which give a perfect since to the scene. Create a new rain layer above all the layers and paint that rain using the white color as shown. This rain drops represent the rain near the characters.


Now decrease the size of the rain brush to paint the rain falling far way from the characters. Once the painting of rain is finished add a Gaussian Blur of Radius 4.2px.

Step 26
Since it is raining heavily we should create thin water spilling from the wizard's hat and the wand and also the tentacles of the Student witch. Using the water flow brushes create a thin flow of water spilling from the hat and wand of the wizard and the tentacles of the student witch as shown.

![final[1]](http://photoshoptutorials.ws/9fdfee4ac94f_18CC/final1.jpg "final[1]")


0 comments:
Post a Comment