In this Tutorial I'll show you how to create a neat cartoon scene in Photoshop. Our scene will contain 2 characters: a cute beast and an angry toy.
You'll only need 1 start image and Photoshop software for this image. This is a more advanced tutorial, so basic knowledge of Photoshop is required.
You can download the source image in high resolution here: cool toy source image
I'll explain things like:
- How to do shadows in simple way.
- How to create a night scene with a lighting effects.
- How to paint a simple forms of trees and bushes on the background.
- Learn how to create two characters with only a single image.
- and many many more...
Let's start! Good Luck!
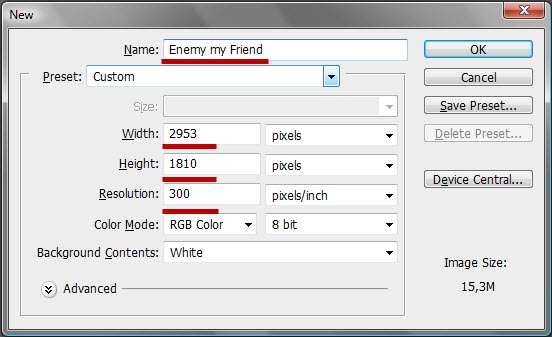
Step 1open your Photoshop and create a New Document (Ctrl+N).
I used these resolutions for my entry:
Name: Enemy my Friend
Width: 2953 pixels
Height: 1810 pixels
Resolution: 300 pixels/inch
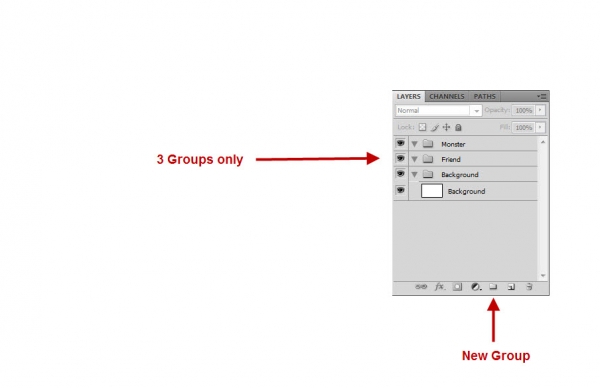
Create 3 Groups (Name these groups: Background, Friend and Monster/Beast) for example.
Start adding new layers there.
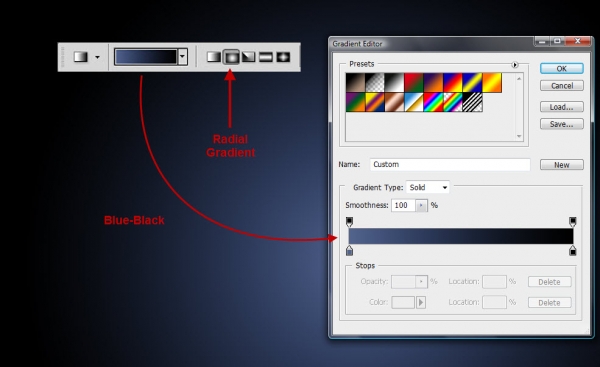
For this step you'll need a Gradient Tool (G).
Go to Radial Gradient and change the Colors to Blue and Black.
Gradient Tool (G) -> Gradient Editor -> Blue-black Colors.
Name new Layer "Background".
Select the Background Layer and go to Image -> Adjustments -> Vibrance.
There change Vibrance to +30 and Saturation to +100.
You'll get this result.

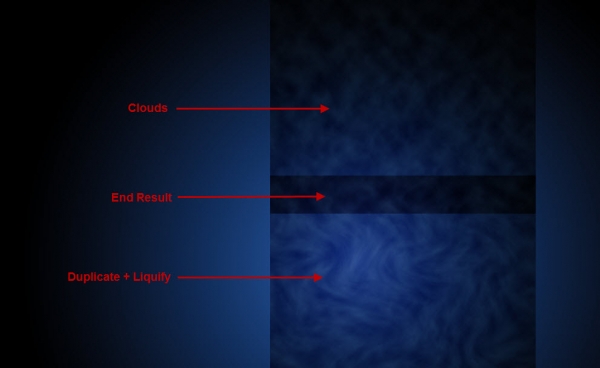
Go to Filter -> Render -> Clouds. (Colors: Black and White) in the new layer.
Name this Layer "Clouds" and change Blend Mode to Soft Light.
Duplicate this Layer one time (Ctrl+J) and go to Filter -> Liquify (Shift+Ctrl+X).
Use the Forward Warp Tool (W) (Brush size: 500 Pixels) on the Clouds.
View the end result on the image below.
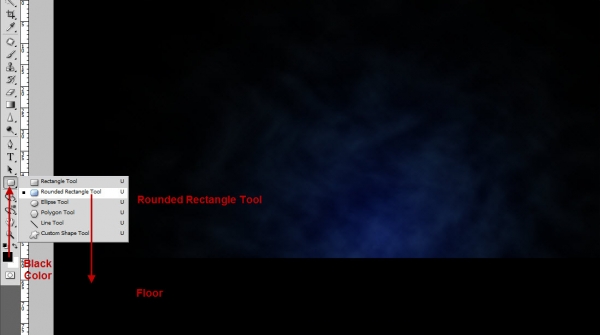
You'll need a new layer (Ctrl+Shift+N), call this layer "Floor".
Create a rectangle with a Rounded Rectangle Tool (U) (Color: Black).
Do this like in the image below.
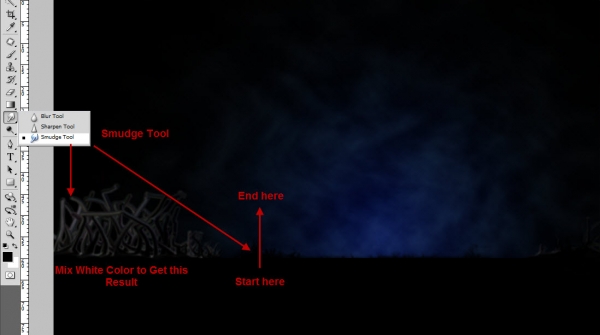
Use Smudge Tool (Hardness: 30%, Strenght: 80%) on the Floor layer.
Go to position -> Left click on the Floor -> Pull the mouse upwards -> Repeat this step more times.
You'll create bushes in this way.
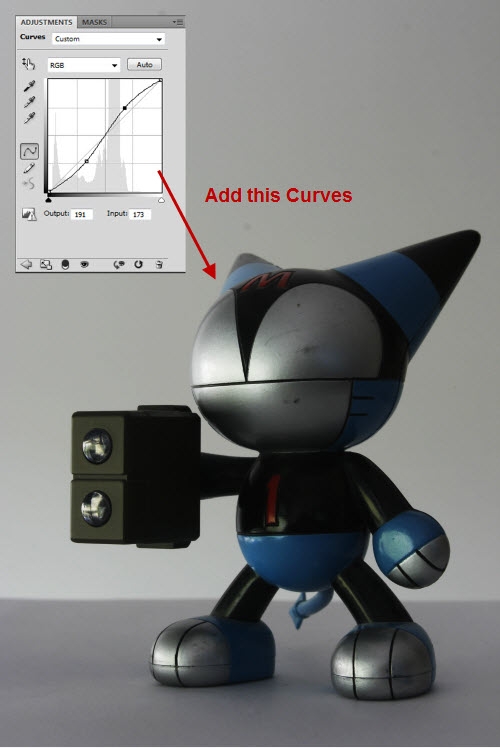
When you'll open it, go to Image -> Adjustments -> Curves (Ctrl+M) and change the curves like this in the image below.
Cut out (Ctrl+C) -> Go to your document -> Import (Ctrl+V).
Use Pen Tool to cut out.
Pen Tool -> Right Click -> Make selection -> Ctrl+C.
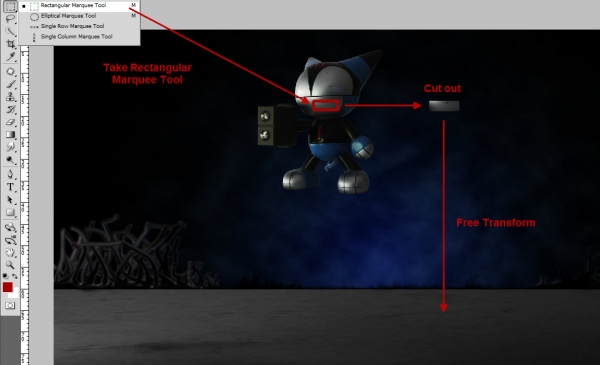
Select the Red Selected Piece on the image with Rectangular Marquee Tool (M) copy and paste it.(Ctrl+C -> Ctrl+V)
Transform this piece by pressing (Ctrl+T).
Increase this piece now.
Change the Blend Mode to Luminosity finally.
Erase a little bit the floor texture with the Eraser Tool (U) on the shown positions. (Hardness: 0% , Opacity: 50%)
Start this step in the "Friend" Group.
Create a Simple Knife.
Select this piece with Polygonal Lasso Tool (L).
Copy (Ctrl+C) and Paste it (Ctrl+V).
Name this Layer "Knife" and transform this object (Ctrl+T).
Get this size -> Select It once again.
Use Brush Tool (B) for Shadows.
New character.
You'll need to take the Toy image once again.
Name this Layer "Friend" and do this steps:
Take the Toy Image -> Use Dodge Tool on It (Range: Highlights, Exposure: 20%) -> Select it -> Press (Shift+F6) (2-4 Pixels) -> Ok
Press (Shift+F7) -> (Delete) on your Keyboard -> Use Smudge Tool (Strenght: 15%). Erase the symbols like "1" and "M" with the Smudge Tool.
Use Brush Tool (Opacity:50% ) for the Shadows on the right side.
Create one big and 3 small Circles for an Eye by using Ellipse Tool (U) .
Merge these Layers (Ctrl+E) and select this Layer. (Ctrl+Left click on the mouse of the thumbnail layer)
Use Brush Tool (Color:Black, Opacity:50%) for the shadows.
Duplicate this Layer for the second Eye.
Create brows and mounth with a Pen Tool (P) at next.
View the image below.
Made two simple Forms with Pen Tool (P) .
Go to Filter -> Blur -> Gaussian Blur -> 6,0 Pixels -> OK.
Merge the Layers.
Name this layer "Torch Light".
Erase something the layer with Eraser Tool (E) (Hardness: 0%) very exactly.
Be careful with erasing the White Serface.
You'll need to erase the layer from the right to the left side. Also view the order below. (3,2,1)
Duplicate the "Friend" (Merge Toy+Knife copy layers) Image (Ctrl+J).
Select the image -> Fill - black (Shift+F5) -> Free Transform (Ctrl+T).
Change the Opacity to 50% and go to Filter -> Blur -> Gaussian Blur (3 Pixels) -> Ok
Shadow is done.
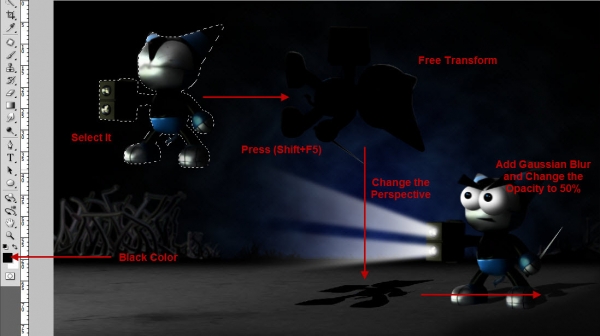
This step will be very simple to do.
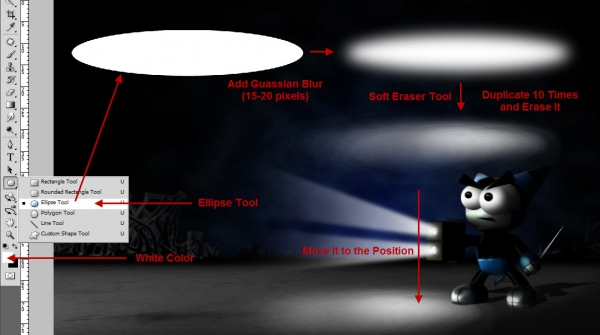
Made an Ellipse with Ellipse Tool (U) on your image like this one. (View the picture below)
Go to Filter -> Blur -> Gaussian Blur (15-20 Pixels) -> Ok
Erase this layer by clicking on the light surface with the Eraser Tool (E). (Hardness: 0%, Opacity: 30%)
Duplicate these layers 5-10 times.
Erase the light every time.
But not everything, only small areas!
Go to the "Monster" Group now.
You'll need to take the Toy image for a Beast.
Also Import this Image to the "Monster Group".
Cut Out the Objects like this below.
Take attention on the numbers of the pieces!
(e.g. Body piece - copy it 3 times)
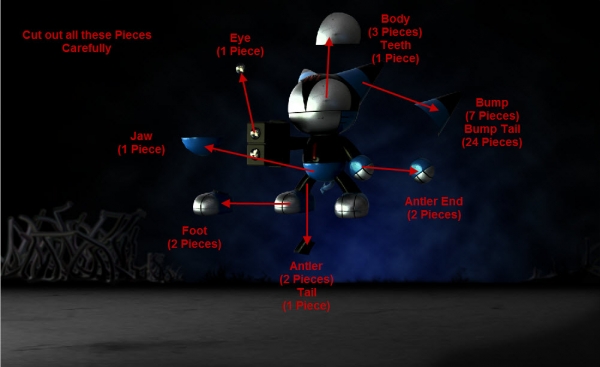
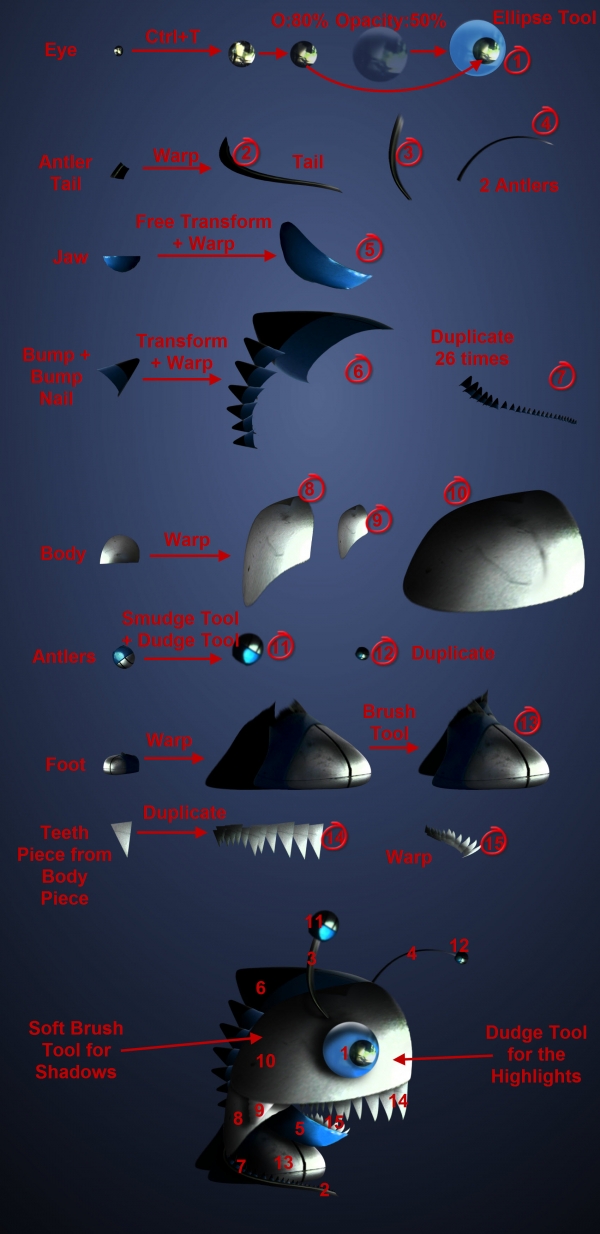
View the image below and do the same.
(1) Eye piece -> Free Transform -> Small eye will get 80% opacity -> Big eye will get 50% opacity -> Create a Blue Circle with Ellipse Tool -> Move these 2 objects on the Ellipse.
(2) Tail -> Warp
(3-4) Antler -> Warp
(5) Jaw -> Free Transform it -> Warp
(6) Bump -> Flip Horizontal -> Warp
(7) Bump Nail -> Free Transform -> Duplicate (Ctrl+J) 26 times
(8-10) Body -> Warp
(11-12) Antlers -> Dudge Tools -> Smudge Tool
(13) Foot -> Warp -> Fill one foot (Black) -> Duplicate -> Brush Tool for shadow
(14-15) Teeth -> Duplicate -> Warp
Move these Pieces on one layer.
Merge (Select all layers -> Ctrl+E) finally.
The result of the Monster will be great!
Create New Layer (Ctrl+Shift+N).
Make a white point with the Brush Tool (B) (Hardness: 0%), and duplicate it one time.
Play with Opacity. (40-70%)
Change size with Free Transform (Ctrl+T).
Do the same step once again and move to the positions.
Made shadow of the one antler with Soft Brush Tool (B) -> Smudge Tool -> Move it in Different Directions.
Redo step 14 for the Shadow.
Create New Layer over the Groups!
Start with a "Smoke" Layer.
Paint some lines and points with the Brush Tool (B) (Hardness: 0%).
Move these lines and points to the both sides with the Smudge Tool (Strenght: 20%) -> Soft Eraser Tool (E).
Duplicate the "Smoke" Layer one time for an better effect. ("Smoke copy" Layer)
Done!
Good luck!
You'll only need 1 start image and Photoshop software for this image. This is a more advanced tutorial, so basic knowledge of Photoshop is required.
You can download the source image in high resolution here: cool toy source image
I'll explain things like:
- How to do shadows in simple way.
- How to create a night scene with a lighting effects.
- How to paint a simple forms of trees and bushes on the background.
- Learn how to create two characters with only a single image.
- and many many more...
Let's start! Good Luck!
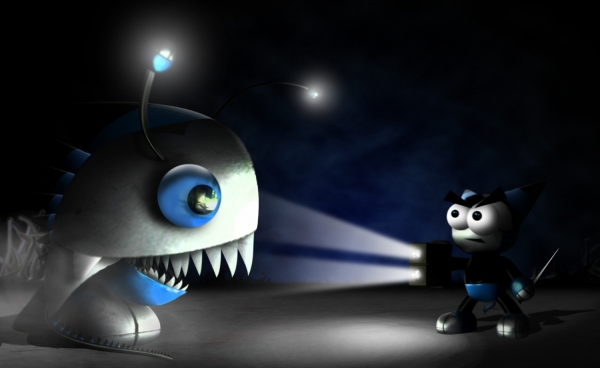
End result:
I used these resolutions for my entry:
Name: Enemy my Friend
Width: 2953 pixels
Height: 1810 pixels
Resolution: 300 pixels/inch
Step 2
If you'll have an order you need to click on this "new group" symbol below.Create 3 Groups (Name these groups: Background, Friend and Monster/Beast) for example.
Start adding new layers there.
Step 3
Create a Background Layer in the "Background" Group.For this step you'll need a Gradient Tool (G).
Go to Radial Gradient and change the Colors to Blue and Black.
Gradient Tool (G) -> Gradient Editor -> Blue-black Colors.
Name new Layer "Background".
Step 4
Remain in the "Background" group.Select the Background Layer and go to Image -> Adjustments -> Vibrance.
There change Vibrance to +30 and Saturation to +100.
You'll get this result.
Step 5
How to create clouds.Go to Filter -> Render -> Clouds. (Colors: Black and White) in the new layer.
Name this Layer "Clouds" and change Blend Mode to Soft Light.
Duplicate this Layer one time (Ctrl+J) and go to Filter -> Liquify (Shift+Ctrl+X).
Use the Forward Warp Tool (W) (Brush size: 500 Pixels) on the Clouds.
View the end result on the image below.
Step 6
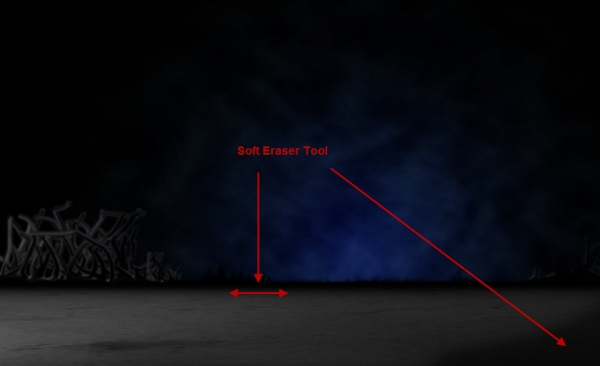
Create a Floor.You'll need a new layer (Ctrl+Shift+N), call this layer "Floor".
Create a rectangle with a Rounded Rectangle Tool (U) (Color: Black).
Do this like in the image below.
Step 7
How to create the Bushes.Use Smudge Tool (Hardness: 30%, Strenght: 80%) on the Floor layer.
Go to position -> Left click on the Floor -> Pull the mouse upwards -> Repeat this step more times.
You'll create bushes in this way.
Step 8
Open the "Toy" Image in your Photoshop. (Ctrl+O)When you'll open it, go to Image -> Adjustments -> Curves (Ctrl+M) and change the curves like this in the image below.
Cut out (Ctrl+C) -> Go to your document -> Import (Ctrl+V).
Use Pen Tool to cut out.
Pen Tool -> Right Click -> Make selection -> Ctrl+C.
Step 9
Create texture for more dateils on the Floor.Select the Red Selected Piece on the image with Rectangular Marquee Tool (M) copy and paste it.(Ctrl+C -> Ctrl+V)
Transform this piece by pressing (Ctrl+T).
Increase this piece now.
Change the Blend Mode to Luminosity finally.
Step 10
Some corrections with the Floor.Erase a little bit the floor texture with the Eraser Tool (U) on the shown positions. (Hardness: 0% , Opacity: 50%)
Step 11
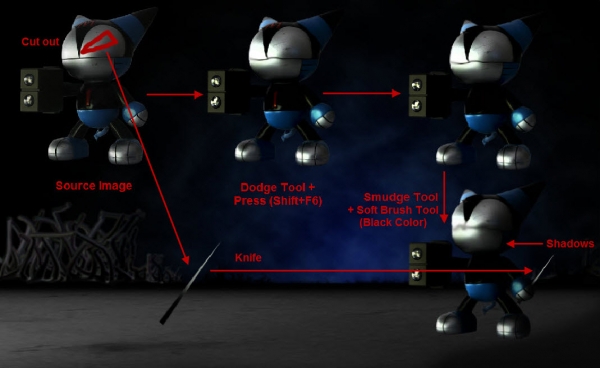
It's time to create a cool character.Start this step in the "Friend" Group.
Create a Simple Knife.
Select this piece with Polygonal Lasso Tool (L).
Copy (Ctrl+C) and Paste it (Ctrl+V).
Name this Layer "Knife" and transform this object (Ctrl+T).
Get this size -> Select It once again.
Use Brush Tool (B) for Shadows.
New character.
You'll need to take the Toy image once again.
Name this Layer "Friend" and do this steps:
Take the Toy Image -> Use Dodge Tool on It (Range: Highlights, Exposure: 20%) -> Select it -> Press (Shift+F6) (2-4 Pixels) -> Ok
Press (Shift+F7) -> (Delete) on your Keyboard -> Use Smudge Tool (Strenght: 15%). Erase the symbols like "1" and "M" with the Smudge Tool.
Use Brush Tool (Opacity:50% ) for the Shadows on the right side.
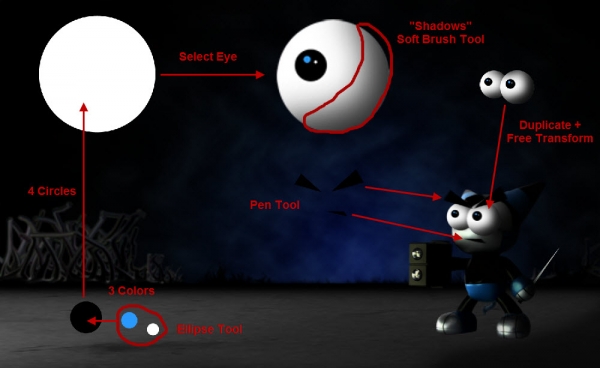
Step 12
Face.Create one big and 3 small Circles for an Eye by using Ellipse Tool (U) .
Merge these Layers (Ctrl+E) and select this Layer. (Ctrl+Left click on the mouse of the thumbnail layer)
Use Brush Tool (Color:Black, Opacity:50%) for the shadows.
Duplicate this Layer for the second Eye.
Create brows and mounth with a Pen Tool (P) at next.
View the image below.
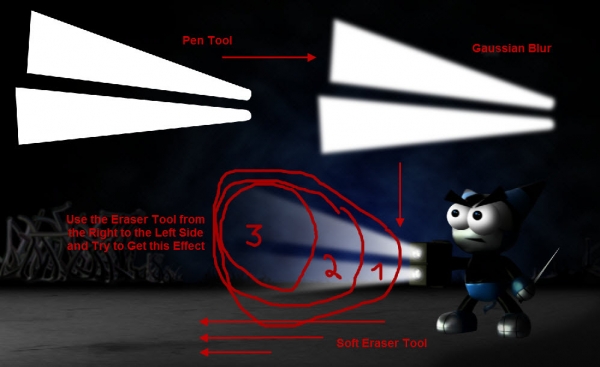
Step 13
Create a Light for the Torch.Made two simple Forms with Pen Tool (P) .
Go to Filter -> Blur -> Gaussian Blur -> 6,0 Pixels -> OK.
Merge the Layers.
Name this layer "Torch Light".
Erase something the layer with Eraser Tool (E) (Hardness: 0%) very exactly.
Be careful with erasing the White Serface.
You'll need to erase the layer from the right to the left side. Also view the order below. (3,2,1)
Step 14
In this step I'll show you how to create simple Shadows.Duplicate the "Friend" (Merge Toy+Knife copy layers) Image (Ctrl+J).
Select the image -> Fill - black (Shift+F5) -> Free Transform (Ctrl+T).
Change the Opacity to 50% and go to Filter -> Blur -> Gaussian Blur (3 Pixels) -> Ok
Shadow is done.
Step 15
Create a Light on the Floor.This step will be very simple to do.
Made an Ellipse with Ellipse Tool (U) on your image like this one. (View the picture below)
Go to Filter -> Blur -> Gaussian Blur (15-20 Pixels) -> Ok
Erase this layer by clicking on the light surface with the Eraser Tool (E). (Hardness: 0%, Opacity: 30%)
Duplicate these layers 5-10 times.
Erase the light every time.
But not everything, only small areas!
Step 16
At next start with a Monster character.Go to the "Monster" Group now.
You'll need to take the Toy image for a Beast.
Also Import this Image to the "Monster Group".
Cut Out the Objects like this below.
Take attention on the numbers of the pieces!
(e.g. Body piece - copy it 3 times)
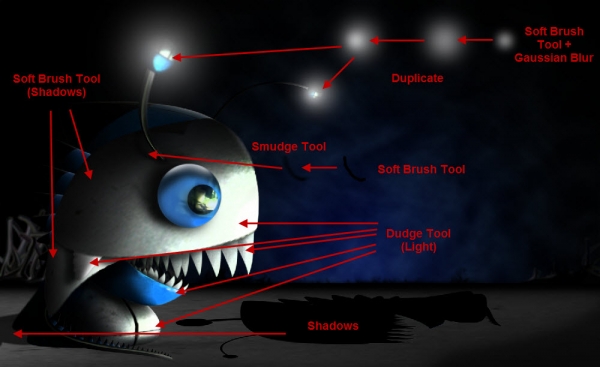
Step 17
Step 17.View the image below and do the same.
(1) Eye piece -> Free Transform -> Small eye will get 80% opacity -> Big eye will get 50% opacity -> Create a Blue Circle with Ellipse Tool -> Move these 2 objects on the Ellipse.
(2) Tail -> Warp
(3-4) Antler -> Warp
(5) Jaw -> Free Transform it -> Warp
(6) Bump -> Flip Horizontal -> Warp
(7) Bump Nail -> Free Transform -> Duplicate (Ctrl+J) 26 times
(8-10) Body -> Warp
(11-12) Antlers -> Dudge Tools -> Smudge Tool
(13) Foot -> Warp -> Fill one foot (Black) -> Duplicate -> Brush Tool for shadow
(14-15) Teeth -> Duplicate -> Warp
Move these Pieces on one layer.
Merge (Select all layers -> Ctrl+E) finally.
The result of the Monster will be great!
Step 18
Create lighting for the Monster antlers.Create New Layer (Ctrl+Shift+N).
Make a white point with the Brush Tool (B) (Hardness: 0%), and duplicate it one time.
Play with Opacity. (40-70%)
Change size with Free Transform (Ctrl+T).
Do the same step once again and move to the positions.
Made shadow of the one antler with Soft Brush Tool (B) -> Smudge Tool -> Move it in Different Directions.
Redo step 14 for the Shadow.
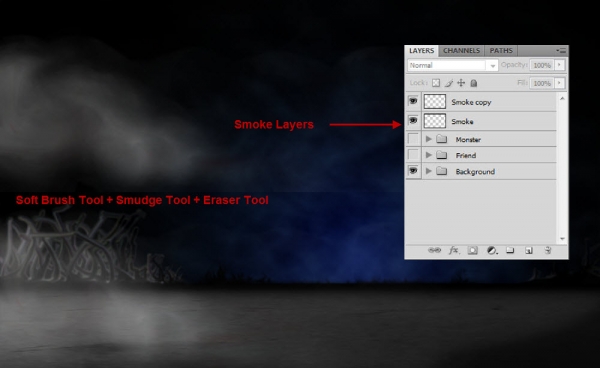
Step 19
Make Smoke.Create New Layer over the Groups!
Start with a "Smoke" Layer.
Paint some lines and points with the Brush Tool (B) (Hardness: 0%).
Move these lines and points to the both sides with the Smudge Tool (Strenght: 20%) -> Soft Eraser Tool (E).
Duplicate the "Smoke" Layer one time for an better effect. ("Smoke copy" Layer)
Done!
Step 20
That's all, end result below!Good luck!


0 comments:
Post a Comment