In this tutorial you will learn how to create an elegant hourglass in Photoshop. While using simple techniques and paying a little attention to the lights, shadows and reflection you can achieve perfect result with photorealistic details.
Final Image
As always, this is the final image that we’ll be creating:

What you will need to create this.
Wood Texture
Step 1
Create a new document of dimension 1900 x 1440 pixel and fill the background with color # ededed. Select pen tool and create the upper shape of hourglass. Make sure to turn shape layer on.

Step 2
Change the ‘Fill’ to 0% just below the ‘Opacity’ option in layer palate. Apply inner glow layer style with color #bdc1c2 and opacity 50%. Name this layer to “outer glass”.


Step 3
Duplicate “outer glass” layer, right click on the layer and choose ‘clear layer style’ to remove all layer styles. Press ctrl + t to transform layer, click on ‘Maintain Aspect ratio’ icon between width & height option and set the height to 98%. Name this layer to “inner glass” and apply inner glow layer style with these settings;


Step 4
Duplicate “inner glass” layer, group all layers and merge the group into a single layer. Name the group to “upper glass”. Now create another shape inside upper glass, make sure to turn shape layer on and apply inner glow layer style of color # 43494a, size 125px and opacity 75%. Name this layer to “glass shadow”.


Step 5
Now we will create some lights and reflections, to do this create a new shape with the help of pen tool. Set its color to white, change its blending mode to soft light & opacity to 40%. Name this layer to “reflection top”.


Step 6
Create two more shapes to create other reflections, set their color to white and rename both layers to “reflection top left” & “reflection top right”.

Step 7
Create lower glass by following steps 1 – 4 and step 6. Create another shape to create reflection on the top of lower glass. Change its color to white and set its blending mode to soft light with opacity to 40%.


Step 8
Now we are going to create middle part of hourglass for this, press P to select pen tool and create a shape with ‘Fill’ 0%. Ctrl + click on the layer to get its selection, select a soft brush of color #d2d2d2 and paint along the left and right edges. Name this layer to “middle”.


Step 9
Now merge “outer glass” layer into “inner glass” layer in both upper and lower glass. Create a layer mask and hide the edges in the centre part. The hourglass will look like this:


Step 10
Now we will create the sand inside the hourglass for this, create a new document of 1000 X 1000 pixels and fill it with color #b0926c. Go to Filter > Noise > Add Noise and add 28% noise to the layer, name this layer to “noise”.

Step 11
Import “noise” layer to our document, select pen too and create a shape for sand in lower glass. Don’t forget to set ‘Fill’ to 100%. Change this shape layer’s color to # b0926 and rename this shape layer to “lower sand”. Select the “noise” layer and keep it just above the “lower sand” layer now press ‘Alt + Ctrl + G’ to create a clip mask. You can also create a clip mask by going to Layer > Create Clip Mask.


Step 12
Now it’s time to add some shadows, to do this select a soft brush of color #a08d76 and brush the highlighted areas to create shadows.


If everything done properly your result will look like this:

Step 13
To create lights, select a soft brush of color # c7b59d & opacity to 60% and paint the highlighted area to create light at that part. Create another layer and paint the upper part of sand, set the blending mode of the layer to screen.


Step 14
Repeat step 11 – 13 to create sand for upper glass, create the upper surface of sand to give it natural look. Create another sand layer in middle part of hourglass in the same way as you created in step 11 – 13.


Step 15
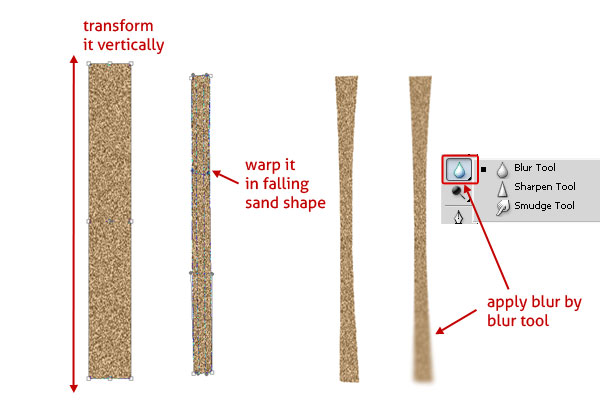
Now to create falling sand, select the “noise” layer and select an area by rectangular marquee tool. Press Ctrl + J to isolate the selection, press Ctrl + T to transform layer and stretch it vertically, again transform layer, right click and select ‘warp’ then transform it to create falling sand. Apply some shadow to match with sand and result will look like this;

Step 16
To create reflections on middle part of hourglass, select pen tool and create reflections carefully. Group these layers and name the group to “white reflections”. Create a new group and rename it to “shadows”, now create some dark shadows in the middle part by pen tool and change its color to # 282828.


Step 17
Now we will create reflection of sand on upper and lower glasses. For this, select pen tool and create a shape of color # ccc3b5. Change its blending mode to color and opacity to 20%.

Step 18
Create another shape of color # 543f25 by pen tool and set its opacity to 30%. Hide the unwanted area by masking; name this shape layer to “lower sand reflection”. Duplicate this layer, transform it to make a little small and set its blending mode to hard light and opacity 20%. Create another shape of color white, change its opacity to 5% and name it “sand reflection white”.


Step 19
We have nearly completed hourglass just need to add some more details or shadows. Reflection in the middle part is quite complicated so pay more attention to this part. Create some more shadows and reflection in the same as in step 16. Change the opacity of layers wherever you feel needed.

Step 20
Create the lights for hourglass, make a selection of hourglass and brush the highlighted areas with color white with opacity 10%.

Step 21
Now we will create the wooden base of hourglass. For this, create a shape layer of color # 766044, name this shape layer to “base”. Open “woodtexture.jpg” and clip mask it to “base” layer, set its blending mode to ‘overlay’. Select a large soft brush of color black and create shadow to base.

Step 22
Next create an ellipse of color # 85643d, name this layer to “base surface” and apply inner glow layer style. Open “woodtexture.jpg”, go to Filter > Distort > Polar Coordinates and select ‘Rectangular to Polar’ option. Import this layer to our document, clip mask this layer to “base surface” layer. Rename this layer to “wood polar”, duplicate this layer and set its blending mode to overlay with opacity 60%.


Step 23
Our hourglass is nearly completed now add shadows to the base of hourglass. Select a soft brush of color black, press F5 to access brush options and set roundness to 30%. Create shadows on base of hourglass. Group all layers and name the group to “hourglass”.

Step 24
Next create the desk on which hourglass will be placed. Create a rectangle of color # d4b383, import “woodtexture.jpg” and set its opacity to 60%. Name this layer to “base wood texture”, duplicate the layer and set its blending mode to ‘soft light’ & opacity 60%. Duplicate “desk” layer, keep it to the top of texture layers and set its blending mode to ‘soft light’. Rename this layer to “wood color”. Wooden base would look like this. Group these layers and name the group “base”. Duplicate this group and merge all layers, go to Filter > Blur >Gaussian Blur and apply blur of 2.5 radius. Add layer mask and hide lower part of base.

Step 25
Now we are creating walls for this, create a gradient of color # bd4300 & # cb8602. Go to Filter > Noise > Add Noise and apply noise to 4%.


Step 26
Create another radial gradient of color black and white, set its blending mode to ‘soft light’ and opacity to 40%. Select a large brush of color # b88d71 and brush around the corners of the scene to darken them.


Step 27
Next select rectangular marquee tool and create four rectangles of color white to create window. Group them and name the group to “window”, copy and merge this group and rename it to “window glass”. Press Ctrl + T and transform “window glass” layer, apply blur of radius 5 pixel and set its blending mode to ‘soft light ‘, set its opacity to 70%.


Step 28
We are about to finish this tutorial now we will add some lighting. Copy all layers and merge them, rename this file to “hourglass scene”. Go to Filter > Render > Lighting effect and apply these settings;

Mask the desk area to remove lighting effect from desk and create the hourglass reflection on the desk.

And We’re Done!
You can view the final outcome below. I hope that you enjoyed this tutorial and would love to hear your feedback on the techniques and
outcome:
outcome:


3 comments:
this looks real.
it looks like it was rendered / made in a 3d software!
wow! amazing Photoshop tutorial! I'll try soon :)
wow it's new inspiration design. thank you.
Post a Comment