Tutorial Details
Program: Adobe Photoshop CS3
Difficulty: Intermediate
Estimated Completion Time: 5 Hours
Download PSD File of this Tutorial
Program: Adobe Photoshop CS3
Difficulty: Intermediate
Estimated Completion Time: 5 Hours
Download PSD File of this Tutorial
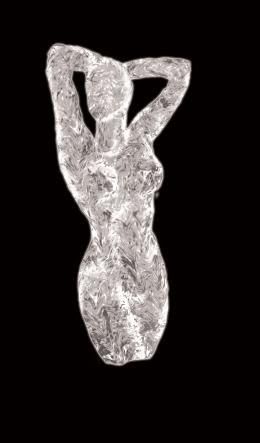
Final Product What You'll Be Creating
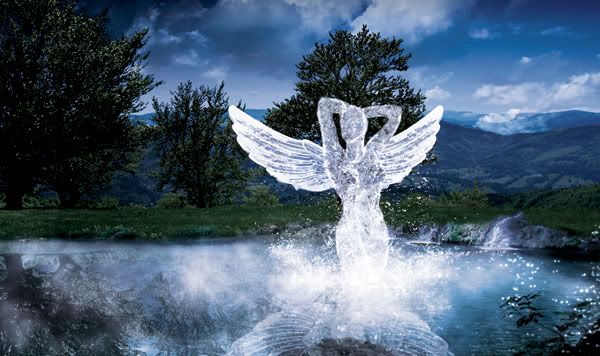
Sometimes all you need to create an incredible photo manipulation in Photoshop is a rough sketch, some nice imagery, and some knowledge of how to use Photoshop’s transformation tools. In today’s tutorial we will demonstrate how assemble an angelic ice sculpture from a rough sketch and some beautiful scenic photos.
Resources
- Sky by OeilDeNuit
- Trees by Manitou
- Water Splash by Robmania
- Droplets by Eccentriceye.com
- Wings by Designious.com
- Lake by Gurss
- Sketch
Step 1
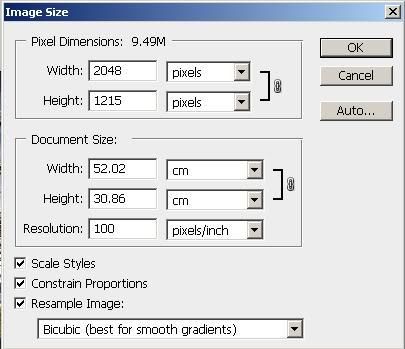
Create a new document 2048 X 1215 in CMYK color mode at 100 dpi. Name it "ice angel". I like to use this color mode because I have a better control over the colors.
Step 2
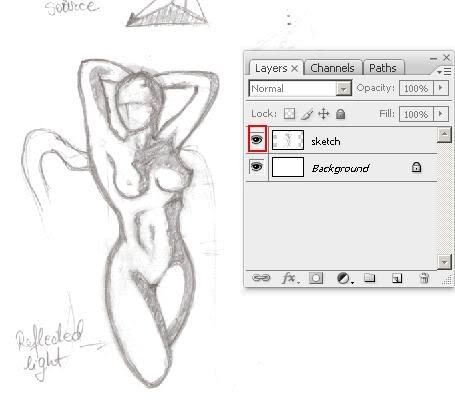
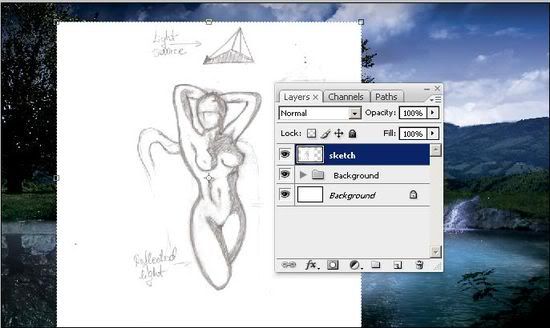
Open the "sketch.jpg" image file in Photoshop. You can do this by dragging the thumb of the picture on top of the Photoshop icon.
Press CMD+A to select the entire picture, then hit CMD+C to copy it. Go to Window > ice angel.psd and hit CMD+V to paste it in. We will use this image as reference for our actual ice angel.
Then click the "eye" in the layers palette to make it invisible.
Now lets create a background for our ice angel. Since it’s made of ice, it’s important that we don’t place it on a bright background, because it will look more like a surge of light.
Step 3
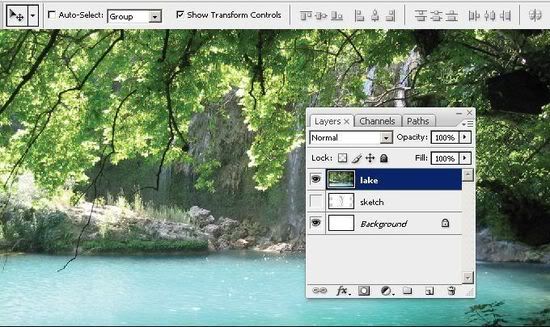
Open the "lake.jpg" picture and do the same thing as in STEP 2, except turning off the visibility.
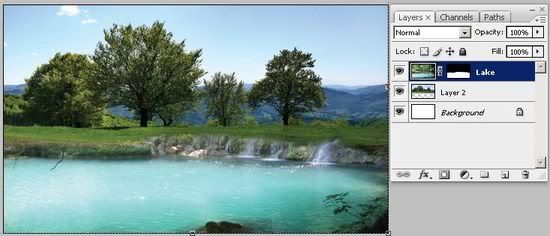
Step 4
Select the Move Tool (V). Make sure you have the "Show Transform Controls" box checked, in the top left of your screen. Now click and drag one of the corners of the picture to make it fit our layout. Hold the Shift key to keep the proportions of the picture. Make it look like the image below.
Step 5
We only need the lake from the picture, so let’s remove the rest. First, rename the "Layer 1" to "Lake" by double-clicking its name.
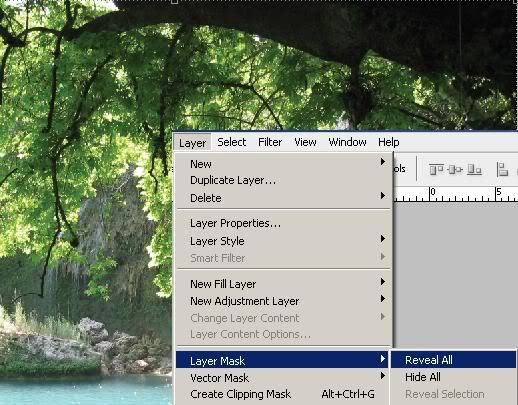
Step 6
With the "Lake" layer selected, go to Layer > Layer mask > Reveal all to create a layer mask. This way we don’t have to wreck the original image and will still be able to return to a previous point just in case something goes bad.
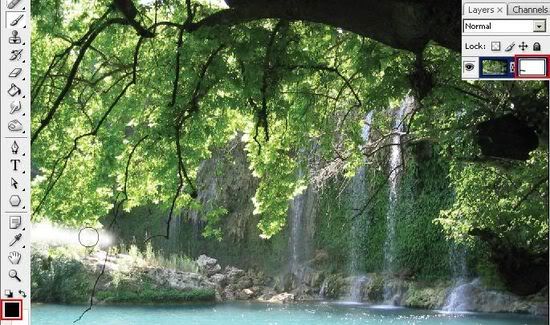
Step 7
Grab the Brush Tool (B). Set the brush Hardness to 0% (top left corner of your screen) and start painting with black (#000000) over the tree and the rocks like in the image below. The "Reveal All" mask hides what you paint over with black. Do this until you get something like below.
Step 8
Open the "Trees.jpg" picture and do the same as in STEP 2. Now select the Move Tool (V) and resize it to fit our drawing. Make it look like below. Drag the "Layer 2" layer under "Lake" layer and rename it "Trees".
Step 9
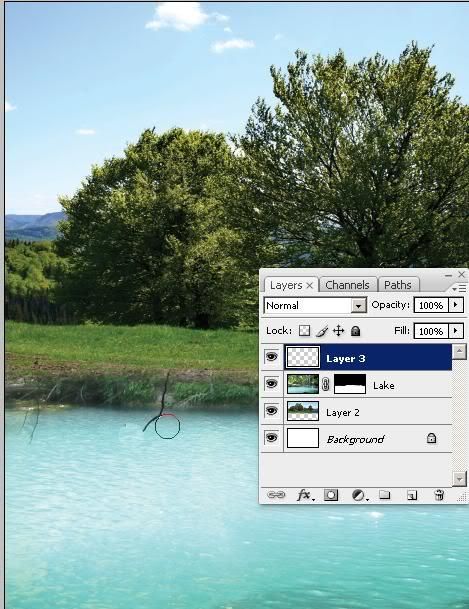
Notice there is a loose branch over the lake? Let’s fix that. Grab the Clone Stamp Tool (S). Press and hold the ALT key to select a source. You’ll know you’re in the source selection mode when your cursor turns into crosshairs. Click somewhere on the water where there is a same tone of shading. Release the ALT key and create a new layer (CMD+SHIFT+N) and click over the branch. You have to select different tones of shades to make that blend in, but you have to select the "Lake" layer each time to get the source, then select the "Layer 3" to fix it.
Step 10
Do the same for the part of branch over the grass.
Step 11
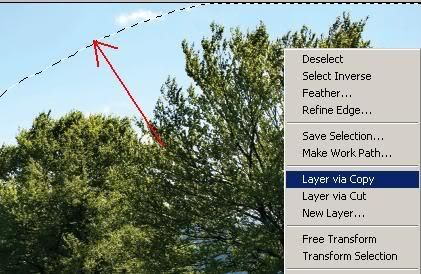
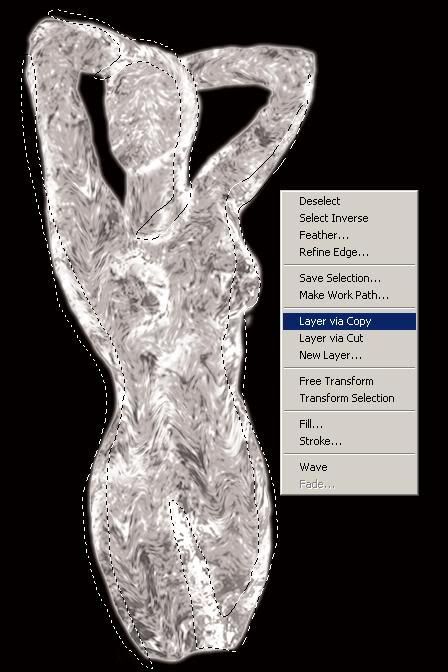
Let’s add some reflections on the water. Grab the Lasso Tool (L) and select the trees and the grass from the "Trees" layer. You’ll know when you’ve made a selection when you see a "marching ants" shape. Right-click on it and select "Layer Via Copy". Rename this layer "Trees reflection".
Step 12
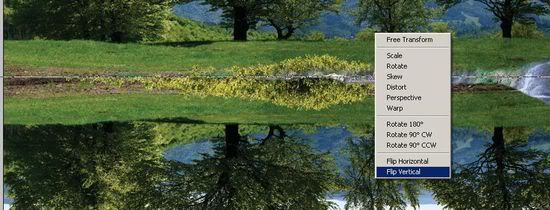
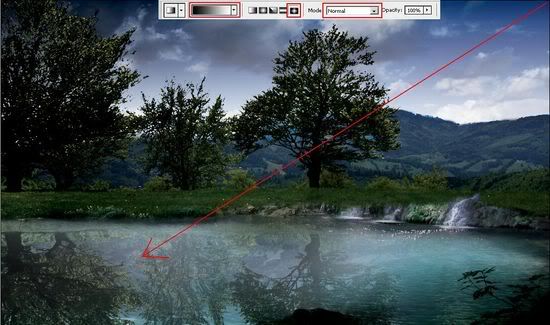
Grab the Move Tool (V) and move it below the trees in the original image. Now press CMD+T to go to Free Transform mode. Right-click it and select "Flip Vertical". Hit Enter. Place it over the water to look like a reflection. Open the Layers palette (F7) and set its blending mode to Multiply and reduce its Fill to 55%.
Step 13
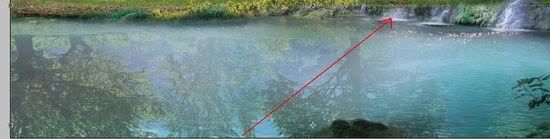
Since the water is wavy, we should also make the reflection look distorted. With the "Trees reflection" layer selected, go to Filter > Liquify. Play around with it until you’re satisfied with the result. Now go to the Layers palette and click the "circle in a square" icon to create a layer mask. Grab the Gradient Tool (G) and use a "Black to white" linear gradient over the "Trees reflection" layer mask.
Step 14
Let’s make a darker and cloudier sky over the trees. Select the "Trees" layer and go to Layer > Duplicate layer (CMD+J). We will alter the image so we can select only the sky.
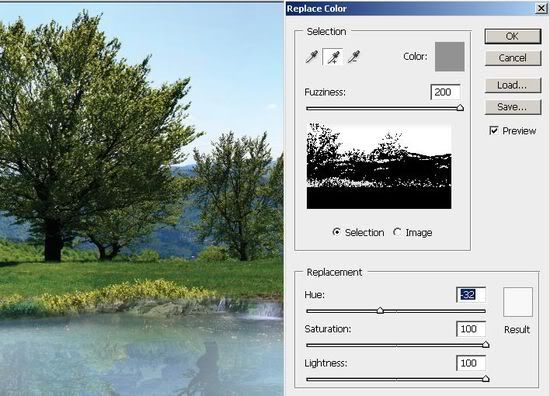
Go to Image > Adjustments > Replace Color and select the sky with the eyedropper tool. Set saturation to 0 and Lightness to 100. The image should look like below.
Step 15
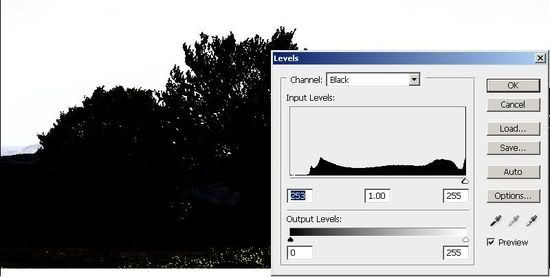
Go to Image > Adjustments > Levels (CMD+L) and select "Black" from the CMYK drop down list and drag the white triangle to the right side of the graphic. It should look like the image below.
Step 16
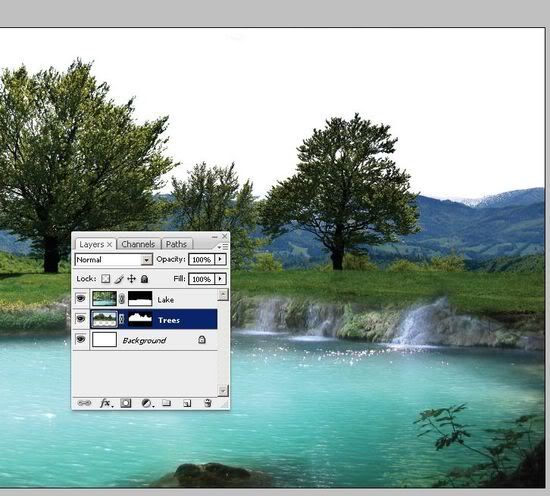
Now we can select the sky easily, even between the branches. Go to Select > Color range and click on the white color, where the sky used to be. Hit OK. Now you should see a "marching ants" selection like we did with the Lasso Tool. Go to Select > Inverse (CMD+SHIFT+I) to invert selection. Select the "Trees" layer in the layers palette and click the "Add layer mask" button. Turn off visibility of the "Trees copy" layer (click the "eye" in the Layers palette). Now it should look like below.
Step 17
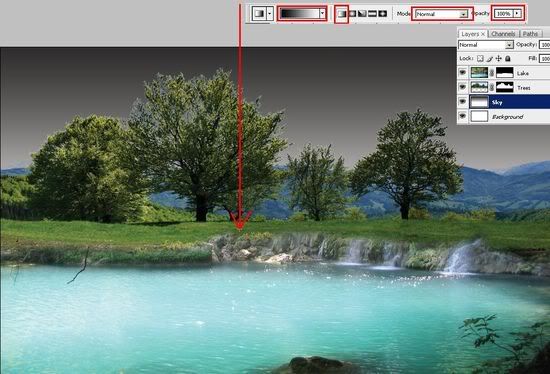
Create a new layer (CMD+SHIFT+N) and name it "Sky". Then drag it under the "Trees" layer in the Layers palette. Grab the Gradient Tool (G) and use a "Black to White" linear gradient and fill it as below.
Step 18
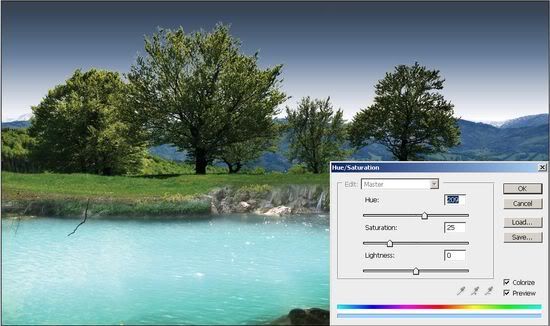
Go to Image > Adjustments > Hue/Saturation (CMD+U) and check the "Colorize" box. Play around with the Hue until you get a blue-ish tint. Increase the Lightness until you’re satisfied with the result. It should look like the below image.
Step 19
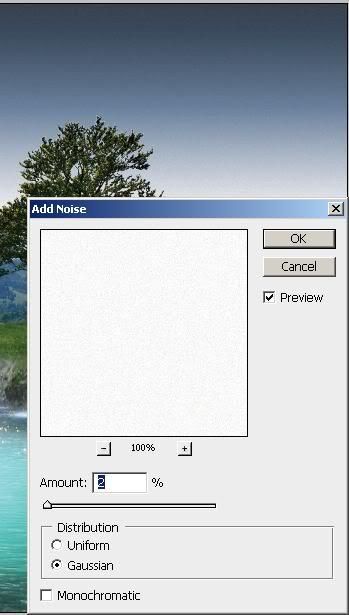
Notice that the gradient leaves some nasty horizontal lines? Let’s fix it! Go to Filter > Noise > Add noise and set it to 2% Gaussian. Set its blending mode to Multiply in the Layers palette (F7).
Step 20
Let’s add some clouds. Open the "clouds.jpg" picture and repeat STEP 3. Place this layer above the "Sky" layer and rename it "Clouds".
Step 21
Resize it so the sky fits our image. You can even flatten it a bit, it doesn’t matter, it will give some more perspective. Just resize it until you like the amount of clouds. Now go to the Layers palette (F7) and set its Blending mode to Overlay. It should look like the image below.

Step 22
Now our base image is pretty much fixed, we just need to tweak it to look nice. Go to Layer > New adjustment layer > Gradient map. I used a simple Black to White gradient with a diamond shape.
Step 23
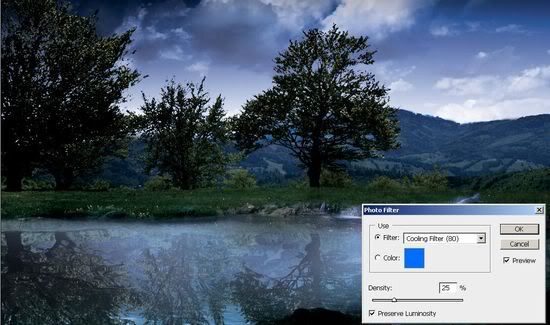
Let’s add another filter the same way: Layer > Adjustment Layer > Photo filter. Set it to Cooling filter (80) or feel free to play around with it until you are satisfied with your result, it’s not necessary to follow strictly every step. Mine looks like the image below.
Step 24
Time to focus on our base element, the ice angel. Create a Layer group in the layers palette (the Folder looking icon), select the top-most layer, hold the SHIFT key and click the "Trees" layer in the Layers palette (F7). Now you should have all layers selected except "sketch" layer. Rename this layer group "Background" like you do with the layers. Click the gray triangle to contract the layer tree. The layers palette should look like below.
Step 25
Create a new layer between the "Background" layer group and the "sketch" layer. Grab the Paint Bucket Tool (G) and fill it with black. This will be a "dummy" layer we will use it to create a better view of what we will do later on. Rename this layer "dummy".
Step 26
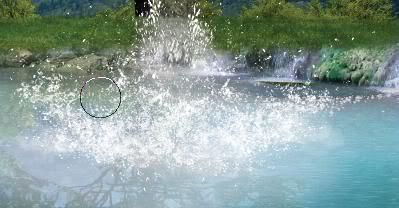
Open the "splash.jpg" image file. Grab the Lasso Tool (L) and select a portion of some water and ice or even glass at random. Copy it and paste it into our drawing.
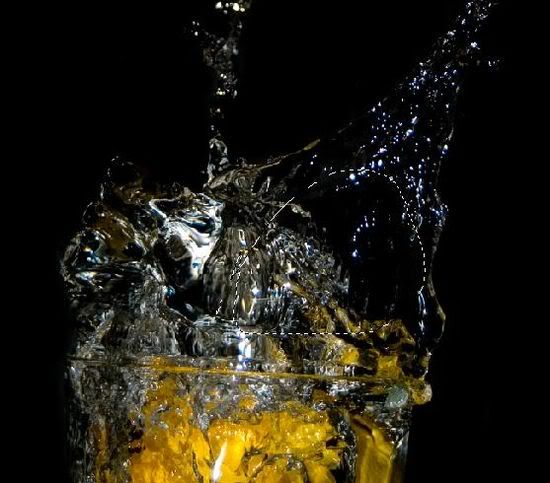
Step 27
Go to the Layers palette and set its blending mode to Screen. Then go to Image > Adjustments > Desaturate (CMD+SHIFT+U). Now assign some shortcut keys.
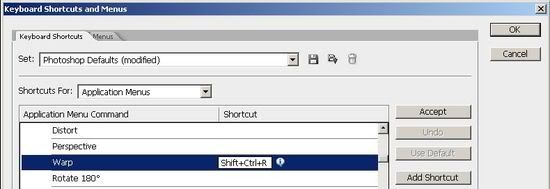
Go to Edit > Keyboard Shortcuts (CMD+ALT+SHIFT+K), select Edit and look for Warp. Click under the Shortcut column and assign a shortcut key or a key combo. I’ve set it to CMD+SHIFT+R. Belive me, this will save you a lot of time and frustration.
Step 28
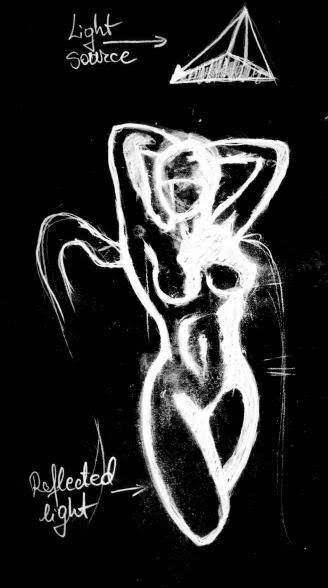
Let’s begin shaping the body. Select the "sketch" layer. Go to Image > Adjustments > Desaturate (CMD+SHIFT+U). Now grab the Burn Tool (O) and set it on Midtones at 100% Exposure.
Darken the contour of the sketch until it looks really dark. When you’re satisfied with the result, go to Image > Adjustments > Invert (CMD+I). Now you should have a white contour and a black paper.
Step 29
Select the layer with the piece of splash and place it above the "sketch" layer. Now using the Move Tool (V), place it above the contour of our body. Use the Warp Tool (CMD+SHIFT+R – set in STEP 27or go to Edit > Transform > Warp. Now start shaping it to fit the contour like in the image below. You don’t have to do exactly the same, just play around with it till you get it right.

Step 30
Go to Layer > Duplicate Layer and do the same thing with this layer as in STEP 29: Warp it to fit the sketch. Don’t worry about being very precise; we will fix that in a later step. Also keep in mind not to overlap the pieces too much, overlapping will create white spots, which are difficult to fix.
Step 31
Select the "splash" layer in the layer palette; hold the SHIFT key and click the "splash copy" layer thumbnail. Now go to Layer > Merge layers (CMD+E), then duplicate it (CMD+J). Do this until the entire sketch is covered up. It should look like the image below.
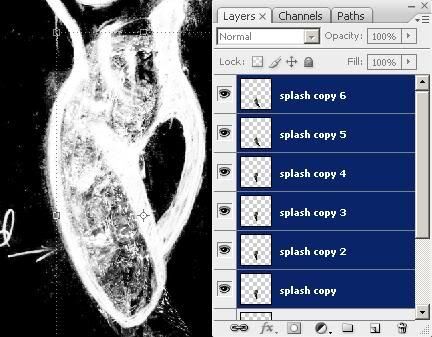
Step 32
Select all the "splash copy" layers like in STEP 31 and go to Layer > Merge layers (CTRL+E). Rename the new layer to "body".
Step 33
Notice that there are some sharp edges in the body? Let’s fix that. Duplicate the layer and go to Filter > Liquify (CMD+SHIFT+X) and start waving the inside portion where there are sharp edges.
This will give it a more fluid look. Feel free to play around with different effects till you get the desired effect. Mine looks like below.
Step 34
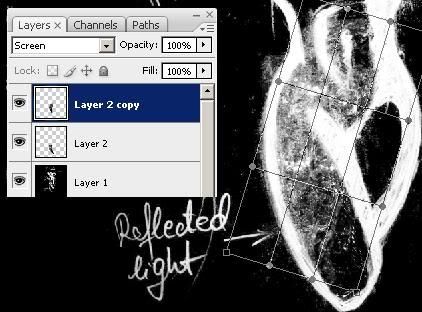
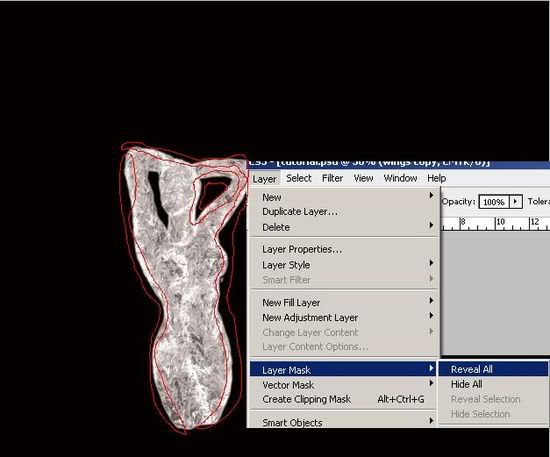
Go to the Layers palette (F7), select the topmost layer ("body" layer) and set its blending mode to Screen. Go to Layer > Layer mask > Reveal all. Now grab the Brush Tool (B) and start painting with black (#000000) over the unwanted parts. If you’re wondering how the mask works, it’s like this: the Reveal All mask acts like a Screen blending mode, meaning it’s making the blacks disappear.
Step 35
Now we need some lights. Grab the Lasso Tool (L) and select the thick white parts from the "sketch" layer, but with the "body" layer selected. Now right-click and select "Layer Via Copy". You should now see a new layer: "body copy." Rename it to "lights." Create a new layer group and place these two layers in it. Also rename the group to "body."
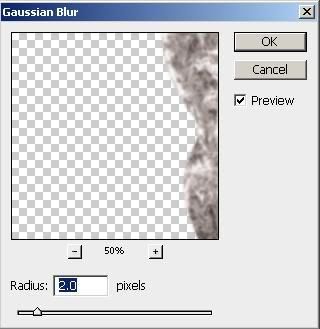
Step 36
Go to Filter > Blur > Gaussian blur and set it to about 10-12 px. Feel free to play around until you like it. Now go to the Layers palette and set its blending mode to Color Dodge and set the Opacity to about 75% or less. It should look like this.
Step 37
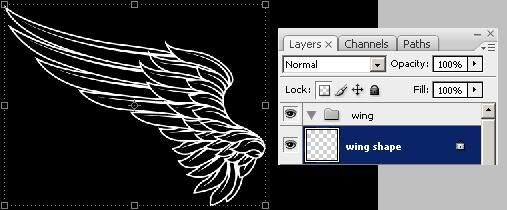
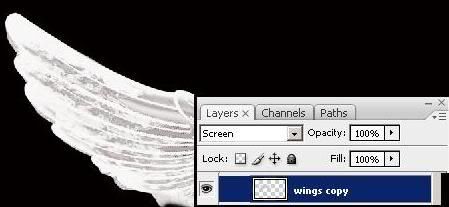
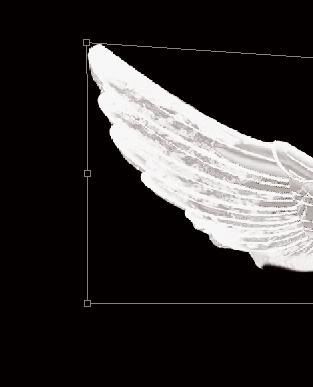
Now for the wings. Open the "wings.eps" file and pick a wing of your choice. The .eps file is an Illustrator 8 file, but you can still open it with Photoshop. Copy that and paste it in our drawing. Rename the layer to "wing shape". Also place it into a new Layer group like we did with the background: Create a new layer group, then drag and drop the "wing shape" layer into it. Also rename the "Group 2" layer group to "wing". Select "lock dead pixels" locking type in the Layers palette and paint over some white.
Step 38
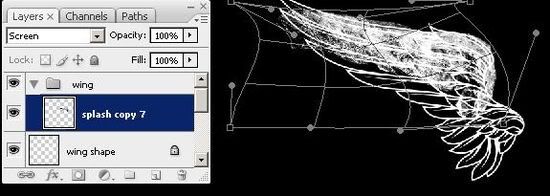
Now follow the same process you followed with the body. Copy and paste parts from the "splash.jpg" (in "wing" layer group). Warp it like we did with the body.
NOTE: Duplicate and merge layers if you are not satisfied with the intensity of the ice.
Step 39
Repeat STEPS 30 – 36 to give it the same effect as the body.
Step 40
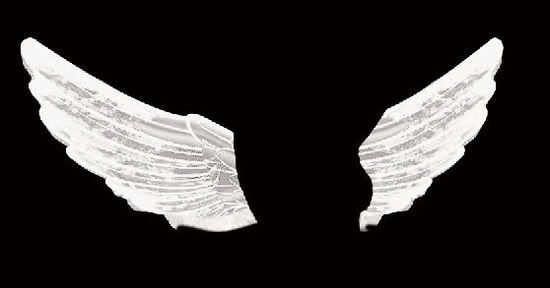
Drag the "wing" layer group over the "Create New Layer" icon in the layers palette. This will create a duplicate of your layer group. Go to Layer > Merge layers (CMD+E). You should now see a new layer called "wing copy". Go to Edit > Free Transform (CMD+T), then right-click and select "Flip Horizontal". Press Enter. Grab the Move Tool (V) and place it over the body to look a bit natural. Set the blending mode to Screen (in the Layers palette).
Step 41
Hit CTRL+T again to access the Free Transform Tool. Hold the CTRL key, then click and drag the corners to give it a bit of perspective. Play around with it until you like it. Then hit Enter.
Step 42
Select the "wing" layer group from the Layers palette. Use the Move Tool (V) and place this wing also. If you want to add also some perspective to it, you must first merge the layers in the group. If you do, re-set the layer blending mode to screen. CTRL+click the "body" layer thumbnail in the Layers palette and select each "wing" layer and hit Delete.
Step 43
Open the "water_splash.jpg". Grab the Lasso Tool (L) and select a large splash of water. Copy it and paste it into our drawing. Rename the layer to "splash". Go to Image > Adjustments > Desaturate (CMD+SHIFT+U). Set its blending mode to Screen. Use the Burn Tool (O) set on Midtones with about 37% Exposure to "erase" the unwanted parts.
Step 44
Use the Move Tool (V) to place it at the base of the body. Rotate it until you are satisfied with the result.
Step 45
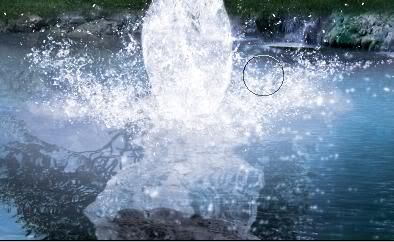
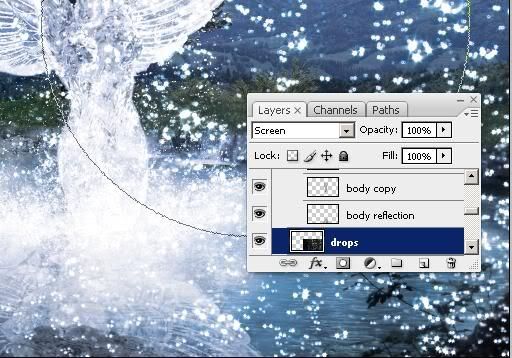
Delete the "dummy" layer. Let’s add reflections of the body, wings and splashes. Duplicate each layer (select layer, then hit CMD+J). Select the "body copy" layer and hit CMD+T for Free Transform. Right-click and select Flip Vertical. Place it like below. Now go to Layers palette and set its Opacity and Fill to 75%. Also go to Filter > Distort > Wave. Play around with it until you get the desired effect. Rename layer to "body reflection". Now it should look like the below image.
Step 46
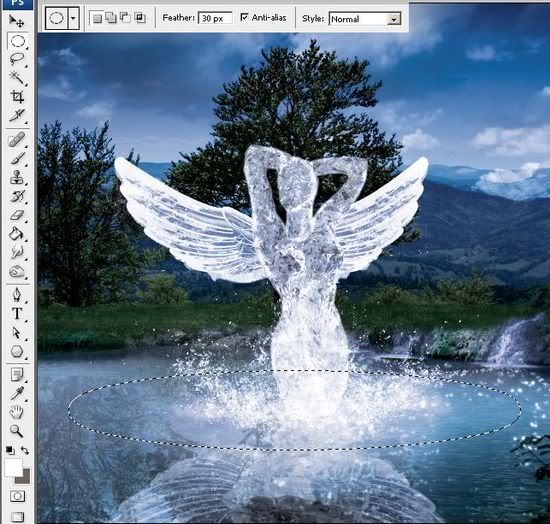
Repeat STEP 45 for the "wing", "wing copy" and "splash". Go to Layer > New > Layer (CMD+SHIFT+N) to create a new layer. Grab the Elliptical Marquee Tool (M) and set Feather to about 30 px.
Create an ellipse like below. Now Grab the Paint Bucket Tool (G) and fill it with white. Set the layer blending mode to Screen and reduce opacity a bit. It should look like below.
Step 47
I added also some water drops that fall from the wings. Open the "droplets.jpg", select it, copy it and paste it in our drawing. Go to Image > Adjustments > Desaturate (CTRL+SHIFT+U). Grab the Move Tool (G) and resize it how you see fit. Set blending mode to screen. Use Burn Tool (O) to hide the gray backgound.
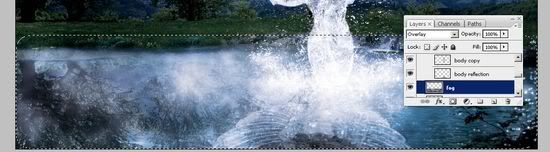
Step 48
Create a new layer (CMD+SHIFT+N) and grab the Rectangular Marquee Tool (M) with a 30 px Feather. Select the lake part. Now go to Filter > Render > Clouds. Make sure you have white/light gray colors in the quick palette. Set the layer blending mode to Overlay. Name this layer "fog".
I didn’t like the yellow grass I got so I added a Selective color adjustment layer (Layer > New Adjustment Layer > Selective color). Select the "yellows" from the dropdown list and reduce the "Yellow" bar to -99%. Also select the "Cyans" and reduce the "Yellow" bar to a minimum. This reduces yellow-ish greens a bit.
Conclusion
As you can see it doesn’t take much to create a stunning work of art using Photoshop. All you need is a rough sketch, some fantastic scenery images, and a little time to create a really phenomenal work of art.


2 comments:
Wow, these are all so amazing
great!!!
Post a Comment