Final Product What You'll Be Creating
Step 1
According to Adobe, a script is a series of commands that tells Photoshop to perform one or more tasks. The first thing you need to do is take a look at Adobe’s JavaScript Reference. You can find it here. This contains all the object properties and methods Photoshop CS4 supports, with examples, and it will give you an idea on what kind of things you can do with scripting in Photoshop. If you are using an older version you can find references here.Step 2
So let’s get started. The main idea for the project is to create text layers for each month containing the dates, so we will be working mainly with text manipulation. Open ExtendScript Toolkit and create a new JavaScript file (Command+N). This will contain all the commands we are going to give Photoshop. If you don’t want to use ExtendScript Toolkit, you can use any simple text editor.Step 3
First we have to define some variables for the document attributes and the calendar color scheme. I made my document 1280×800 at 72 pixels/inch resolution, named it "PhotoshopScriptCalendar" and chose 2010 as the year of the calendar we will create.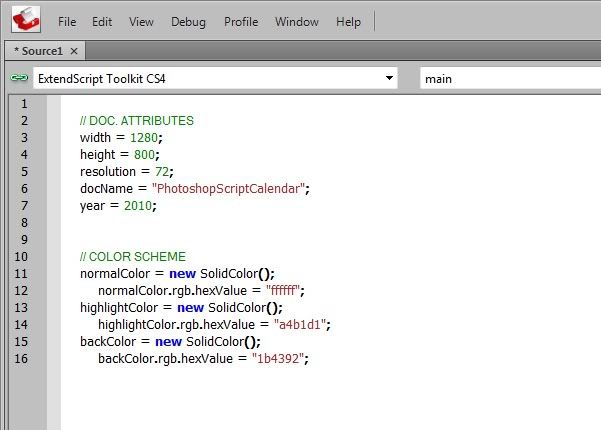
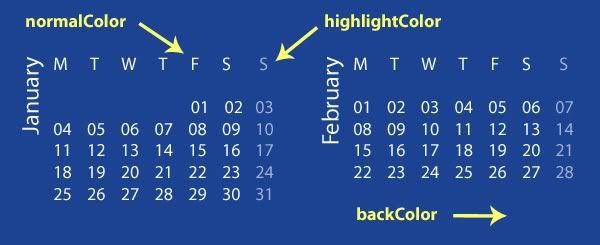
This is the basic color scheme we are going to use. "NormalColor" is for weekdays and month names. For Sundays I used a different color in order to make them stand out, this is "highlightColor", and we’ll be using "backColor" as the default calendar background color if we do not select a custom image for that.
Step 4
As I said before, we are mainly going to work with text manipulation, so we must define some variables for the indentation and text that we are going to use repeatedly, like the month headers.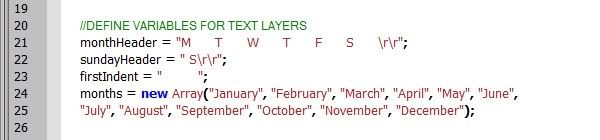
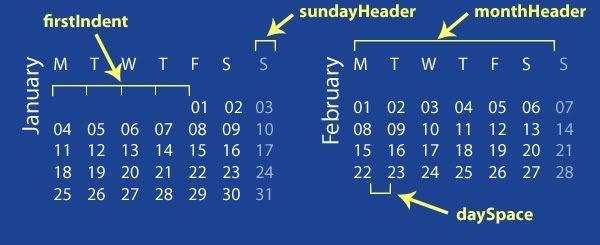
In order to set a different color to the Sundays column, we have to make it a different text layer from the other days. This is why we have two headers: "monthHeader" – Monday to Saturday, and "sundayHeader". Each of these two variables end with two "\r". These stand for new line characters, the same as pressing the Return key on your keyboard. Next we define the indentation variable. Notice that the first of January is a Friday, so for each day before that we must put an indent instead of numbers. The number of whitespaces of these variables depend on the font you use and the size of it, so it will need a little bit of trail and error before you get it right. Finally, make a list of all the month names.
Step 5
Now that we have every thing we need, we can start creating the .psd document.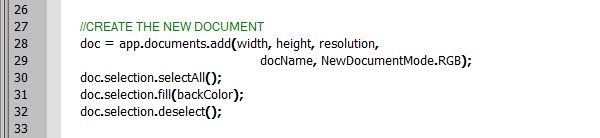
As you can see, the code is fairly readable. To our Photoshop application, we add a new document with the specified width, height, resolution, and name we defined earlier, a color mode, and retain its reference in a new variable "doc". By default all new documents are in RGB, so we could have omitted that parameter, but if you want CMYK for example, you could use "NewDocumentMode.CMYK". The same with LAB, GRAYSCALE and BITMAP. You can find all of these in the references linked above.
Next we make a new selection and select the entire document, fill it with our background color, and eventually deselect it.
Step 6
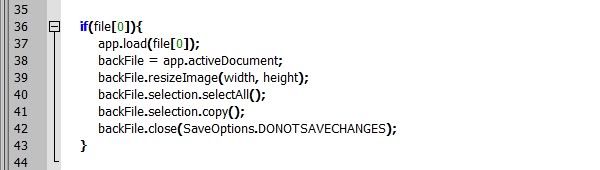
Next we need to add a custom background from an existing image. The gradient background from the final result posted above is actually a separate image.For this we are going to use the openDialog() function. This opens the dialog from "File > Open" and puts in the array "file" the list of selected images. We are going to use only the first selected image which is in the "file" array at position 0. So, first we need to check if any image was selected.

Next, we are going to load the selected image in our application and get a reference to it by calling "app.activeDocument" which returns the currently active document in Photoshop.

Resize the image to our preferred width and height. Again, we make a new selection of the whole document, copy this selection and close the document with the option of not saving the changes.
Finally, in our calendar document, paste the selection. This puts the image as the first layer above the Background layer. Then name it something like "BackgroundImage".
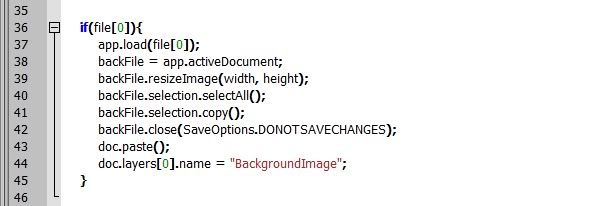
Notice that if no image was selected from the dialog, none of these commands would have been done.
Step 7
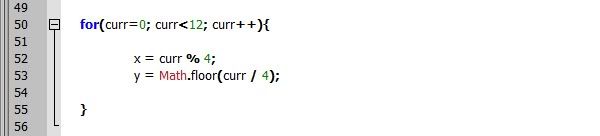
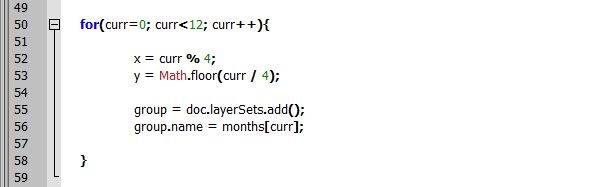
OK. Now comes the actual generation of the calendar. This could be a little more difficult, but we’ll take it step by step and hopefully it won’t be that hard to understand.We need to do a set of actions for each month of the year. For this we use a "for" loop. Basically, this takes the variable "curr", which we use to denote the current month we are working with, sets its initial value to 0, then does the set of actions repeatedly, incrementing the value of "curr" each time, until this becomes 12. Thus going through all twelve months.

In the end we want to have the layers for each month in a separate group. So we are going to start off by creating a layer group and giving it the name of the current month. We use here the list of months we defined earlier.
Step 8
Next we create a new text layer inside our group and set its name to the current month. This is going to be our month name layer.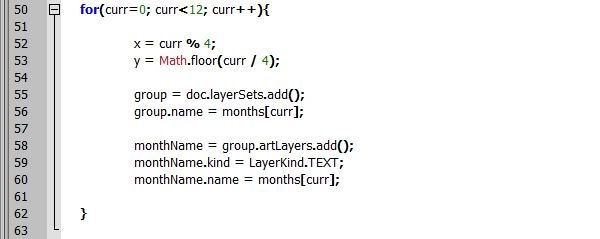
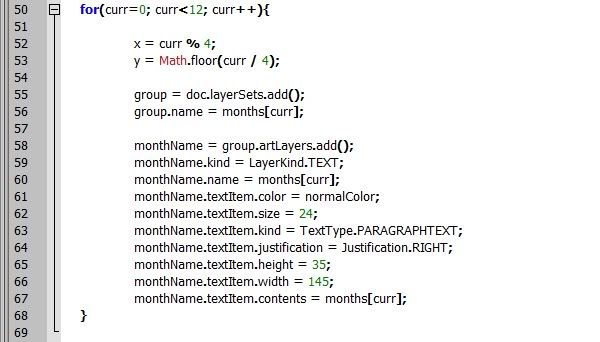
Now we have to set the text attributes such as text color, font size, and justification. We are going to set the type of our text to "PARAGRAPHTEXT" and give our layer the preferred dimensions. The "contents" attribute of the "monthName" variable stands for the actual text that will be visible inside the layer, so we want this to be the name of the current month.
Finally we are going to rotate the layer 90° counter-clockwise and position our layer. Here we are going to use our offset variables "x" and "y".
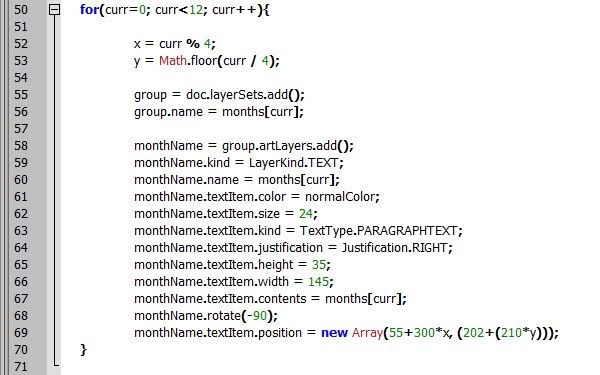
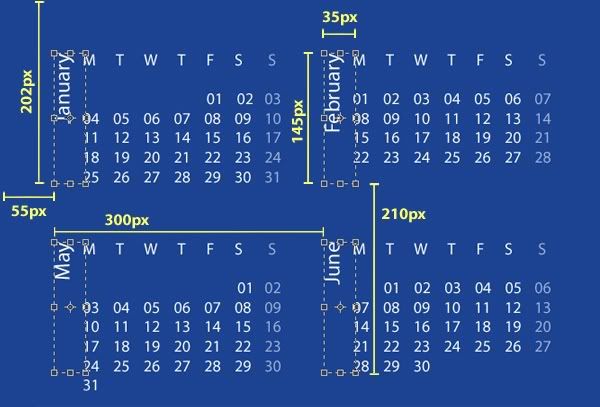
Please keep in mind that the positioning is done relative to the layers’ top left corner, but since we’ve rotated the it 90° CCW it now has become bottom left corner. If your document has different dimensions from mine, you may need to change the constants I used for positioning. The values I used are listed below.
Step 9
Next we are going to make the text layer that will contain all the dates in the current month, except the Sundays. We are going to add it to the group we created earlier and set its name, justification, font color and size, and position it. We are going to add the content of this a little bit later, I’ll explain why, when we get to that point.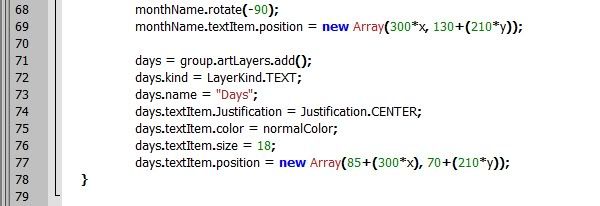
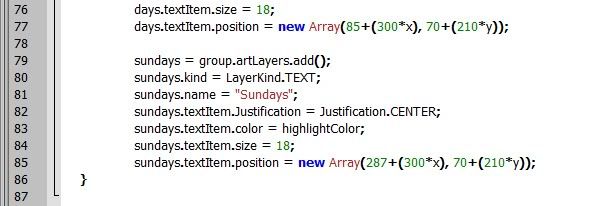
Same thing for the Sundays layer, but this time we are going to set the color to "highlightColor".
Step 10
Now, we need to create two variables that will hold our text as we generate it, "text" will contain the weekdays and "textSun" the Sundays. We start of by adding the headers and putting the indent for the first of the month. We create a new date with the javascript "Date()" function from the year of our calendar, the current month and the first of that month, and get its position in the week. Remember, the numbering always starts from 0, so for example if the first of the month is a Monday, "n" will be 0, if it is a Tuesday, "n" will be 1 and so on. Then we need to add the indent we defined at the beginning to our "text" variable as many times as needed. If the first of the month is a Wednesday for example, we’ll add the indent two times.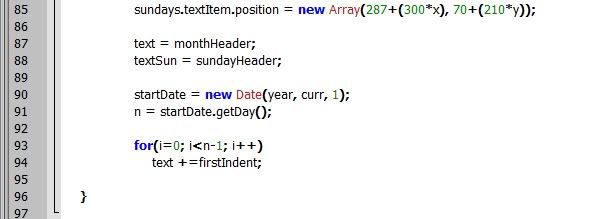
Step 11
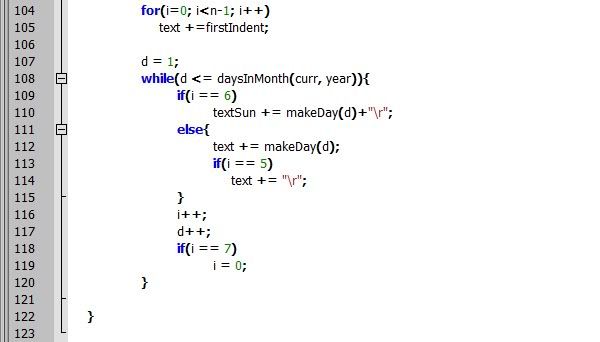
OK. It’s time to generate all the numbers for the month. For this we need to know how many days there are in our current month and we need the numbers in "leading zeros" format, so we must go back and define two custom functions: "daysInMonth" and "makeDay". So please scroll up to the top of your code and add these functions. As I said the "daysInMonth" function returns the number of days in the month we give it, and "makeDay" returns the number we give it in a specific format and adds some whitespace, necessary for spacing the days of the month. So, for example if we call the "daysInMonth" function with the year = 2010 and the month = 0 (January) it will return the number 31. If we call the "makeDay" function with d = 3 for example, it will return the text "03 ", but if d = 13 it will return "13 ". Notice that if "d" is less than 10 it will add a zero before it.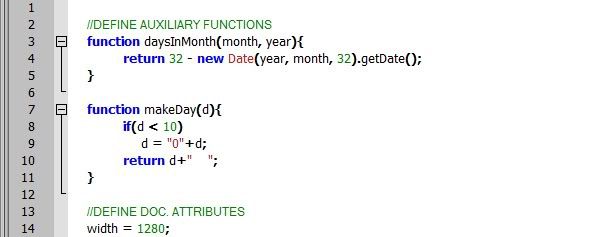
We are going to start from d = 1 and increment it until it reaches the number of days in the month. Now, if "i" has the value "6" it means that it is a Sunday, so we have to add it to the Sunday layer. Remember to put an "\r" here for new line. Otherwise, we add it to the weekdays. Here we add a new line only if the current day is "Saturday" ("i" is "5"). At the end, we have to increment both "i" and "d", and if the value of "i" reaches "7", that is if the last day added was a Sunday, we have to make it "0" again.
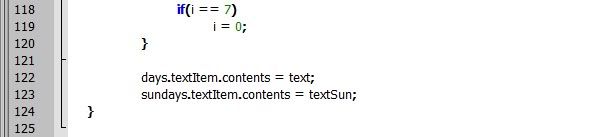
Finally, we have all the dates in our text variables and we can add them to our layers. The reason we have delayed this step is that it takes some time for Photoshop to add text to a layer, so it’s better to add it all at once, rather than add each day separately.
Step 12
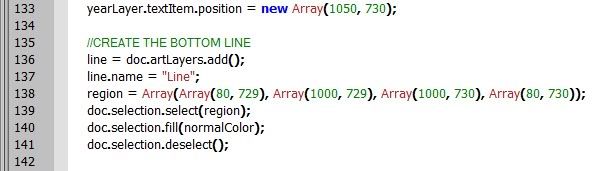
So, all the month layers are now generated, and all we need to do is to make the year layer, and that little line at the bottom. For the year layer it’s the same procedure we used before, create a new layer, give it a name, text size and color, and position it where we want.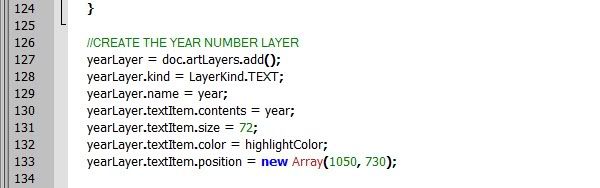
For the bottom line it is a bit different. First we must define a region with X and Y coordinates for all four corners, then make a selection out of that region, fill it with our color on a new layer and finally deselect it.
Step 13
All our code is done! The only thing to do now is to run it. If you are using ExtendScript Toolkit, from the drop down menu select "Adobe Photoshop", if you do not have Photoshop opened, click on the little icon on the left "Connect to target application", and then press the play icon. If you’ve used a different text editor, save the file with the ".js" or ".jsx" extensions, and run it from Photoshop: File > Scripts > Browse and then select your file.Conclusion
We are finished! Hope you’ve enjoyed working on this little project. Scripts in Photoshop are very useful when having to do repetitive actions and can make your job a whole lot easier once you get the hang of them. Please do not hesitate to send any suggestions you may have, they are always welcomed!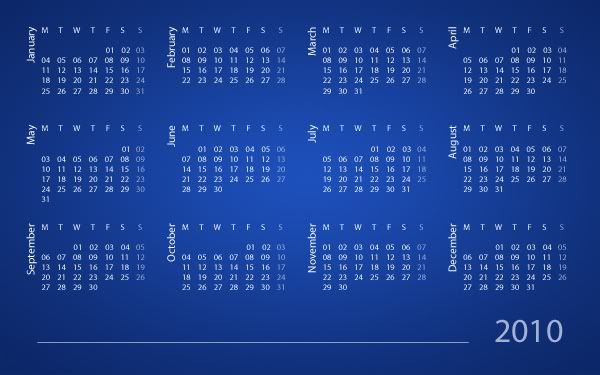
if you like this then don't forget to send us your feedback.
Download PSD Files


0 comments:
Post a Comment