Tutorial Details
Program: Adobe Photoshop CS3
Difficulty: Advanced
Estimated Completion Time: 2-3 Hours
Download Source Files
Program: Adobe Photoshop CS3
Difficulty: Advanced
Estimated Completion Time: 2-3 Hours
Download Source Files
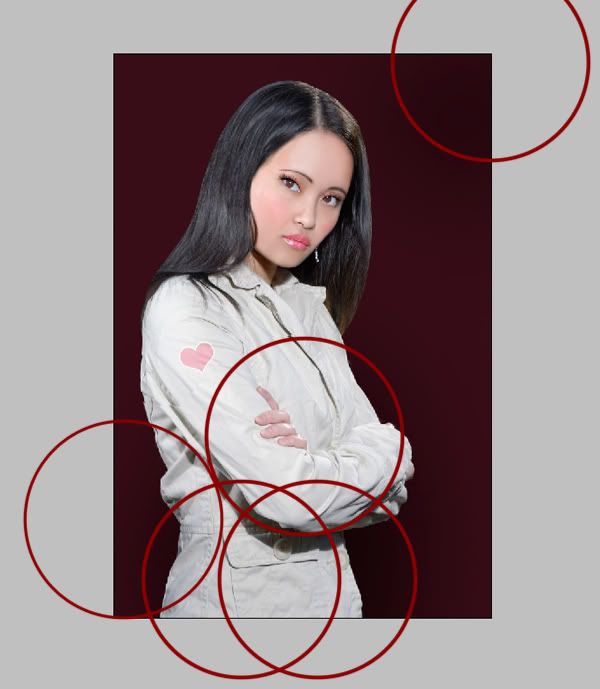
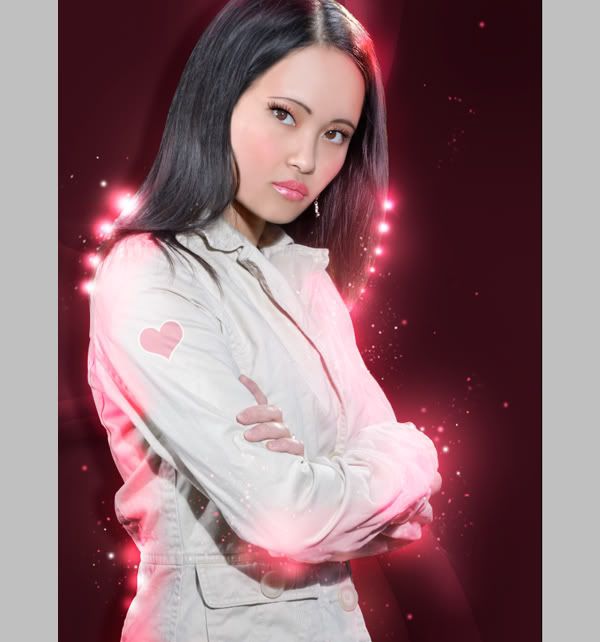
Final Product What You'll Be Creating
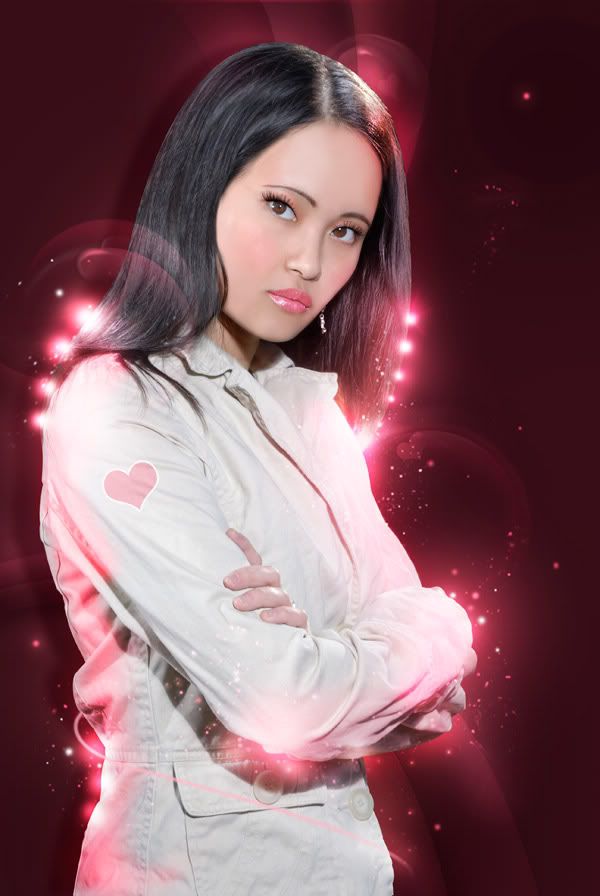
Have you ever wanted to see what you would look like after a complete makeover? Today, I’m going to
show you how to transform a regular, every day photo into a real glamour shot. In this tutorial, you will learn how to retouch a model’s face and subtly manipulate her hair. In addition, we will enhance the canvas by adding attractive lighting and 3D effects. This tutorial requires considerable Pen Tool skills, but with perseverance and a passion for design, you will certainly be able to achieve great results.
show you how to transform a regular, every day photo into a real glamour shot. In this tutorial, you will learn how to retouch a model’s face and subtly manipulate her hair. In addition, we will enhance the canvas by adding attractive lighting and 3D effects. This tutorial requires considerable Pen Tool skills, but with perseverance and a passion for design, you will certainly be able to achieve great results.
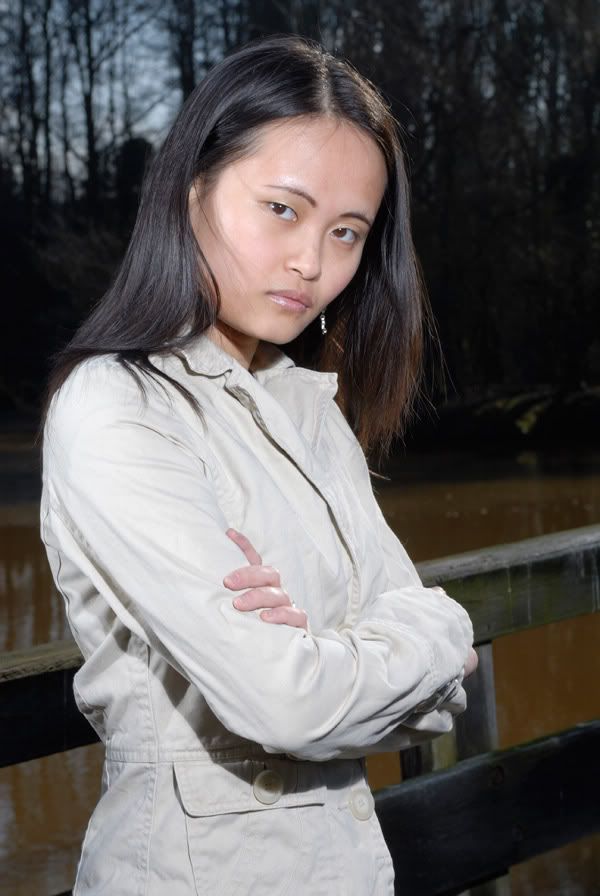
Original Photo
As a web designer and photo editor, I get to work with a number of wonderful photographers. In today’s tutorial we will be working from a photo by Gerard van Oosbree. I want to take this opportunity to thank him sincerely.
Step 1
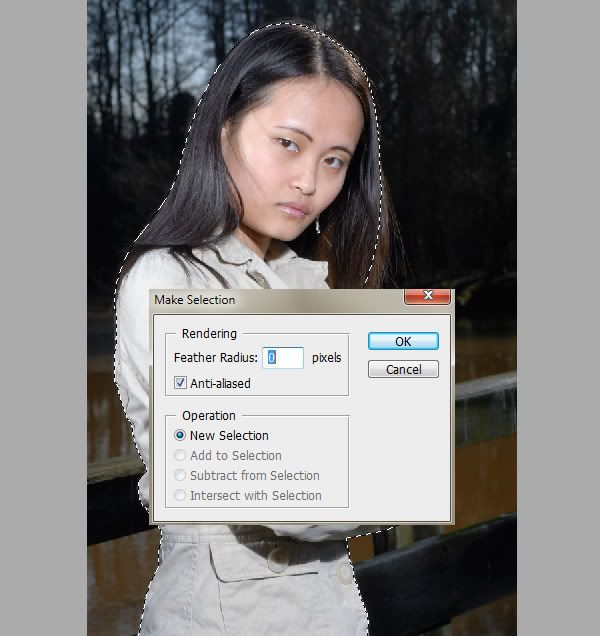
Open the picture , then go to Layer> New> Layer from Background. Open a new Layer (Shift+Command+N) and name this "Background". Drag the "Background Layer" downwards, fill it with color #000000 then lock it.
We are now going to remove the background using the Pen Tool. Return to the layer with the model, select the Pen Tool (P) and set this to Paths. Click accurately around the model until you have closed the path. Now right-click your mouse and select the option "Make Selection". Ensure that the Feather is set at 0. Copy (Command+C) and Paste (Command+V) the selection and name this layer "Original". Having done this, remove "Layer 0".
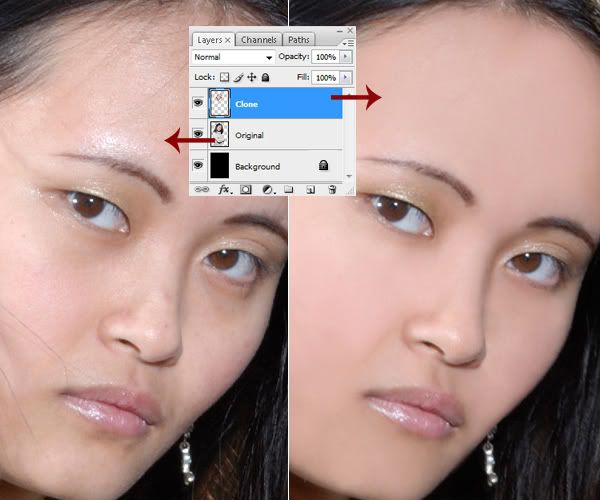
Step 2
The model has now been cut out. Before we airbrush the skin, we first need to make it smooth. We do this in a subtle way using the Clone Tool. Duplicate the "Original Layer" and name it "Clone." Zoom in (Command++) until you can clearly see the structure of the skin. Having selected the "Clone Layer", go to the Clone Stamp Tool and work away the skin’s irregularities. To do this use a soft round brush of 30 pixels with the opacity at 65%. For larger areas use a larger soft brush. Equalize the bags under the eyes and excess hair on the face. Make sure the skin is smooth but that its structure is not completely lost. The last thing we want is a plastic doll effect.
Step 3
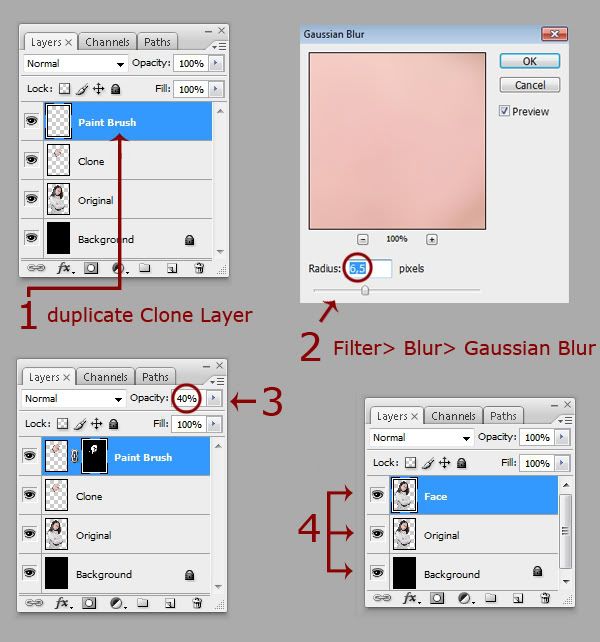
In this step we are going to airbrush the skin and use a Layer Mask to retrieve facial contours. To do this, choose a brush size of 28 to 30 pixels. Duplicate the "Clone Layer" and name this "Paint Brush". Having selected the "Paint Brush Layer" go to Filter> Blur> Gaussian Blur, set the Radius at 6.5 and click OK. The skin is now airbrushed. For an even more beautiful and natural skin effect lower the opacity of the "Paint Brush Layer". To do this, go to the layers palette and set the opacity at 40%. Now go to Layer> Layer Mask> Reveal All and set the foreground color to #000000.
Paint the eyes, mouth, nostrils, eyebrows, hair and clothing very carefully using a soft brush (opacity 100%). When you paint the contours of an object set the opacity to 16%, to ensure that everything blends well. Do the same for patches of skin where you want to keep the original shine, contours and structure. When you do this keep the opacity low, because you do not want to retrieve too much of the original skin.
Now that you are ready, add the "Paint Brush Layer" and the "Clone Layer" (Command+E) together. Then add the "Clone Layer" and the "Original Layer" together and duplicate the original layer. Name this layer "Face".

Step 4
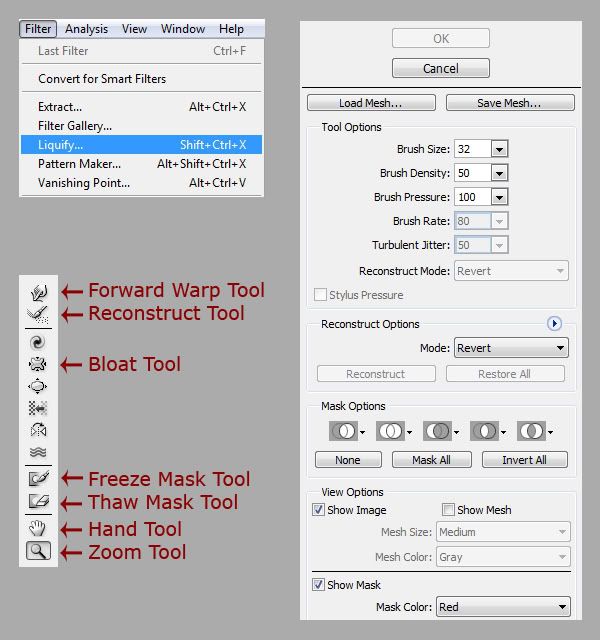
A tense moment, as we are about to adapt the face using the Liquefy Tool. Working with this tool requires some agility, but with patience and perseverance you will definitely get good results. Select the "Face Layer" and go to Filter> Liquify (Shift+Command+X). Zoom in 4 times with the Zoom Tool (Z) and use the Hand Tool (H) to move the photo back and forth.
Enlarging the eyes
We start with the left eye. Before re-shaping the eye, we first use the Freeze Mask Tool to protect the lens from distortion. To do this set your brush size to 32 pixels and click the Freeze Mask Tool (F). Paint very carefully inside the eye, on the lens. Be careful not to touch the skin. If this does happen, use the Thaw Mask Tool (D) to delete it. Repeat this step for the lens of the right eye. Having done this set your brush size to 75 pixels and go to the Forward Warp Tool (W). Drag the left eyelid very carefully upwards. Repeat this with the right eye. If you went too far and the result looks rather unnatural, then go to the Reconstruct Tool (R) and correct it.
Refining the nose
Take the Forward Warp Tool (W), adjust your brush size to 91 pixels and place it next to the left nostril. Carefully drag the left nostril to the right. Now set your brush size to 32 pixels and drag the nostril downwards so it appears less sharp.
Making the mouth sexier
Select the Forward Warp Tool and set your brush size to 55 pixels, place the brush below the left corner of the mouth and drag it up a little. To give the lips more volume, place the Bloat Tool (B) on the lower lip. Press and move your mouse gradually over the lower lip to ensure that the volume is spread evenly. Repeat this with the upper lip.
Narrowing the face
Set your brush size to 110 pixels, place the Forward Warp Tool next to the right side of the forehead, and drag the forehead, bit by bit, to the left. Do the same with the right side of the face: the cheekbone, cheek and chin. Now, using the Forward Warp Tool, drag the bottom of the chin upwards. Repeat this step for the left side of the chin and jaw line.
Narrowing the forehead
We do this by dragging down hair from above the forehead. To do this set your brush size at 205 pixels. Place the Forward Warp Tool slightly above the hairline on the forehead. Starting at the left side of the forehead, drag the hair down to the desired level. Continue until you have done this for the whole forehead. We are now finished adjusting the face and hair. Click OK.
Step 5
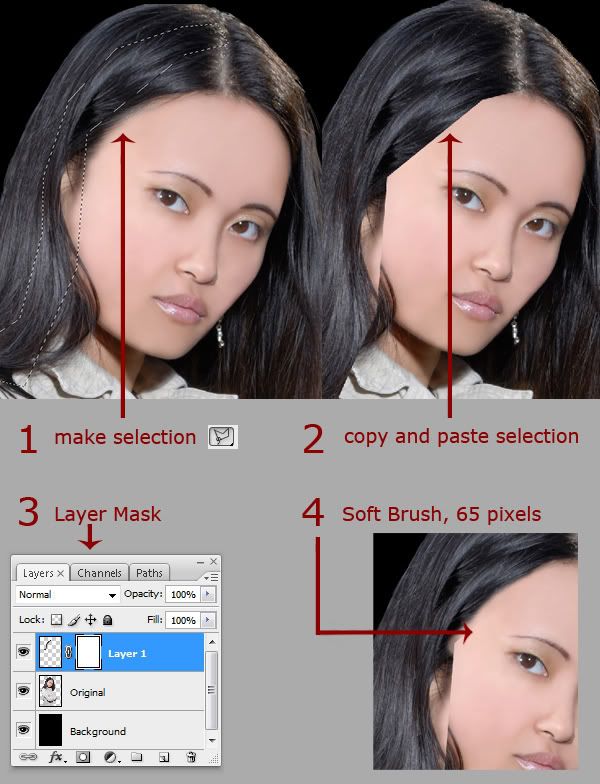
Before we proceed with retouching the face, we are first going to adjust the hair. First add together the "Face Layer" and the Original Layer" (Command+E). Using the Polygonal Lasso Tool select a sample piece of hair. Copy (Command+C) and Paste (Command+V) the selected hair just in front of the left ear. Rotate the hair sample with the Free Transform Tool (Command+T) so that it blends well with the rest. Once you are happy with the positioning of the piece of hair then go to Layer> Layer Mask> Reveal All. Set the foreground color to #000000 and the background color to #ffffff. Pick a round soft brush of about 65 pixels and set the Opacity at 60%. Now paint carefully from top to bottom, along the hair and over the face. Repeat this on top of the head and along the hairline / parting. Use a smaller brush for the edges. Return to the “Original Layer” and select with the Polygonal Lasso Tool another piece of hair. Copy and paste this hair and drag this layer on top of "Layer 1". Now place the hair further back.
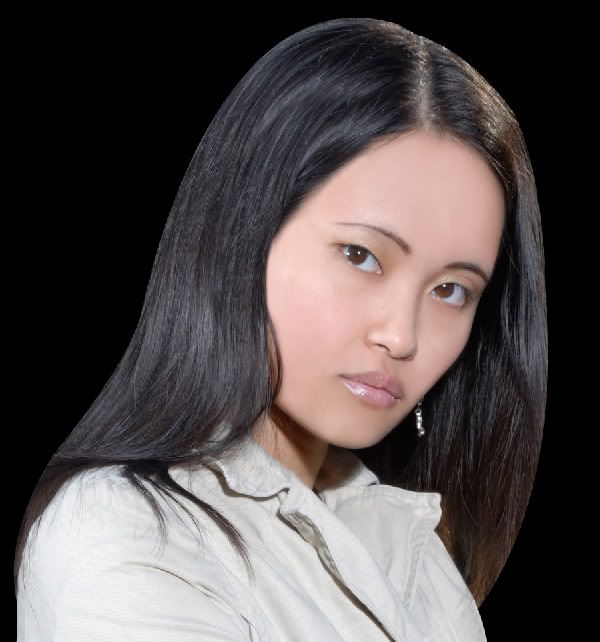
Go back to the "Original Layer" and using the Polygonal Lasso Tool select the piece of curly hair hanging over her left cheek and jaw line. Paste the hair and drag this layer under "Layer 1". Repeat this procedure. You now have 3 or more layers of hair. Select the top layer and add the layers together (Command + E). Name this layer "Hair".
See the result below:
Step 6
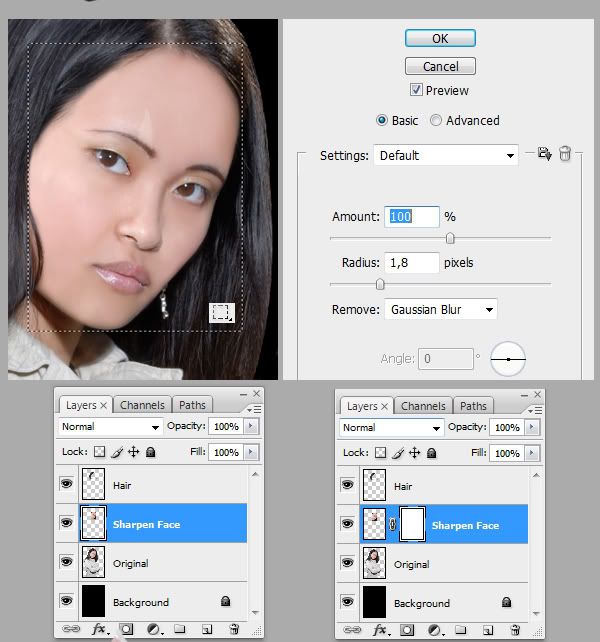
We have now arrived at the sharpening of the face. Having selected the "Original Layer" take the Rectangular Marquee Tool and select the face. Copy and Paste the selected area and name this Layer "Sharpen Face". Now go to Filter > Sharpen> Smart Sharpen. Set the Radius at 1.8 and Remove on Gaussian Blur. Go to Layer > Layer Mask > Reveal All and set the foreground color to #000000 and the background color to #ffffff. Take a soft round 90 pixels brush, set the opacity at 77% and carefully paint over the face. The eyes, eyelids, eyebrows and mouth should be left alone. This also applies for the nose, except for its upper part. Be careful not to remove too many contours, otherwise the face will lose depth.
Step 7
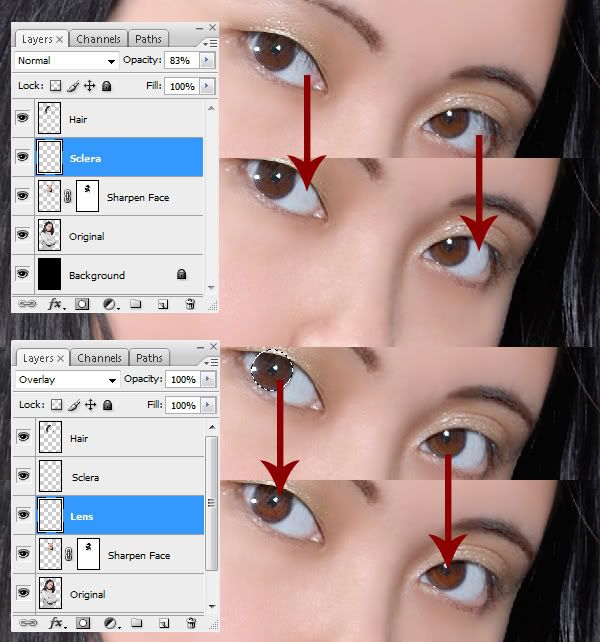
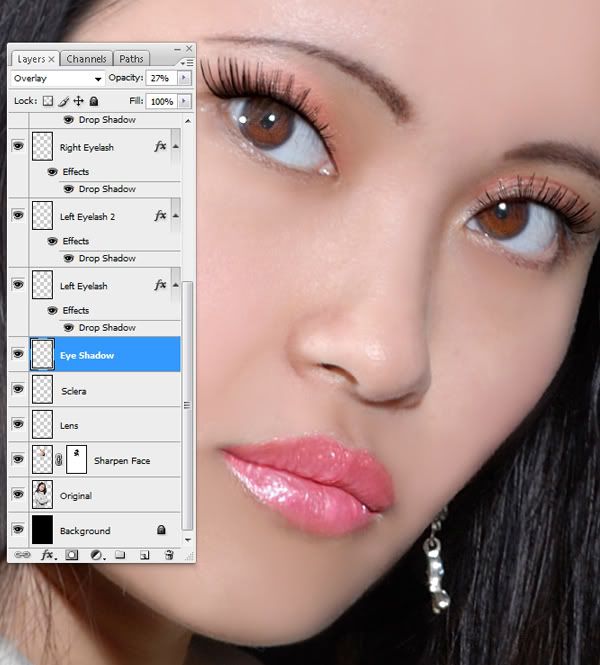
We will now continue with the whitening of the sclera (white part of the eye) and lightening the lens. To do this go to Layer > New Layer (Shift+Command+N) and name this layer "Sclera". Then go to the Eyedropper Tool and select the whitest part of the sclera. Take a soft round brush of about 17 pixels and set the opacity at 39%. Now very carefully fill in the sclera with the selected color. Use a smaller brush to remove the upper eyelashes from the sclera. Make sure that you do not remove too much shade. In this case slightly lower the Opacity.
Now that you are finished whitening the sclera we will continue with the lens. Select the "Sharpen Layer Face", take the Elliptical Marquee Tool, keep the Shift key pressed and select the lens. Copy and paste the selected area and name this layer "Lens". Return to Select > Reselect (Shift+Command+D). Set the "Lens Layer" to Overlay and the opacity at 61%. Take the Dodge Tool and set the Range at Midtones and the Exposure at 50%. Now cautiously fill in with a soft round 23 pixels brush, the inside of the selected area except for the pupil and the edge of the lens. Erase any excess eyelid with the Eraser Tool. Repeat this step for the right lens.
Step 8
In this step we add eyelashes and eyeliner. Normally I use real eyelashes that I copy and paste from another photo. Because I do not have a suitable picture at my disposal we will have to make do with eyelash brushes.
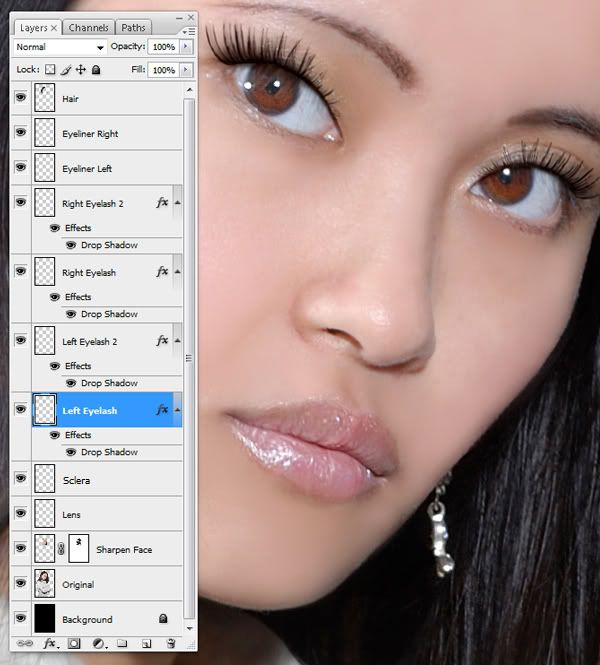
Before continuing, download here the eyelash brushes. Open on top of the "Eye White Layer" a new layer and name this "Left Eyelash". Set the foreground color to #120503, your brush size to 197 pixels and choose from your brush palette the Eyelash brush "open6-left". Place the brush above the left eyelid and rotate it with the Free Transform Tool until it is in position.
Now go to the Liquify Tool (Shift+Command+X) and model with the Forward Warp Tool (W) the line of the Eyelash Brush so that it exactly fits the eyelid. Once you have finished click OK. Now go to Layer > Layer Style > Drop Shadow (or double-click on your layer). Set the Blend Mode to Multiply, the color to #0e0101, the Opacity to 75%, Angle to -34, Distance to 8 pixels, Spread to 0% and the Size to 12 pixels.
Duplicate the "Left Eyelash Layer" and name this "Left Eyelash 2". Set the opacity of this layer at 67% and change in the Drop Shadow Palette the Distance to 6 pixels and the Size to 4 pixels. This duplicated layer gives the lash more volume.
Repeat the above step for the right eye. Name the Layer for the right eye, " Right Eyelash " and the duplicate layer "Right Eyelash 2". Once you have finished adding the eyelashes, we can start drawing in eyeliner.
Open on top of the "Right Eyelash Layer 2" a new layer. Name this Layer "Eyeliner Left". Set the foreground color to #100404 and take a soft round brush of 6 pixels with 42% Opacity and Flow at 38%. Now paint a line above the eye very carefully. Now set the Layer Mode to Multiply and the Opacity to 53%. Once you have finished with the eyeliner on the left eye, repeat this step for the right eye. Name this layer "Eyeliner Right".
Step 9
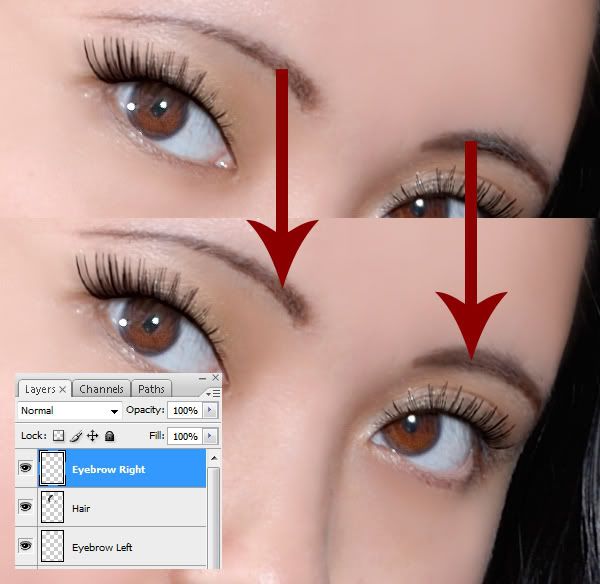
In this step we are going to correct the eyebrows. Open on top of the "Eyeliner Right" a new layer and name this "Left Eyebrow". Set the foreground color to #220f06, take a soft round brush of 11 pixels, set the opacity at 40% and paint very carefully over the left eyebrow. Use a smaller brush for the left end of the eyebrow. Now set the Layer Mode of your layer to Multiply and the Opacity to 25%. You are now finished with the left eyebrow.
As you can see in the picture, the right eyebrow has an unusual dark spot. We will remove this. To do this, go to the "Original Layer". Select, using the Rectangular Marquee Tool, the center of the left eyebrow. Copy, paste and drag the new layer on top of the "Hair Layer". Go to Edit > Transform > Flip Horizontal. Then use the Free Transform Tool and rotate the eyebrow until it is in the right position. Take a soft brush with the opacity at 75% and with the Eraser Tool, erase everything around the spot. Make sure that it all blends well. Once you have finished, open a new layer on top of "Layer 1". Set the Layer Mode to Multiply and the Opacity to 25%. With the foreground color still at #220f06, paint in the eyebrow carefully with a soft brush. Now set the opacity of "Layer 2" at 21% and add this layer to "Layer 1" (Command+E). Name this layer "Right Eyebrow".
Step 10
We are now going to color the lips. Open on top of the upper layer a new Layer and name this "Mouth". Set the Layer Mode to Overlay and the opacity to 50%. Take a soft brush of 40 pixels with Opacity at 40% and the Flow at 66%. Choose the following color #c55071 and paint the lips. Once you have finished, get the Dodge Tool, set the Range to Highlights and the Exposure to 50%. Then paint the light patches on the lips to make them shine even more. After this take the Burn Tool, set the Range to Shadows and the Exposure to 18%. Paint with a soft round 7 pixel brush the border between the lips on the left side of the mouth.

Step 11
Now we are finished with the mouth, we are going to color the eyelids. Open a new layer on top of the "Mouth Layer" and name it "Eye Shadow". Drag this layer under the "Left Eyelash Layer". Set the Layer Mode to Overlay and the Opacity to 27%. With the foreground color at #d1123a, take a soft brush of 21 pixels. Set the Opacity to 21% and the Flow to 80% and start coloring the eyelids. Use a slightly lighter pink as you move upwards.
Step 12
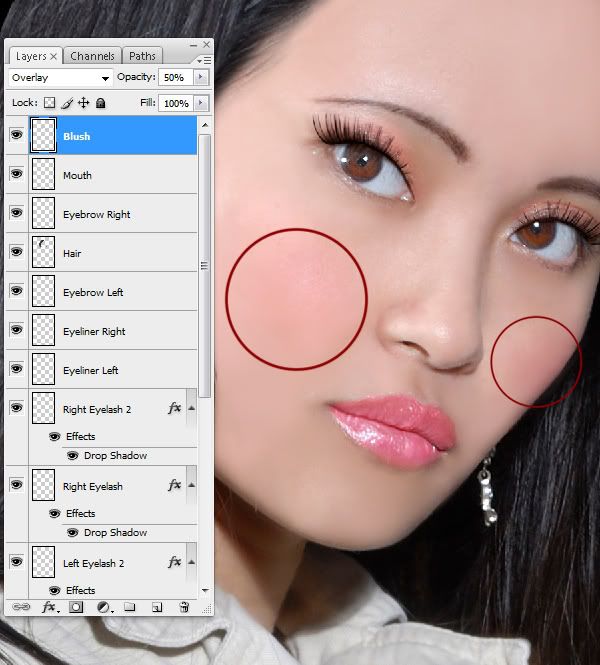
We are now at the penultimate step for the face: putting blush on the cheeks. Open a new layer on top of the upper layer and name this "Blush". Set the Layer Mode to Overlay and the Opacity to 50%. Take a soft brush of 140 pixels, set the Opacity at 31% and the Flow at 35%. Now start to color gently on the lower left cheek (near the nose). Make a circular motion up to just below the cheekbone. Do the same with the right cheek but with a smaller brush.
Step 13
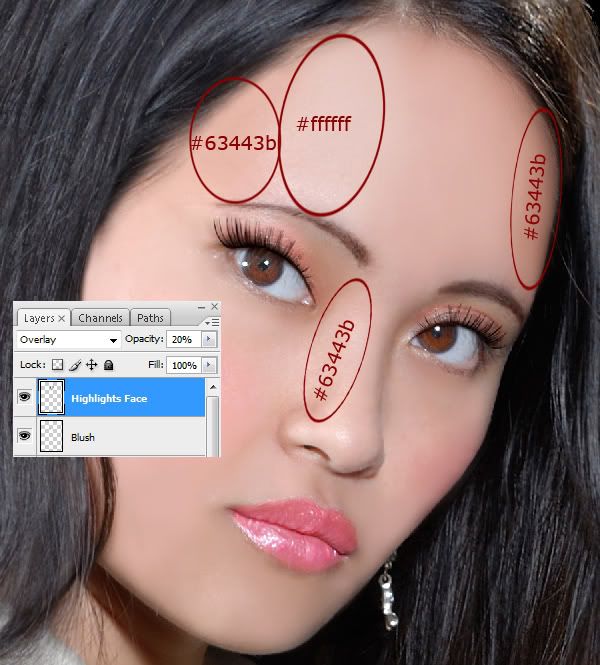
The final step for the face: adding highlights and shadows. Open a new layer on top of "Blush Layer" and name this "Highlights Face". Set the Layer Mode to Overlay and the Opacity to 20%. Set the foreground color to #ffffff and the background color to #63443b. Now take a soft 80 pixel brush and set the Opacity at 25% and the Flow at 100%. Start coloring with the foreground color on the left forehead, up to and including the temple. Then using the background color, color the temple. Keep coloring until an attractive contrast has been created going from light to dark. Also using the background color, color along the right side of the head (along the hairline) and left past the nose. We have now added the shadow and highlights.
Step 14
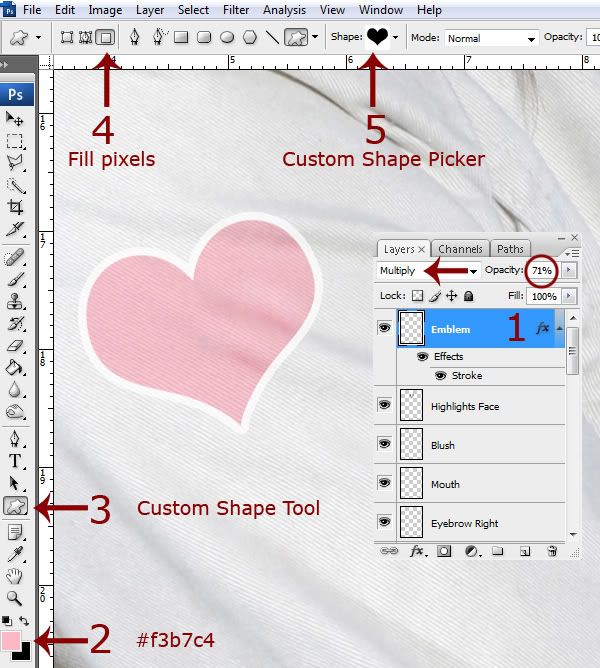
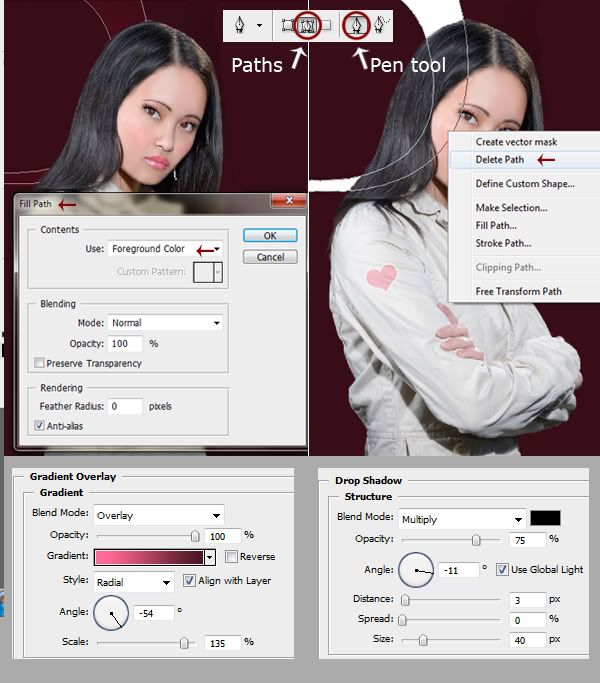
We have now come to adding an emblem on the sleeve. You can draw the emblem with the Pen Tool, but here I am going to use a heart-shape. If you don’t have a heart-shape in your custom shapes, you can find from the internet.
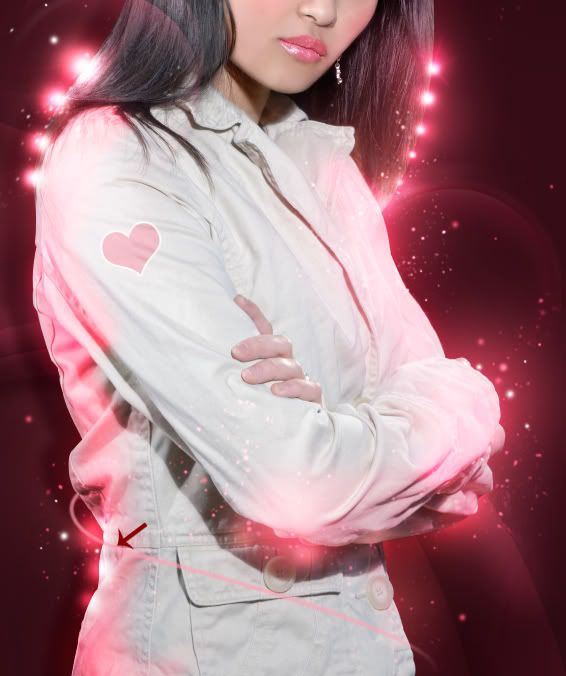
Open on top of everything, a new layer and name this "Emblem". Set the Opacity to 71% and the Layer Mode to Multiply. Set the foreground color to #f3b7c4 and then go to the Custom Shape Tool. Select Fill Pixels then open the Custom Shape Picker where you select your heart shape. Place the shape on the sleeve and drag it to get the right size. Rotate the heart-shape using the Free Transform Tool (Command+T), so that it follows the direction of the sleeve and with its right side over the creases. Go to Layer > Layer Style > Stroke (or double-click on your layer) and set the Size to 8 pixels, the Position to Outside, the Blend Mode to Overlay, the Opacity to 100% and the Color to #ffffff. When you have finished click OK. Use the Burn Tool with the Range on Mid-tones and the Opacity at 71% for the shadow effect of the creases. Carefully paint along the creases. Use the Dodge Tool to highlight the lighter areas bordering the shadows.
Step 15
Now that we have finished with the model, we are going to change the background. Before doing this we first have to link together all the layers we used for the model. Select the top layer and hold down the shift key while you select the “Original Layer”. Then click on the "Link Layers" button, at the bottom of the layers palette. Then go to the layers arrow in the upper-right corner of the layers palette and select "Convert to Smart Objects". All layers have now been converted into 1 layer. Name this layer "Model".
You can always change the model layers by double-clicking "Model Layer". Once you have finished changing a layer, save it by using (File> Save (or Command+S) and then return to the canvas.
OK, on with the background. Return to "Background Layer". Remove the lock, set the foreground color to #33151d and fill this using the Paint Bucket Tool. Then put the lock back on. Open a new layer on top of the "Background Layer" and name this "Background 2". Set the Opacity of this layer to 75% and the Layer Mode to Normal. Take a round soft, 1709 pixel brush; set the Opacity to 36% and the Flow to 100%. With the foreground color set at #000000, place your brush in the top right-hand corner, and to the left and right of the jacket, as shown in the picture below.
Step 16
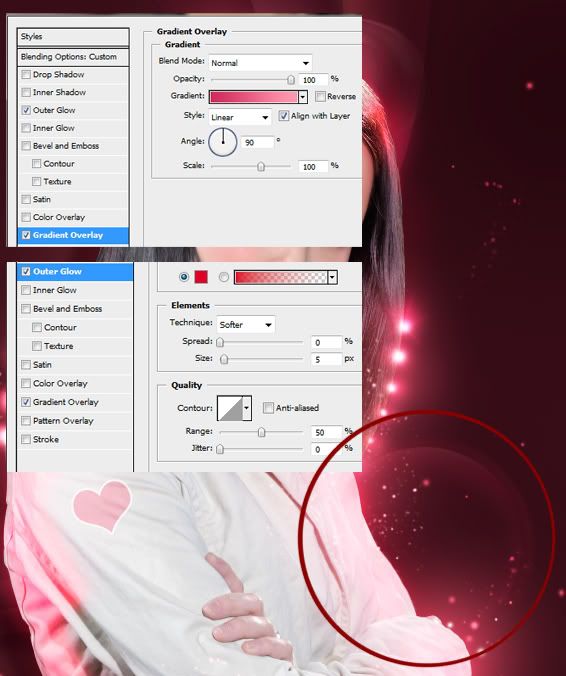
Now open a new layer on top of the "Background 2 Layer" and name this "Shape 1". Set the foreground color to #ffffff and select Paths in the Options Bar. Then take your Pen Tool (P) and from the left moving upwards, draw a crescent shape. (See picture below). Once you have done this, right-click your mouse and select Fill Path. Use the foreground color you have just chosen and click OK. Now right-click again and select Delete Path. Now that you have colored the shape white go to Layer > Layer Style > Blending Options, set the Layer Mode to Overlay and the Opacity to 17%. Then select the Gradient Overlay and set the Blend Mode to Overlay and Opacity to 100%. Set the Style to Radial, Angle to -54 and the Scale to 135%. Then click on the Gradient Editor to adjust the colors. For the foreground choose the color #ef6d98 with the Location at 0% and for the background color #411c26 with the Location at 100%. Now select Drop Shadow in your Blending Options. Set the Blend Mode to Multiply, the color to #000000, the Opacity to 75%, Angle to -11, Distance to -3 pixels, Spread 0%, and the Size to 40 pixels. Once you have finished click OK. You have now completed your first shape.
Step 17
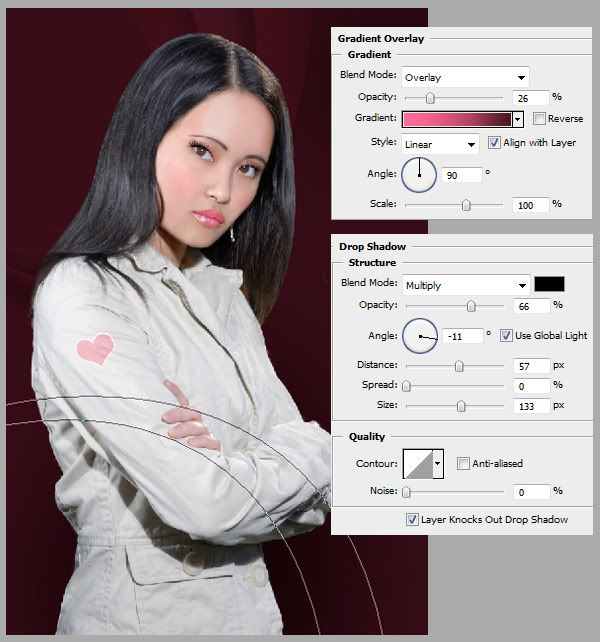
Open a new layer on top of "Shape 1" and name this "Shape 2". With your Pen Tool (P) draw the same shape again just to the right of the first shape. After you have drawn the shape and filled the path with the foreground color #fffff, remove the path (Delete Path). Then go to Layer > Layer Style > Blending Options. Now set the Layer Mode to Overlay and the Opacity to 17%. Use the settings shown below for the Gradient Overlay and Drop Shadow.

Step 18
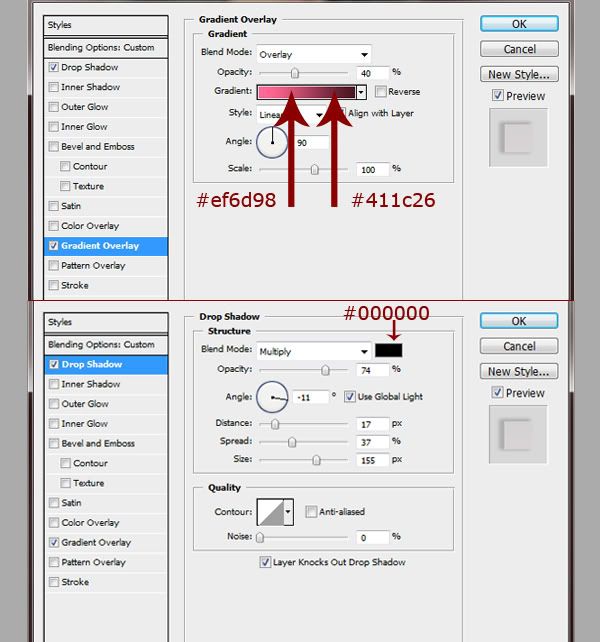
For the third shape open a new layer on top of "Shape 2 Layer " and name this "Shape 3". Set the Layer Mode to Overlay and the Opacity to 31%. With your Pen Tool (P) draw the same shape again next to the second shape. Again, fill the path with color #ffffff then delete it (Delete Path). Go to Layer Style (or double-click on your layer for Blending Options) then select Gradient Overlay and Drop Shadow. Use the settings shown below.

Step 19
We are now going to repeat steps 16, 17 and 18 for the bottom right-hand corner, only this time we are going to draw to 2 shapes. Open a new Layer on top of "Shape 3 Layer " and name this "Shape 4". Set the Layer Mode to Overlay and the Opacity to 16%. Take your Pen Tool and draw the same shape as before, but now from the left downwards (see picture). Once you have finished, fill the Path with color #ffffff then delete it (Delete Path). Double-click on your layer and select Gradient Overlay and Drop Shadow. Adjust these to the settings below.
Step 20
For the second shape open a new layer on top of "Shape 4 layer" and name this "Shape 5". With your Pen Tool draw a shape to the left of the first shape, and fill this with color #ffffff. Then remove the Path. After this set the layer Blend Mode to Overlay and your Opacity to 25%. Select Gradient Overlay and Drop Shadow and use the settings below.
Step 21
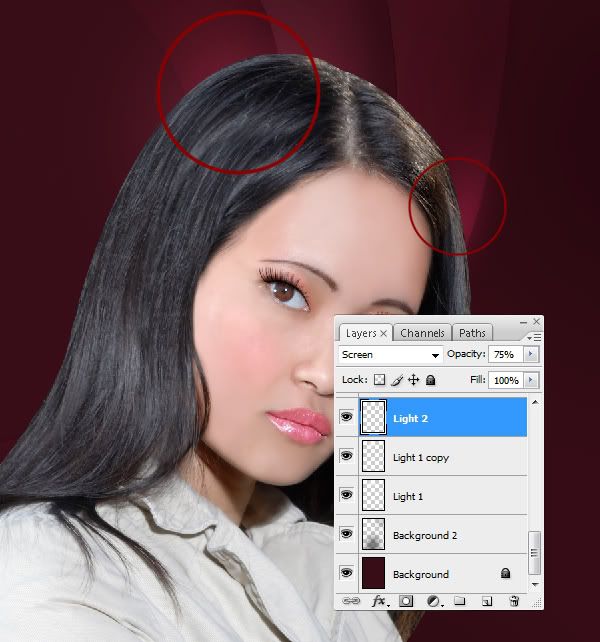
We are now going to add lighting effects to enhance the background shapes. To do this put a new layer on top of the "Background Layer" and name this "Light 1". Set the Layer Mode to Overlay and the Opacity to 100%. Take a round soft 860 pixel brush and set the foreground color to #ffffff. Click on the hair left of the crown (see picture). Duplicate this layer and set the Opacity to 93%. Now open a new layer on top of the duplicated layer and name this "Light 2". Set the Layer Mode to Screen and the Opacity to 75%. With the foreground color at #bc2356, take a round soft 400 pixel brush, set the opacity to 44% and right-click on and just over the hair. Go to Edit > Transform > Warp and drag the brush slightly upwards, following the direction of the shape behind. Carefully erase any excess light on the right side using a soft brush.
Step 22
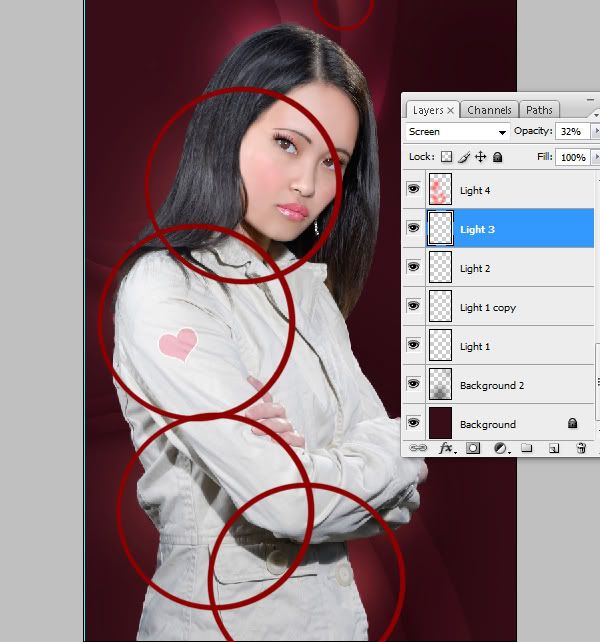
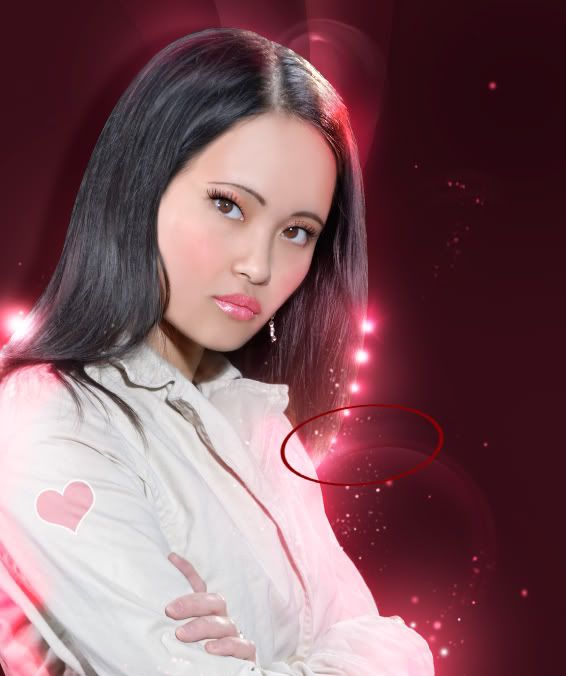
Open a new layer on top of "Light 2 Layer" and name this "Light 3". Now set the Layer Mode to Screen and the Opacity to 32%. Set the foreground color to #e36666, take a round soft 620 pixel brush with the opacity at 77% and place this right above the model (see picture). Open another new layer, name this "Light 4", and set the Layer Mode to Screen and the Opacity to 30%. Take a round soft 1240 pixel brush, with the opacity at 77% and place it over the bottom of the jacket on the right and left sides, then over the left shoulder and head.
Step 23
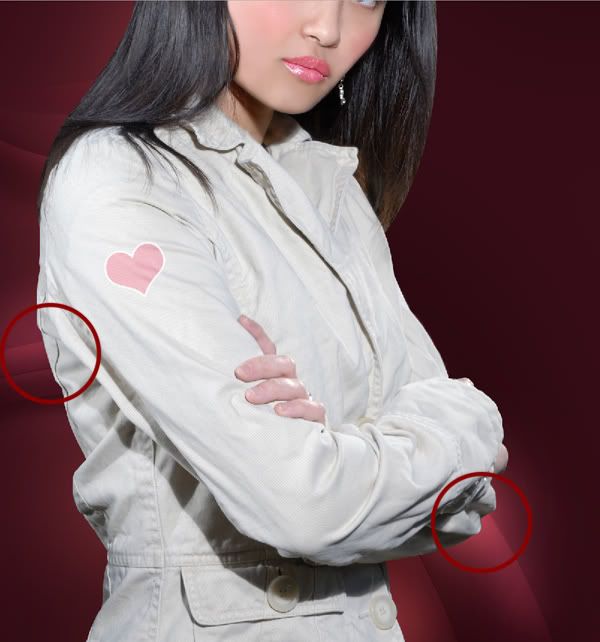
Open a new layer on top of "Light 4 Layer" and name this "Light 5". Set the Layer Mode to Overlay, the Opacity to 100% and the foreground color to #ffffff. Take a soft 862 pixel brush with the opacity at 100% and place this over the left side of the jacket (see picture). Erase the light just below the brush using the Eraser Tool (soft brush, opacity 50%), so that the underlying lower shape gets back its original color. Open a new layer and name this ‘Light 6". Set the Layer Mode to Overlay and the Opacity to 100%. With the foreground color still set at #ffffff, place a round soft 715 pixel brush under the end of the right sleeve. Go to Edit> Transform> Warp and drag the brush downwards, towards the underlying shape. When you are ready, duplicate the "Light 6 Layer" and set the opacity to 18%. Select Color Overlay from the Blending Options and change the white color to #c6185a. We have now finished the background lighting effects.
Step 24
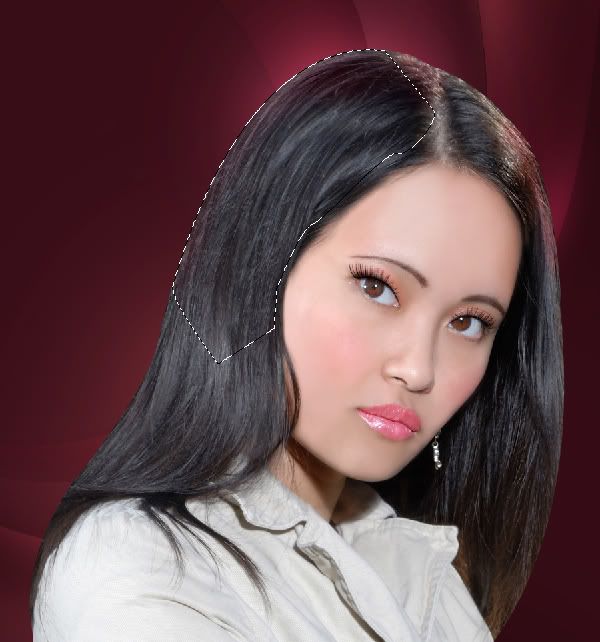
To make the lighting more realistic we are going to put a slightly darker pink light on the left side of the hair. Open on top of the layers palette a new layer and name this "Light Top". Set the Layer Mode to Color and the Opacity to 43%. Take your Pen Tool and create a path round the edges of the hair on the left side. Once the path is closed, right-click and choose Make Selection. Using a soft brush paint the left side of the selected area with the color #34121b. Then remove the selection (Select > Reselect of Shift+Command+D) and using the Eraser Tool erase any unwanted lighting. If you find that you have removed too much, select the hair again (Shift+Command+D) and refill the selected area with your brush.
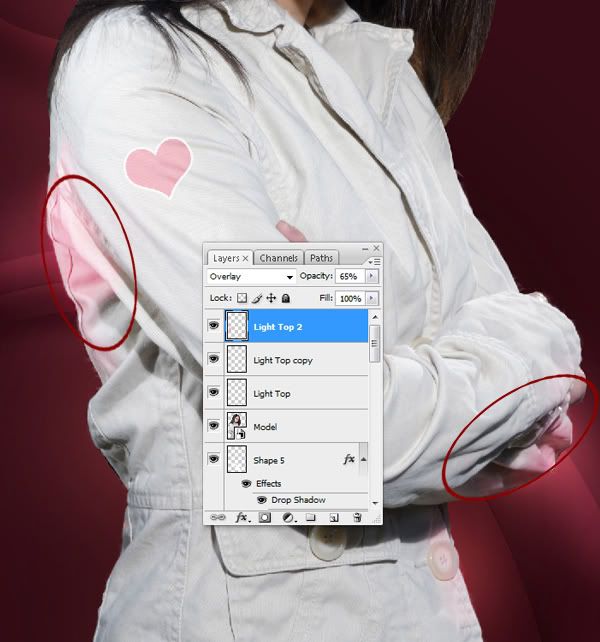
Step 25
Repeat the previous step for the lighting on the jacket. To do this open a new layer and name this "Light Top 2". Set the Layer Mode to Overlay and the Opacity to 65%. Carefully paint inside the edge of the jacket where the background is lit. Erase any excess background light using the Eraser Tool.
Step 26
We are about to place a shadow behind the model, but first need to link the bottom light layers together in a group. To do this go to "Light 6 copy Layer" and hold down the shift key while you select “Light 1 Layer". Then click the "Link Layers" button, at the bottom of your layers palette. Now go to the layers arrow and select "New Group from Layers". Name this group "Lights". Repeat this for the Shape layers. Name this group "Shapes".
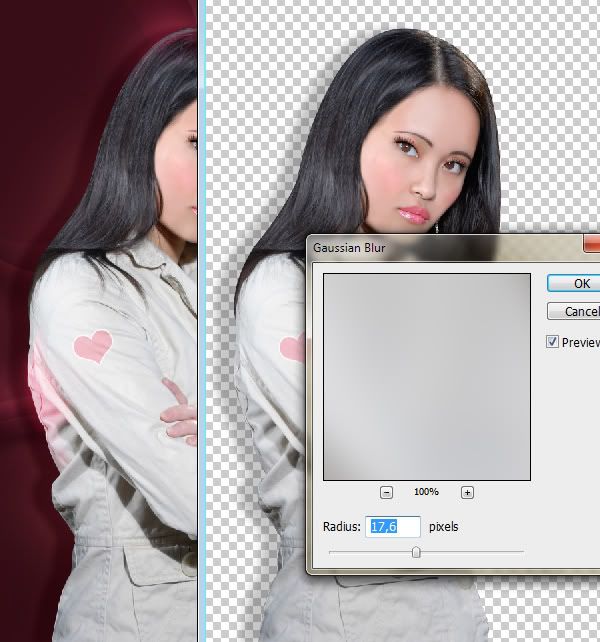
To place a shadow behind the model, we need to return to the "Original Layer". Double-click on this Layer, click OK, select the "Original Layer" and duplicate this layer. Double-click on the layer, select Color Overlay and set the color to #1a0208. Then set the Layer Mode to Normal and the Opacity to 43%. Now go to Filter > Blur > Gaussian Blur. Set the Radius to 17.6 pixels and click OK. Drag the duplicate layer under the "Original Layer" and name this "Shadow". Now drag the "Shadow Layer" to the left until it is visible, to the model’s left. When you have finished, save the layer (File> Save of Command+S) so you can continue working on the canvas.
Step 27
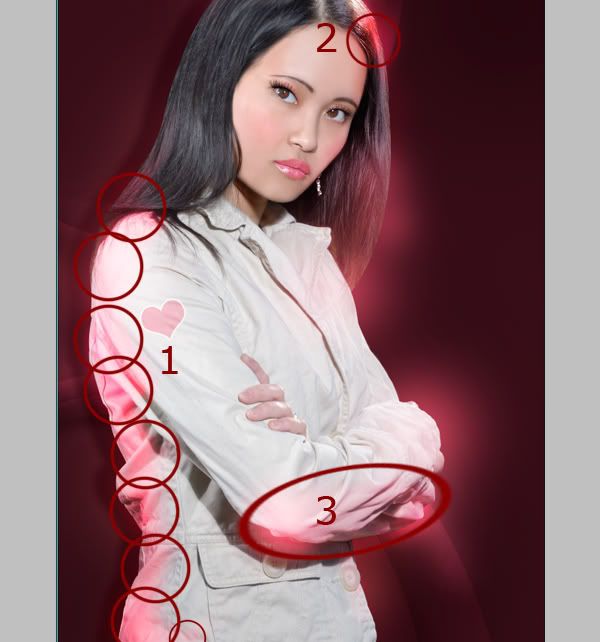
We are now going to give the canvas some sparkles, shapes, and more light effects. Open a new layer on top of the "Light Top 2 layer" and name this "Light Top 3". With the foreground set at #ffffff, take a round soft 340 pixel brush with the Opacity and Flow op 100%. Set the Layer Mode to Overlay 100% and place your brush on the hair to the right of the parting. Then open a new layer and name this "Pink Hair Glow". Set the foreground color to #ea8ca1, the Layer Mode to Overlay, the Opacity to 36% and paint over the right-side of the hair with a round soft 300 pixel brush. Erase any excess light on the forehead with the Eraser Tool. Once you have finished, open a new layer and name this "Pink Lighting Model". Set the Layer Mode to Screen, 100%. Take a soft brush, with the same settings, and place this left of the shoulder, on and under the elbow, and to the model’s right.
Step 28
Open a new layer and name this "Pink Glow Left Side". Set the Layer Mode to Overlay, 100%. Now take a round soft 250 pixel brush and set the color to #e83d54. Starting at the bottom left of the jacket, paint slowly upwards going as high as the mouth. Erase a little bit of light here and there on the jacket using the Eraser Tool. Try to avoid going over the background too much with your brush. Use a smaller brush with a lower Opacity as you move upwards. Once you have finished, open a new layer and name this "Pink Glow Right Arm". Set the Layer Mode to Overlay and the Opacity to 51%. Set the foreground color to #e98a9f, take a round soft 320 pixel brush with the Opacity at 55% and the Flow at 100%. Paint up and over the elbow, slowly towards the right-side of the arm. Be careful not to get too much paint on the background. Once you have finished open a new layer, name this "Pink Hair Glow 2". Set the Layer Mode to Overlay, the Opacity to 100% and the foreground color to #f69ab0. Take a round soft 320 pixel brush, with the Opacity at 100% and click the front right-hand side of the hair.
Step 29
Open a new layer, name this "Lights", set the Layer Mode to Overlay and the Opacity to 62%. Set the foreground color to #ffffff and, with the Opacity at 100%, place your brush four times, one below the other, down the left-hand side of the hair. Start at the top with a brush size of 170 pixels and get smaller as you go down. Do the same with the right-hand side of the hair, but now 6 times. Also click your brush several times below the left seam and under the elbow.
Step 30
Before continuing, we are first going to link some layers together. Select the “Lights layer", hold down the shift key and select the "Light Top 2 Layer". Then click the Link Layers button at the bottom of the layers palette and go to the layers arrow.
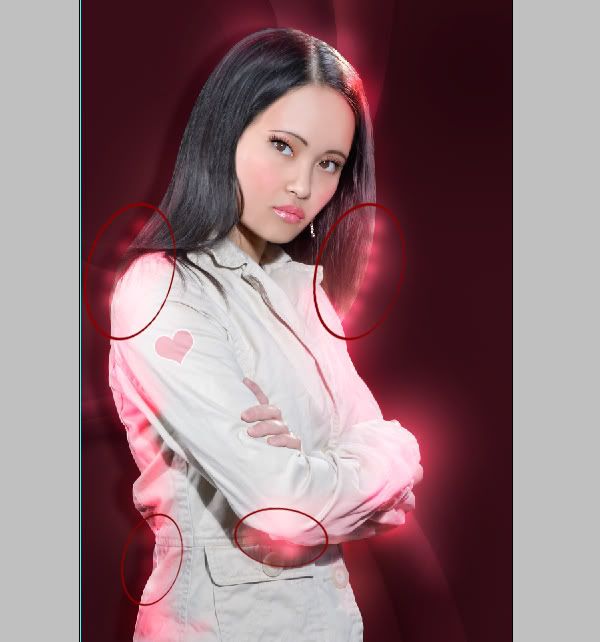
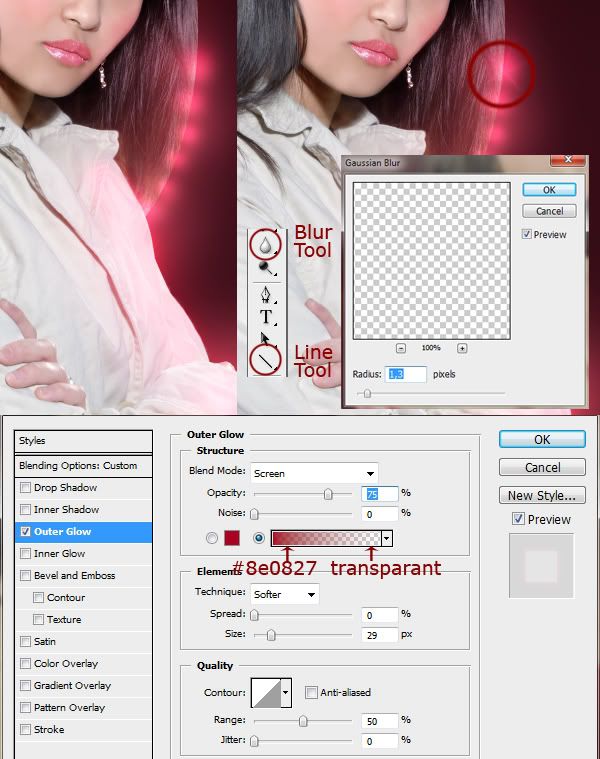
Choose "New Group from Layers". Name this group "Exposure Model". Now open a new layer on top of this group and name this "Sparkles 1". Set the foreground color to #8e0827, take a round soft 170 pixel brush with the Opacity and Flow at 100%. Also put lights here, one below the other, and finish at the bottom with a small brush. Set the Layer Mode to Screen and the Opacity to 100%.
Then open a new layer and name this "Star". Now take your Line Tool, set the Weight to 3 pixels and draw some short lines crossing over each other. After this go to Filter> Blur> Gaussian Blur, set the Radius to 1,3 pixels and click OK. Then take the Blur Tool, set the Mode to Lighten and the Strength to 20%. Now carefully paint over the lines. Once you have finished, take your Eraser tool, set the Opacity to 23% and carefully with your brush (size 65 pixels) start erasing over the very ends of the lines moving inwards. Set the layer Mode to Screen and the Opacity to 91%. Now go to the Blending Options (double-click on the layer) and select ‘Outer Glow’. Set the Blend Mode to Screen, the Opacity to 75%, Spread to 0% and Size to 29 pixels. Then click on the Gradient Editor. Choose for the foreground color #8e0827 and for the background transparent, with the location set at 100%.
Step 31
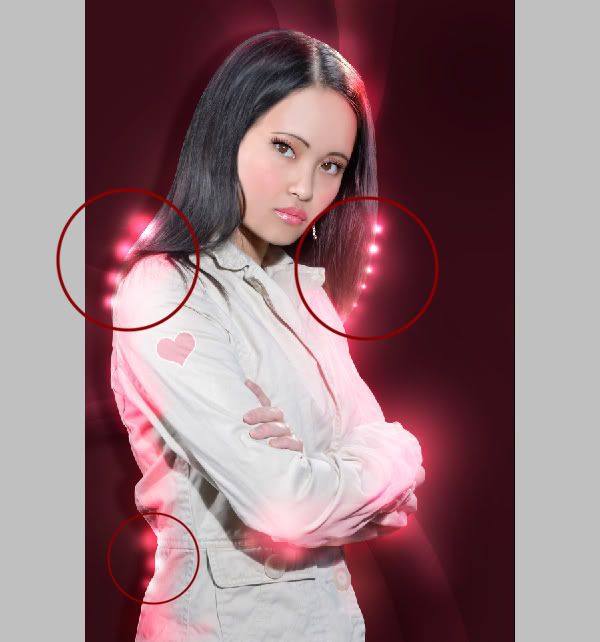
Open a new layer on top of the "Star Layer" and name this "Light 2". Set the Layer Mode to Overlay and the Opacity to 100%. With the foreground color at #ffffff, take a round soft 60 pixel brush with the Opacity at 100%, and place it on top of the original lighting, on the right edge of the hair. Duplicate this layer 4 times and put each duplicated layer under the previous one. Use the Free Transform Tool to reduce lighting. Once you have finished, duplicate all 5 layers and set the Layer Mode to Screen.
We are now going to repeat the above step for the left side of the hair. Open a layer and name this Light 3". Set the Blend Mode to Overlay, 100%. Now use a bigger brush of around 100 pixels. Duplicate this layer 3 times and place these one under the other, going from large to small. Once you have finished, duplicate these 4 layers but keep, for these duplicated layers, the Blend Mode on Overlay. Set the Opacity lower for these last layers to help keep the lighting consistent.
We are also going to do the same with lighting the hips. Open a new layer and name this "Lights 4". With the foreground color still set at #ffffff, put your 170 pixel brush on the left side of the model’s hip. Duplicate this layer twice and put one under the other. Now duplicate these 3 layers and keep the Layer Mode on Overlay. Set the Opacity of the first duplicated layer to 43%, the second to 60% and the third to 30%. Once you have finished, link all the layers together into one group and name this "Lights".
Step 32
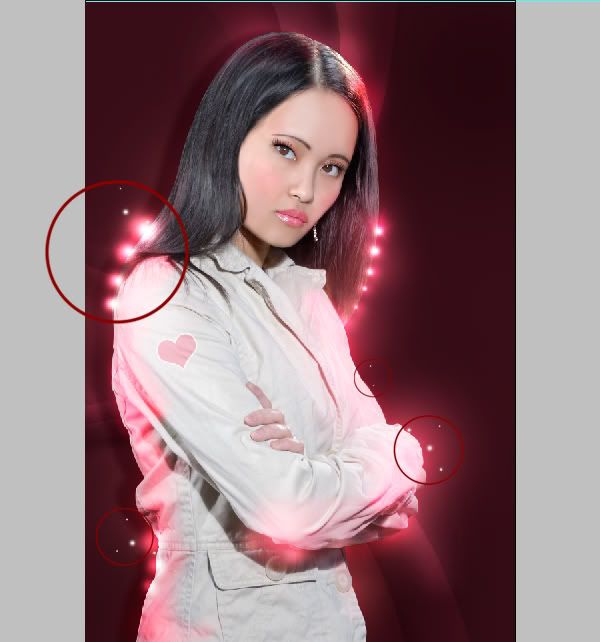
Open a new layer on top of the Lights group and name this "White Sparkles". With the foreground color still set at #ffffff, take a soft 120 pixel brush and place it on the lighting by the shoulder, moving from bottom to top. Afterwards place your brush on different parts of the canvas, each time using a different brush size and Opacity. Duplicate this layer twice (or more); place these on another part of the canvas. Rotate the duplicated layers with the Free Transform Tool. Erase some parts of them.
Step 33
We are now going to add some pink sparkles. Before starting we need to download the sparkle brushes. Open a new layer on top of the White Sparkles layers and name this "Pink Sparkles". Set the Layer Mode to Screen, 100% and the foreground color to #ee949e. Place the sparkle brush on the canvas. Duplicate this layer as many times as possible (I did it about 45 times), and rotate these layers with the Transform Tool. In some layers add Outer Glow and change the color to white (Color Overlay in the Blending Options). Distort some sparkles with the Smudge Tool or with the tools inside the Transform Tool. In some places erase sparkles with the Eraser Tool. Once you have finished adding sparkles (you can also make your own splatters and sparkles), link these together into one group. Name this group "Sparkles’.
Step 34
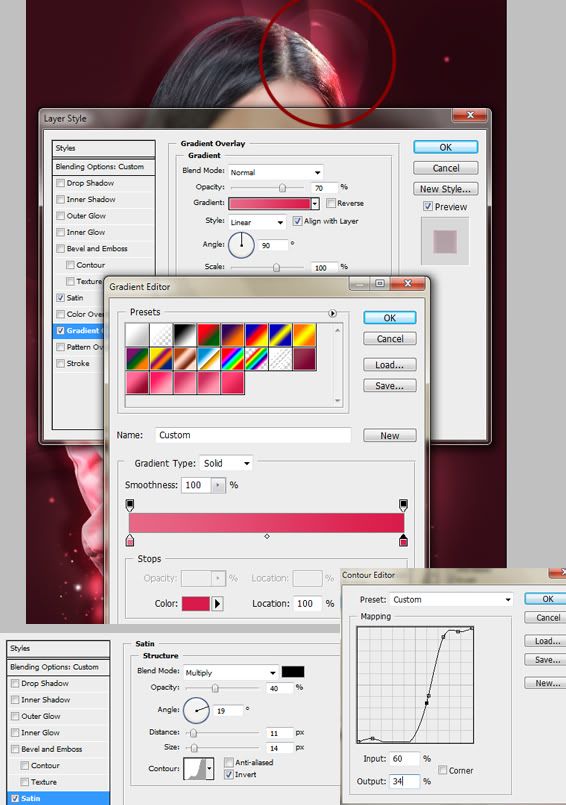
Now that we have finished adding the sparkles we are going to add some circular shapes. Open a new layer on top of the Lights group and name this "Circle 1". Set the Layer Mode to Normal 32%, take a hard round 430 pixel brush with the Opacity at 100%. Set the foreground color to #ffffff and place the brush half on the hair top right, and half on the background. Set the Layer Mode to Normal and erase some light on the inside. Make sure that an edge appears which broadens. Then take the Smudge Tool and smudge the edge to the right, creating a 3d effect. Now go to the Blending Options and select the Gradient Overlay. Set the Blend Mode to Normal, the Opacity to 70%, the Style to Linear, the Angle to 90% and the Scale to 100%. Go to the Gradient Editor and set your colors. For the foreground use color #cc6884 and for the background #ba214a. Now select Satin, set the Blend Mode to Multiply, the color to #000000, the Opacity to 40%, the Angle to 19, the Distance to 11 pixels and the Size to 14 pixels. In the Contour Editor, change the Preset to Custom, the Input to 60% and the Output to 34%. Once you have finished click OK.
Step 35
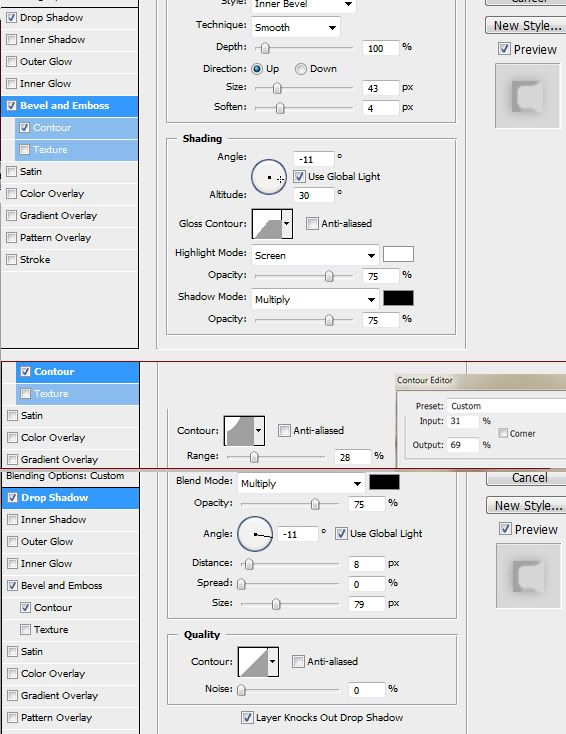
To create a 3-D effect in the circle we have just made, duplicate the "Circle 1 Layer". Set the Layer Mode to Overlay and the Opacity to 32%. Distort the shape using the Warp, Distort or Perspective tool. Then smudge the shape with the Smudge Tool. After this in the Blending Options select Bevel and Emboss and select Contour. Use the settings shown below. Now also select Drop Shadow. For this, use the second set of settings shown below.
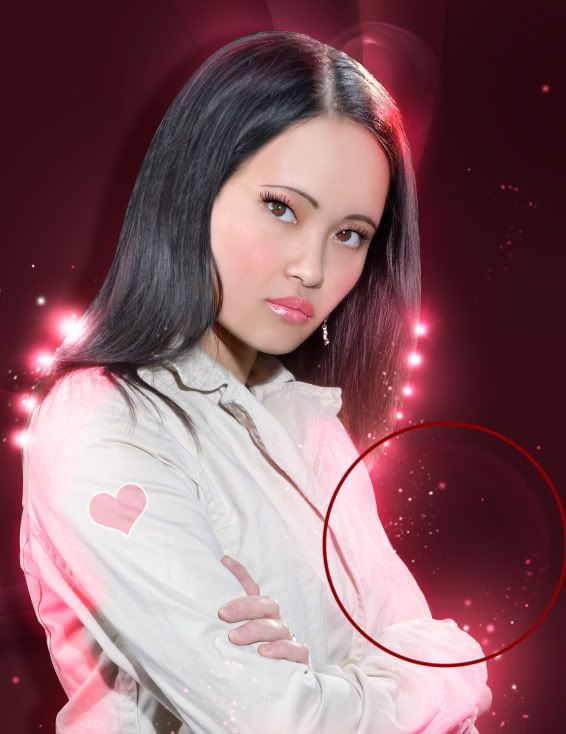
Step 36
Repeat step 34 for a second and slightly bigger circle and place it just to the model’s right. Name this layer "Circle 2". Set the Layer Mode to Overlay and the Opacity to 38%. Also use the Blending Options in step 34, but change the Gradient Overlay Opacity to 13%. In the Satin setting, change the color to #8c0d25, the Distance to 46 pixels and the Size to 114 Pixels. Set the Contour Editor Input to 40% and the Output to 41%.
Step 37
Open a new layer and name this "Circle 3". With the foreground color still on white, put a slightly smaller hard brush on the circle we have just made. Set the Layer Mode to Overlay and the Opacity to 100%. Erase part of this until an edge is visible again. Do this with a soft brush with a low Opacity. In the Blending Options set the Gradient Overlay to Normal, the Opacity to 100%, the Style to Linear, the Angle to 90 and the Scale to 100%. Then select Outer Glow, set the Blend Mode to Screen, the Opacity to 75%, the Noise to 0%, the spread to 0, the Size to 5 pixels, the Range to 50% and the Jitter to 0%. Use a gradient for the Glow color. Set the foreground color to #bd042b and the background to transparent.
Step 38
In this step we are going to light up the left side of the circle we have just made. To do this open a new layer and name this "Light effect". Set the Layer Mode to Overlay, the Opacity to 27% and the foreground color to #ffffff. Now place a soft brush of around 125 pixels on the left, under the hair. Then take the Smudge Tool and brush the light out to the right. Duplicate this "Light Effect Layer" and enlarge it with the Free transform Tool. Erase a little bit under the edge with the Eraser Tool. To do this use a soft brush with a low Opacity.
Step 39
Open a new layer and name this "Circle 4". Set the foreground color to #cf5074, take a hard 730 pixel brush and place this on the left side, partly over the hair and partly over the background. Erase the bottom and middle parts with the Eraser Tool then set the Layer Mode to Overlay and the Opacity to 32%. In Blending Options select Bevel and Emboss then use the settings shown below. Once you have finished duplicate the "Circle 4 Layer" and place this slightly to the rear. Select Bevel and Emboss then Outer Glow. Use a gradient for the Outer Glow color, just like you did in step 37. Set the foreground color to #bd042b and the background to transparent.
Step 40
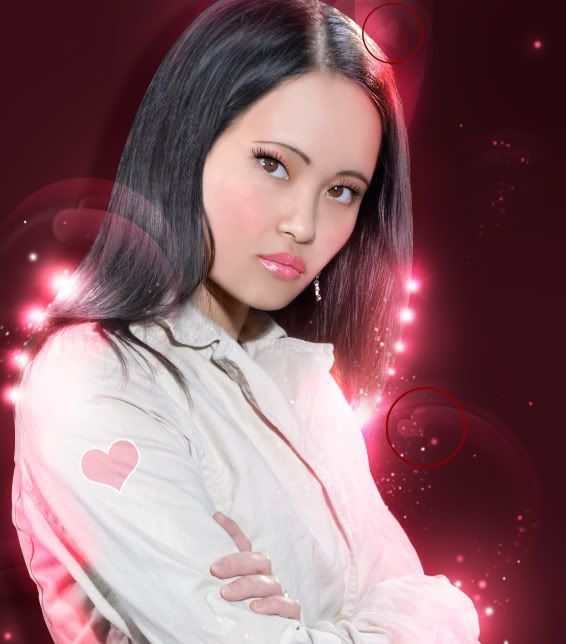
We have now finished adding the circular shapes. Link these layers together into one group and name this "Circles". Once you have done this we are going to add a curve round the model. To do this open a new layer and name this "Curve". Set the layer Mode to Normal, 100% and the foreground color to #eb9daf. Take your Pen Tool and set this to Paths. Near the bottom of the jacket draw a smooth curve going from left to right. Now go to the Brushes Menu and make the brush very small, as narrow as a thin line. Right-click on the path you have just made and choose Stroke Path. Using a soft brush with a low Opacity erase the right end of the curve with the Eraser Tool. Then, in Blending Options select the Outer Glow, set the Blend Mode to Normal and the Opacity to 100%.
Step 41
In this step we are going to add some more light to make the complete picture more realistic. Open a new layer and name this "Light on Top". Set the foreground color to #ffffff and place a soft brush, with the Opacity at 100%, on various spots on the canvas. To do this use different brush sizes and sometimes lower the Opacity.
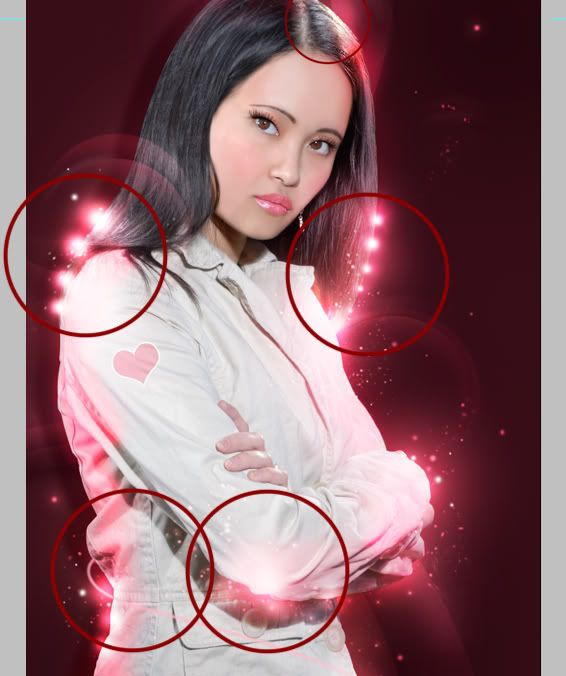
Step 42
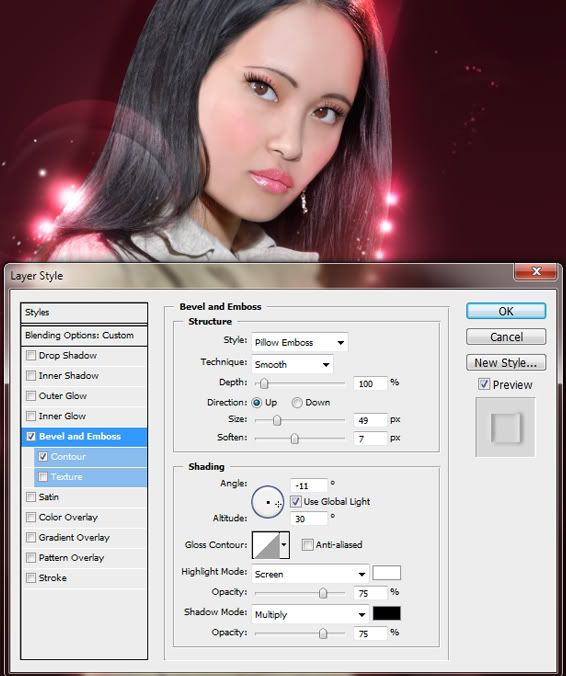
We have now almost finished. Open a new layer and name this "Heart 1". With the foreground color set at #ffffff, go to Custom Shapes Picker, choose a heart-shape and place this just to the model’s left. Now set the Layer Mode to Overlay and the Opacity to 25%. Using a soft brush, erase the right side of the heart-shape. Double-click on your layer and in Blending Options select Bevel and Emboss. Use the settings shown below.
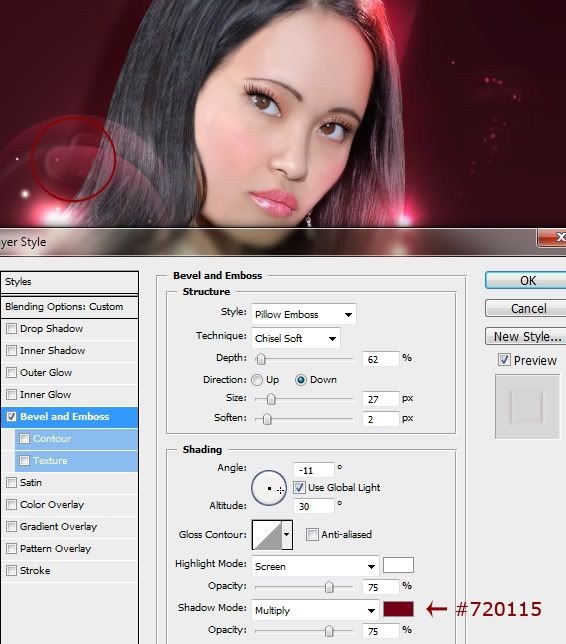
Step 43
Duplicate the "Heart 1 layer", make the heart-shape smaller and rotate this with the Transform Tool. Place the heart-shape in the circle, to the model’s right. Then set the Opacity of the Layer Mode to 33%. Take your Smudge Tool and spread it to the right, following the shape of the circle behind it. Once you have finished, also duplicate this layer and place it above the model to the right. Take the Smudge Tool again and distort the lower part of the heart-shape. Now set the Layer Mode Opacity to 16%.
Step 44
This is the final step of the tutorial: adding light effects to the left heart-shape. To do this open a new layer on top of the last duplicated layer and name this "Smudge". Set the Blend Mode to Screen, the Opacity to 84% and the foreground color to #cd637b. Take a soft 50 pixel brush with the Opacity at 100%, and place this on the heart-shape to the model’s left. Using the Smudge Tool, brush the round shape out to the right following the shape of the circle behind it.
Conclusion
You have now finished the tutorial. Remember that there are endless ways to retouch a photo. This was just one of my ways. Each photo is different, and because of this so is my approach. My preference is for high-resolution photos where you can clearly see the skin’s structure. Retouching is an art, especially when, after an intensive and dramatic intervention, you have still managed to leave the skin intact and that you can still see every single pore. Maybe this could be my next tutorial: a high-resolution close-up photo of the face, so you can truly learn the art of dramatic yet natural retouching.
Download Source File of this Tutorial


0 comments:
Post a Comment