The new Adobe Photoshop CS5 Extended is about to be released, it was announced already and among the new features there is one really special that is the Repoussé. This new feature or tool will allow us to create 3D objects extruding texts, selections, paths and layers masks. It's a really powerful tool and I had the chance to try it and now I will share with you one of my first experiments with it.

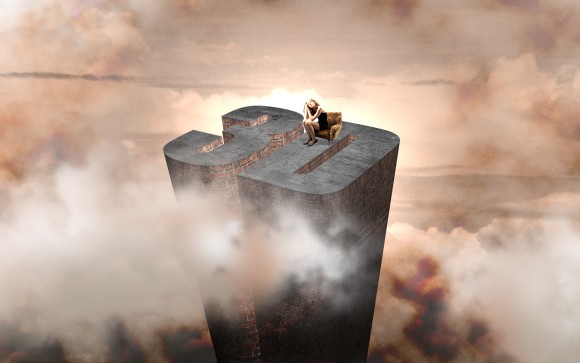
In this tutorial I will recreate an image of a tutorial I did for Digital Arts Magazine last year which I used Photoshop and Illustrator to create a 3D text with a girl on top of it, the tutorial was the CREATE MILE-HIGH TYPE ART. So this time I will do everything using just Photoshop CS 5 Extended with the Repoussé. I also want to mention that I'm still learning these new features/tools and I will try to share as much as I can with you guys and if you are using the beta of Photoshop feel free to share with us as well.
Repoussé is a new research system for the interactive enhancement of 2D art with 3D geometry. Repoussé creates a 3D shape by inflating the surface that interpolates the input curves. By using the mean curvature stored at boundary vertices as a degree of freedom, a user is able to manipulate the inflated surface intuitively and efficiently using a single linear system. - Adobe
Step 1
Open Photoshop CS 5 Extended and type with the Horizontal Type Tool (T) type the word 3D using Impact for the font.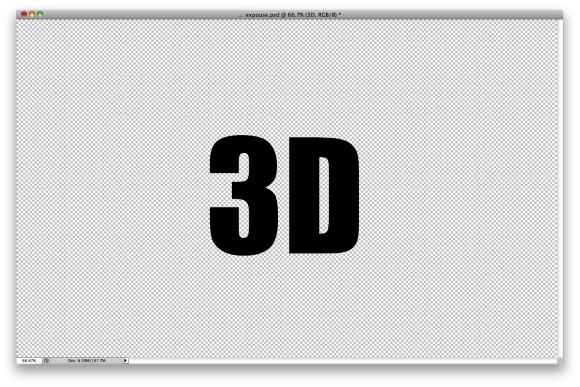
Step 2
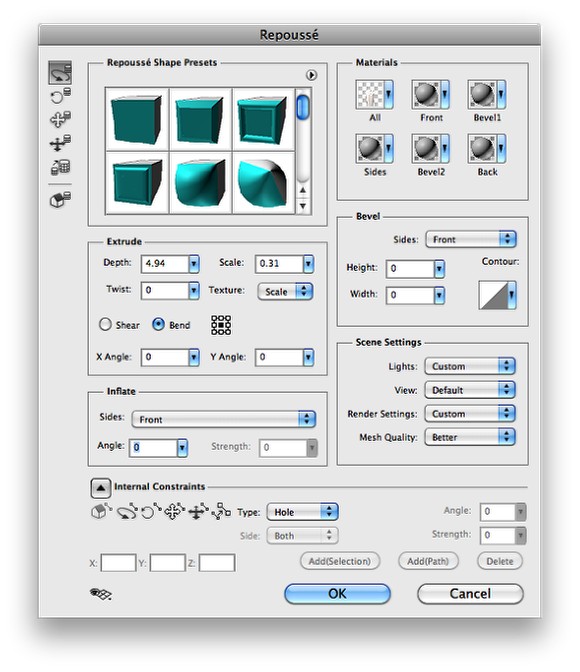
Go to 3D>Repoussé>Text Layer, this is the new 3D tool built-in in Photoshop CS Extended. With Repoussé we will be able to create all sorts of extrusions from text layers, selections and layer masks. In this case we will use a text layer.Once the Repoussé settings window is opened you will have quite a few settings. First you can choose from some Shape Presets, which have a basic extrusion, different kinds of bevels and other presets. For this tutorial I use the basic one but, I've changed the Extrude values to create the effect I wanted. You also have the Materials, Bevel, Scene and Inflate settings but I won't get into these right now because I'm still learning them and preparing new tutorials about them as well.
For the Extrude settings I used 4.94 for the Depth and 0.30 for the Scale so the 3D seems to be coming from the ground to up in the sky with a very strong perspective.
Another cool thing here is that you can rotate, scale and move the object around until you find the right position.
Step 3
This is the 3D text I wanted, in the past I would have to use another software like Illustrator or a 3D app such as Cinema 4D, now I can do that in Photoshop.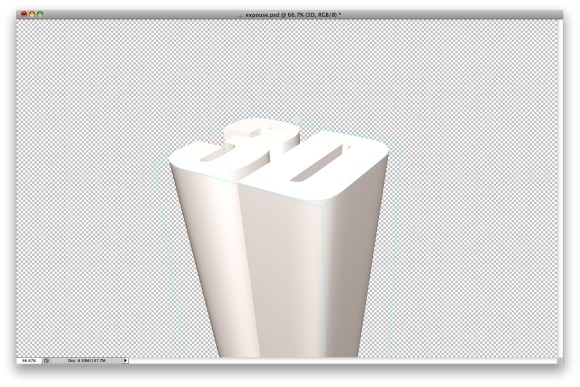
Step 4
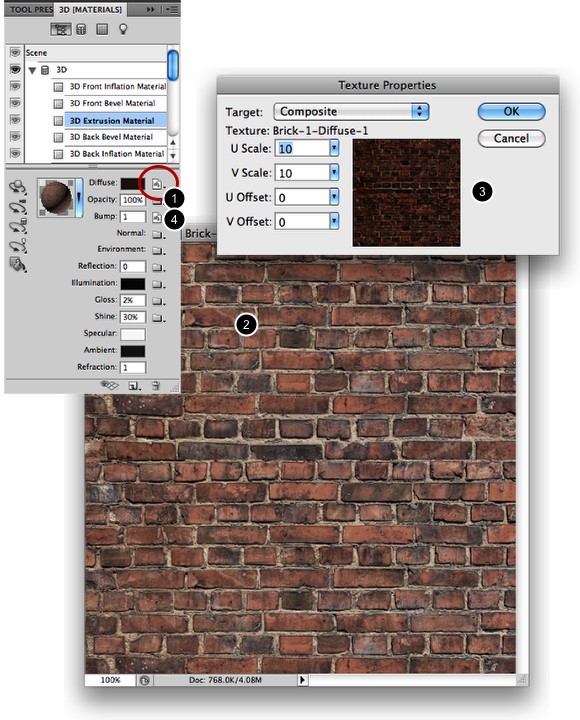
To add and edit textures is pretty easy as well. As in Photoshop CS 4 we have the 3D palette where we can edit our 3D objects, you can access this palette going to Window>3D. Select the 3D object and then you will have the 3D front Inflation, 3D front Bevel, 3D extrusion... all of these are the areas where you can apply materials. Select the 3D Extrusion Material and the on Diffuse click on the folder next to the color (1) and select Open Texture. The texture will be open in a new window like when you edit a Smart Objects. So in this window you can create your materialI'm using a brick texture from Shutterstock, you can find it from the web. So adjust your texture in terms of colors then save this file. Photoshop will automatically updates the 3D object adding the texture. If you want to make the bricks smaller just click again on the icon next to the color and select Edit Texture. A dialog box with Texture Properties will open where you can adjust the UV Scale and Offset. I used 10 for the U and V Scale.
The last thing here is apply the same texture to the Bumpmap (4). Simply repeat the same thing. The bump will add depth to the texture like the displacement map where the light areas go up while the dark areas go down.
Step 5
Now select the 3D Front Inflation Material and repeat the same thing we did in the previous step, this time however I'm using another texture, a concrete one which was courtesy of Shutterstock and you can find it from the internet search.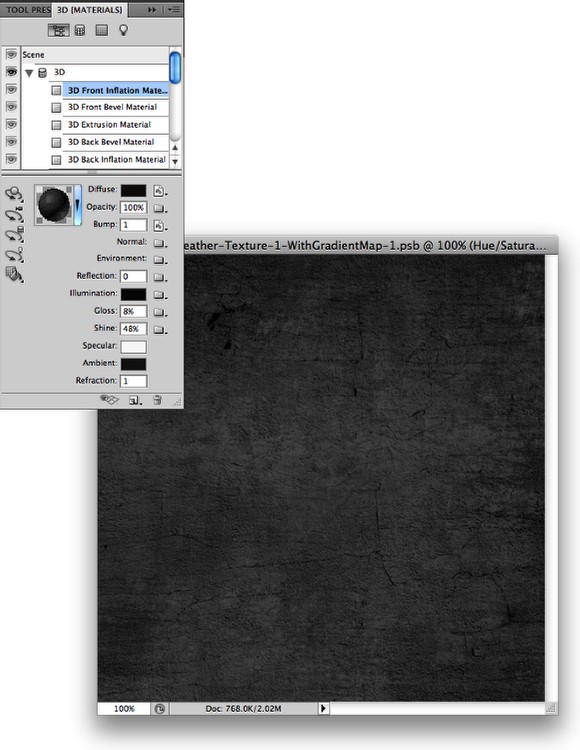
Step 6
Once you changed the materials this will be the result you will have. As you can see the whole process was much easier than if you have to do that using different tools and them exporting and importing in Photoshop.
Step 7
As you can see there is light as well. Yes you can add lights to make your scene more realistic. In this first part I have only one light. It's a Point Light with Intensity of 2. It also creates shadows, where I've changed to 100% of softness to make the shadows really soft.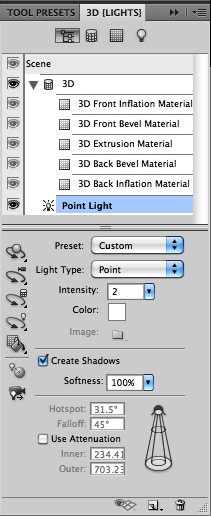
Step 8
In this step I started mixing the 3D object with 2D objects, in this case a photo I took from an airplane when I was traveling. I wanted to give a sort of warm feeling to my image so first I went to Image>Adjustments>Hue and Saturation and changed the Hue to -10, the Saturation to -65 and the Lightness to 10. Then I went to Image>Adjustments>Color Filter. I selected orange for the color and 50% density. Then at last, I went to Layer>New Adjustment Layer>Gradient Fill. I used grey and black for the gradient with Radial for the Style, so the grey would be in the center of the radial gradient. After that I changed the Blend Mode of this Gradient Fill to Color Dodge to create the sun behind the 3D text.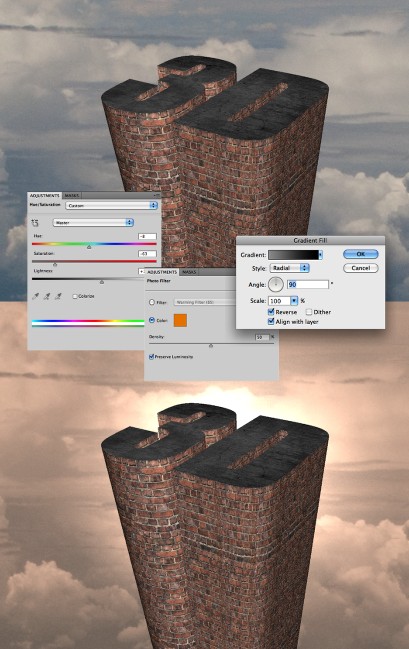
Step 9
Add a new layer on top of the other layers including the 3D object. Then make sure you have black and white for the color and go to Filter>Render>Clouds. Change the Blend Mode to Color Burn.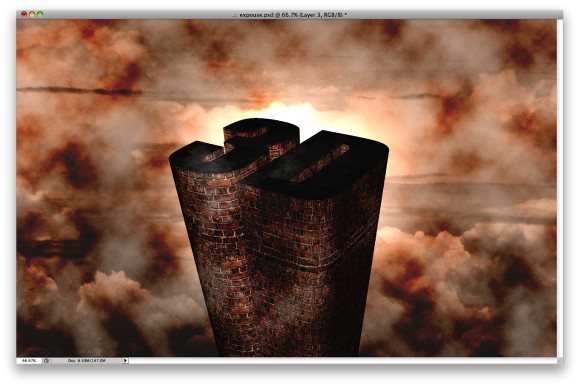
Step 10
With the Eraser Tool (E) delete parts of the layer leaving just the bottom part of the layer. Use the image below for reference.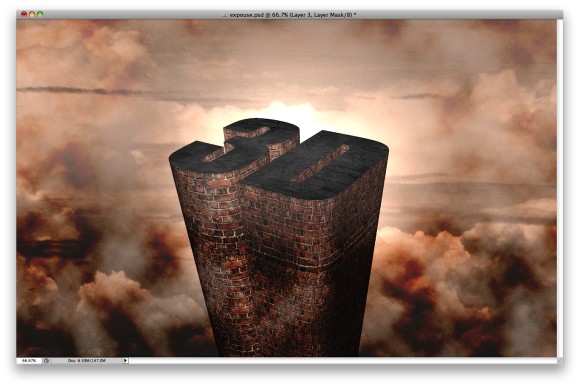
Step 11
I have already shown you how to create clouds using the Brush Tool (B), so let's do it again. Add a new layer on top of the others and go to Window>Brushes. For the brush settings use the image below for reference. The most important part is the Texture where you will selec the clouds pattern. It's also important to notice that if you increase the size of your brush you will have to increase the scale of the brush texture.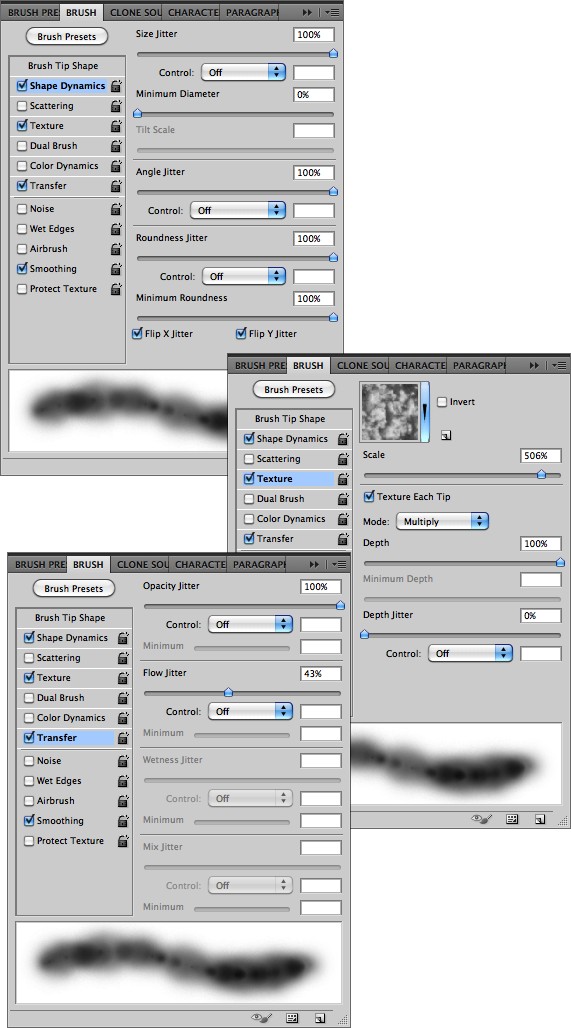
Step 12
Select the Brush Tool (B) and white for the color, then with the brush we created start painting some clouds. First paint just a few clouds like the image below (1-2)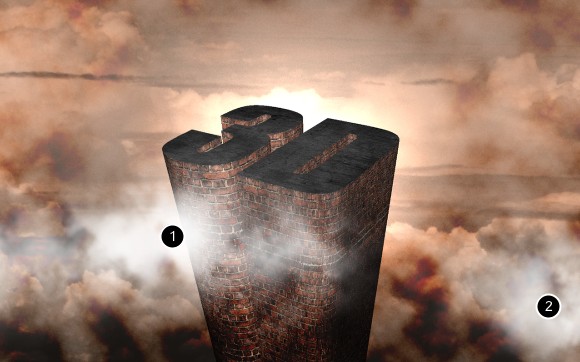
Step 13
Select a light brown now for the color and paint more clouds, especially over the white clouds we created in the previous step.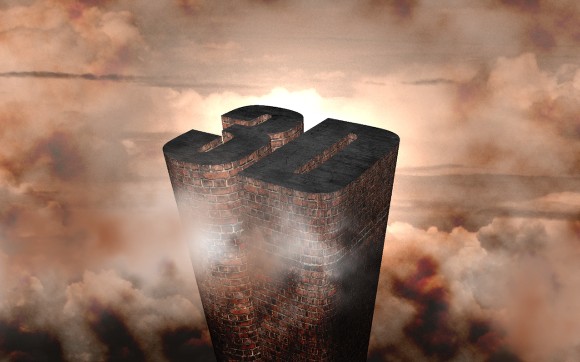
Step 14
Now select white again for the colors and paint more clouds. The idea of this 3 steps was to add depth to our clouds by adding some dark areas using the light brown.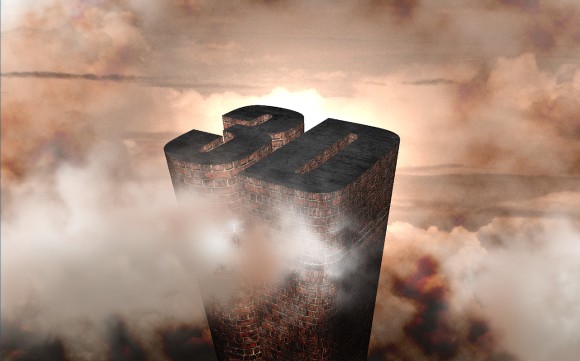
Step 15
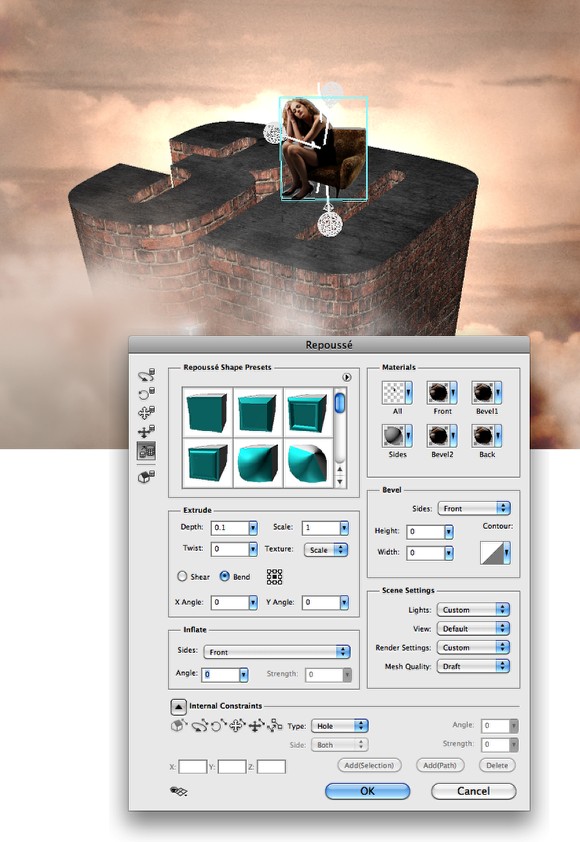
Import a photo of a person to add to our scene, I'm using a photo of a girl sitting on a chair which was courtesy of Shutterstock, you can find it also from the internet. After that extract the background of the image and copy it and paste it in our design. Select just the girl and the chair and then go to 3D>Repoussé>Current Selection.
Step 16
The idea here is to create a 3D object from a 2d photo so we can position it and create some shadows, but also to play and learn with the Repoussé tool. Change the Depth to 0.1 and the scale to 1. Remove the materials leaving only the front one. Now a very important detail, over the Internal Constraints, change the Type to Hole, that will create wholes in the areas that were transparent, otherwise Photoshop would render a big solid and it would ignore those transparent areas.Once again rotate, move and scale your object until you find the right position. You can do that later on as well.
Step 17
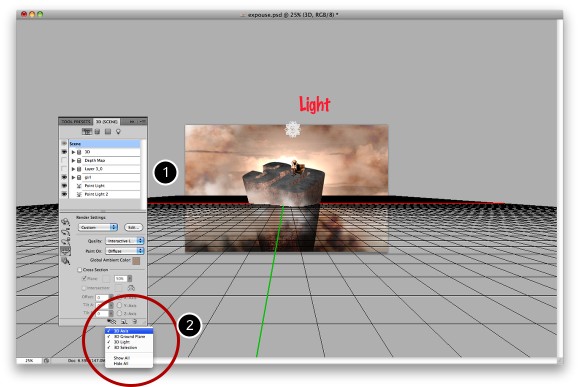
In order to create a 3D scene with the 3D text and the girl we will have to merge them in one 3D layer. To do that is simple, select the 3D layers and go to 3D>Merge 3D Layers. By doing that you will create one 3D layer only with both objects. So over the 3D Palette you will see the 3D text and the Girl objects where you will be able to edit them like scale, rotate, move and change the extrude options as well.
Step 18
Now the most important thing to do is to adjust your objects in your 3D scene (1). Move the lights so you can illuminate the scene properly and play around with other objects. As I mentioned before I'm still learning so the best thing to do is try different things, render a preview to see how it looks and try again.To see all the 3D objects click on the little icon at the bottom of the 3D palette, the one with the eye and select Show All. (2)
Step 19
The best thing with the Repoussé tool is that you can edit the 3D object anytime during your design process, so if you think a different position might look better you can do it or try a different illumination everything is possible.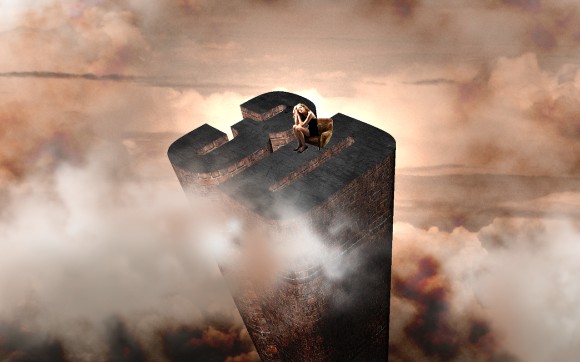
Conclusion
Once you position all your 3D elements there's one extra step to do that is different from the Photoshop workflow which is render the 3D object using the Raytrace Final mode. Photoshop then will render the object and create the shadows and details, it usually takes a few minutes to do that, but it's a necessary process. If you are used to other 3D softwares you already know that.
So basically in this tutorial/making-of I showed you a little bit of this incredible new tool that comes with the new Photoshop CS5 Extended. There are lots of things to learn and practice but I'm sure the Repoussé will be very useful for those, like me, that are trying to mix 3D objects with photos and other 2D objects that we are used to do in Photoshop.
4 comments:
knpa ya repoese saya ga bisa terbuka,,,
http://allgraphics42.blogspot.com/
here is a blog about similar things.
kul chop, is rocking
photoshop cs 5 new version is perfect solution thanks.
PerfectCracks.com
Post a Comment