Final Product What You'll Be Creating

Tutorial Assets
The following assets were used during the production of this tutorial.(Click to The Image for Large Size )
- Clouds and Water
- Hand 32
- Default Photoshop’s Puzzle Texture (In case you don’t have it you can search for something similar)
Step 1 – Creating a New Document
Go to File > New and create a new blank document, on the dialog set Width and Height values to 600px, and Resolution to 72. Set the background color to White, and hit OK.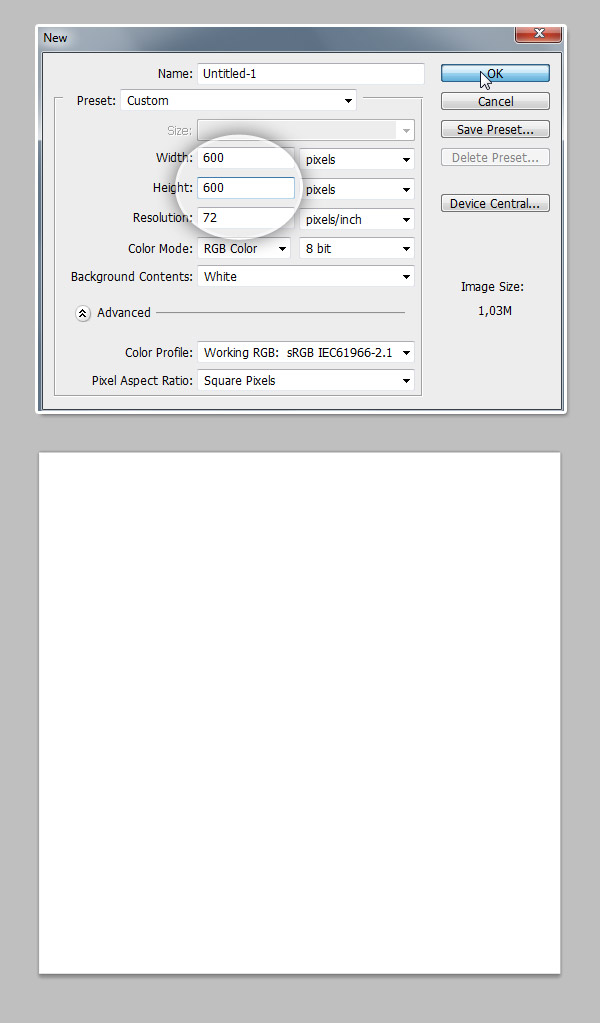
Step 2 – Color Fill Layer
At the bottom of Layers Panel, click on the Create new fill or adjustment layer icon and select Solid Color… on the color picker set the color to: #C7C7C7 which is a nice gray, and hit ok, now you have a fill layer to work with.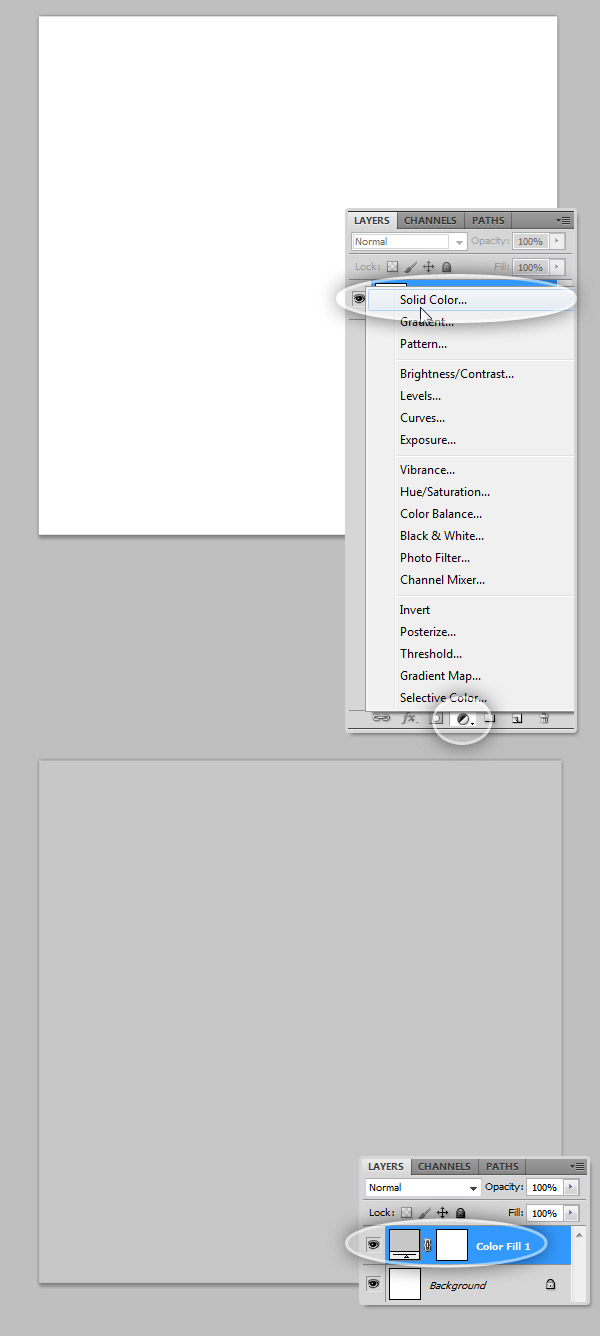
Step 3 – Create a 3D Sphere From a Layer
Now let’s start with the main element of this tutorial: the actual sphere. Select the previous’ step Fill Layer on the Layers Panel, then on the menu bar click on 3D > New Shape From Layer > Sphere. This process will create a nice gray sphere on your document, you can edit it this layer as a 3D object, rotate it, scale it, and more… we will see how to do it forward. Change the 3D Layer name to "Sphere" on Layers Panel.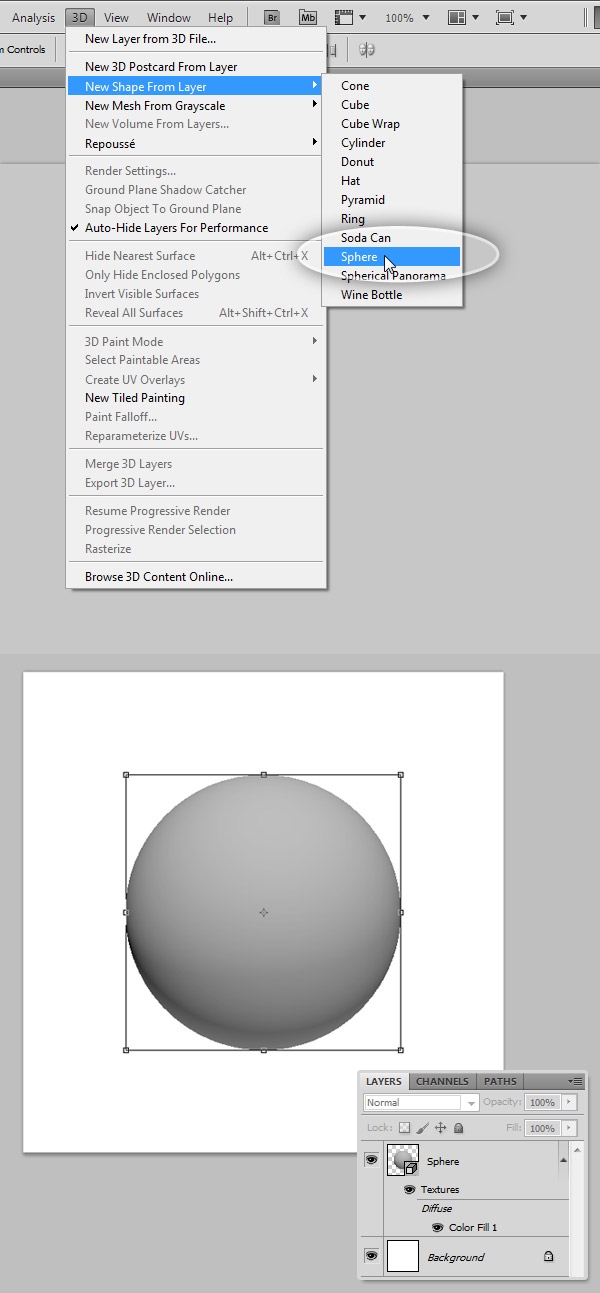
Step 4 – Scale the 3D Object
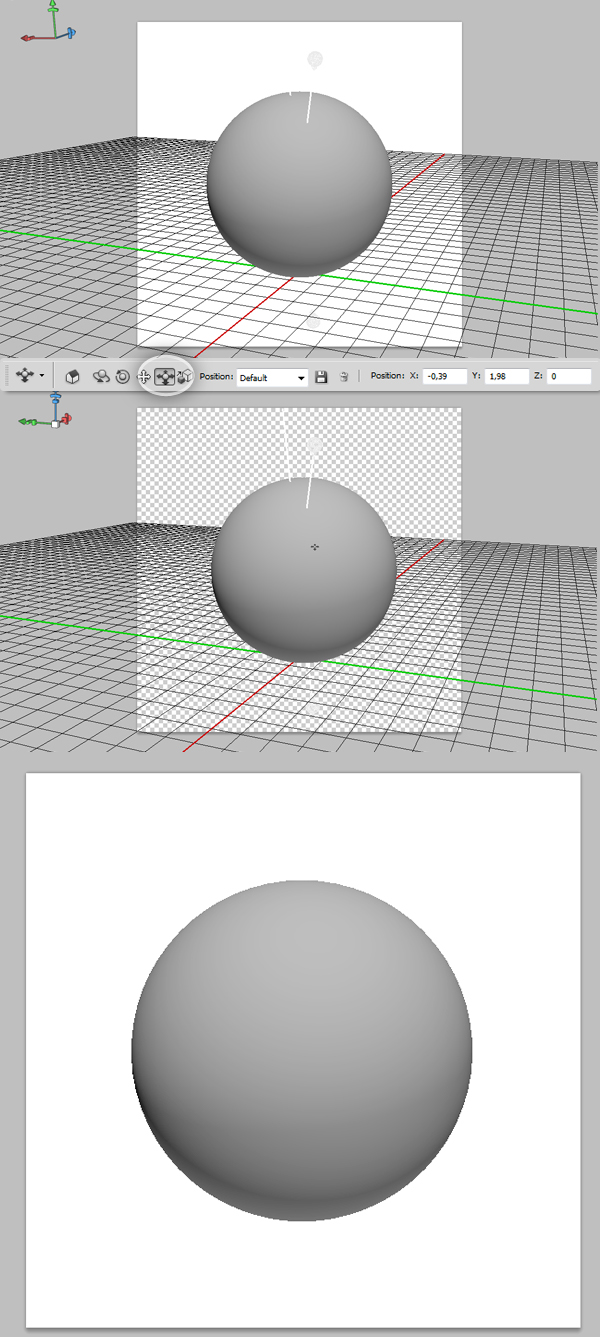
Now we will slide the sphere a little bit to make it look closer to us using the Slide Tool under the 3D tools. On the Tool bar, look for the 3D tools section, by default the active tool is the 3D Object Rotate Tool, click and hold over it to see the different options, you can see them as well on the Options Panel which is on top of the Photoshop Workspace. Select the 3D Object Slide Tool, click and drag cover the sphere to slide it front and back, try to get something like the bottom of the following image.If you want to dig into the 3D Tools, you can take a look at this Basic Guide, which describes all the different options of Photoshop’s CS4 3D Tools.
Step 5
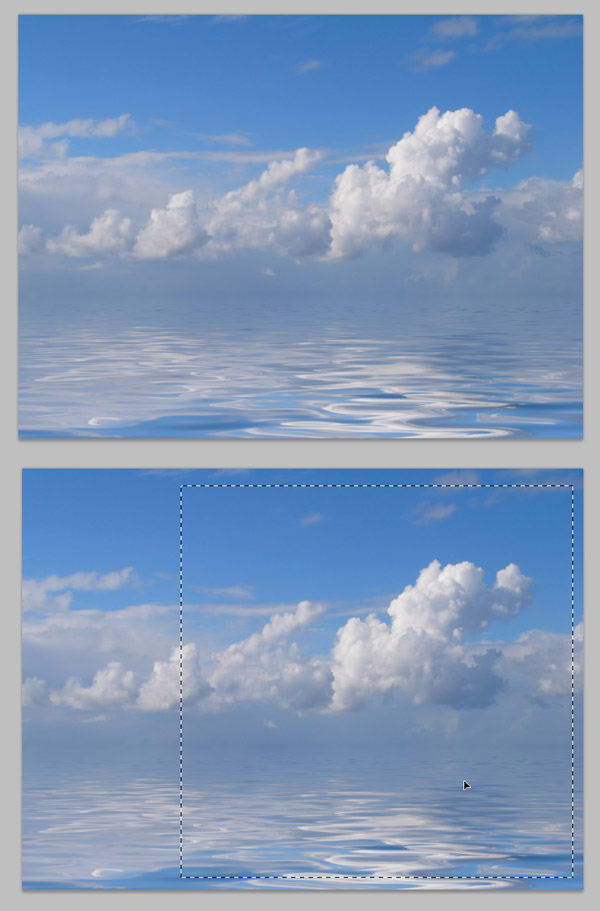
We will add a reflected texture to our sphere, but first we need to edit the texture to have it ready. Open the "Clouds and Water" image. We will edit this image in order to leave it ready to be applied as a texture, this is an optional step, you can skip it and jump to the Step 8 and apply the texture image as is.I rather prefer doing the following edition before creating a texture to avoid undesired sharpen areas with ‘lines’ on the texture. Using the Rectangular Marquee Tool, select a perfect square from the picture (you can hold the Shift key while dragging to have a squared selection) then Copy (Command/Ctrl + C) the selection.
Step 6
Create a New Document, set the Width and Height values to 1200px and the Resolution to 72 pixels per inch. Paste the copied image and using the Move Tool (select the Show Transform Controls checkbox on the top Options Panel) scale the pasted image in order to exactly match the new document boundaries.Then, go to Filter > Other > Offset, on the dialog change the Horizontal value between 500 and 600. You should have something like the bottom of the image below.

Step 7
Next we need to hide the line dividing the image, on the Tools Bar, select the Clone Tool, holding the Option / Alt Key, click on a spot which will be the source of the cloning, then paint as if you are using the Brush Tool all across the merging line. Try to get something like the image below. Finally save the document with a descriptive name like "sky texture.psd".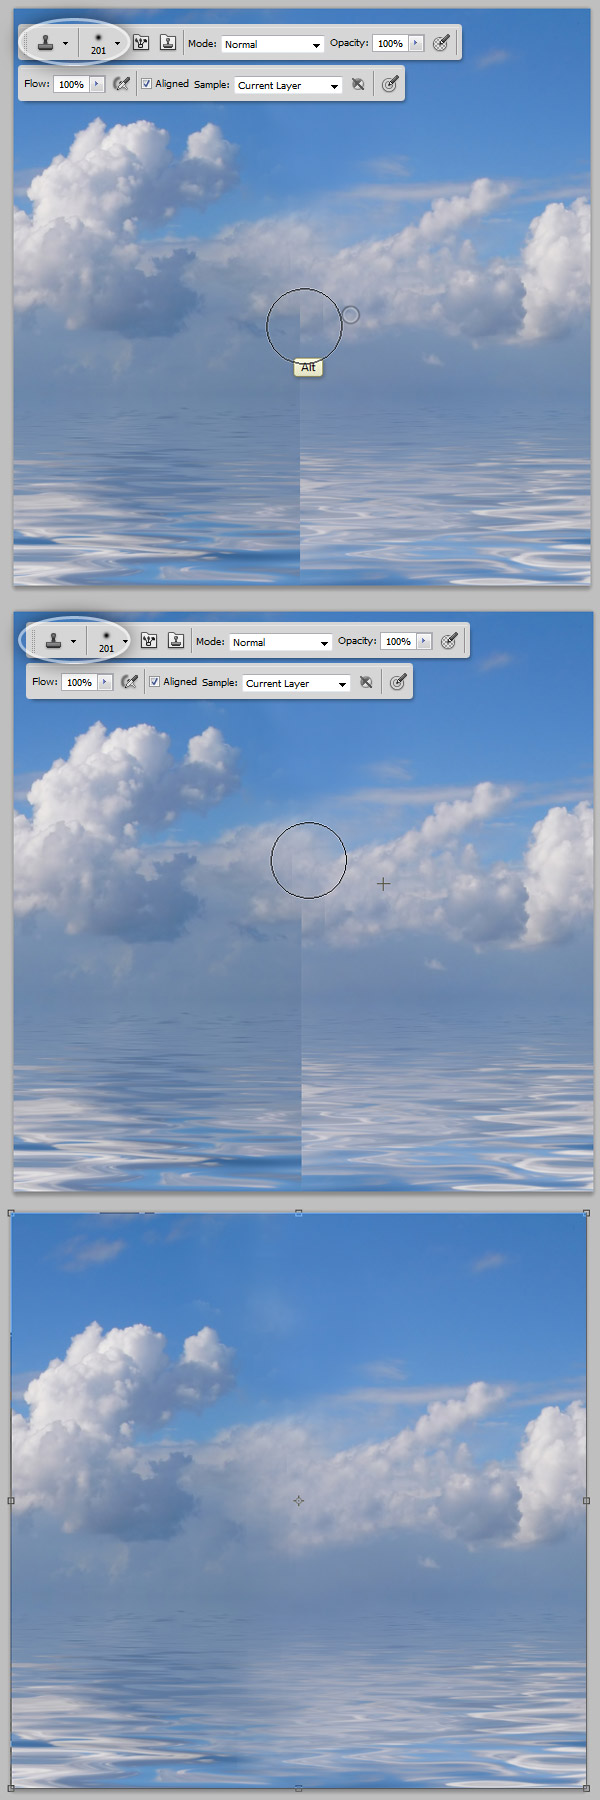
Step 8 – Reflection
Select the "Sphere" on the Layers Panel, open the 3D Panel (Window > 3D). Click on the three icon from the top to show only the Material options, on the list below select the Sphere_Material, on the options at the bottom of the Panel, set the following values: Reflection: 50, Gloss: 80% and Shine: 50%. Now the sphere is looking shinier.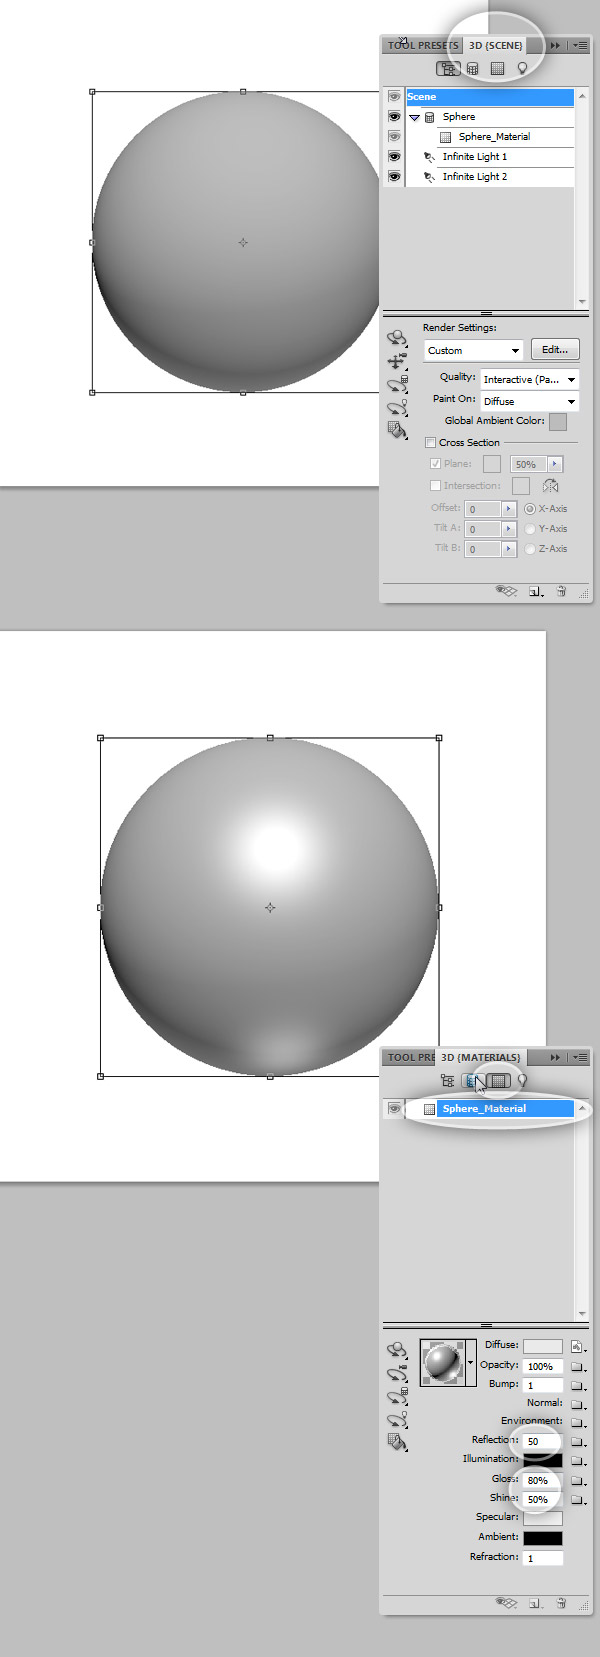
Step 9 – Bump Texture
Still under the Materials option, Click on the tiny folder next the Bump value, select Load Texture and browse to the texture folder on your Photoshop Installation, (Presets/Textures). In case you don’t have it, you can Google any other puzzle pattern, just ensure the patter is black and white. When you select the pattern, hit OK and see the result, you can use the 3D Object Rotate Tool to look the Bump Texture being applied.
Step 10 – Polishing the Puzzle Texture
Click again on the tiny folder next to the Bump Value, there click on Open Texture… a new window will be opened with the plain texture. On the new window, adjust the Levels (Command/Ctrl + L) and set the values as shows the screenshot below, save the texture document and save it, then back to the main document you’ll see the change.
Step 11 – Scaling the Bump Texture
The pieces are looking a little bit big, we will scale the texture a little bit, on Bump Texture’s tiny folder icon, select Edit Properties. On the opening dialog, set the U and V Scale values to 1,2. This will reduce the pattern size a bit. It looks good so far, let’s add more details to our Sphere material.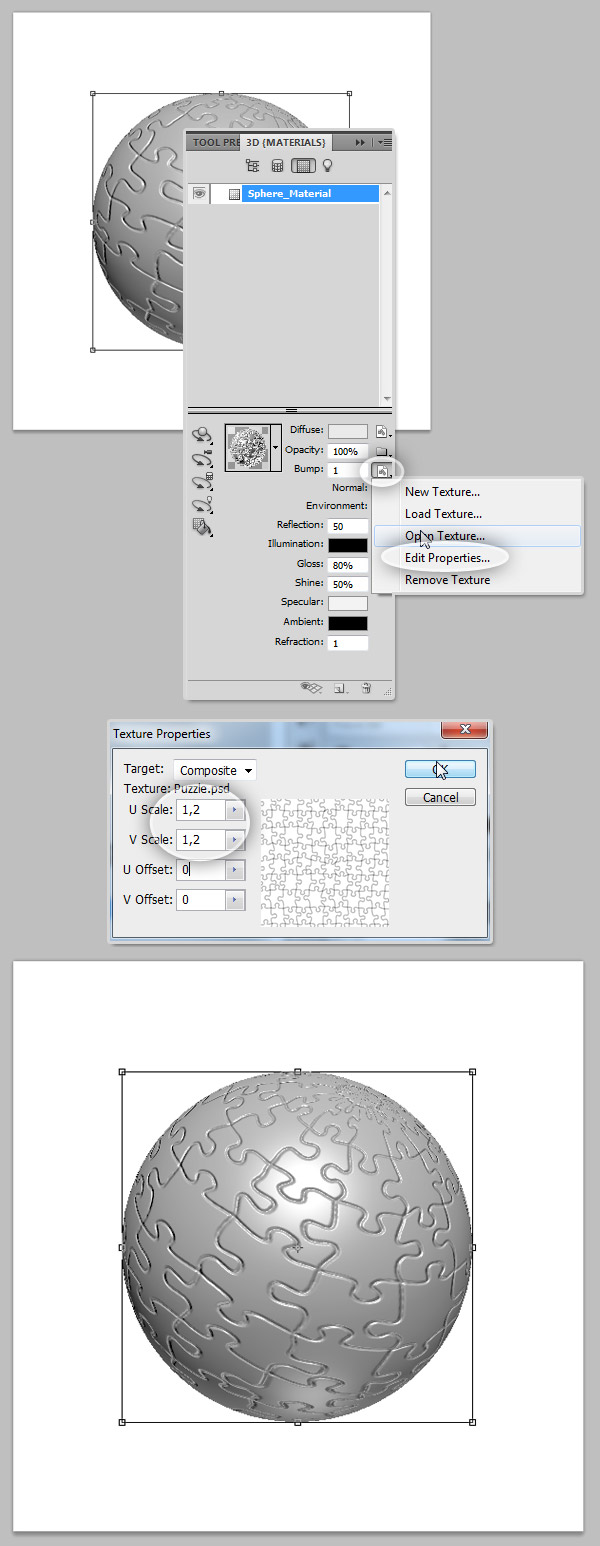
Step 12 – Image Light
On the 3D Panel, click on the fourth little icon from the top to show the Lights options, then on the bottom of the Panel click on the New Light button and select New Image Based Light. On the tree at the top of the lights panel, click on the brand new image light, and on its options click on the little folder next to Image, select the Load Texture option and load the "sky texture.psd" texture we created before. Set the Intensity to 0,5.If you want to, back to the Materials Panel, and reduce the intensity of the Reflection to 30.

Step 13 – Set the Final Size and Position
Rotate and Scale the sphere using the 3D tools. On the 3D Panel, click on the first icon on the top, you’ll see the Scene Options, there click on the Scene on the top list, and below set the Quality value to Ray Traced Final, this option will render the image with the highest quality possible, and there you will see if the texture and the reflection looks good.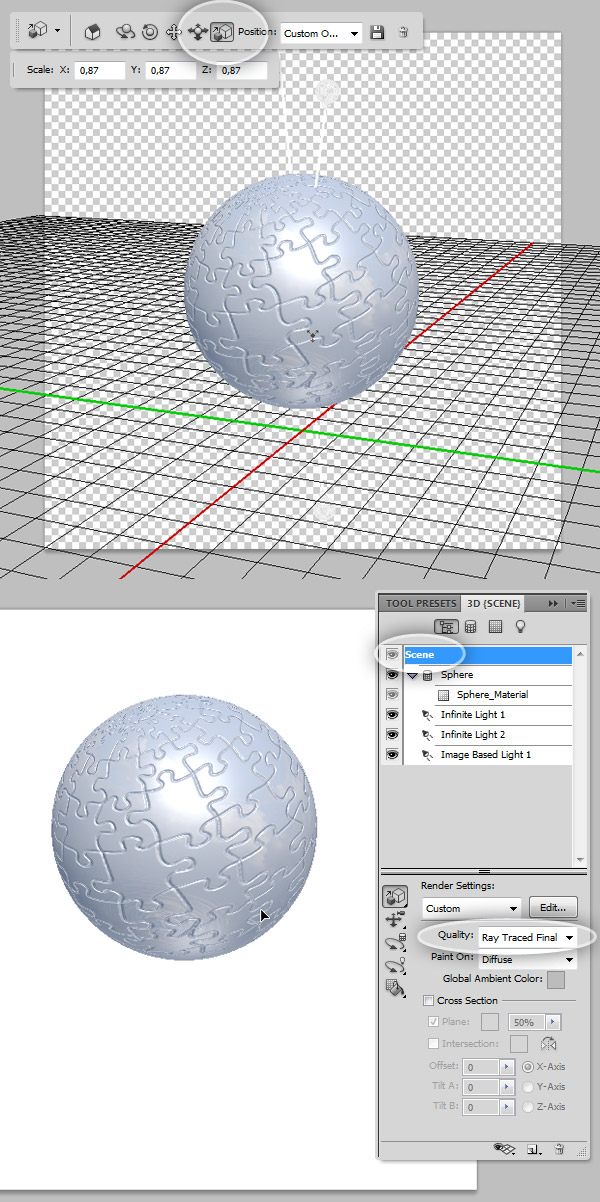
Step 14 – Add the Hands
Open the "Hands" picture from the assets, copy it and paste it on a Layer over the 3D sphere (Tip: you can drag the image over the document and a Smart Object of it will be automatically created). Resize it using the Move Tool and the Transformation controls trying to match the hands’ concavity with the sphere radius.Ensure the "Hands" Layer is above the 3D "Sphere" Layer, select the layer and on the Layers Panel, set the Opacity Value to 50%, this way you will have a better look of the hands’ position.
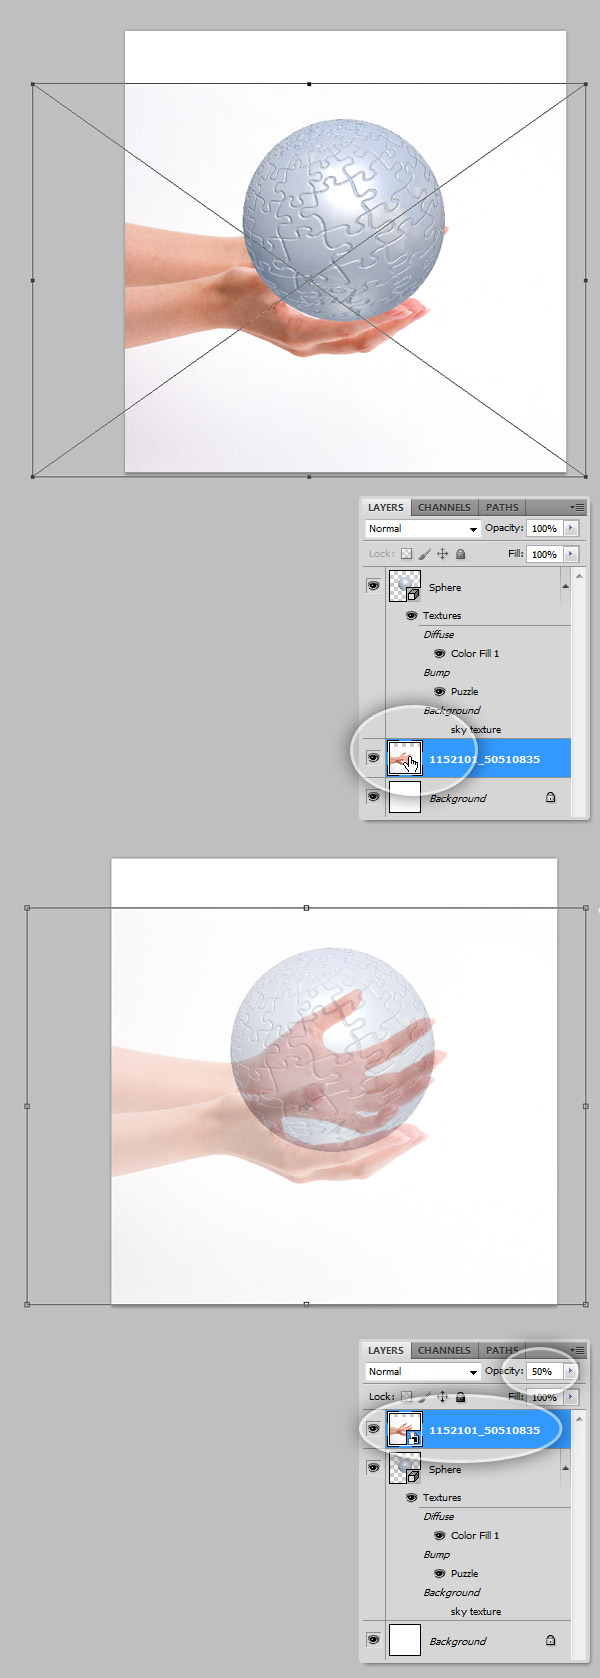
Step 15 – Circle Marquee
Turn back the opacity of the "Hands" layer to 100%, with that Layer selected, Command/Ctrl + click over the 3D "Sphere" Layer. This process will create a circular selection active over the "Hands" layer.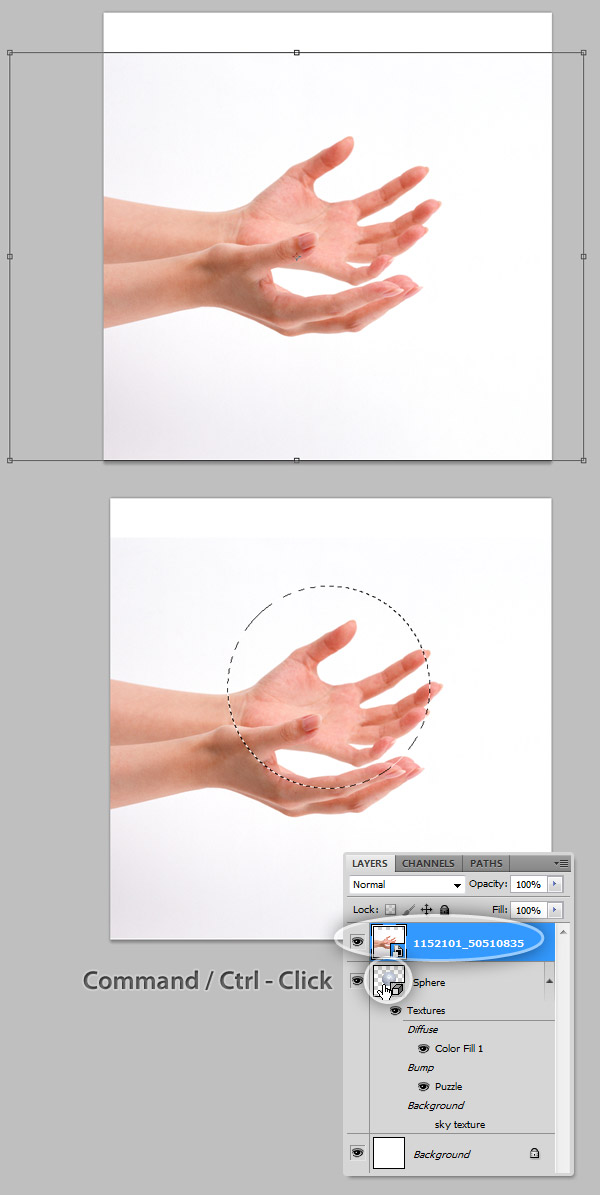
Step 16 – Subtracting Areas of the Circular Selection
Without deselecting the circular marquee, down the Opacity of the "Hands" Layer to around 50%. Then, on the Tools Panel, select the Lasso Tool, on the Option panel on top click on the Subtract From Selection option. Then draw a selection covering the right hand’s thumb, part of the palm and the fore finger, close the selection and this area will be subtracted from the circular selection. Finally turn the Opacity to 100% again.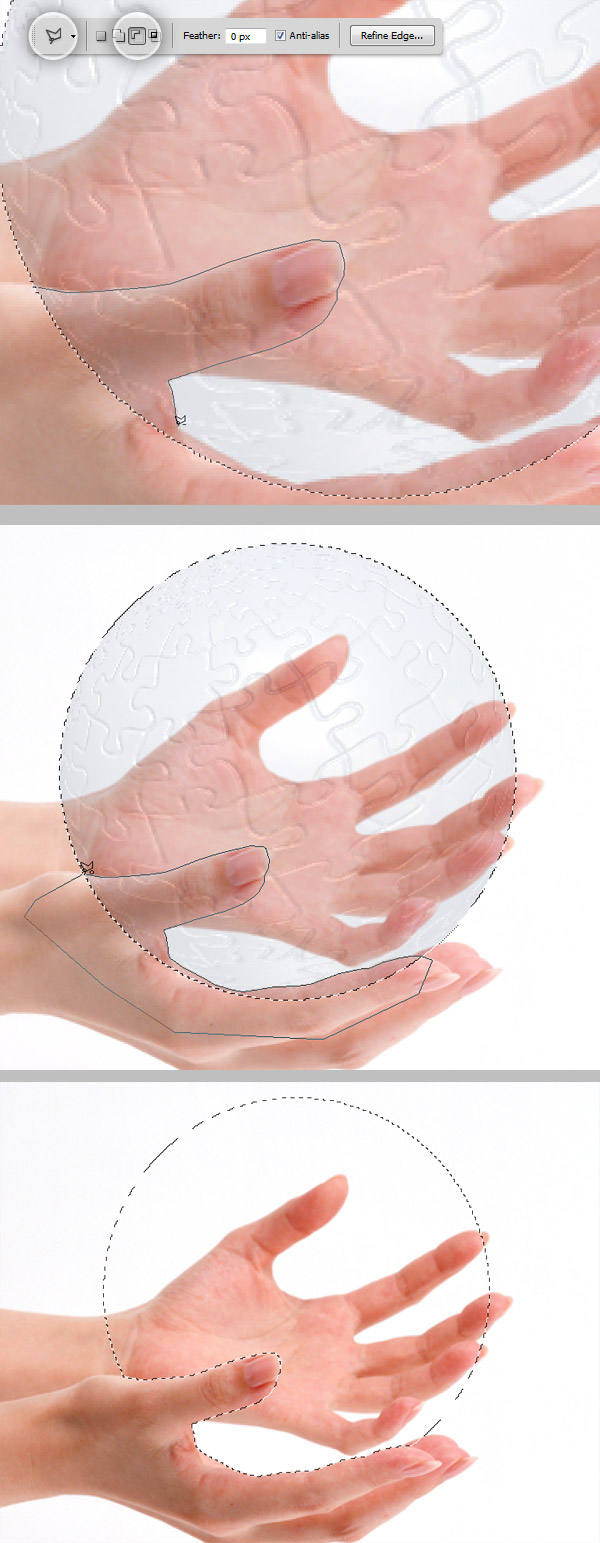
Step 17 – Masking the Hands
Always with the "Hands" layer selected on the Layers Panel, go to Layer > Layer Mask > Hide Selection. If you make it right, the sphere will show up nicely placed over the hands. Then hit Command/Ctrl + D to remove the selection.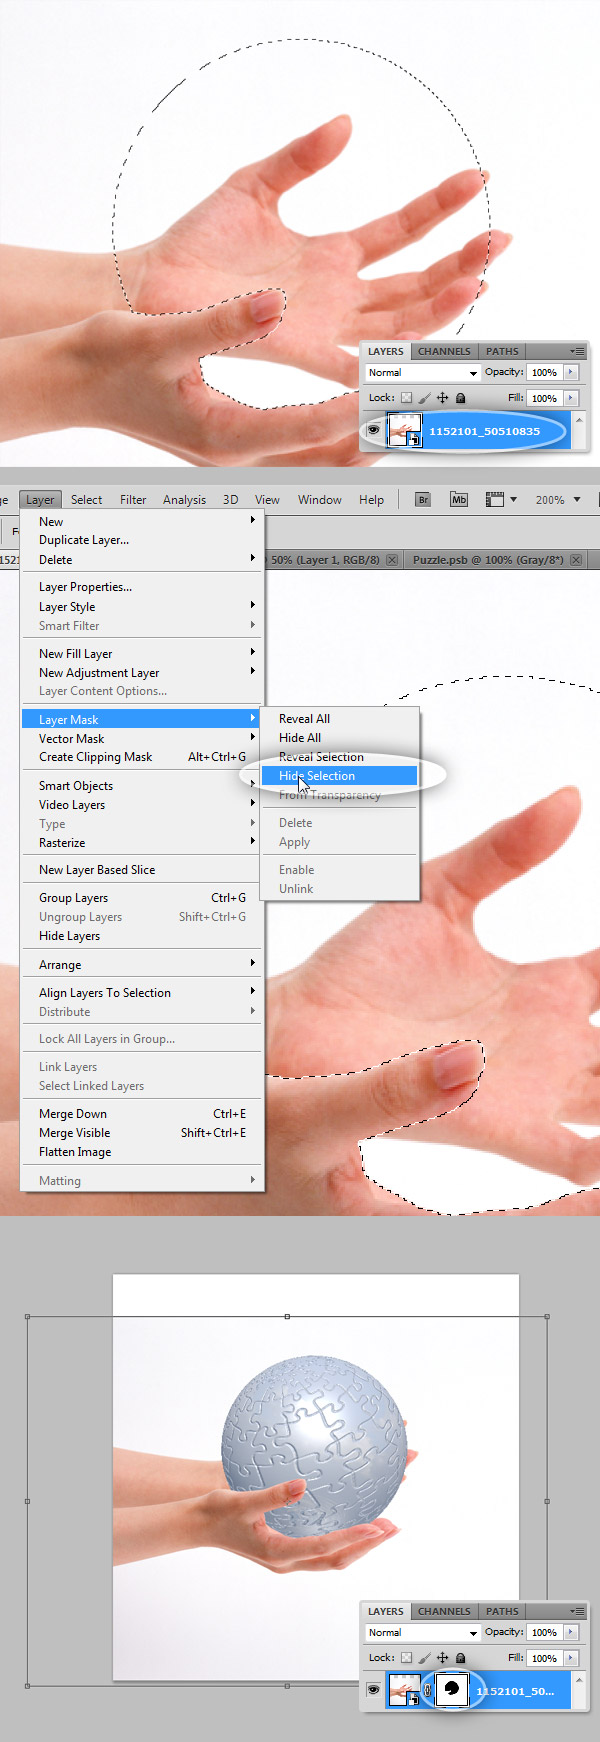
Step 18 – Adjust the Hands Saturation
Now, Double click on the hands Layer, since this is added as a Smart Object we cannot edit it directly, if you just copy and paste it, there’s no need to double click. Either on a new window, or on the same document, hit Command/Ctrl + U to open de Hue Saturation Adjustments Dialog, there set the values shown on the screen shot below and press OK, the hit Command/Ctrl + L to open the Levels Adjustment window, set the values shown below and press Ok. Finally, Save the document and close it (in case you are working over a Smart Object).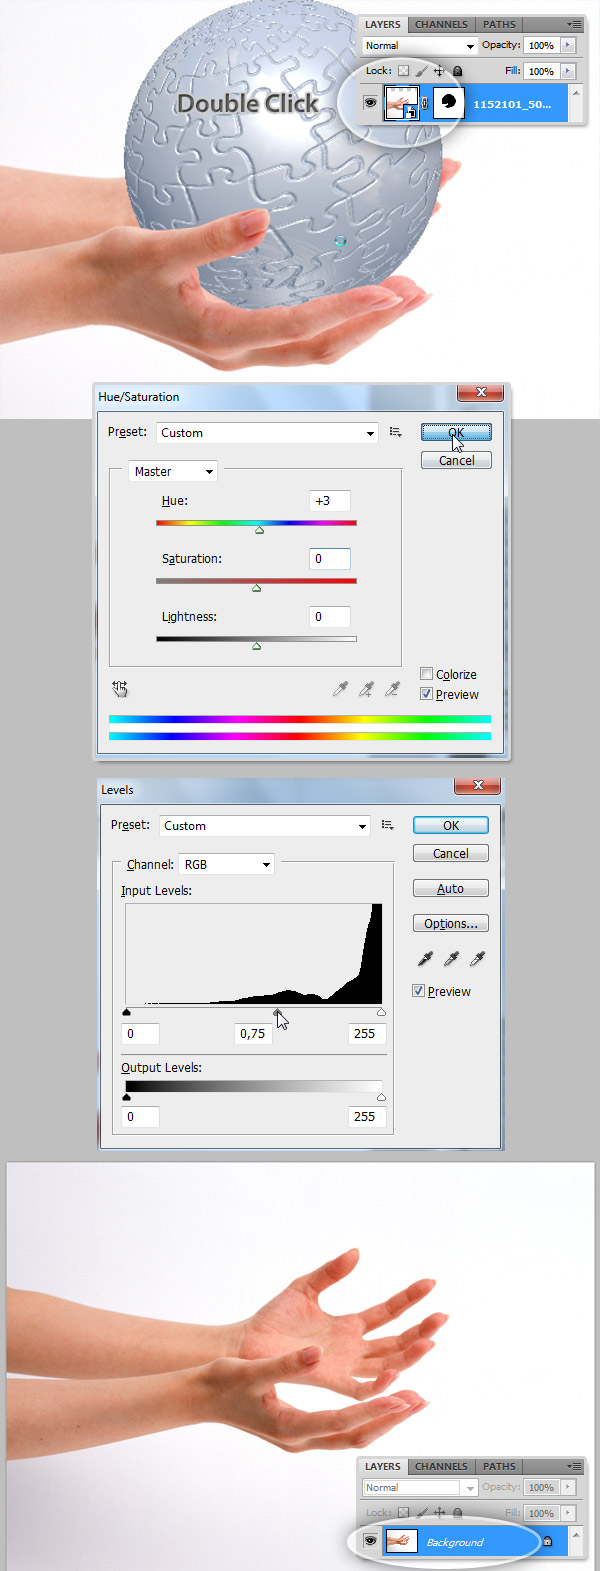
Step 19 – Masking the White Background
Once again, select the Hands Layer, then using the Magic Wand Tool and setting the Tolerance Value to 16 on the Options Panel, click over the White area of the image. This process will create a quick selection all around the hands. Next, Option / Alt – Click the Layer Mask miniature on the Layers panel to show the actual mask, there using the Paint Bucket Tool fill the selection with Black (#000000) and remove the selection (Command/Ctrl + D). Then, click over the "Hands" layer miniature to see how it looks, the best way of check if the extracting is good, is by changing the background color for a moment for a darker variant, like dark gray or white, and then switch it again as shows the bottom of the image below.
Step 20 – Adjusting the Lights
Select the 3D "Sphere" once again, on the 3D Panel, select the Scene Options and find under the Scene elements the Infinite Lights, by default two lights are added. Select the first light and on its Options set the Intensity to 0,9. If you need to, you can move the Light Position using the particular tools for this element, by clicking on the Rotate Tool but not the one on the Tools Bar but the little tool on the Options panel on the 3D Window.For the Infinite Light 2, set the Intensity to 0,4 and rotate its position behind the hands.
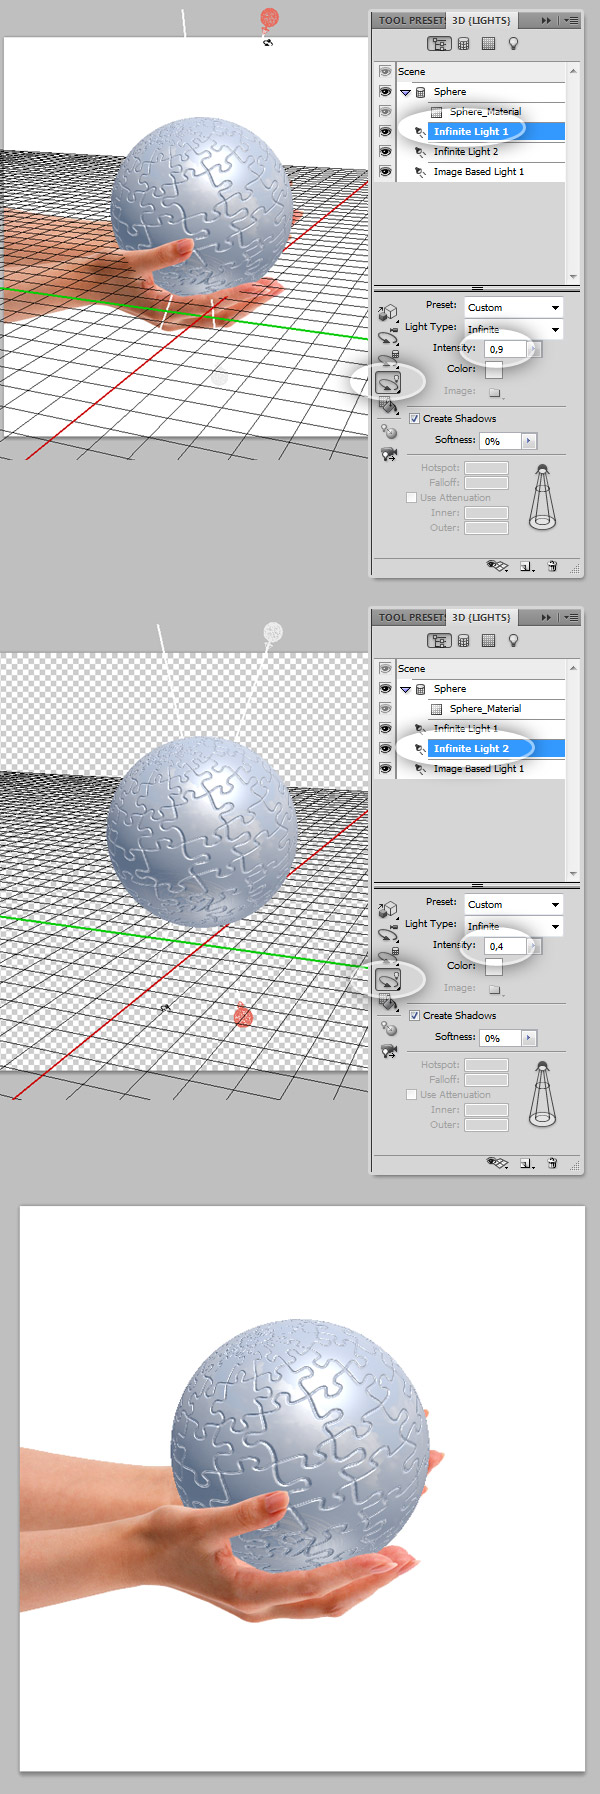
Step 21 – Rasterize the Sphere
Click on the Scene and under Render Settings select Ray Traced Final. Then duplicate the 3D Layer by dragging it on the Layers Panel to the tiny New Layer icon at the Bottom, then select the copy, Option Click over it and select Rasterize, then hide the original 3D Layer.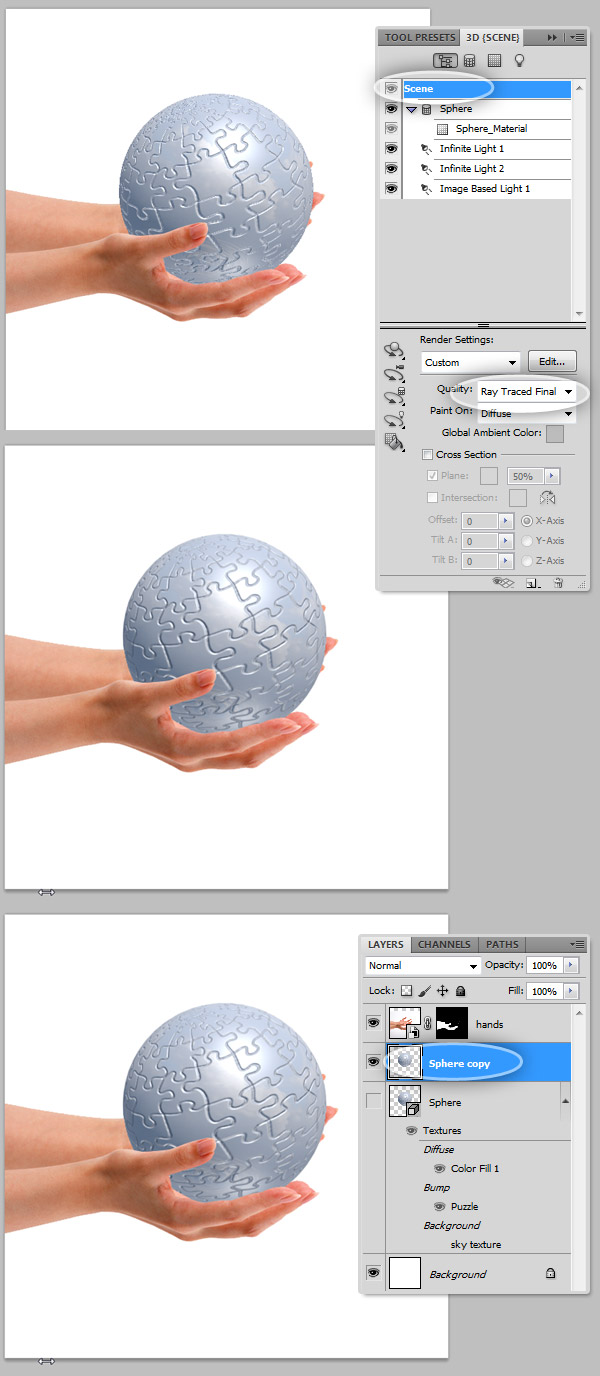
Step 22 – Remove Some Pieces
Working with the rasterized copy of the 3D sphere, select the Lasso Tool from Tools Panel and draw a selection around a piece of the puzzle (it can be any piece). Then, Cut (Command/Ctrl + X) the selection and Paste (Command + V) the piece above the "Sphere copy" layer, repeat this step with as many pieces as you want.
Step 23 – Fill the Inside of the Sphere
Command/Ctrl + Click over the hidden 3D "Sphere" Layer to create a circular selection. Then, create a new layer behind the "Sphere Copy" layer and name it "Sphere BG", using the Paint Bucket Tool fill the selection with the following color: #292929 and press Command/Ctrl + D to remove the selection.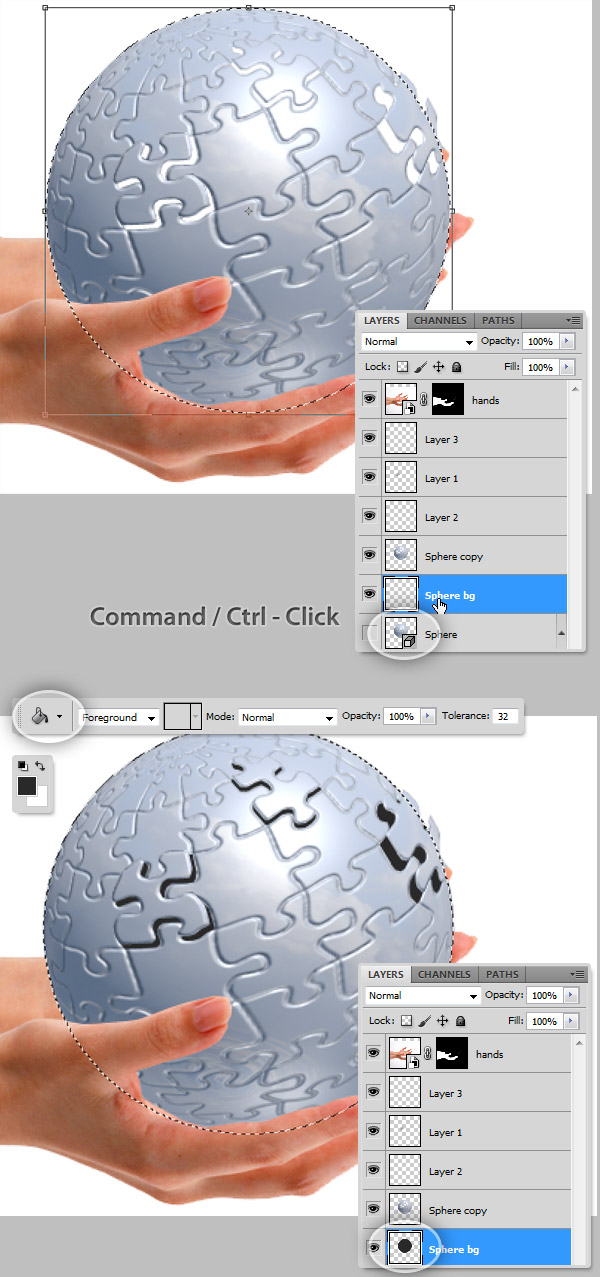
Step 24 – Polish the Cut
Select the Eraser Tool and on the options panel set a brush tip size of around 2 px, then on the "Sphere Copy" layer delete all the possible imperfections on the missing pieces’ holes.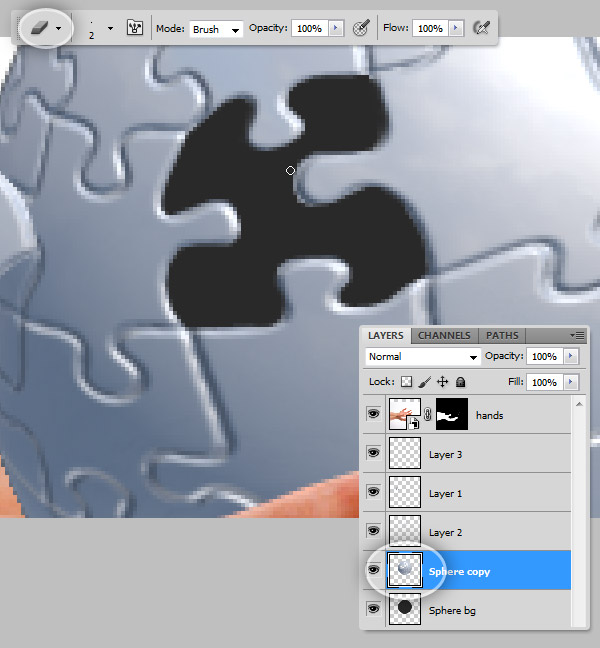
Step 25 – Create a Shadow for the Floating Pieces
Select one of the extracted pieces, on the Layers Panel, drag the piece layer over the New Icon at the bottom to duplicate it, then using the Move Tool, move the copy a few pixels down and left (or right if applies). Then, still with the "Piece Copy" layer selected go to Layer > Layer Style > Color Overlay and set this color: #262B2F. Now repeat this action with all the other extracted pieces.
Step 26 – Dodge and Burn
Working over the pieces, select the Dodge Tool and set a soft Brush Tip on the options panel, then start highlighting some areas on the extracted piece, repeat this process wherever you consider it necessary.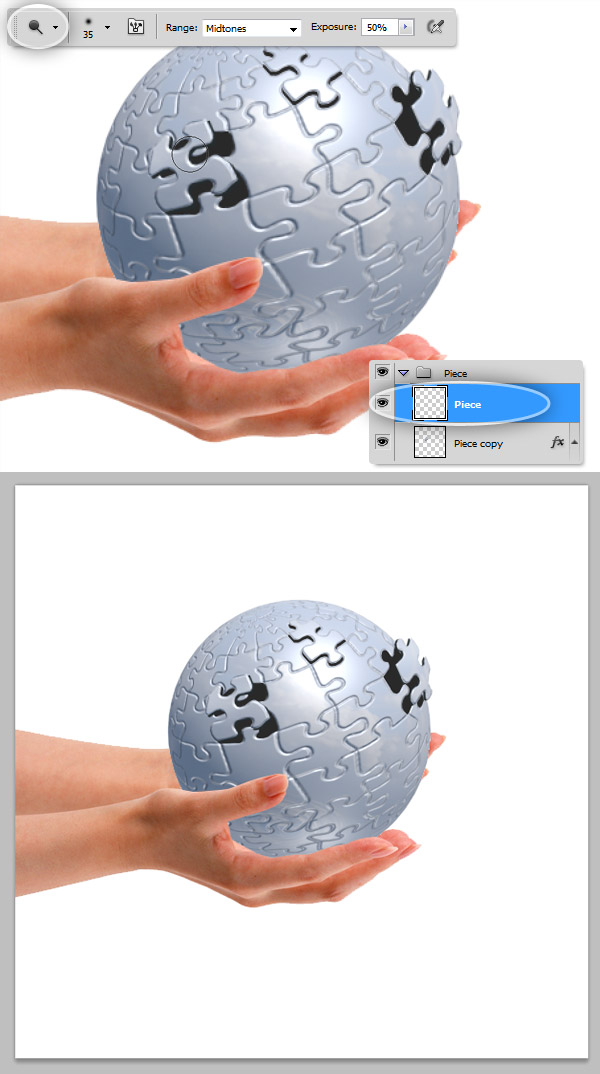
Step 27 – Add an Effect to the Sphere Inside
Select the "Sphere Bg" Layer, and go to Layer > Layer Style > Gradient Overlay, set a Radial Gradient using the following colors: #2C2D31 and #606165.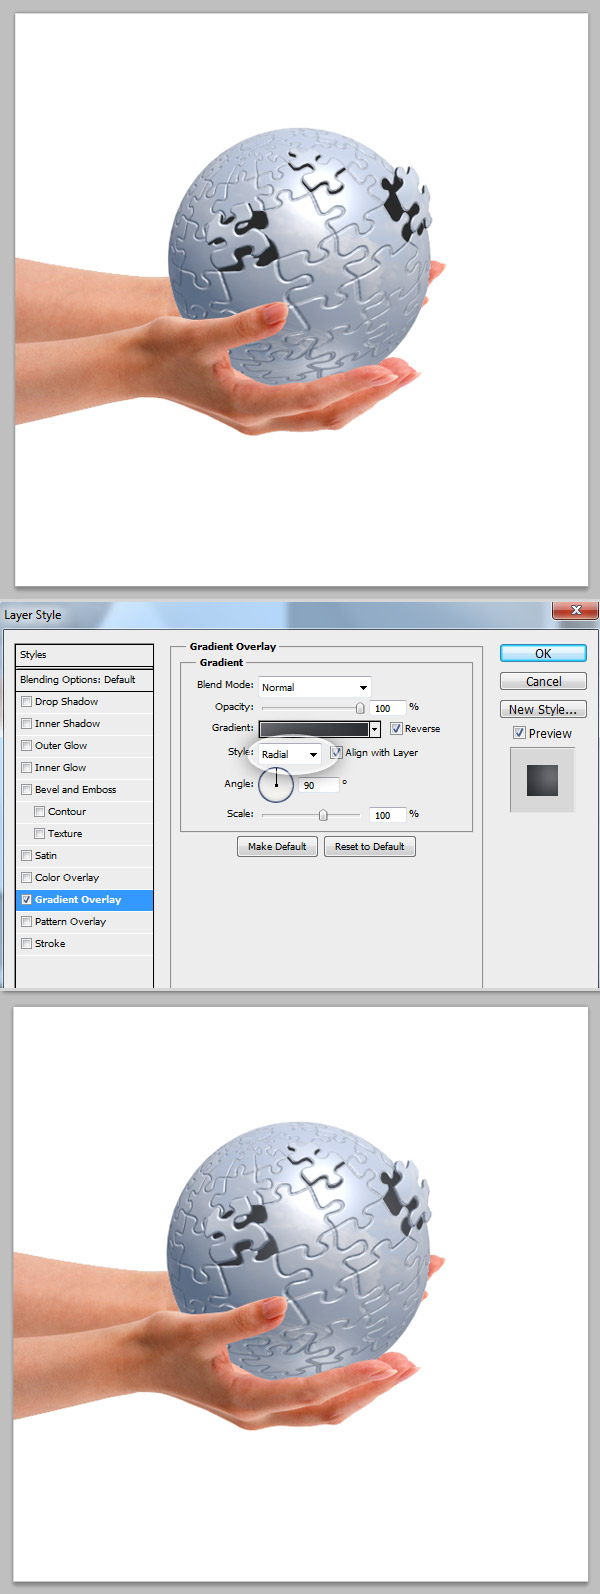
Step 28 – Puzzle Inner Shadows
Sometimes using a plain Filter is not enough to create a determinate effect, in this case add an inner shadow to the holes of the missing pieces. Using the Magic Wand Tool make a selection of the hole on the "Sphere copy" layer, then select the "Sphere bg" layer and copy the selection and paste it just above the "Sphere bg" layer. Next, Command/Ctrl click over the recently pasted layer miniature on the layers panel, select the Marquee Tool on the tools panel and move the selection a few pixels down left (or right if applies) and delete the selection. Repeat this process with all the holes of the floating pieces.
Step 29 – Hands’ Shadows
Let’s add the hands’ shadows, create a new layer named "Hand Shadows" above the "Sphere copy" layer. Using a 40px Brush Tool (Hardness 0%) Color: #292929 and Opacity and Flow to 50% paint the shadows over the sphere as shows the image below.
Step 30 – Dodge and Burn the Hands
Select the "Hands" layer and use both the Dodge and Burn Tools to adjust the lights and shadows trying to match the overall scene.
Step 31 – Gradient Background
Go to Layer > New Fill Layer > Gradient… behind all the other layers. Set the gradient colors to #FFFFFF and #D8DCDF and Style: Radial. Move the position of the gradient as you prefer.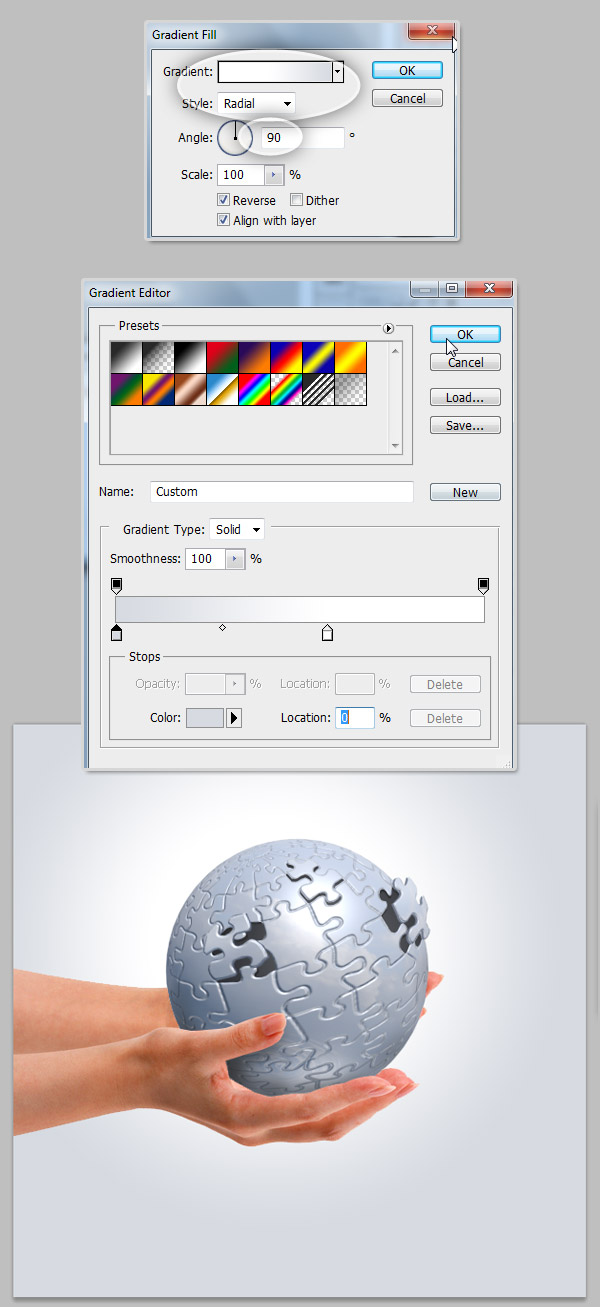
Step 32 – Curves
Open the Adjustments Panel (Windows > Adjustments), and add first a Curves Adjustment Layer above all the other layers on the design. Use the values shown on the following screenshots, we are adjusting the general RGB colors, and a particular fixes on both Red and Blue channels.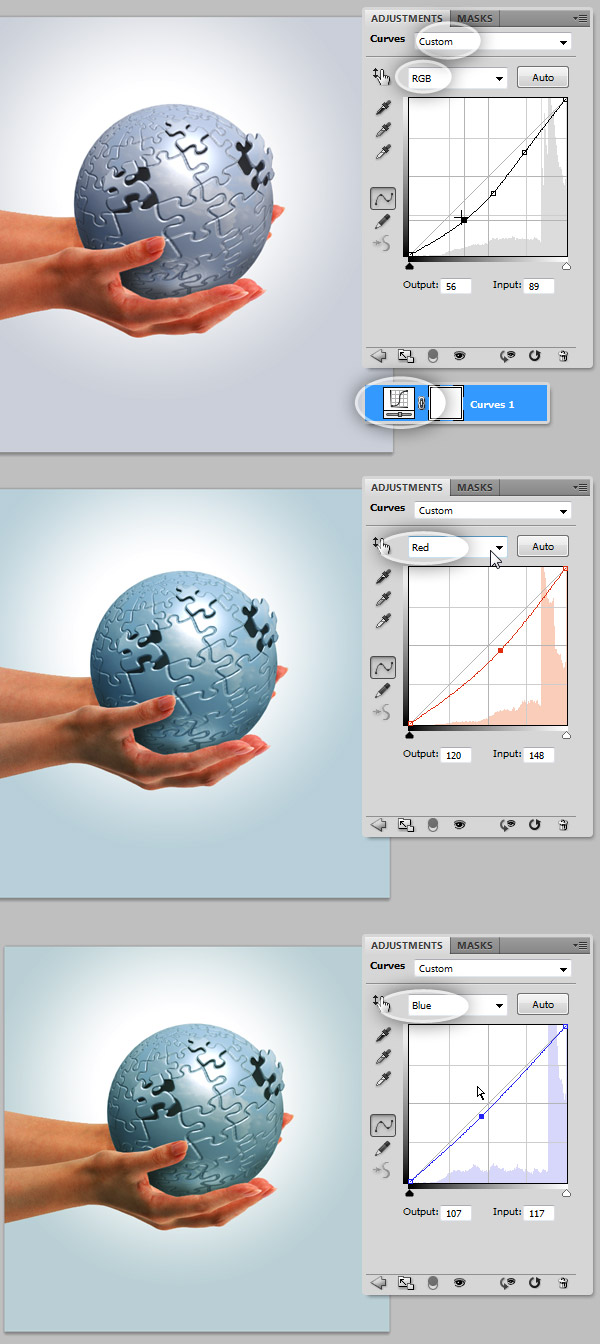
Step 33 – Levels
Now, let’s add a Levels Adjustment Layer to increase the intensity of the dark colors. Use the values shown on the following image.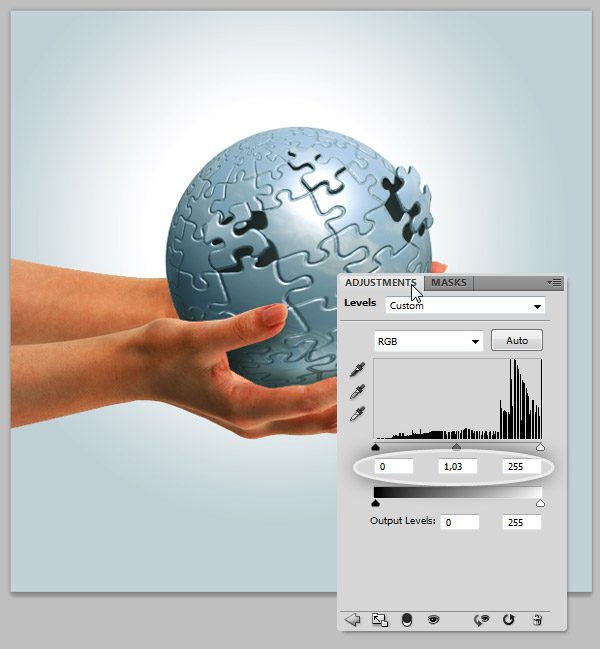
Step 34 – Hue Saturation
Next add a Hue/Saturation adjustment layer, select the Reds colors and adjust the values as shows the image below.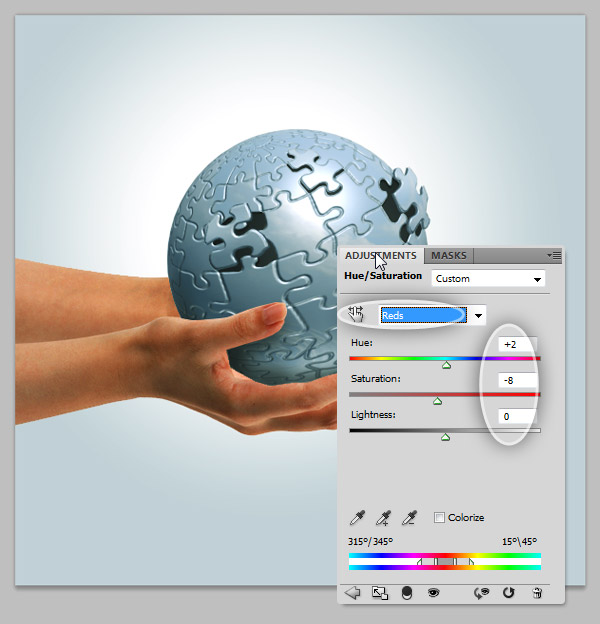
Step 35 – Gradient Map
Finally to give the image a dramatic look, add a Gradient Map Adjustment Layer, set a Black – White gradient. On the Layers Panel, select the Gradient Map adjustment, set its Blending Mode to Overlay and its Opacity to 50%.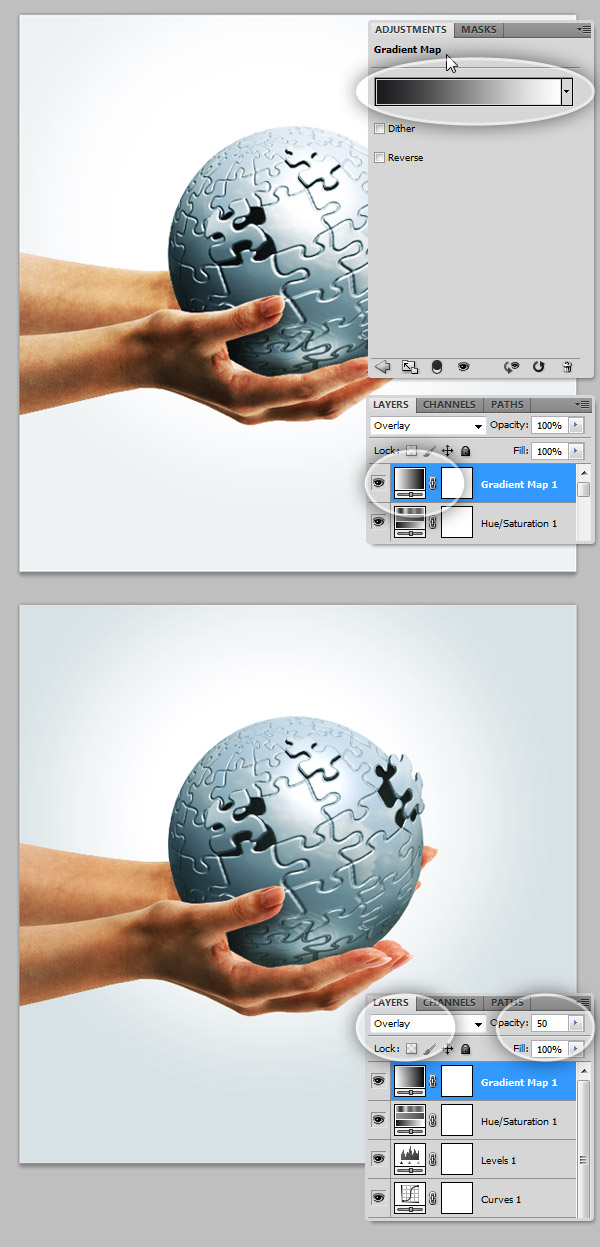
Conclusion
At the end you should have something like this, now is your turn to create something new playing with different shapes and colors..

0 comments:
Post a Comment