Final Product
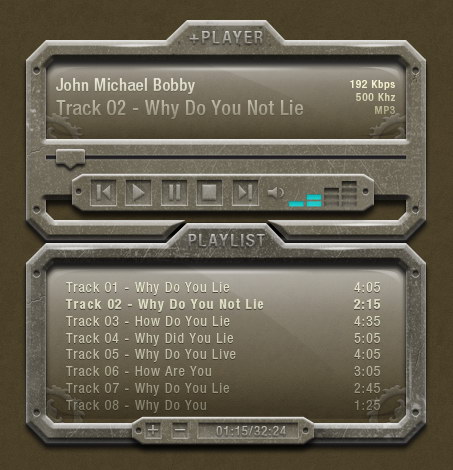 In this tutorial, we will use a combination of layer styles, textures, and a bit of manual drawing to create a Winamp-style mp3 player skin.
Tutorial Assets
The following assets were used during the production of this tutorial.- Scratched Metallic Textures
Step 1: Draw Basic Shape
To get accurate size, we will use grid to help us designing. Open Preferences dialog box (Command/Ctrl + K). In Guides, Grid & Slices setting, set Gridline every: 100 pixels and Subdivisions: 5.
Step 2
Create a rectangular shape with size 400px x 200px and color: #4f4834.
Step 3
Activate pen tool. Click path to add two points on each corner. See picture below for its placement.
Step 3
Hold Alt to temporarily change Pen Tool to Convert Point Tool. Alt-click all new points we have just created.
Step 4
Still using pen tool, click on all corner points to delete them.
Step 5
Click top line to add 4 points. Alt-click on each point to convert them to sharp point.
Step 6
Move upward two middle points as high as one box.
Step 7
Create a rectangular path inside our path and select Subtract from option bar. Add two sharp points on each corner, after that delete all corners.
Step 8
Our corner is just too thick. We will try to keep its size uniform, one column width. To help us, draw a one column size in rectangular shape, rotate it 45 degrees, and place it on the corner.
Step 9
Manually, move points using direct selection tool.
Step 10
Repeat step 8 and 9 to other corners to give them an equal size.
Step 11
Add these layer styles.
Step 12: Add Textures
Create new layer and place it above the shape. Use splatter brush to draw some dirt. Hit Command/Ctrl + Alt + G to convert layer to Clipping Mask.
Step 13
Add scratched metallic textureson top of the shape. Click Image > Adjustments > Desaturate to remove its color. Set blend mode to Screen with Opacity: 45%. Hit Command/Ctrl + Alt + G to convert texture layer to Clipping Mask. The texture is now inside the shape.
Step 14
Bevel and Emboss layer styles add 3D effect on our shape. However, since I’m not satisfied with the result, I will add more light onto its side. So, select the side using polygonal lasso, create new layer, and draw black to white gradient. Change Blend mode to Screen and reduce its Opacity to 20%. Below, you can see the difference before and after adding gradient.
Step 15: Add Title
Write PLAYLIST for the title of this shape. Add following layer styles.
Step 16
Draw a circle shape. Set layer Fill to 0%, add layer styles.
Step 17
I notice that lower part of the shape is too dark. There’s no detail seen. To fix this, I will draw manually. Command/Ctrl-click shape layer. Use small soft brush then paint it with white. You can see the difference before and after painting white.
Step 18: Create Background
Currently, we are using white for background. This doesn’t help because white tends to make everything around it lighter. So, let’s add background now. Double click Background to convert it to layer. Click Edit > Fill and select Color: #332c1c. Add texture onto the layer. You can do this by pasting a texture onto the layer and set its Blend mode to Screen or Multiply, or you can add layer style Pattern Overlay and use one of the available patterns.
Step 19: Draw Screen
Draw a rectangular shape and place it behind the shape. Set Fill to 0%. Add layer style Gradient Overlay.
Step 20
Duplicate the path we’ve just created. Click Add Adjustment Layer and choose Gradient Fill. Draw another path exactly described as seen in the picture below and select Intersect. The combination of both paths will give us a nice reflection on the top left corner.
Step 21
Let’s add another gradient to make the top screen brighter. Draw a rounded rectangle on top. Set Fill to 0%. Add layer styles Gradient Overlay with blend mode Screen to keep lighter pixel.
Step 22
Add more shadows on lower part of the screen. We just need to repeat the previous process. Draw a rounded rectangle, set Fill to 0%. Add layer style Gradient Overlay, but this time, choose blend mode Multiply to hide all lighter pixels.
Step 23: Add Ornaments on Screen
Use pen tool to draw some shapes and place them behind the screen. Add layer styles.
Step 24
Reduce layer ornament Opacity to 50%. Add layer texture on top of the ornament. Set blend mode to Screen and reduce its Opacity to 45%. Convert layer texture to Clipping Mask.
Step 25
Duplicate the ornament and place it on the opposite side. Hit Command/Ctrl + T, right click, and choose Flip Horizontal.
Step 26: Add Details on Screen
Let’s add more details on screen. Start by adding highlight. Create a crescent shape path and place it on the top left corner. Click Add Adjustment Layer icon and select Gradient Fill from white to transparent. Set Opacity to 50%.
Step 27
Duplicate highlight and place it on the top right corner. Hit Command/Ctrl + T, right click and select Flip Horizontal. If you notice, in real life, lighting is never perfect. It’s almost impossible to have the same highlight on both sides. So, for this duplicated highlight, change Opacity to 20%.
Step 28
Repeat the previous steps, but this time, use black to transparent to create shadow.
Step 29: Add Cracks
I always love small details. Small details altogether give perfect impression on your work. One thing you can do to add realism on your work is adding some imperfections, in our case, a crack. This is pretty easy actually. Start by creating new layer, draw 1px black line using Pencil tool. Duplicate layer (Command/Ctrl + J), move it 1px. Hit Command/Ctrl + I to invert its color to white. Reduce black line Opacity to 30% and white line to 20%. Delete both ends of the lines using soft small Eraser tool.
Step 30
Repeat the same process to another crack.
Step 31
At 100% zoom, you can see our little cracks.
Step 32: Add Highlight
Let’s add some random highlight. Start by drawing a white dot using 2px soft brush. Hit Command/Ctrl + T and stretch it horizontally. Erase its ends using soft Eraser tool.
Step 33
Duplicate highlight and place it on other positions.
Step 34: Add Playlist Title
Add text for playlist. Add bold style to one of the songs to indicate it is active. Use color #ffffc5 and add following layer styles.
Step 35
To fade the playlist, add layer mask and draw gradient from white to gray.
Step 36: Add Playlist Button
Draw a polygonal shape and place it on the lower part of the playlist. We need to repeat Step 11 to 13 to add similar textures onto the shape. Add scratched metallic textures, desaturate its color (Command/Ctrl + Shift + U). Set blend mode to Screen, reduce Opacity to 45%. Hit Command/Ctrl + Alt + G to convert layer to Clipping Mask. Add following layer styles.
Step 37
Duplicate circular shape from the corner of the playlist. Place it on both edges of the new shape. Resize it to 90%.
Step 38
Draw a rectangular shape. Set Fill layer to 0%. Add following layer styles.
Step 39
I want to add more definition to lower part of the rectangular shape by adding more light. To do this, we just need to draw a 1px line using pencil tool and set its opacity to 20%.
Step 40
Below, you can see the slight difference before and after adding 1px line.
Step 41
Using rectangular tool, draw + sign and add following layer styles.
Step 42
Duplicate + sign and remove its horizontal shape to turn it into a – sign.
Step 43
Draw longer rectangular shape next to the – button.
Step 44
Inside the shape, add text for Current Track Time/Total Playlist Time.
Step 45: Drawing Player Interface
Duplicate Playlist interface. Change its title to +PLAYER. We don’t need the song playlist so delete its text.
Step 46
Draw a rectangular path and select Add to Shape. Draw a poygonal path, place it on lower part of the player and select Subtract.
Step 47
We don’t want this interface to be exact duplicate of the playlist. To make it unique, let’s add some difference. Move textures, move highlights, and add more cracks.Don’t forget to reposition the screen. Move its highlights, shadows, and accessories on bottom corner.
Step 48: Time Indicator
Draw a thin rectangular shape and add some layer shapes.
Step 49
We’ll draw a time track indicator. Draw shape made of rounded rectangle and a triangle. For its color use: #4f4834.Add texture on top, set its blend mode to Screen with Opacity 45%. Convert texture layer to Clipping Mask. Add following layer styles.
Step 50: Add Player Button
Draw another polygon on top of the player interface. Repeat Step 36, adding texture and layer styles.
Step 51
Draw a rectangular shape, set Fill to 0%. Add following layer styles.
Step 52
Draw shape made of rectangle and triangle. Add following layer styles.
Step 53
Use same technique to create another button.
Step 54
Draw a small speaker icon shape. Next to it, create a crescent shape made of two overlapping circle. Add following layer styles, similar to previous buttons.
Step 55
Draw some rectangular shapes. Add following layer styles.
Step 56
Duplicate layer shape (Command/Ctrl + J) and delete some of them. Remove all used layer styles and add following Color Overlay.
Step 57
Add circular shape on both ends of the shape. See Step 37 for reference on how to do it.
Step 58: Add Song Info
Add text contains track informations. Add layer mask. Draw wite to black gradient to make it fade away.
Step 59
We’re done with the interface.
Step 60: Changing Interface Color
We can also change its color. Add Adjustment Layer Hue/Saturation and place it on top of the interface. Change its settings.
Conclusion
As you can see, designing interfaces is not just about adding layer styles. There’s a lot more in the process. I hope you can learn some new techniques from this tutorial. If you have any questions, feel free to ask in the comment form below.
Final Product
In this tutorial, we will use a combination of layer styles, textures, and a bit of manual drawing to create a Winamp-style mp3 player skin.
Tutorial Assets
The following assets were used during the production of this tutorial.
- Scratched Metallic Textures
Step 1: Draw Basic Shape
To get accurate size, we will use grid to help us designing. Open Preferences dialog box (Command/Ctrl + K). In Guides, Grid & Slices setting, set Gridline every: 100 pixels and Subdivisions: 5.

Step 2
Create a rectangular shape with size 400px x 200px and color: #4f4834.

Step 3
Activate pen tool. Click path to add two points on each corner. See picture below for its placement.

Step 3
Hold Alt to temporarily change Pen Tool to Convert Point Tool. Alt-click all new points we have just created.

Step 4
Still using pen tool, click on all corner points to delete them.

Step 5
Click top line to add 4 points. Alt-click on each point to convert them to sharp point.

Step 6
Move upward two middle points as high as one box.

Step 7
Create a rectangular path inside our path and select Subtract from option bar. Add two sharp points on each corner, after that delete all corners.

Step 8
Our corner is just too thick. We will try to keep its size uniform, one column width. To help us, draw a one column size in rectangular shape, rotate it 45 degrees, and place it on the corner.

Step 9
Manually, move points using direct selection tool.

Step 10
Repeat step 8 and 9 to other corners to give them an equal size.

Step 11
Add these layer styles.


Step 12: Add Textures
Create new layer and place it above the shape. Use splatter brush to draw some dirt. Hit Command/Ctrl + Alt + G to convert layer to Clipping Mask.

Step 13
Add scratched metallic textures
on top of the shape. Click Image > Adjustments > Desaturate to remove its color. Set blend mode to Screen with Opacity: 45%. Hit Command/Ctrl + Alt + G to convert texture layer to Clipping Mask. The texture is now inside the shape.

Step 14
Bevel and Emboss layer styles add 3D effect on our shape. However, since I’m not satisfied with the result, I will add more light onto its side. So, select the side using polygonal lasso, create new layer, and draw black to white gradient. Change Blend mode to Screen and reduce its Opacity to 20%. Below, you can see the difference before and after adding gradient.


Step 15: Add Title
Write PLAYLIST for the title of this shape. Add following layer styles.


Step 16
Draw a circle shape. Set layer Fill to 0%, add layer styles.


Step 17
I notice that lower part of the shape is too dark. There’s no detail seen. To fix this, I will draw manually. Command/Ctrl-click shape layer. Use small soft brush then paint it with white. You can see the difference before and after painting white.


Step 18: Create Background
Currently, we are using white for background. This doesn’t help because white tends to make everything around it lighter. So, let’s add background now. Double click Background to convert it to layer. Click Edit > Fill and select Color: #332c1c. Add texture onto the layer. You can do this by pasting a texture onto the layer and set its Blend mode to Screen or Multiply, or you can add layer style Pattern Overlay and use one of the available patterns.


Step 19: Draw Screen
Draw a rectangular shape and place it behind the shape. Set Fill to 0%. Add layer style Gradient Overlay.


Step 20
Duplicate the path we’ve just created. Click Add Adjustment Layer and choose Gradient Fill. Draw another path exactly described as seen in the picture below and select Intersect. The combination of both paths will give us a nice reflection on the top left corner.


Step 21
Let’s add another gradient to make the top screen brighter. Draw a rounded rectangle on top. Set Fill to 0%. Add layer styles Gradient Overlay with blend mode Screen to keep lighter pixel.


Step 22
Add more shadows on lower part of the screen. We just need to repeat the previous process. Draw a rounded rectangle, set Fill to 0%. Add layer style Gradient Overlay, but this time, choose blend mode Multiply to hide all lighter pixels.


Step 23: Add Ornaments on Screen
Use pen tool to draw some shapes and place them behind the screen. Add layer styles.


Step 24
Reduce layer ornament Opacity to 50%. Add layer texture on top of the ornament. Set blend mode to Screen and reduce its Opacity to 45%. Convert layer texture to Clipping Mask.

Step 25
Duplicate the ornament and place it on the opposite side. Hit Command/Ctrl + T, right click, and choose Flip Horizontal.

Step 26: Add Details on Screen
Let’s add more details on screen. Start by adding highlight. Create a crescent shape path and place it on the top left corner. Click Add Adjustment Layer icon and select Gradient Fill from white to transparent. Set Opacity to 50%.

Step 27
Duplicate highlight and place it on the top right corner. Hit Command/Ctrl + T, right click and select Flip Horizontal. If you notice, in real life, lighting is never perfect. It’s almost impossible to have the same highlight on both sides. So, for this duplicated highlight, change Opacity to 20%.

Step 28
Repeat the previous steps, but this time, use black to transparent to create shadow.

Step 29: Add Cracks
I always love small details. Small details altogether give perfect impression on your work. One thing you can do to add realism on your work is adding some imperfections, in our case, a crack. This is pretty easy actually. Start by creating new layer, draw 1px black line using Pencil tool. Duplicate layer (Command/Ctrl + J), move it 1px. Hit Command/Ctrl + I to invert its color to white. Reduce black line Opacity to 30% and white line to 20%. Delete both ends of the lines using soft small Eraser tool.

Step 30
Repeat the same process to another crack.

Step 31
At 100% zoom, you can see our little cracks.

Step 32: Add Highlight
Let’s add some random highlight. Start by drawing a white dot using 2px soft brush. Hit Command/Ctrl + T and stretch it horizontally. Erase its ends using soft Eraser tool.

Step 33
Duplicate highlight and place it on other positions.

Step 34: Add Playlist Title
Add text for playlist. Add bold style to one of the songs to indicate it is active. Use color #ffffc5 and add following layer styles.


Step 35
To fade the playlist, add layer mask and draw gradient from white to gray.

Step 36: Add Playlist Button
Draw a polygonal shape and place it on the lower part of the playlist. We need to repeat Step 11 to 13 to add similar textures onto the shape. Add scratched metallic textures, desaturate its color (Command/Ctrl + Shift + U). Set blend mode to Screen, reduce Opacity to 45%. Hit Command/Ctrl + Alt + G to convert layer to Clipping Mask. Add following layer styles.


Step 37
Duplicate circular shape from the corner of the playlist. Place it on both edges of the new shape. Resize it to 90%.

Step 38
Draw a rectangular shape. Set Fill layer to 0%. Add following layer styles.


Step 39
I want to add more definition to lower part of the rectangular shape by adding more light. To do this, we just need to draw a 1px line using pencil tool and set its opacity to 20%.

Step 40
Below, you can see the slight difference before and after adding 1px line.

Step 41
Using rectangular tool, draw + sign and add following layer styles.


Step 42
Duplicate + sign and remove its horizontal shape to turn it into a – sign.

Step 43
Draw longer rectangular shape next to the – button.

Step 44
Inside the shape, add text for Current Track Time/Total Playlist Time.

Step 45: Drawing Player Interface
Duplicate Playlist interface. Change its title to +PLAYER. We don’t need the song playlist so delete its text.

Step 46
Draw a rectangular path and select Add to Shape. Draw a poygonal path, place it on lower part of the player and select Subtract.

Step 47
We don’t want this interface to be exact duplicate of the playlist. To make it unique, let’s add some difference. Move textures, move highlights, and add more cracks.
Don’t forget to reposition the screen. Move its highlights, shadows, and accessories on bottom corner.

Step 48: Time Indicator
Draw a thin rectangular shape and add some layer shapes.


Step 49
We’ll draw a time track indicator. Draw shape made of rounded rectangle and a triangle. For its color use: #4f4834.
Add texture on top, set its blend mode to Screen with Opacity 45%. Convert texture layer to Clipping Mask. Add following layer styles.


Step 50: Add Player Button
Draw another polygon on top of the player interface. Repeat Step 36, adding texture and layer styles.


Step 51
Draw a rectangular shape, set Fill to 0%. Add following layer styles.


Step 52
Draw shape made of rectangle and triangle. Add following layer styles.


Step 53
Use same technique to create another button.

Step 54
Draw a small speaker icon shape. Next to it, create a crescent shape made of two overlapping circle. Add following layer styles, similar to previous buttons.


Step 55
Draw some rectangular shapes. Add following layer styles.


Step 56
Duplicate layer shape (Command/Ctrl + J) and delete some of them. Remove all used layer styles and add following Color Overlay.


Step 57
Add circular shape on both ends of the shape. See Step 37 for reference on how to do it.

Step 58: Add Song Info
Add text contains track informations. Add layer mask. Draw wite to black gradient to make it fade away.

Step 59
We’re done with the interface.

Step 60: Changing Interface Color
We can also change its color. Add Adjustment Layer Hue/Saturation and place it on top of the interface. Change its settings.


Conclusion
As you can see, designing interfaces is not just about adding layer styles. There’s a lot more in the process. I hope you can learn some new techniques from this tutorial. If you have any questions, feel free to ask in the comment form below.


0 comments:
Post a Comment