Step 1
Open a new file (mine is 540×300 at 72ppi). It is important to note that although the size of the document doesn’t matter, you will need to adjust the layer styles we apply accordingly if you choose to play along at home. If you’ve read many of my other tutorials you’ll know that anytime I am trying to create a real object, I like to have a piece of reference to work from, so I’ve inset my example in the Step 1 graphic.
I’m going to fill the background with a pretty radial gradient ( #788e9e to #263744) because we’ll be first drawing in a light gray and I want to be able to see what I’m doing. You can fill the background with any color you like… except purple.
(*note: If you’re an 8 year old girl, you are of course the exception to the purple rule and you should use it to your little heart’s content.)

Step 2
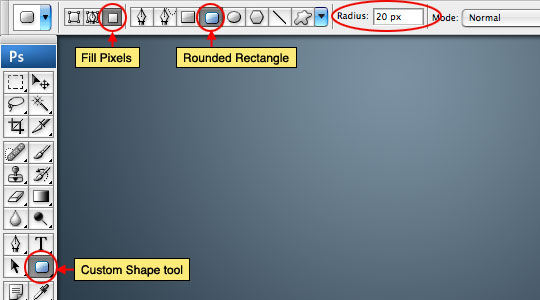
Create a new layer by pressing the Create New Layer button at the bottom of the Layers palette and rename itPlate. Press the U key to switch to the Custom Shape tool and choose Rounded Rectangle from the menu at the top of Photoshop, make sure that the Fill Pixels icon is checked and set the Radius to 20 pixels.
(*note: If your layers palette isn’t visible, activate it by choosing Window>Layers from the main menu.)
Step 3
Set your foreground and background colors to #e9e9e9 and #d2d2d2 respectively, then drag a nice rectangular shape onto the stage. I took my tape measure to the garage and figured out that the standard US license plate is a 2:1 aspect ratio, so my rectangle is 500×250 pixels.
(*note: If you want to see the size of your shape as you create it, open the Info window by choosing Window>Info from the main menu.)

Step 4
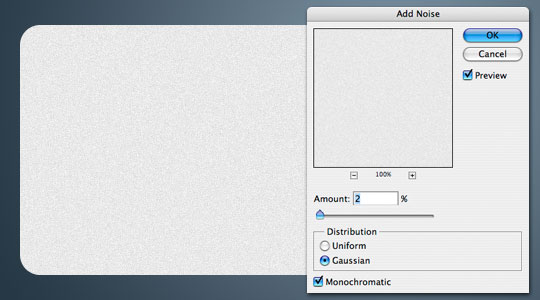
Since most license plates have a reflective quality that makes the surface shimmer, lets add that effect with a little noise. Select Filter>Noise>Add Noise from the main menu, set the Amount to 2% and make sure that Gaussian and Monochromatic are checked before hitting OK.
Step 5
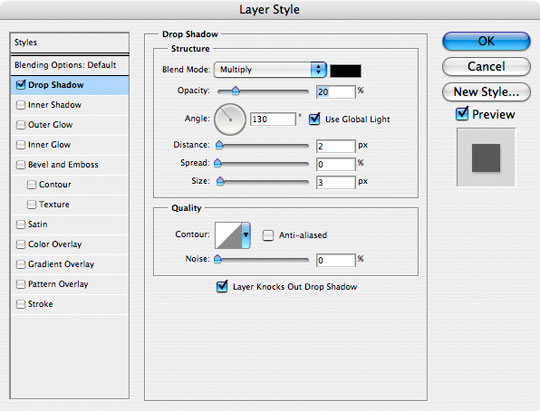
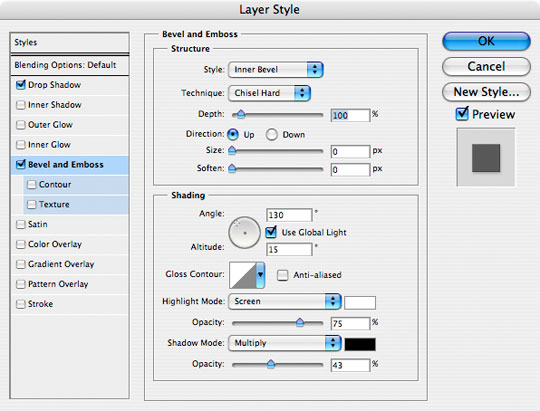
Double click next to the layer name in the Layers palette to bring up the Layer Styles dialog then add the following Drop Shadow and Bevel And Emboss.
Step 6
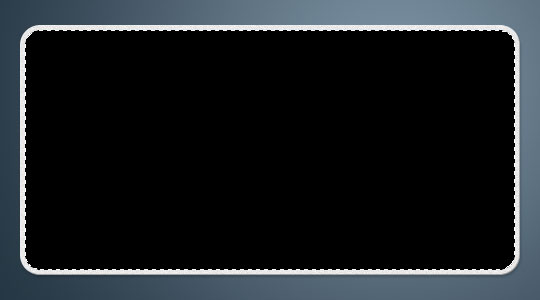
Create a new layer and call it Bevel. This is where the embossed bevel around the edge of the license plate will live.
Command-Click (PC: Ctrl-Click) on the Plate layer’s icon to load the plate as a selection (*note: the Bevel layer should still be selected as the working layer). Now from the main menu choose Select>Modify>Contract and set the amount to 5 pixels.
Lets fill the area with black. Press the D key to reset the foreground color to black and then press Option-Delete (PC: Alt-Backspace) to fill the area with black.
Step 7
Lets now contract the selection again (Select>Modify>Contract) but this time lets go 10 pixels. Press Delete (PC: Backspace) to remove the area inside the selection and press Command-D to release the selection.
Step 8
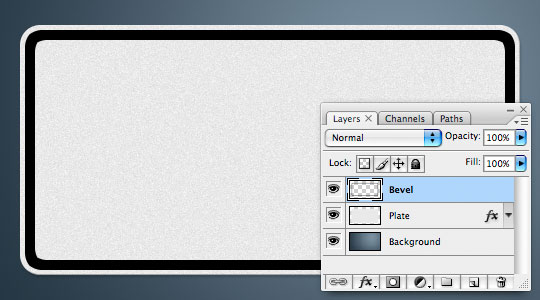
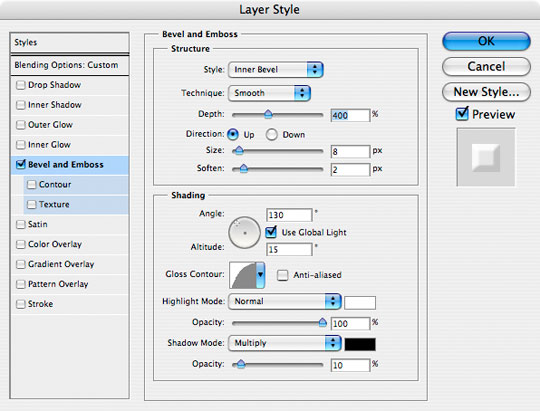
Lower the Bevel layer’s Fill opacity (at the top of the Layers palette) to 0% making the black outline on the layer momentarily invisible, then add the following layer styles.


Step 9
It’s time to lay down the custom license plate letters (or numbers if you prefer). For this little number I tracked down a cool font called License Plate created by Dave Hansen. You can download it HERE or you can download the tutorial file at the end of the lesson and get both fonts used in this exercise.
Press the T key to call up the Text tool, set the text color to #404d5e and for my example the font size is 135pt.

Step 10
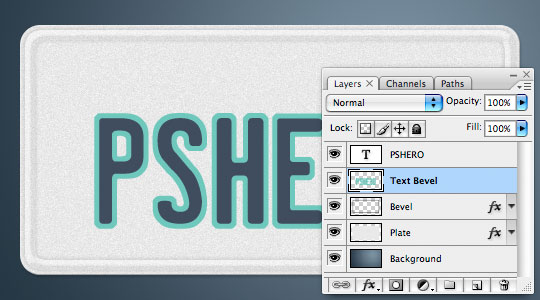
Create a new layer beneath the text layer we just created by holding down the Command (PC: Ctrl) key while clicking the Create New Layer icon at the bottom of the layers palette and rename it Text Bevel.
With the Text Bevel layer now selected, Command-Click (PC: Ctrl-Click) on the text layer icon to load the text as a selection. Now expand the selection by 5 pixels by using the Select>Modify>Expand option in the main menu and fill the selection with any color (except purple of course). I used this very attractive turquoise color. Go ahead and Command-D (PC: Ctrl-D) when you’re done to release the selection.
Step 11
Just like we did with the Bevel layer in Step 8, drop the Text Bevel‘s Fill opacity to 0% and the following Bevel And Emboss layer style.
Step 12
If you’ve switched tools for some crazy reason, press the T key to get the Type tool back. Set the text color to a nice shade of red like #c02922, switch to the font Mistral which you can download HERE or in the exercise files at the end of the tutorial. This is the font which the California logo on the license plate is based on. (*note: Those picky Californians took the liberty of changing things inside their text to make it cooler, but we’re not that fussy, so we’ll leave the nice Mistral font alone.)
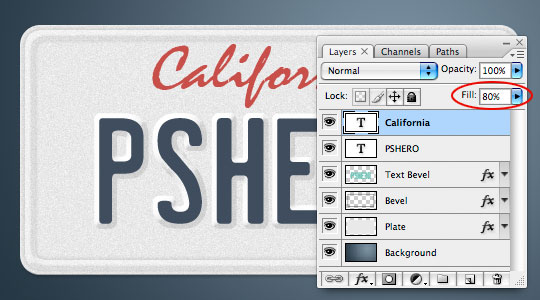
It should really go without saying that you can now click on the stage and type the word California… unless of course you’re license plate is from a different state, and in that case, you’re on your own. Lets also lower the Fill opacity of the California layer to around 80%.
(*note: When you’re done with the text, it’d be a lovely idea to drag this layer to the top of the layers stack, just to keep our previous text and it’s associated bevel next to each other.)
Step 13
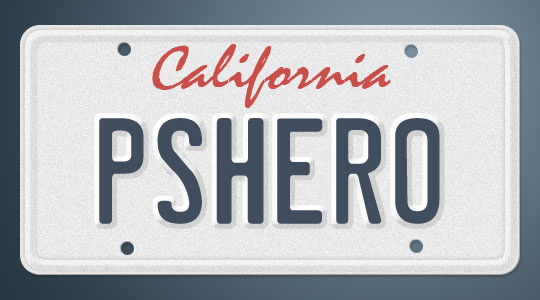
With the California lettering firmly in place, lets click back to the Plate layer and punch some holes in it. Choose the Elliptical Marquee tool, which is in the fly out menu for the Rectangular Marquee tool. If you’re confused, press the M key to select it from the Tools palette, then click and hold on the tool until the fly out menu appears.
Holding the shift key to constrain the selection to a perfect circle, click and drag a selection where your first hole lives. Now just press Delete to remove the selected area and repeat for the other 3 holes. Because I’m completely anal, I actually resized my reference picture license plate to the same size as my document and cut the holes accordingly. I’m sure this surprises you because of the whole California font speech in Step 12… but I’m selectively picky, what can I say?
Step 14
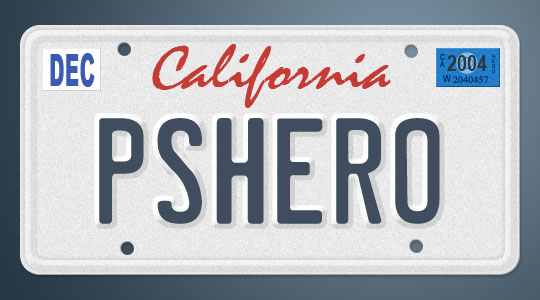
We all know licence plates wouldn’t be cool without all those expensive stickers we "get" to pay to add every year, so lets add a few of those. I figure if you can make Rectangular Marquee selections and know how to use the Type tool, I shouldn’t have to walk you through this part… and If you can’t, then you haven’t been paying attention and you should go back to Step 1 and try to learn something this time.
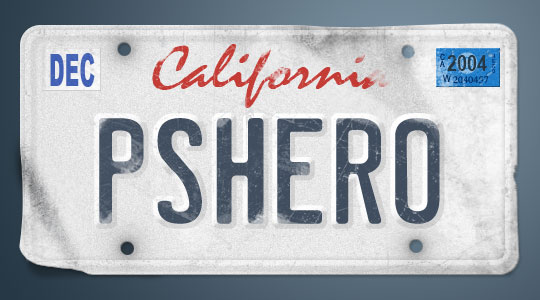
So this would be my finished product with the pretty stickers added.
Step 15
You could go crazy with some of the grunge brushes I handed out in the Hero Header II and Create An Old Envelope tutorials, and bend the edges a little like in the Sticker Edge Peel lesson to really age the plate.
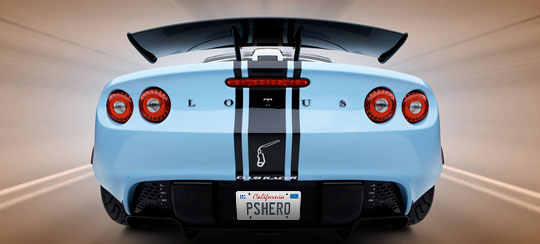
Step 16
And if I actually owned this vanity plate… and a Lotus… Shazam!! Our final result.


0 comments:
Post a Comment