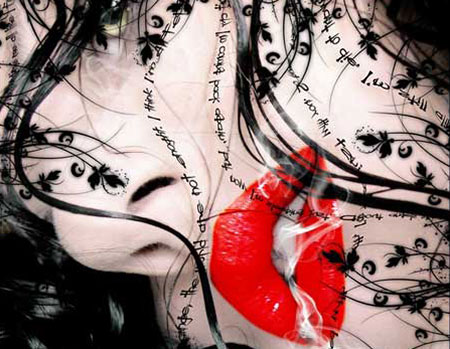
This task we'll see how to change the eyes' color and lips' color, make the colors negative, create a wavy text and a text's mirror reflection, put over the pictures, download and use substandard brushes.

Open the girl's photo: File - Open.

Copy the layer using the command Layer ? Duplicate Layer. Take the next instrument: Filter ? Blur - Gaussian Blur?

Change the layer's type on Multiply. Connect this layer with the previous one, applying the commandLayer ? Merge Down (ctrl+e). Correct the photo's brightness, contrast and color using the next combination: Image ? Adjustments ? Curves.

Minimize the color intensity of the new picture, using the command Image
? Abjustments ? Hue/Saturation? (ctrl+u)

Create a new layer using the fast button New Layer on the Layers window. Take the Brush Tool and change the color that you need. Set out brush's hardness on 0% and paint the colored part of the eyes.

Blur the contours a little, using Filter ? Blur ? Gaussian Blur and change the layer's type on Overlay. Merge this layer with the previous one, applying Layer ? Merge Down. Now we have such a picture:

Change the lips' color now. You have to mark them first of all using the next tool Polygonal Lasso Tooland apply the next combination Image ? Adjustments ? Curves (ctrl+m)

Take the next instrument (Horizontal Type Tool). Insert black color on the upper panel, choose the type Ogilvie Cyr and write the necessary words. Make several of such layers with different text in one row. Create the text's mirror reflection, using the command Edit ? Transform ? Flip Horizontal. Set the text in a vertical line then, applying the command Edit ? Free Transform. Get to the Liquify window (shift+ctrl+x)

Make the text look wavy as it would imitate the hair, using Twirl Clockwise Tool and Bloat Tool.

Merge all the text's layers (Layer ? Merge Down) and copy the new layer: Layer ? Duplicate Layer to create the words' shadows. Blur a little the new layer that you've got after merging them, applying the command Filter ? Blur ? Gaussian Blur, move it a little, corresponding to the words' position. Minimize the layer's visibility on Layers window.

Now we have to put over the smoke picture. We have to take first several different pictures showing the smoke and set each of them on a new layer above the basic one. It is necessary to open the picture in a new file, mark it with Rectangular Marquee Tool and
copy Edit ? Copy (ctrl+c). Get back to the processed picture's file and set it on a new layer: Edit ? Paste (ctrl+v).

Make it look white with next combination: Image ? Adjustments ? Invert (ctrl+I), and change it's position on the necessary one: Edit ? Free Transform (ctrl+T). Change the type of each smoke's layer on Lighten.

Set the design now, suing the brushes (you may download them fromhttp://www.deviantart.com/deviation/33101426/?qo=5&
q=by%3Aanarasha-stock&qh=sort%3Atime+-in%3Ascraps). Introduce the brushes in a special map Brushes and put it in the Photoshop program's map. Take the Brush Tool and download the necessary brushes in the window on the upper panel. To get back to the standard brushes' collection, choose in the same window Reset Brushes option.

Make the design near the lowest photo's edge. Copy three times this layer (Layer ? Duplicate Layer) and apply the next combination: Edit ? Free Transform (ctrl+t) to turn it around. Place it near each of the composing parts. Merge the design's layers, copy the layer that you've got, blur it a little and change the layer's type on Multiply.

Introduce the frame using Crop Tool и Rectangle Tool.


Open the girl's photo: File - Open.

Copy the layer using the command Layer ? Duplicate Layer. Take the next instrument: Filter ? Blur - Gaussian Blur?

Change the layer's type on Multiply. Connect this layer with the previous one, applying the commandLayer ? Merge Down (ctrl+e). Correct the photo's brightness, contrast and color using the next combination: Image ? Adjustments ? Curves.

Minimize the color intensity of the new picture, using the command Image

Create a new layer using the fast button New Layer on the Layers window. Take the Brush Tool and change the color that you need. Set out brush's hardness on 0% and paint the colored part of the eyes.

Blur the contours a little, using Filter ? Blur ? Gaussian Blur and change the layer's type on Overlay. Merge this layer with the previous one, applying Layer ? Merge Down. Now we have such a picture:

Change the lips' color now. You have to mark them first of all using the next tool Polygonal Lasso Tooland apply the next combination Image ? Adjustments ? Curves (ctrl+m)

Take the next instrument (Horizontal Type Tool). Insert black color on the upper panel, choose the type Ogilvie Cyr and write the necessary words. Make several of such layers with different text in one row. Create the text's mirror reflection, using the command Edit ? Transform ? Flip Horizontal. Set the text in a vertical line then, applying the command Edit ? Free Transform. Get to the Liquify window (shift+ctrl+x)

Make the text look wavy as it would imitate the hair, using Twirl Clockwise Tool and Bloat Tool.

Merge all the text's layers (Layer ? Merge Down) and copy the new layer: Layer ? Duplicate Layer to create the words' shadows. Blur a little the new layer that you've got after merging them, applying the command Filter ? Blur ? Gaussian Blur, move it a little, corresponding to the words' position. Minimize the layer's visibility on Layers window.

Now we have to put over the smoke picture. We have to take first several different pictures showing the smoke and set each of them on a new layer above the basic one. It is necessary to open the picture in a new file, mark it with Rectangular Marquee Tool and

Make it look white with next combination: Image ? Adjustments ? Invert (ctrl+I), and change it's position on the necessary one: Edit ? Free Transform (ctrl+T). Change the type of each smoke's layer on Lighten.

Set the design now, suing the brushes (you may download them fromhttp://www.deviantart.com/deviation/33101426/?qo=5&
q=by%3Aanarasha-stock&qh=sort%3Atime+-in%3Ascraps). Introduce the brushes in a special map Brushes and put it in the Photoshop program's map. Take the Brush Tool and download the necessary brushes in the window on the upper panel. To get back to the standard brushes' collection, choose in the same window Reset Brushes option.

Make the design near the lowest photo's edge. Copy three times this layer (Layer ? Duplicate Layer) and apply the next combination: Edit ? Free Transform (ctrl+t) to turn it around. Place it near each of the composing parts. Merge the design's layers, copy the layer that you've got, blur it a little and change the layer's type on Multiply.

Introduce the frame using Crop Tool и Rectangle Tool.

0 comments:
Post a Comment