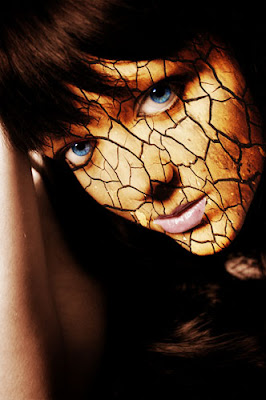
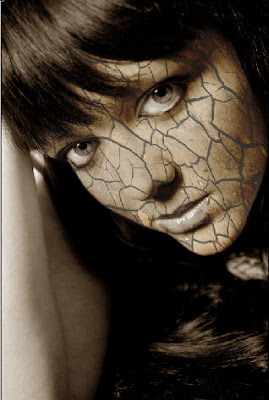
This tutorial shows you how to turn any face skin into mud skin and this is the final result :
Now this is the original image :from here
and this is the mud texture : from here
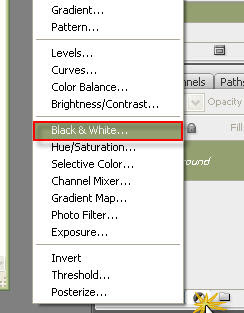
1-Open the face image ,set a new Black & White mask layer :
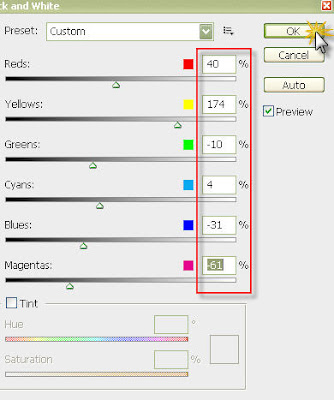
Then put the settings like the next pic:
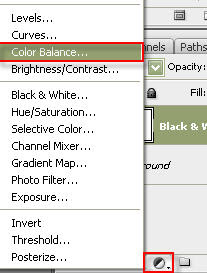
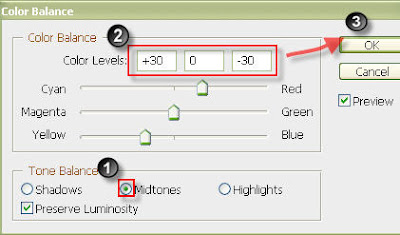
2-Now add a Color Balance Mask layer:
Then put the settings like this:
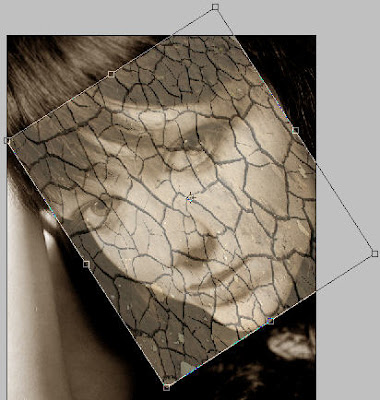
3-Open the texture image select it then copy(Ctrl+C) it and paste(Ctrl+V) it in the face document then press Ctrl+T to transform it like the next pic:
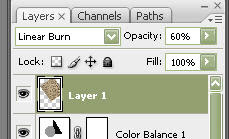
4-Change the blend mode and the opacity(of the texture layer) to "linear burn" and 60%:
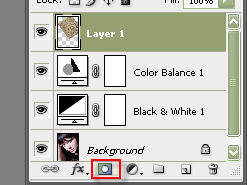
5-Now add a layer mask to previous layer (mud layer):
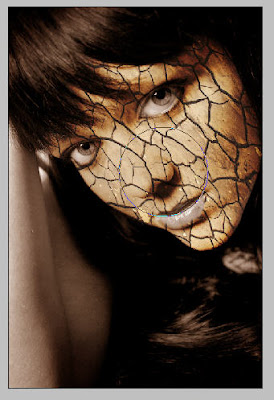
6-With the black foreground color select the brush and paint the eyes and leaps and edges of the face to turn the result similar to this :
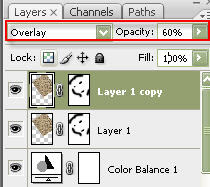
7-Duplicate the mud layer and change the blend setting like this:
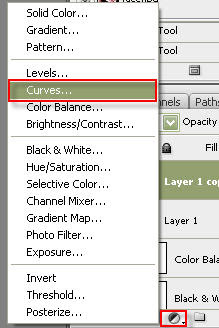
8-Add a Curves Mask layer:
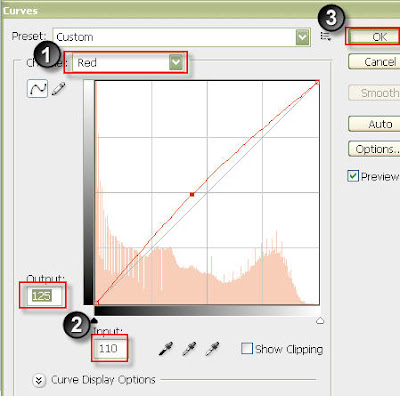
go to the red channel and change the settings like this:
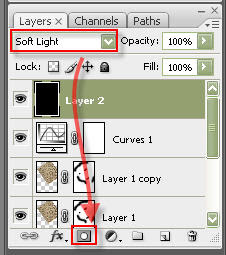
9-Add a new layer fill it with black then change the blend mode to Soft Light then add a layer mask :
10-paint the hole image with black except the edges (make sure you are selecting the mask layer):
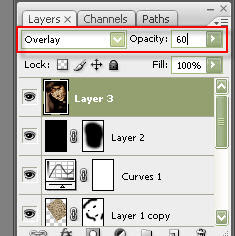
11-now I'm gonna show you a magic shortcut to merge all the layers in "new" layer (Ctrl+Shift+Alt+E) now change the new layer bland mode to Overlay and the Opacity to 60:
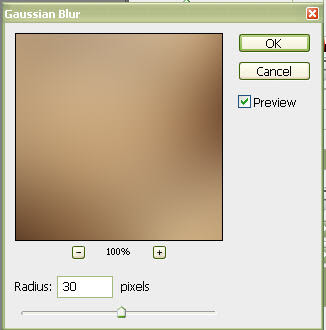
12-now duplicate the previous layer then go to Filter>Blur>Gaussian blur
then put the radius like the next pic:
13-Go to the background layer (the first layer) then select the eyes :
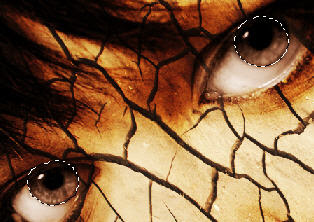
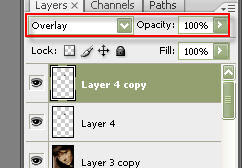
copy it then paste it in the top of the layers duplicate the layer (the eyes layer) then change it blend mode to overlay:
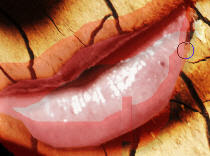
14-Now go to the background layer then select the lips
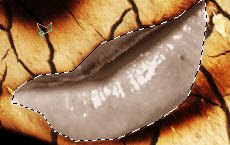
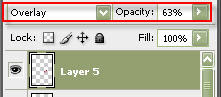
copy them (lips) and paste them in new layer in the top of the other layers then change the blend settings of it like this:
15-the final step is to select the blur tool and make a tour on the edges of the lips:
and this is the final result :

Now this is the original image :from here
and this is the mud texture : from here
1-Open the face image ,set a new Black & White mask layer :

Then put the settings like the next pic:

2-Now add a Color Balance Mask layer:

Then put the settings like this:

3-Open the texture image select it then copy(Ctrl+C) it and paste(Ctrl+V) it in the face document then press Ctrl+T to transform it like the next pic:

4-Change the blend mode and the opacity(of the texture layer) to "linear burn" and 60%:

5-Now add a layer mask to previous layer (mud layer):

6-With the black foreground color select the brush and paint the eyes and leaps and edges of the face to turn the result similar to this :

7-Duplicate the mud layer and change the blend setting like this:

8-Add a Curves Mask layer:

go to the red channel and change the settings like this:

9-Add a new layer fill it with black then change the blend mode to Soft Light then add a layer mask :

10-paint the hole image with black except the edges (make sure you are selecting the mask layer):

11-now I'm gonna show you a magic shortcut to merge all the layers in "new" layer (Ctrl+Shift+Alt+E) now change the new layer bland mode to Overlay and the Opacity to 60:

12-now duplicate the previous layer then go to Filter>Blur>Gaussian blur
then put the radius like the next pic:

13-Go to the background layer (the first layer) then select the eyes :

copy it then paste it in the top of the layers duplicate the layer (the eyes layer) then change it blend mode to overlay:

14-Now go to the background layer then select the lips

copy them (lips) and paste them in new layer in the top of the other layers then change the blend settings of it like this:

15-the final step is to select the blur tool and make a tour on the edges of the lips:

and this is the final result :


0 comments:
Post a Comment