This tutorial is intended for everyone who is beginning at digital drawing/painting, if you like drawing and Photoshop then you are the perfect candidate to follow this tutorial.
I will show here how I have made this image from scratch, using simple techniques like clipping masks and layer blending modes. The tools I used were basically the brush and the smudge ones; I also used the fibers filter to make some texture.
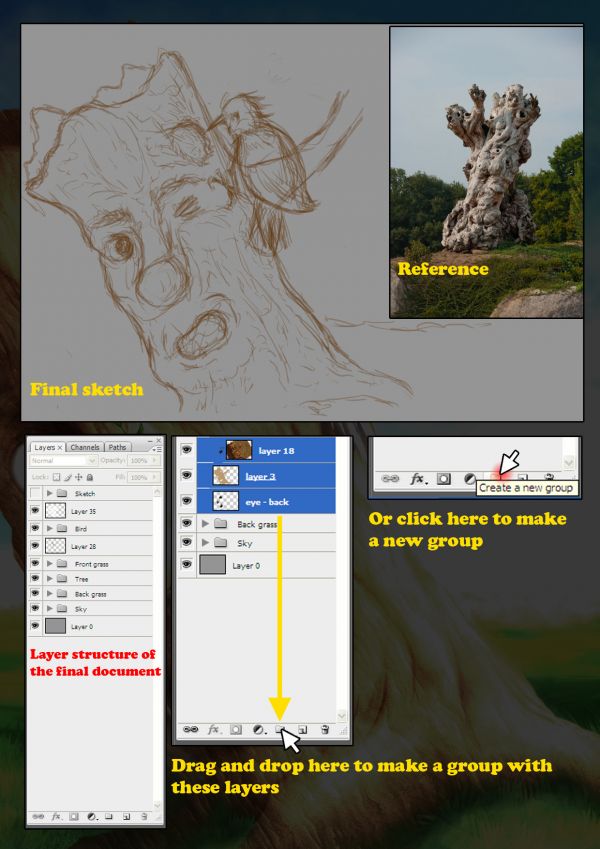
Once you have a clear idea of what you want to get, it is always useful searching for some references. We need to create an old tree and a woodpecker for the image. Looking for some pictures of the elements I wanted to create was very helpful for me before doing anything else.
There are a lot of pictures of woodpeckers and old trees at SCX. Look for some woodpeckers pictures. The things you have to take into account are the proportions and check the colors. Look also the usual positions of this birds on the tree. In order to help you to create the tree you can search for some old trees on the web and check of the trunks forms and shapes. Check also how the bark fits into the trunk to have a clear idea of what you should paint.

Step 1
Let's go
Now open a new document, Use a standard landscape ISO A4 (297x210mm.) at 300 DPI.
Fill in the background with 50% black to make the sketch work more comfortable.
Make a new layer and begin drawing the figures with your favorite brush. It is useful to make the sketch on a new transparent layer to enable it without hiding the rest of the image since you will use the sketch as a reference a lot during your work.
Don't worry about the color at this point. Just try to make the figures the more convincing as possible and a good composition
Just some advice before going further with this work, name each layer you create and/or use groups for each element of your drawing. This is very useful for not getting lost when you have a lot of layers.
I don't usually name the layer (dumb me!) but it is always useful for me putting them into a group. I show here the layer structure of the final image looks like.
To make a new group you only need to click the folder icon in the bottom of the layers panel. Then you only need to drop the layers you want into the new folder. This can be done selecting the layers you want (hold shift or ctrl) and then dragging and dropping them into the little folder icon.

Step 2
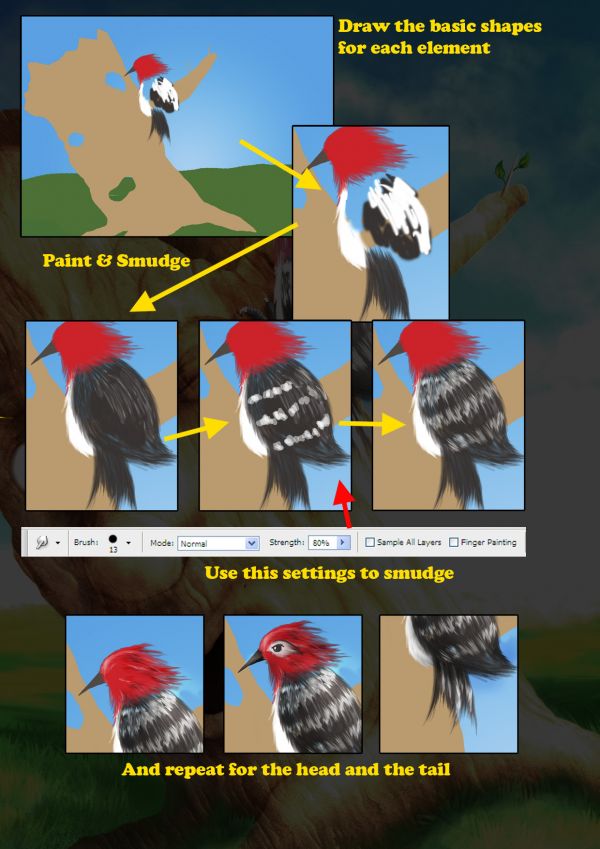
Once you are happy with your sketch, draw the basic shapes using a hard brush (100% opacity). Use the layers you need in order to keep the things with enough separation and pick a base color to work with later
I personally used one layer for the sky and another one for the background (second plane), one for the tree, and four layers for the bird (bark, head, wing and body-tail).
The bird is the more complex figure so we need to put more attention on it. In order to draw the feathers use a 9px brush with 20% opacity, Begin drawing the elements keeping in mind that the brush strokes should go in the same direction that the feathers of a real bird. Work like this until you are satisfied with the shape of your bird.
Pick a 5px hard brush to make the beak shape, at this time with the opacity at 100%.
On a new layer (normal mode) pick another color and add some brush strokes. Don't care about blending it; just make them rough where you want to add color.
Now blend those strokes, pick the smudge tool and smudge the new color added in the same direction of the feathers.
Complete the head in the same way of the wing's feathers adding now some darker colors. Draw the black and white zones of the eye and blend them again with the smudge tool. Pick a smaller brush for this zone because these feathers should look thinner than the ones of the wings.
Draw the eye to complete the bird with a thin brush. The 5 px. one should be enough. Only some strokes are needed here until you get satisfied, crtl+z and ctrl+alt+z can be your best friends here.

Step 3
Time to explain how a clipping mask works:
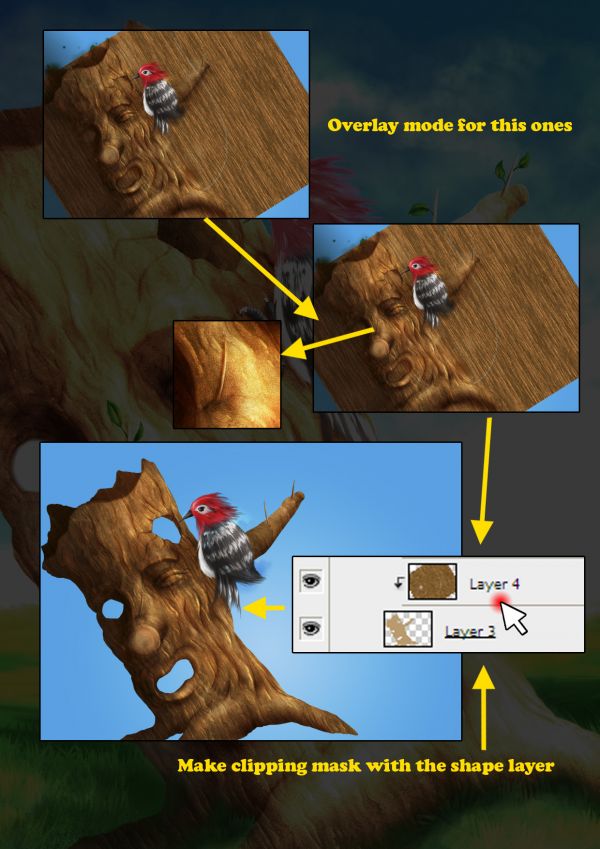
When you have a layer, the tree shape in this case, and you want to draw over it but keeping the borders of the layer with the shape, the best way of doing it is creating another layer over the shape one and then clicking in the middle of both holding the alt key.
This means that you are using the previous layer as clipping mask and everything you draw/paint on the new layer will only be visible into the shape of the layer used as clipping mask
Here the snapshots made with the clipping mask disabled to show better the effect and the work done but remember to use it always. You can also specify when you want to use a layer as a clipping mask selecting the layer and then Menu > Layer > New > Layer... (Ctrl+shift+n). On the new screen check the box "Use previous layer to create clipping mask"
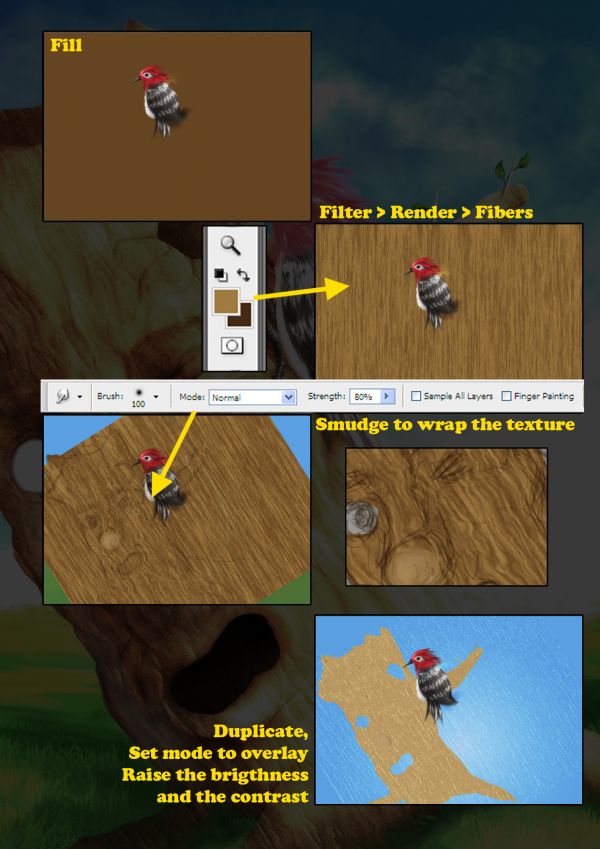
It's time to do with the tree now. You have to fill a lot of space here and a texture is always useful in these cases.
Enable the sketch layer and put it on the top (if isn't there). Make a new layer (ctrl+shift+n) and place it over the tree shape; pick a dark brown for the background color and a light one for the foreground. Fill in the layer with one of these colors.
Go to Menu > Filters > Render > Fibers. Play around with the variance and strength to get the result you want. I personally used the defaults, Variance = 16 and strength = 4
Now rotate the layer to match the tree direction and with the smudge tool wrap the texture around the trunk, do it gently with soft and short strokes displacing the texture to make some convincing wrinkles. The front nose part has no sense with this texture so paint a bit on the layer with the light brown you picked for the filter. this step is very important because a texture is completely useless if you don't wrap into the thing you want.
The texture still looks too flat. You have to duplicate the layer, desaturate it (ctrl+shift+u) and set the mode to overlay, now go to Menu > Image > Adjustments > Brightness/Contrast..., play around with it until you get a good result, Here I raised the contrast to the max and lowered the brightness a bit. You can also check the "Use legacy" box to make this effect more extreme. In this case was not needed.

Step 4
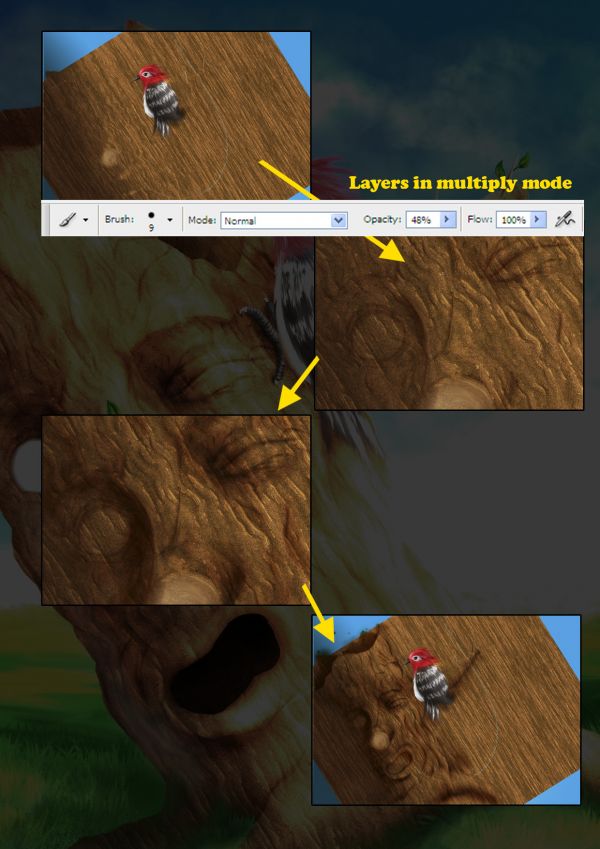
With the sketch layer still enabled create a new layer in multiply mode, pick a dark brown color and make a linear gradient to add a general shadow an then pick a thin brush (9px.) and use the same color to draw the face details and add also the darker shadows with this brush.
Change the brush to a bigger and softer one (100px.) and improve the shadows in the darker zones.
Finish this step with a big brush (300px. and bigger) and low opacity to make some subtle shadows
Here you can do your work in many ways. If you want to redo part of your picture the best way of not losing hours of work is creating one layer for each point you have made but your document will increase the size quickly. If your computer slows down too much you can always save your document, merge some layers and then save again with a different name. You can always open the previous document to go back in your work. In this picture I used four layers. This can also be done on one layer, in this case ctrl+z, ctrl+alt+z and the history panel will be your best friends.

Step 5
Time for the overlays now, make a new layer and a pick a very light brown color, close to white. With a soft big brush with low opacity begin painting the zones that should be highlighted. be careful with those thin branches and use a small brush to highlight the border.
We still have to create some holes on the tree surface. Remember the clipping mask layer? Select it and mask or erase the zones needed
The final image shows how the tree looks using the shape layer as clipping mask.

Step 6
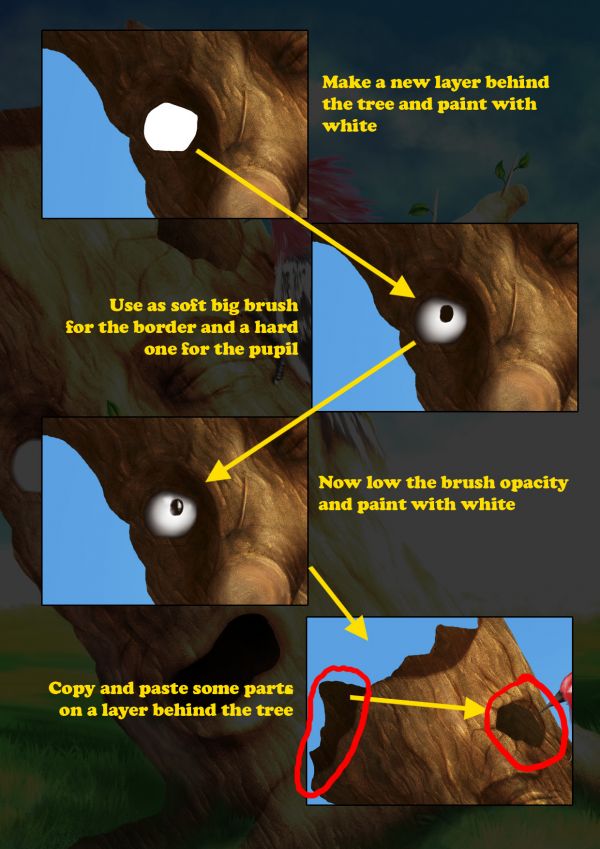
Make a new layer behind the tree one. Paint it in white in the eye zone, now pick a dark color and a big brush and on a new layer add some strokes far enough from the border for only painting a smooth gradient on the white zone. Then change the brush to a harder and thinner one (19px.) and draw the pupil, change the color to white and low the opacity to a 30% to blend the pupil and add some light reflection.
For the other holes just copy a piece from the upper part of the tree and paste on a layer behind the tree one. Go to Menu > Image > Adjustments > Hue/Saturation... and decrease the lightness slider to darken the piece used for the mouth.

Step 7
The tree is almost done, but we need to place it on a field so we need to create some grass in the foreground and in the background.
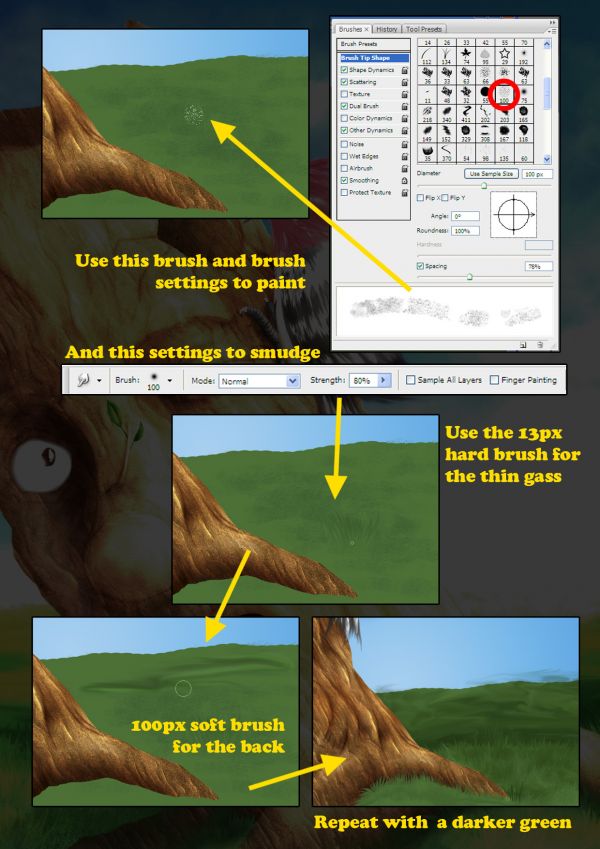
Create a new layer somewhere in front of the grass shape layer and behind the tree. Pick the "Rough Round Bristle", go to the brush presets menu. In the brush tip shape section modify the spacing percent to a 70 - 80%. Enable also the scattering box for this brush since you need to create random strokes with no sense, just some kind of rough texture.
With the 100px. soft round brush select the smudge tool and smudge the strokes done before to make the background grass. We don't need to create details here, just smudge randomly.
Use the 13px. hard round brush to smudge the grass on the foreground, begin smudging the zones closest to the background to end with the top front part. You need to be more careful here, try to smudge in different directions and with different length on the strokes to make some convincing grass.
We need also to create a layer in front of the tree to create the grass in the zone where the root meets with the ground. Create the grass on this layer in the same way.
Create a new layer, choose a darker green and repeat the entire process to add some depth.

Step 8
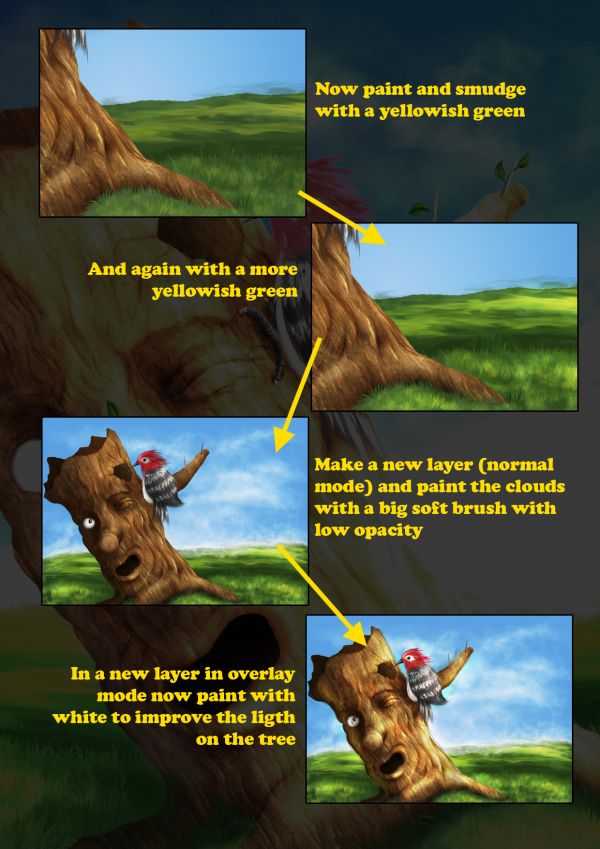
The grass is not finished yet, repeat the smudging process in two different layers and make the green lighter and yellowish for each one of these layers.
The sky looks flat and simple. Pick a big soft round brush with low opacity (10%), add some strokes to create some clouds, reduce the brush size and paint over the horizon line to blend it
On a new layer in overlay mode paint with white to improve the light on the tree. Some light needs to added to the dark zone of the tree to add an isometric light effect, not too much, the wood does not reflect too much light.

Step 9
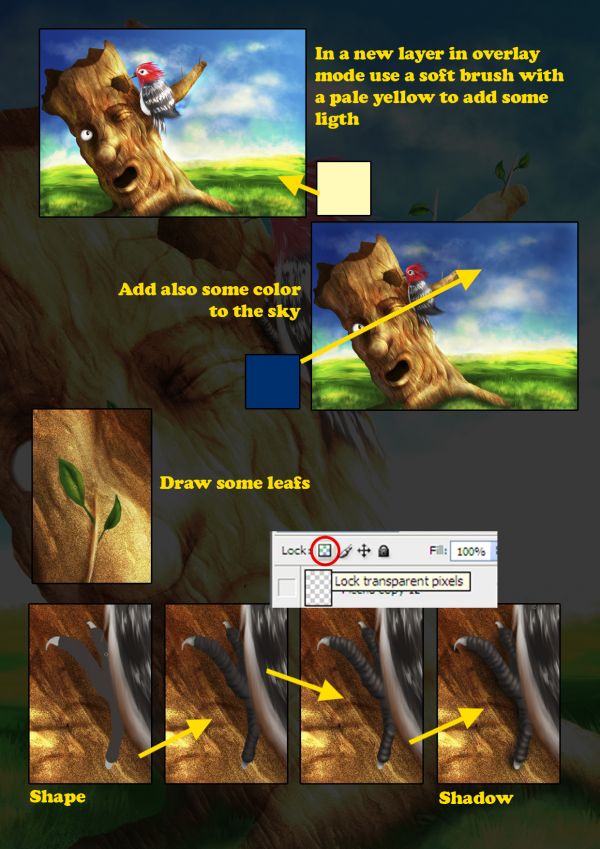
Use a new layer in overlay mode to improve the light on the background and finish blending the skyline. Use a very light color but not white, in this way you can give the highlights the tone you want, in this case I used a very light yellow (close to white)
The shape and the size of the bird can be improved. In my case the layers used for the bird were flattened but this was not a problem I had flatten the layers used for it but in this case this wasn't a problem. I transformed and warped it a bit to give it a more natural bird looking.
The sky still looks very flat. Darken it a bit in some zones with a big brush and a dark blue to add some depth.
The leaves were painted on a new layer with a thin brush first to make the shape. Then use a darker green and a softer brush with low opacity to add some details/shadows. Finish with a lighter green and the same brush to add the highlights.
Create a new layer for the claw and draw the shape. This time do not use this shape a clipping mask because the zone we want to draw/paint is very small and simple.
Instead of using the shape layer as clipping mask go to the layers panel and click in the small icon to lock the transparent pixels. With this icon enabled on a layer the program only allow us to paint over previously painted zones keeping the transparent zones untouched. This is very useful when you want to paint keeping the borders.
Paint some details with black and highlight the zones needed with a light gray to make a convincing claw.
Create a new layer under the one of the claw and paint the shadow of the claw/bird.

Step 10
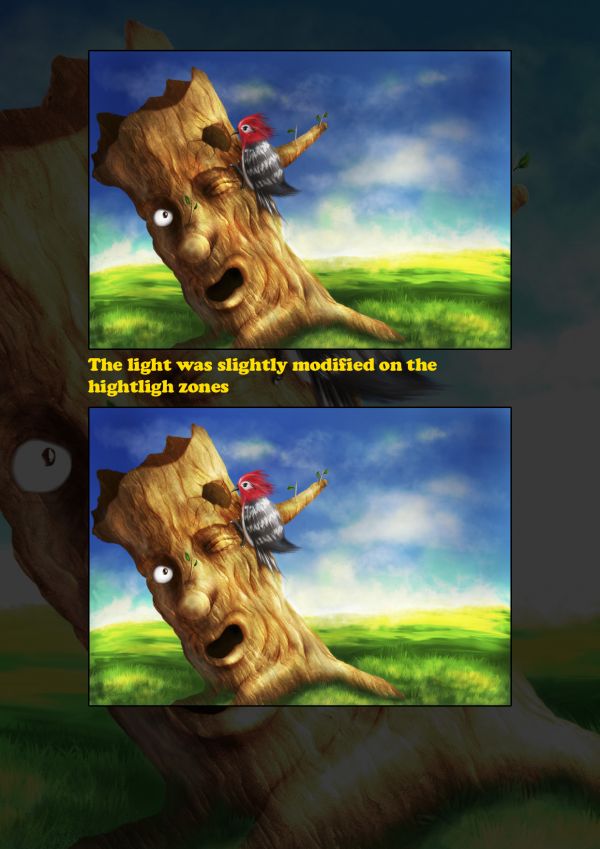
When I had almost finished the picture there was something in the light that did not convince me. The tree was too dark comparing with the background, I tried to dark the background but the result was still unconvincing.
The solution in this case was adding some light to the tree. On a new layer in the top and in overlay mode begin painting with white with a very big (>600px.) soft round brush and do not use too much opacity. In the case you end with a too bright image you can also lower the layer opacity or use the eraser tool in the zones you want.

Step 11
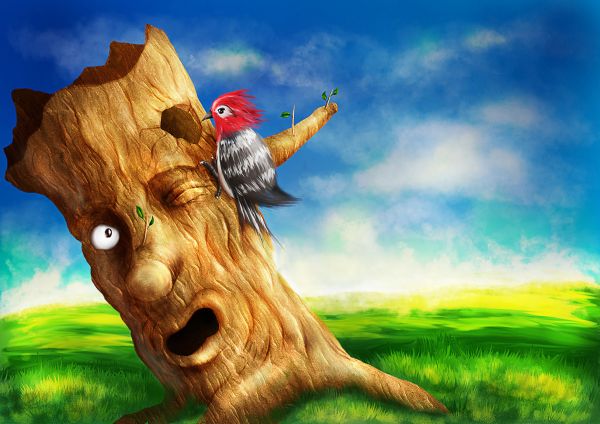
Finished

2 comments:
Better things I seen ever before. Kind of thind ever increases the work-sense. Illustration are realy shows a complete art-work in whichever way you want. This images are really helpful for Photoshop to email and other work like email Newsletter, HTML email Templates.
Online PhotoShop Editor is a free online photo editor with a professional touch. Fix, adjust and filter your images. Manage your images in your browser , No registration No download
Here : http://onlin-photoshop.blogspot.com
Here : www.onlin-photoshop.blogspot.com
Post a Comment