Photoshop CS2 Water in Floating Island

In this Photoshop tutorial, we will learn how to create a picture with two different stories, one: a town on an island and two: the deep and huge body of water below it. We will learn how to blend images perfectly, make an underwater image look realistic through the use of applying brushes in different colors, the eraser tool to soften the edges and the clone stamp tool. We will also learn how to retouch the image to further beautify the image and how to soften the contrast and make the image look dreamy.

Preview of Final Results
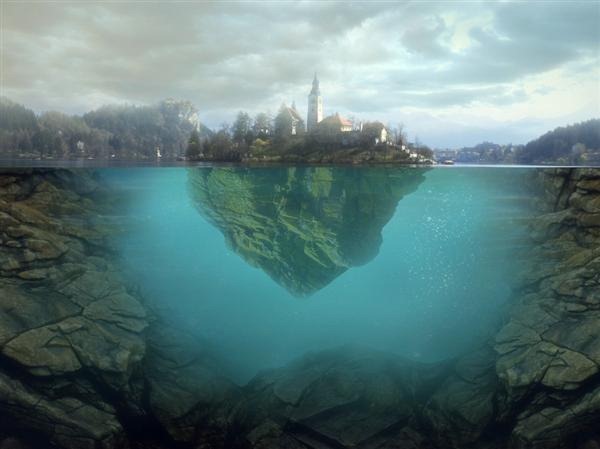
Floating Island

Photoshop CS2 Water in Floating Island Tutorial

Tutorial Details

  • Program: Adobe Photoshop CS2
  • Version: 9
  • Difficulty: Medium
  • Estimated Completion Time: 1 to 1.5 hours

Resrouces

Step 1 - Create the Photoshop document

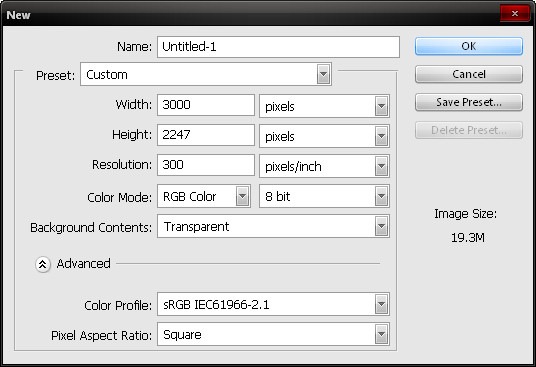
To begin, let’s create a new image file, go to the Menu bar and click on File > New, and then input the following values on their respective fields:
  • Width: 3000 pixels
  • Height: 2247 pixels
  • Resolution: 300 dpi
  • Color Mode: RGB Color; 8bit
  • Background Contents: Transparent
step1_create_new

Step 2 - Create the town above the sea

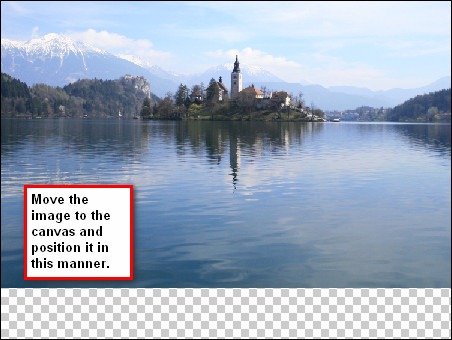
In this step, we will be creating the town situated above the sea. To start, let’s open the stock image: The Island 2. We won’t be doing editing or cutting on this image so let’s activate the Move tool (V) and left-click on the image and drag it to our canvas then rename that layer to “island town”. To rename a layer, simply double click on the words “layer 1” and the text edit box would appear and you can now rename the layer.
step2_move_image
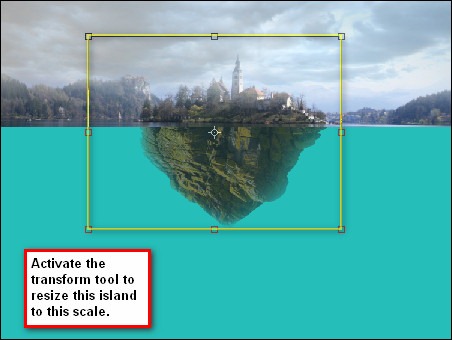
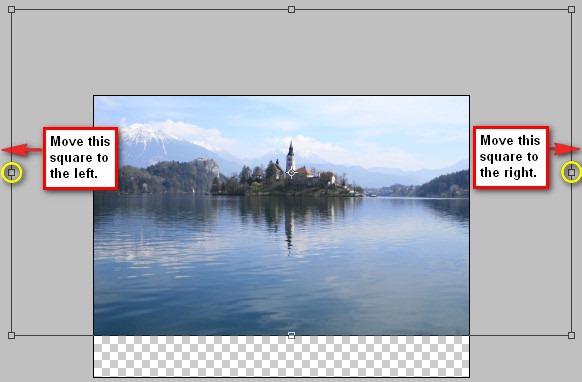
Now we will be resizing our image for composition purposes – the town above the sea is situated above a huge rock below it as well as the rest of the surrounding islands. Let’s activate the transform tool (Ctrl/Cmd + T) and to resize the image, we just need to click on the little squares that would appear around the image.
step2b_transform_image
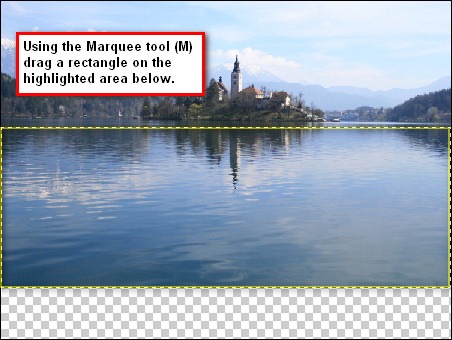
Next, we would be removing the sea on the “island town” layer for we will be putting the region under the sea on that part. Activate the Marquee tool (M) and follow the instruction on the image below:
step2c_marquee_tool
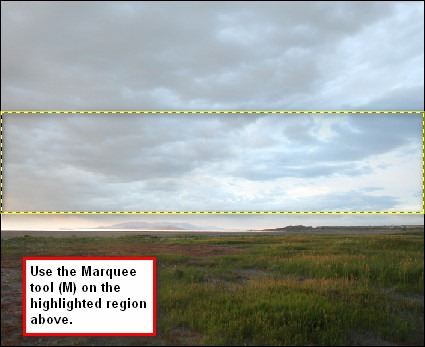
Now we will be changing the sky of this image. Open the Stormy Sky stock image, and then activate the Marquee tool (M). See image below:
step2_marquee2
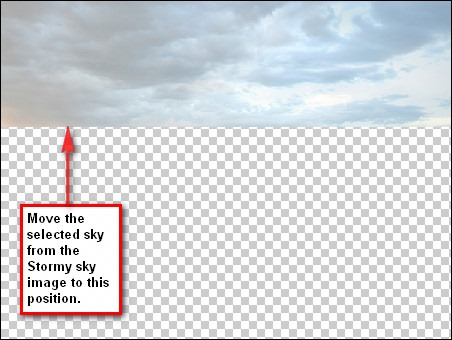
After you’ve selected the area let us now transfer that to our canvas using the Move tool (M).
step2d_move_to_this_position
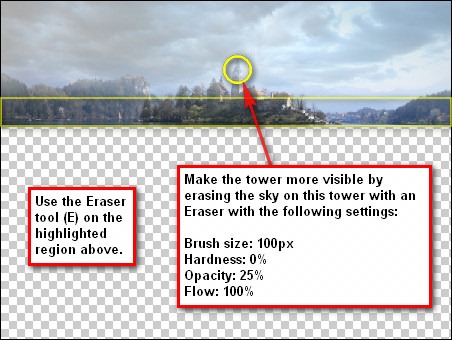
Once on the canvas rename that layer to “sky”. Next, we will make the town look dreamy. To do that, we will need the Eraser tool (E). Activate the Eraser tool (E) and use the settings below:
  • Brush size: 900 px
  • Hardness: 0%
  • Opacity: 100%
  • Flow: 100%
Note: To edit the Brush Hardness, just right click on the image when the Eraser tool is active and then you will see the Hardness option, now change it to 0%. 0% makes the brush softer while 100% makes it sharper.
step2e_eraser


Step 3 - Create the sea depths

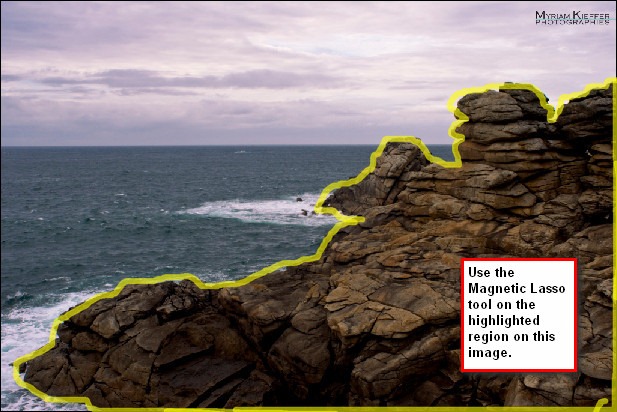
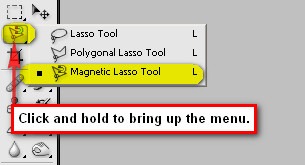
Now on this step we are going to be creating the region under the sea. First let’s add the huge rock to where the town is placed upon. Open the stock image: Little Island. We’re going to remove the island from its background, to do that we will be using the Magnetic Lasso tool (L).
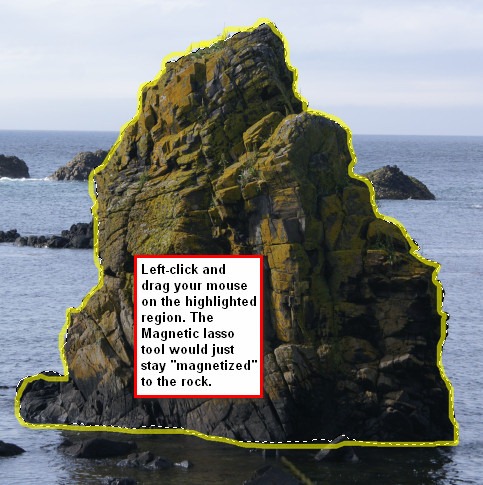
step3a_magnetic_lasso_tool
step3b_magnetic_lasso_tool
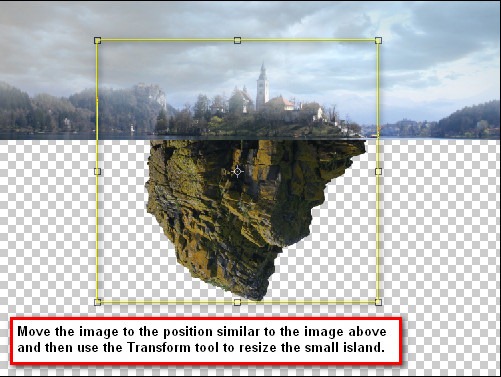
Now after you’ve selected the small island, let us transfer that to our canvas using the Move tool (V) put this layer as well as the layers that would be created on this step under the “island town” and “sky” layers. Once you’ve moved it to the canvas, rename it to “island below”. Next, activate the Transform tool (Ctrl/Cmd + T) for us to resize the image. See image below:
step3c_transform_the_island
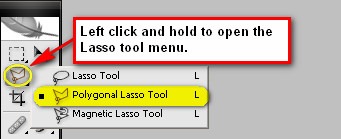
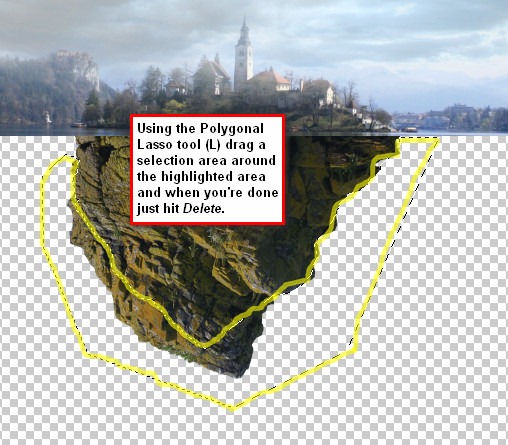
Composition-wise, the island looks off, so we would need to erase some parts of it to make it look like a triangle. Activate the Polygonal Lasso tool (L).
step3d_polygonal_lasso_tool
step3e_select_and_delete
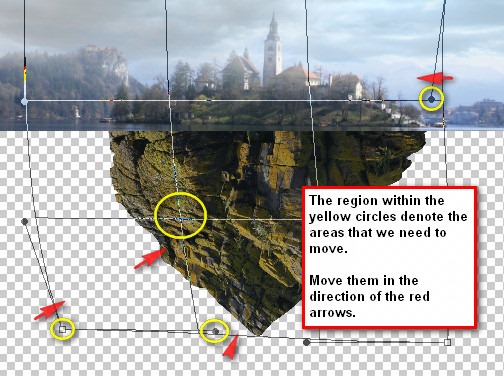
To remove the selection area lines just press Ctrl/Cmd + D to deselect. Next, let’s fix the angle of the island. Activate the Transform tool (Ctrl/Cmd + T) and right click on the canvas to bring up the contextual menu then click on Warp.
step3f_warp
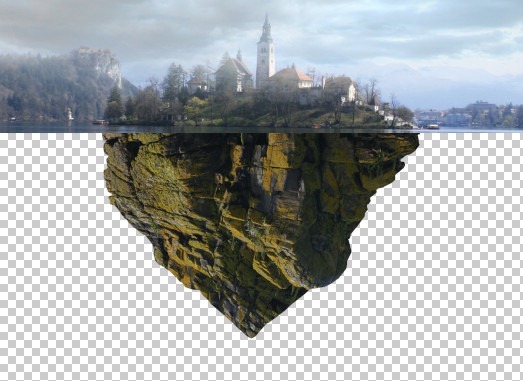
step3g_result
Next, we will be changing the brightness/contrast of the “island below” layer. To change its settings, from the menu bar, go to Image > Adjustments > Brightness/Contrast and then input the following:
  • Brightness: 2
  • Contrast: -31
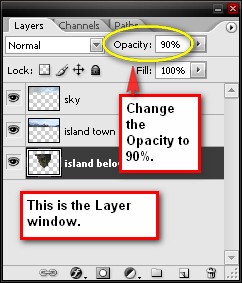
Then we would need to reduce its Opacity because basically, when the human eye opens under the sea, things don’t seem to be too clear. Let’s change the Opacity on the Layer window to 90%.
step3h_layer_window
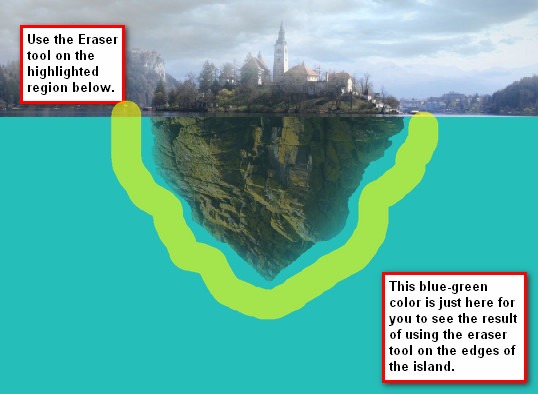
Also, we would need to soften the edges of the island since things under the sea don’t appear that sharp. Activate the Eraser tool (E) and input the values below:
  • Brush size: 700 px
  • Hardness: 0%
  • Opacity: 100%
  • Flow: 100%
step3i_erase_the_edges
step3ii_final_transformation
Now, we will be adding the mountainous region under the sea. Let’s open Sea Background Stock II, once it has been opened, activate the Magnetic Lasso tool (L) to cut the rocks from the image. See image below:
step3j_plt_this_region


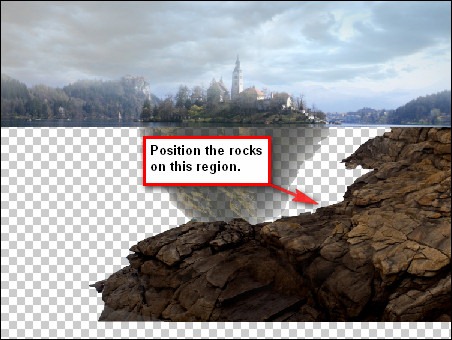
Once you’ve finished selecting the image, let us now move this pile of rocks to the canvas. Once it is in the canvas, rename that layer to “hill under the sea”.
step3k_position_the_hill
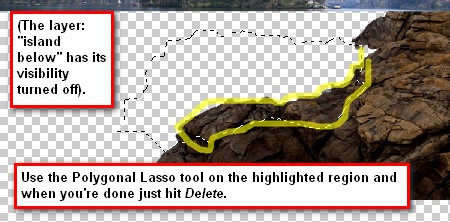
Now activate the Polygonal Lasso tool (L) for we are going to take away a part of this huge hill to as not to distract the viewer’s attention to the center of the image.
step3L_remove_this_region
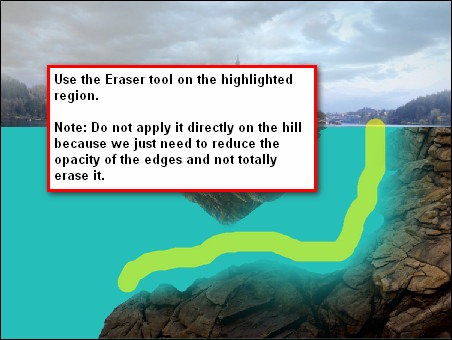
Next we would be erasing some parts of the “hill under the sea” layer to make it look like it really is underwater. Activate the Eraser tool (E) and input the values below:
  • Brush size: 700 px
  • Hardness: 0%
  • Opacity: 100%
  • Flow: 100%
step3m_erase_the_edge
Now, we would need to reduce the Saturation of the hill, because its red color is quite distracting. Click on the “hill under the sea” layer and then from the menu bar go to Image > Adjustments > Hue/Saturation or simply press Ctrl/Cmd + U while the “hill under the sea” layer is selected. When the Hue/Saturation box opens, input the following values:
  • Edit: Master
  • Hue: 0
  • Saturation: - 35
  • Lightness: 0
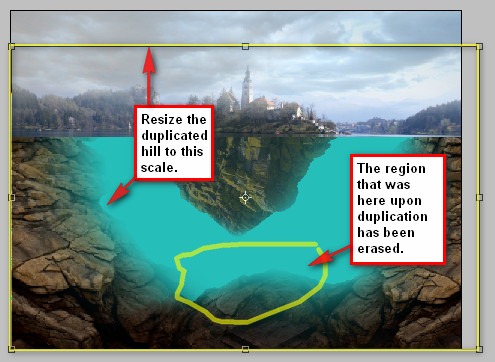
Next, what we need to do is we would need to create another hill without using another stock image. To make that happen, we just need to duplicate our “hill under the sea” layer by pressing “Ctrl/Cmd + J” then activate the Transform tool (Ctrl/Cmd +T) , right click on the canvas and pick “Flip Horizontal” from the contextual menu. When you have flipped it, activate the Transform tool once again and resize the duplicated layer and erase its region below. Note: Use the same Eraser tool values above.
step3n_duplicate_transform_erase
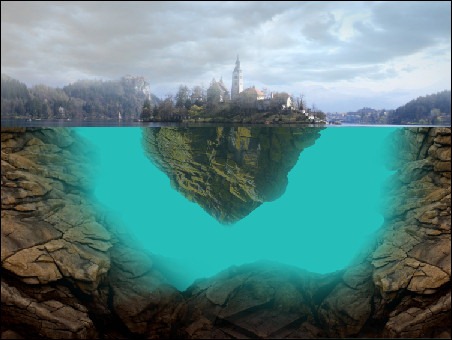
step3o_result
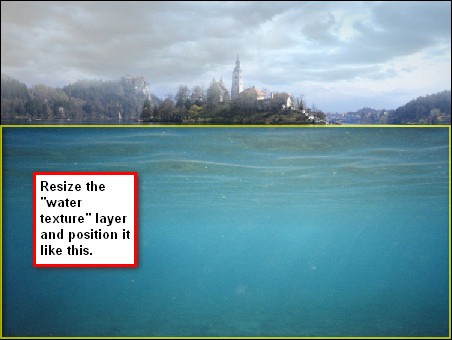
Now we will be adding another stock image and this image would serve as our water texture. Open 36…Underwater stock and move it to our canvas, and then rename the layer to “water texture” and then put this layer above all the layers on this step. Transform it as needed. See image below:
step3p_water_texture_position
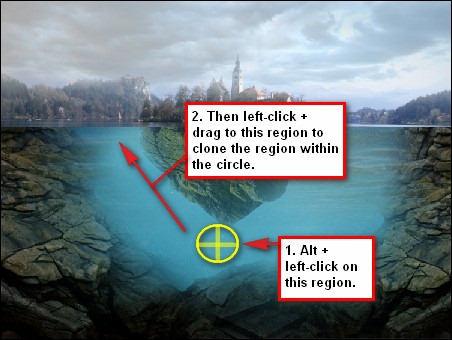
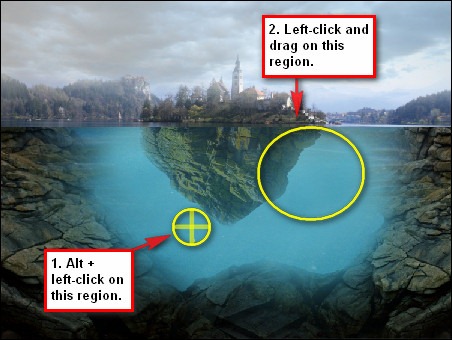
Obviously, the waves from the stock image are very distracting, so we would need to remove it. To do that, activate the Clone Stamp tool (S) and use the following values:
  • Brush size: 600 px
  • Mode: Normal
    Opacity: 100%
  • Flow: 100%
step3q_clone_1
step3r_clone_2
Now that we’re done, let’s group the layers that we’ve created. Select the layers: “island below”, “hill under the sea”, and the duplicated “hill under the sea” layer and then press Ctrl/Cmd + G to group them. You may also try pressing the folder icon on the Layer window which is the Create a New Group button and then drag the layers for this step on to that group. When you’re done rename the group to “Under the sea”
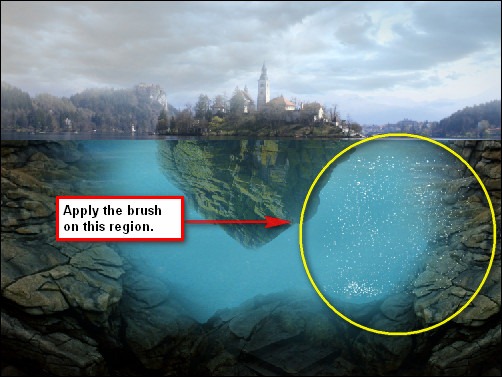
After that we would now be putting the bubbles on our image. Activate the Brush tool (B) and then right click on our image for a menu to pop up. This menu shows the brushes currently activated, but we won’t use that, what we’re going to use is Rons Winter Collection brushes! To open those brushes click on the “play” button located to the right of the Master Diameter box.
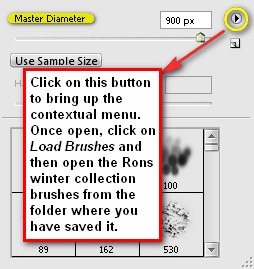
step3s_brush_menu
Create a new layer, rename it to “bubbles” put it on top of all the layers inside the “Under the sea” group and then activate your Brush tool (B) which has Rons Winter Collection brushes open and then change the brush values to the following:
  • Brush size: 900 px
  • Hardness: default
  • Opacity: 100%
    Flow: 100%
step3t_apply_the_brush


We will be erasing the excess to make the bubbles look realistic. Activate the Eraser tool (E) and set its values to the following:
  • Brush size: 700 px
  • Hardness: 0%
  • Opacity: 100%
  • Flow: 100%
step3u_erase_this_region
If you’d look carefully these bubbles still look unreal, so to make it blend in seamlessly, let’s reduce its Opacity to 50%.

Step 4 - Retouch the image

In this step we would be retouching the overall image, we would be painting a dark blue color on the region under the sea and a little blue green color on the surface of the sea as well to make it look realistic. We would also be adding some general changes to our image like changing its color, its brightness and its contrast and a lot more.
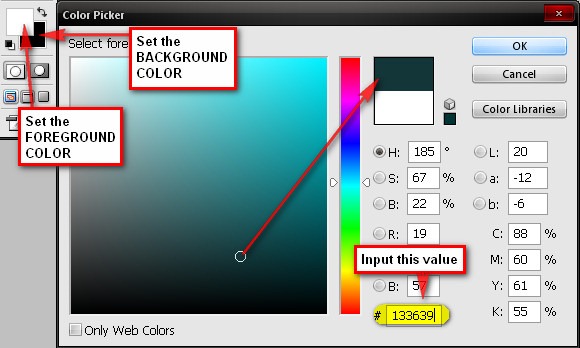
So to begin, let’s create a new layer, put it on top of the “bubbles” layer and name it “dark blue”. Activate the Brush tool (B) and let’s change the color of our Brush by clicking on the foreground color on the Color picker on the Tools menu. Once the Color Picker box opens, input the following values:
  • #: 133639
step4a_color_picker
Next, activate the Brush tool (B), then right click on the canvas and click on the “play” button once again and click on “Reset Brushes” then use the following brush settings below:
  • Brush size: 900px
  • Hardness: 0%
  • Opacity: 100%
  • Flow: 100%
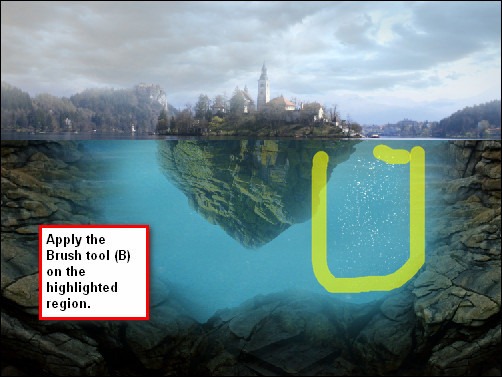
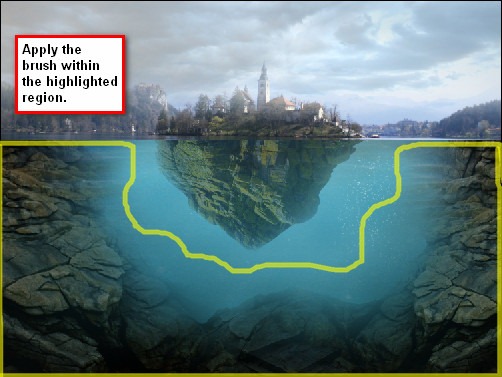
Now we’re all set to paint! Click on the “dark blue” layer and follow the instructions on the image below:
step4b_apply_the_brush
Now let’s add a little blue green color on the area just below the surface of the body of water and on the island itself. Create a new layer and rename it to “blue-green” and then click on the Set foreground color button and input the following value:
  • #: 25beb9
Use the following brush settings:
  • Brush size: 600px
  • Hardness: 0%
  • Opacity: 15%
  • Flow: 100%
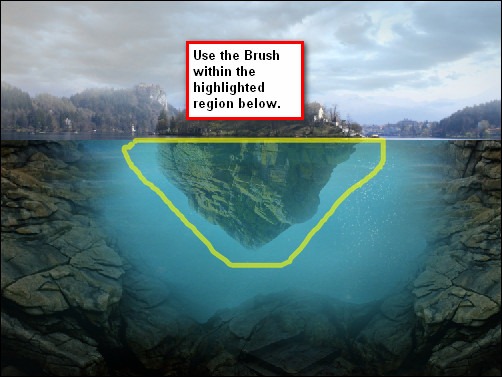
See image below for instructions:
step4bb_apply_the_brush_2
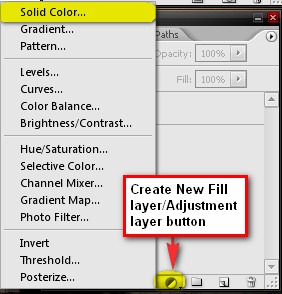
After that we would start adjusting the colors and brightness/contrast of the overall image. First, let’s create a Solid Color adjustment layer. To do that, click on the black and white circle button on the Layer window or better known as the Create New Fill layer/Adjustment layer button and click on Solid Color once the contextual menu opens.
step4c_create_new_fill_layer_adjustment
Once the Solid Color box opens, input the values below:
  • #: 000228
Your workspace would now be filled with a dark blue color but in order to apply that to our image, let us change its Blending mode to Exclusion and its Opacity to 40%.
Note: The Blending modes are available at the Layer window just to the left of the Opacity value. (The text shown is simply Normal) Click on the drop-down menu to see the Blending modes.
Let’s create another Solid Color but this time input the value below:
  • #: 2f6e89
Set its Blending mode to Overlay and its Opacity to 25%.
Next let’s create a Curves adjustment layer. When the Curves box opens, follow the instructions below:
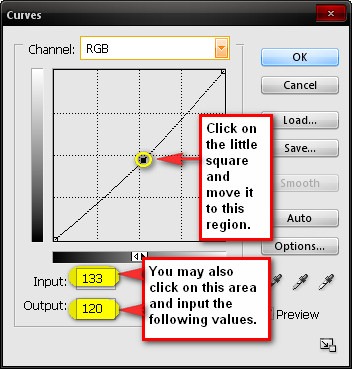
step4d_curves
Then let’s create another Solid Color adjustment layer, and then when the box opens, input the following value:
  • #: b4f9ff
  • Blending mode: Soft Light
  • Opacity: 20%
Then after that, let’s create a Color Balance adjustment layer and then let’s input the following values:
  • Color Levels: 23, 0, -24
  • Tone Balance: Midtones
  • Preserve Luminosity: Checked
Finally, let’s create a Brightness/Contrast adjustment layer and when the box opens, let’s input the following values:
  • Brightness: 6
  • Contrast: 6

Step 6 - Make the image look dreamy

In this step, we would creating an effect which would make our image look dreamy or in more technical terms to soften the contrast. To do that, I advise you to save your file first as a PSD file, so in the future you could edit the image. Now, the process is like this, right click on any layer to bring up the contextual menu and when the menu pops up click on Flatten Image. As soon as it is Flattened duplicate that layer (Ctrl/Cmd + J), and then go to Filter > Blur > Gaussian Blur on the Menu bar and input these settings:
  • Radius: 16.0 pixels
Then change its Blending mode to Lighten and its Opacity to 40%. After that just right click on any of those two layers and click on Flatten image. Finally, let’s sharpen the pixels to make the image look crisp. To Sharpen the image, go to Filter > Sharpen > Smart Sharpen and input the following values:
  • Settings: Default
  • Amoutn: 125%
  • Radius: 1.0 px
  • Remove: Gaussian Blur
You might be thinking that sharpening it after making the image look dreamy is absurd, but it’s actually not. It actually makes the pixels sharper and clear but still maintaining the dreamy atmosphere.

Final Results

Floating Island

1 comments:

Anonymous said...

I did this tutorial and was very pleased with my outcome. I posted the picture I made on a wall in my next game. The tutorial was excellent, very easy to follow. Thank you so much

StarLite Moon

Post a Comment