Final Product What You'll Be Creating

Tutorial Assets
- Flower texture
- Net Texture
- Diagonal Texture
Step 1
Create a new document, 600 x 600 px. Before we proceed with this tutorial, take a look at the area setup and arrangement. Make sure each color area is on its own layer and name them as shown below.

Step 2
For "heart up" layer, choose Custom Shape tool, select heart shape to make the shape as show image below.

Step 3
Press Cmd/Ctrl + T to transform the shape as show image below. Then press Cmd/Ctrl + Enter to make a selection and fill it with any color.

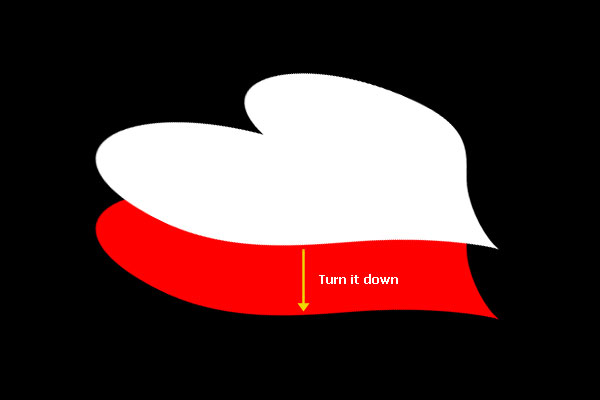
Step 4
For “heart front” layer, press Cmd/Ctrl + J to duplicate “heart up”. Rename new layer “heart front” and move it under “heart up”. Then turn it down as show below.
Step 5
Draw the shape like the image as show below using Pen tool. Then fill it with the color that used to “heart front”.


Step 6
For “heart back” layer, use Pen tool to drawn as show in images below. We should group all of heart layers to a folder and call it “heart”.


Step 7
Before you add details to the heart you need you make the background. Because it is very easy to do this, so I will not tell you how to do, just make something like image below.

Step 8
Add the following layer style to “heart up”.


Step 9
Add the following layer style to “heart front”.


Step 10
Add the following layer style to “heart back”.


Step 11
Press Cmd/Ctrl + J to duplicate “heart front”, rename new layer “heart bottom”. Move this layer under “heart front” and turn it down as image show below.

Step 12
Press Cmd/Ctrl + T to transform it. So “heart bottom” is smaller than “heart front” a little.

Step 13
We only change Inner Shadow in layer style of "heart bottom" and keep the other style.


Step 14
Add the flower texture to the heart. Change its Blending Mode to Soft Light and reduce Opacity to 20 degree.

Step 15
Create a new layer under "heart front", call it "front shadow". While holding Cmd/Ctrl down click on "heart front" to obtain its selection and fill black color. Go to menu Filter > Blur > Blur More. While holding Cmd/Ctrl down click on "heart bottom" to obtain its selection. Then press Cmd/Ctrl + Shift + I to reverse the selection and press Delete to delete the excess area.

Step 16
Outside “heart” folder, create new folder on top, call “golden ribbon”. In this folder, create new layer, call it “ribbon”. Use Pen tool to draw the following images as show below.


Step 17
Reduce its Fill to 0 degree and add layer style to it.


Step 18
Create new layer upon "ribbon", call it "ribbon border". While holding Cmd/Ctrl down click on "ribbon" to obtain its selection and fill any color. Use Pen to drawn the shape as show image below. Then press Cmd/Ctrl + Enter to make the selection from this shape and press Delete.


Step 19
Add the following layer style to "ribbon border".


Step 20
Create new layer under “ribbon”, call it “ribbon net”. I made the “net texture” already. So you only need to download it and add to “ribbon net” as show below.

Step 21
Add the following layer style to “ribbon net”.


Step 22
Create new layer under “ribbon net”, call it “ribbon shadow”. Use Pen tool to drawn as image show below.

Step 23
Set Brush as show below. Then while choosing Pen tool right click on the Path and select Stroke Path with brush.


Step 24
Reduce Opacity of "ribbon shadow" to 50 degree.

Step 25
Create new layer upon "ribbon border" call it "ribbon light". Draw a white line as image below and reduce its Opacity to 60 degree.


Step 26
Select “heart” folder and “ribbon” folder right click and choose Duplicate Layers. Press Cmd/Ctrl + E to merge two new folders into one new layer and rename it “reflection”. Move it under “heart bottom” and turn it down as show in image below.

Step 27
Delete the area in selection.


Step 28
Go to menu Filter > Blur > Gaussian Blur, set Radius: 3px.

Step 29
Press Cmd/Ctrl + T to transform “reflection” and reduce its Opacity to 30 degree.


Step 30
Add the layer mask to “reflection”. Use Brush tool with black color to draw as image below.


Step 31
Create new layer under “heart bottom”, call it “box shadow”. While holding Cmd/Ctrl down click on “heart up” to obtain its selection and fill black color. Then turn “box shadow” down as show in image below.

Step 32
Go to menu Filter > Blur > Gaussian Blur, set Radius 10px.


Step 33
Press Cmd/Ctrl + T to transform it to smaller and reduce its Opacity to 40 degree.


Step 34
Create new folder between “heart” and “golden ribbon”, call it “white card”. Create new layer in this folder, call it “card”. Use Rounded Rectangular tool (set radius 3px) to draw as show in image below, fill it with any color.

Step 35
Add the following layer style to “card”.


Step 36
Add “diagonal texture” and reduce its Opacity to about 8 degree. I made it already. You only need to download it for using.

Step 37
Choose Horizontal Type tool, set it as show in image below and type any text.

Step 38
Merge all of layers in “while card” into new one. Press Cmd/Ctrl + T and while holding Cmd/Ctrl down transform it as show below.

Step 39
Add the following layer style to it. So we have done.


0 comments:
Post a Comment