Step 1
In this Step I have provided all the links to the sources I have used to make this image.
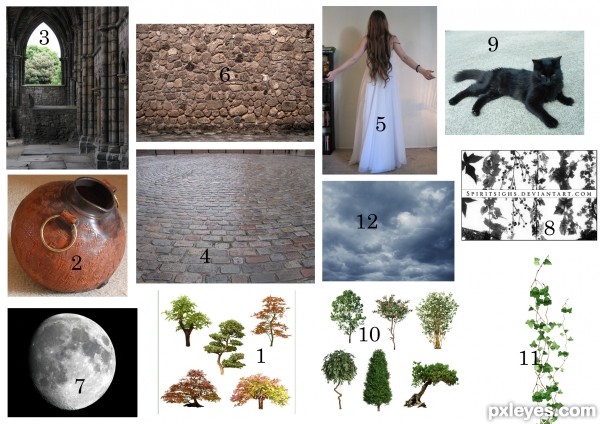
Sources:-
1. TREE Stock:
(Thanks to Linzee777)
2. PITCHER:
(Thanks to SalsolaStock)
3. Window:
(Thanks to inkd-in-blood)
4. Floor:
(Thanks to CamaroGirl666-Stock)
5. Lady
(Thanks to sinned-angel-stock)
6. Stone wall
(Thanks to jrrhack )
7. Moon
8. Plant Brush
(Thanks to spiritsighs-stock)
9. Cat
( Thanks to jetblackvelvet-stock )
10. Tree Stock
( Thanks to linzee777 )
11. Vine Weed
( Thanks to sheisprettystock )
12. Sky
( Thanks to arca-stock )
Step 2
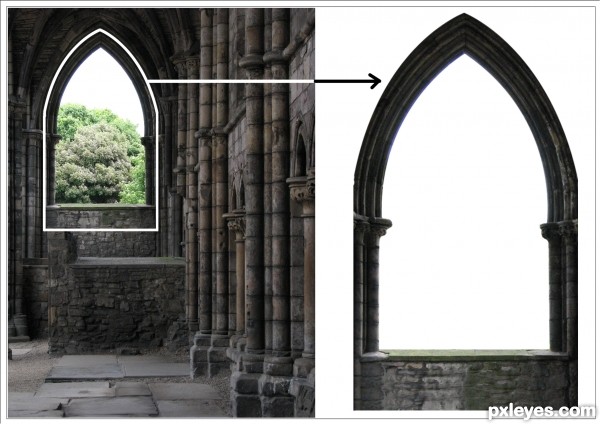
We start of by creating a new .psd file of 2292px width and 1620px height, 72 dpi. After that we bring in the Source 3 (window) and extract the window with a pen tool as shown.
Step 3
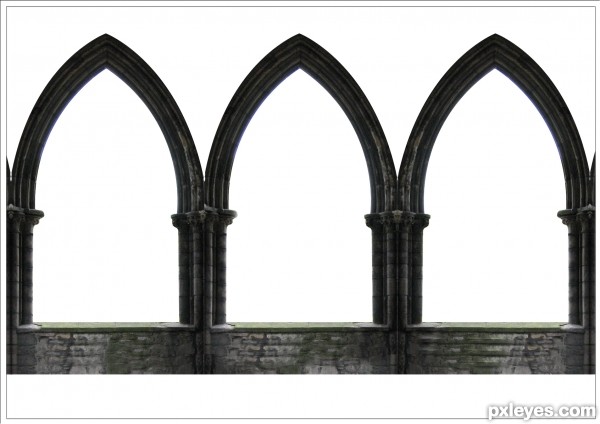
Now we copy the same layer 3 times and scale it according to the dimensions of the .psd file we created i.e 2292px width and 1620px length. Then we select all the layers together and merge them and name the layer WINDOW.
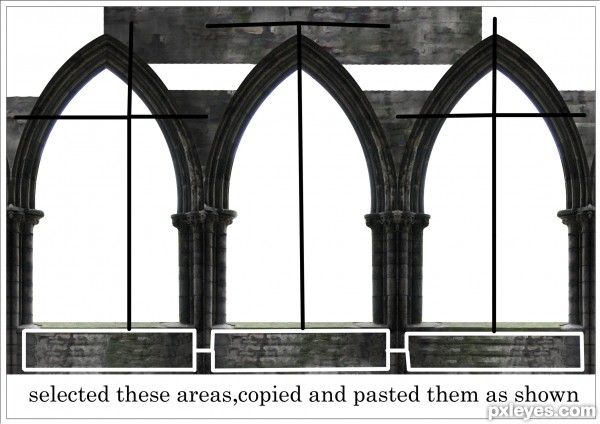
Step 4
In this step with any of the various selection tools provided by Adobe Photoshop we select the white marked portions, copy them[Ctrl+C], paste them[Ctrl+V] in different layers and arrange them as shown. Then we merge all the layers and name the layer UPPER WALL. This UPPER WALL layer will be placed below the WINDOW layer.
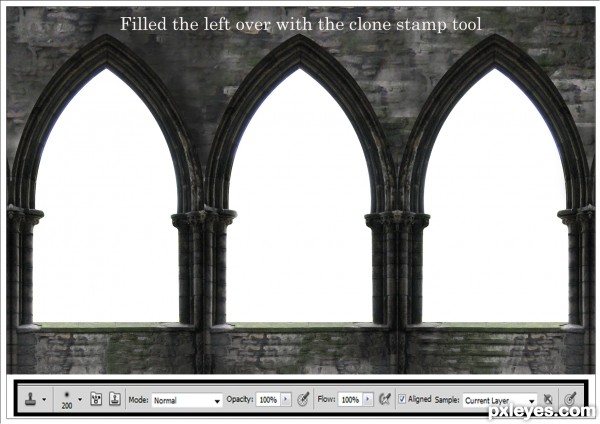
Step 5
Now we will complete the UPPER WALL and fill the empty spaces with a clone stamp tool [settings given below in the image]. For that we hold Alt button and take sample of the portions which we pasted on Step 4 and fill up the empty or blank portions. The image would look as follows:
Step 6
Then we take a Burn Tool [settings given below in the image] and darken the portions of the UPPER WALL layer as shown below. The areas marked with white should be darker than the areas marked with yellow.

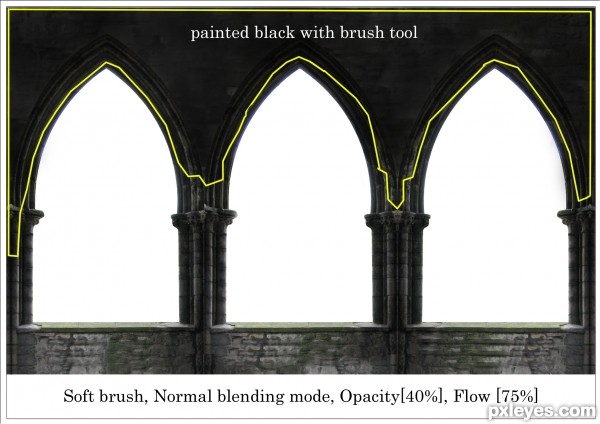
Step 7
Now we make a new layer over the UPPER WALL layer and paint with a soft round brush [settings given below in the image] with black color [#000000]. We name this layer UPPER WALL BLACK PAINT. This we do because the upper portion of the wall is in complete darkness away from the moon's light.
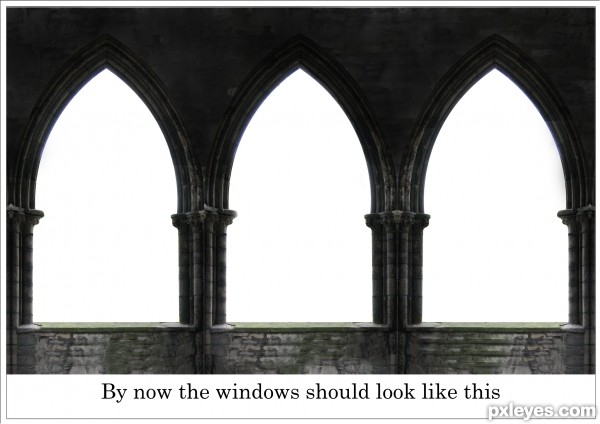
Step 8
After Step 7 our image should look like this.
Step 9
Now we bring in the Source 4 (Floor). Select the area marked in black with a pen tool and copy paste it on a new layer. We name this layer FLOOR.
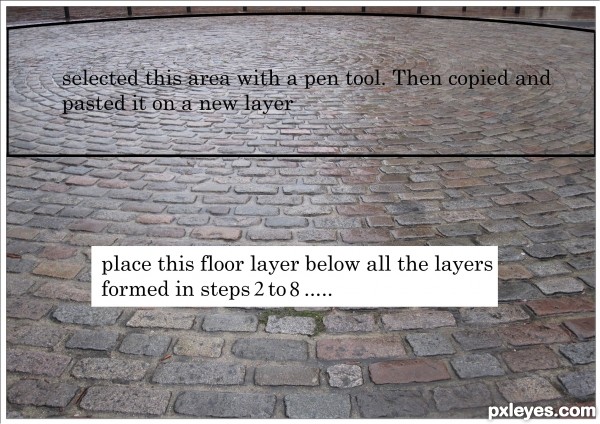
Step 10
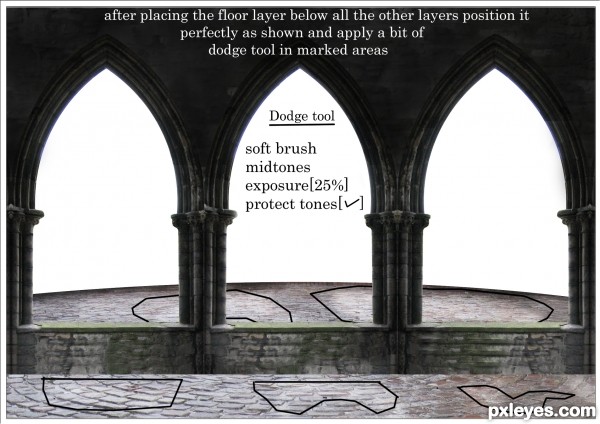
Next we place the FLOOR layer below all the layers made in Steps 2-8 and position it as shown in the image below. Henceforth we take a Dodge Tool [settings given below in the image] and apply them on the areas marked in black.
Step 11
Then we bring in our Source 6 (Stone Wall) and select a square shape (as marked in the image below) and Copy and Paste it several times. We now arrange all these layers side by side to make a long wall as shown. Then we merge all these layers and name it STONE WALL.
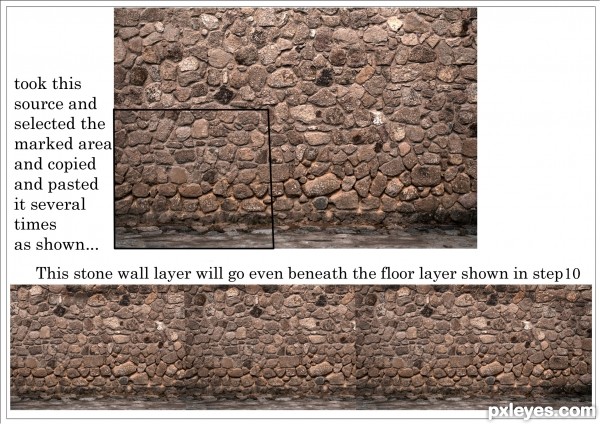
Step 12
After our stone wall is ready, we place this layer below the FLOOR layer and position it as shown in the image below. Then with a pen tool we select the upper portion of the stone wall [parallel to the floor edge] and eliminate or remove it [the portion as marked below].

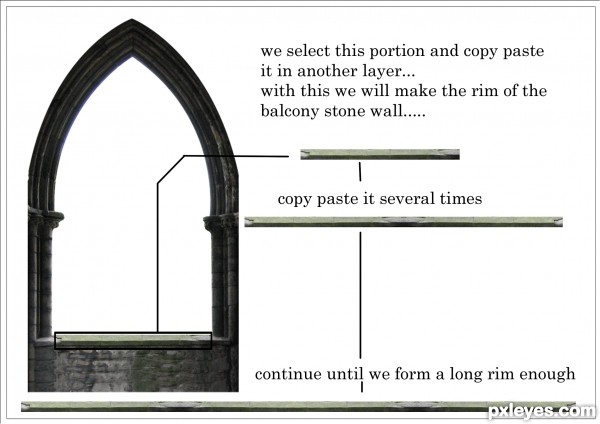
Step 13
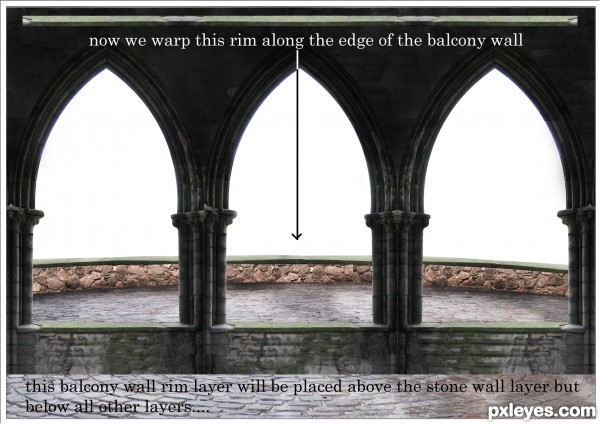
In this step we make the rim of the stone wall. For this we go to the WINDOW layer and select the rim of the window as shown. Then we Copy and Paste it several times and then merge them down to make a long rim. We name this layer STONE WALL RIM. This layer will be placed above the STONE WALL layer.
Step 14
Now we place the rim made in Step 13 along the upper edge of the stone wall. I used Puppet Warp option of Adobe Photoshop CS5 to warp it along the edge but you can warp it using Free Transform [Ctrl+T] option.
Step 15
Now in this step we do the job of merging all these layers well. For that we take a soft round brush [settings given below in the image] and paint on the white areas as shown in the image below.

Step 16
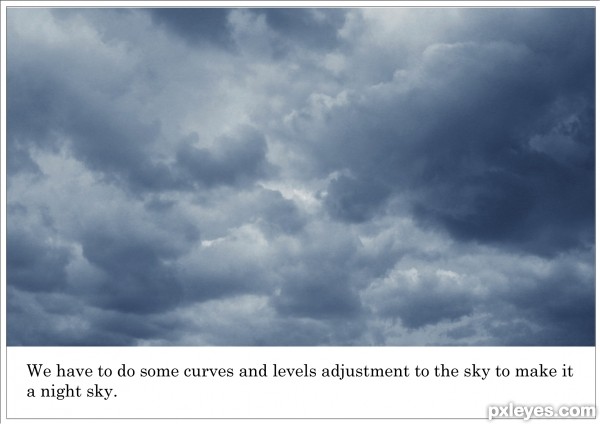
We bring our next Source image that is Source 12 (Sky). As it is not a night sky we definitely have to make it darker.
Step 17
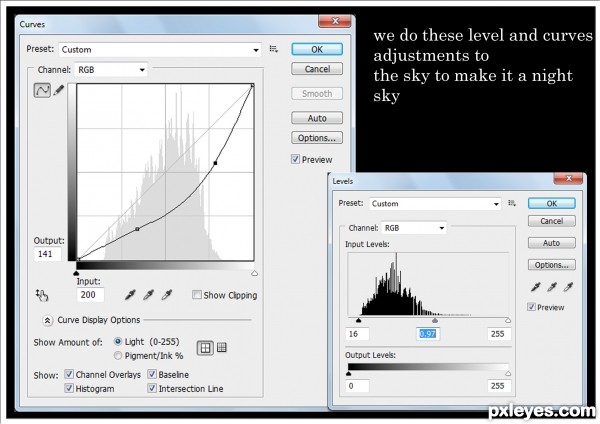
To make the sky a night sky we make some levels and curves adjustment [settings given below in the image] which we do by going to Image->Adjustment->Levels; Curves.
Step 18
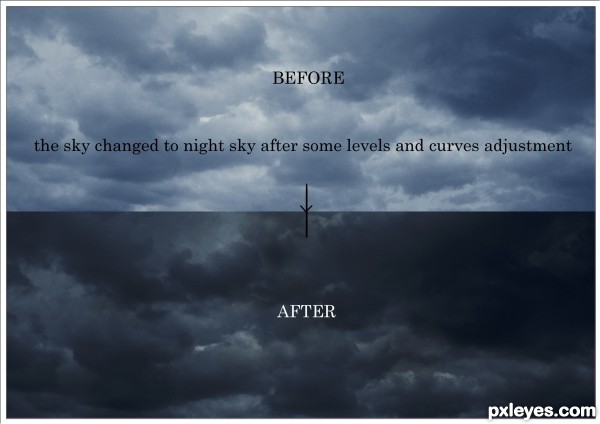
In this step we have portrayed the before and after effect to the sky due to the levels and curves adjustment. We name this layer SKY.
Step 19
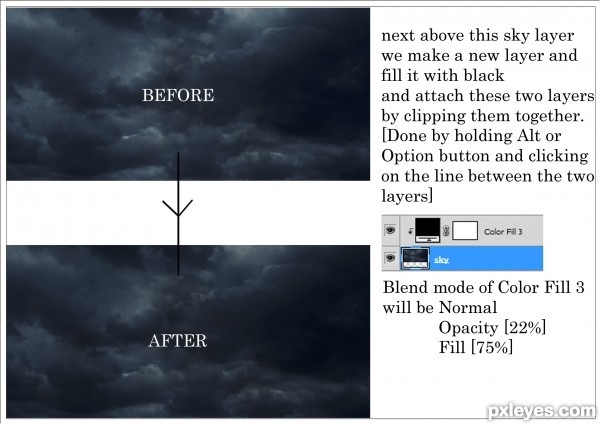
In this step we make a Black [#000000] Color Fill adjustment layer above the sky layer and clipped these two layers together as shown.
Step 20
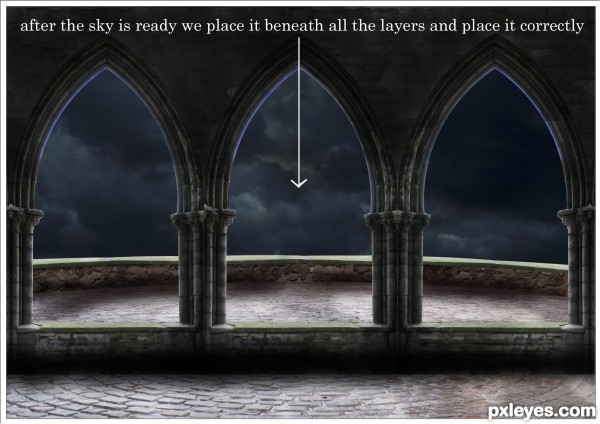
Now that our sky is ready we place this SKY layer below all the other layers and position it as shown below.
Step 21
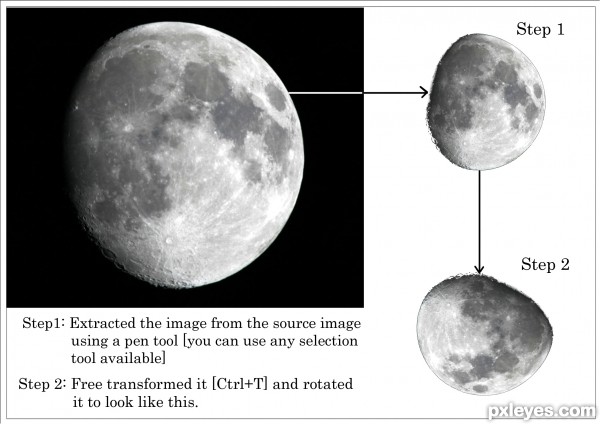
Here we bring in our Source 7 (Moon) and thereafter we follow the steps as described in the image below.
Step 22
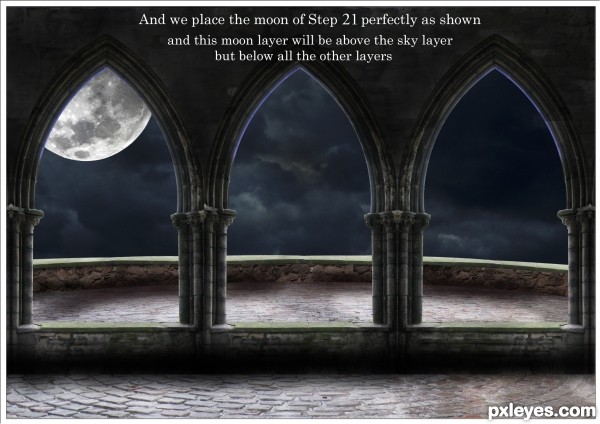
Then we place this moon layer just above the SKY layer but below all the other layers and position it to the left as shown. We name this layer MOON.
Step 23
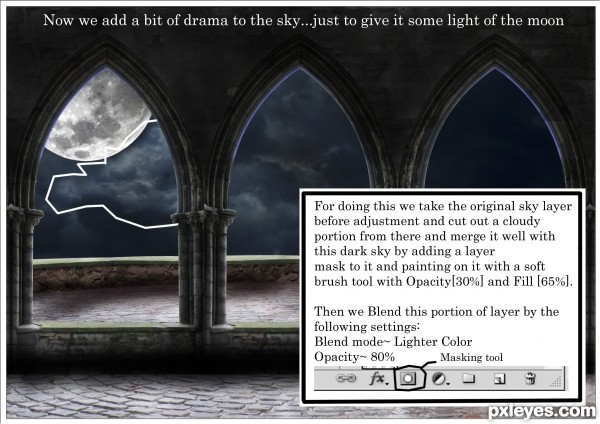
In here we add some lighting effect to the clouds caused because of the moon light. The process to do that is described in the following image. We name this layer WHITISH DARK CLOUD.
Step 24
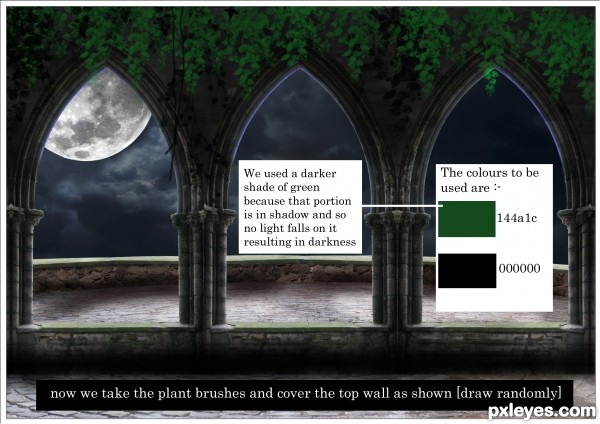
Now in this step we will paint the weeds on the upper wall portion of the image. For that we take ourSource 8 ( Plant Brushes ) and paint the plants with 100% Opacity as shown. The colors that we will use are mentioned in the image below. We will place this layer above the UPPER WALL layer. We will name this layer PAINTED PLANTS-TOP.
Step 25
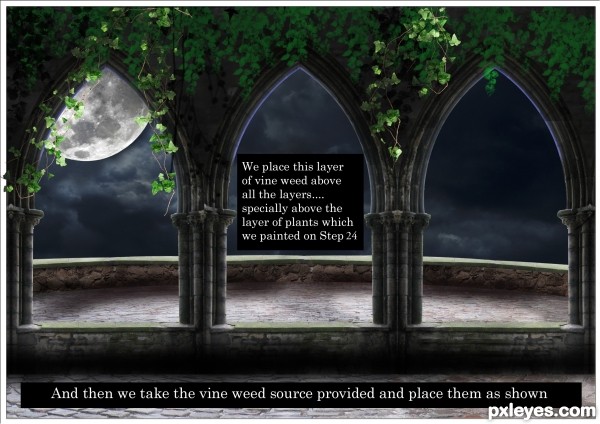
Next we bring our Source 11 ( Vine Weeds ). We make several (around 4) copies of this layer and position the plants as shown in the image below. We merge all these layers together and name it VINE WEEDS. The layer order is mentioned in the image below.
Step 26
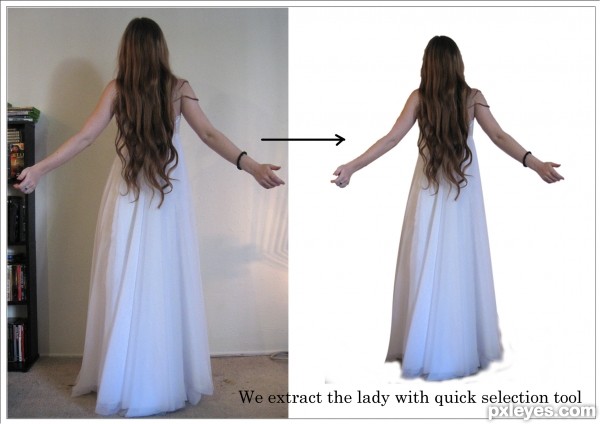
Next we will bring in our source 5 ( Lady ) and extract the lady out from the source image with a quick selection tool as shown. We name this layer LADY.
Step 27
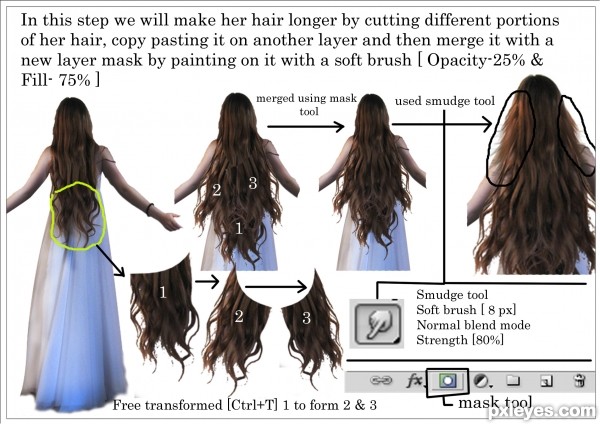
In this step I have show the Step by Step process on how I made the hair of the LADY long. All the instructions are mentioned below in the image. We name these layers HAIR EXTENSION 1, 2 and 3 respectively and HAIR-SMUDGED LEFT FRINGE and HAIR-SMUDGED RIGHT FRINGE. We place these layers above the LADY layer.
Step 28
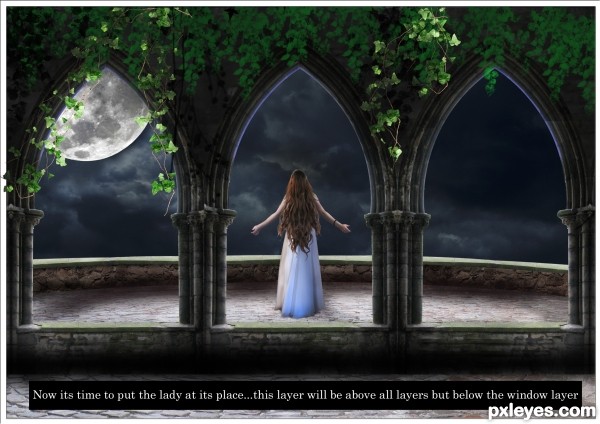
Now as our LADY is ready we bring the LADY layer along with the extensions and fringes into our main image and place it as shown.
Step 29
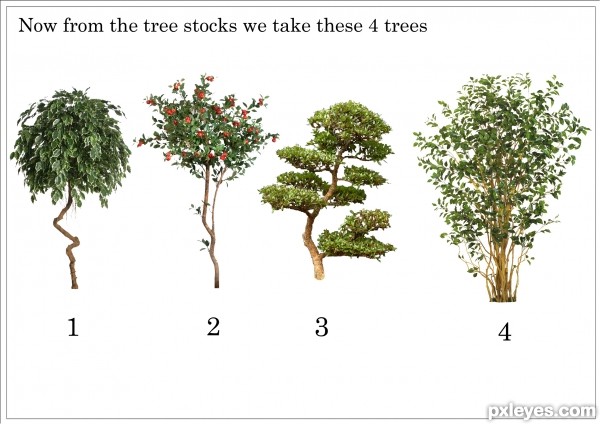
In this step we select 3 plants and 1 tree as shown below from the Source 1 and 10. We select the tree (No. 3) from Source 10 and the plants (No. 1, 2 and 4) from Source1.
We named these layers as follows:-
Plant 1-> BALCONY PLANT-RIGHT
Plant 2-> INSIDE WALL PLANT- LEFT
Tree 3-> BIG OUTSIDE TREE
Plant 4->BALCONY PLANT- LEFT
We named these layers as follows:-
Plant 1-> BALCONY PLANT-RIGHT
Plant 2-> INSIDE WALL PLANT- LEFT
Tree 3-> BIG OUTSIDE TREE
Plant 4->BALCONY PLANT- LEFT
Step 30
Accordingly we position the plants and the tree selected in Step 29 as shown below. Their positions have been marked by their respective numbers.

Step 31
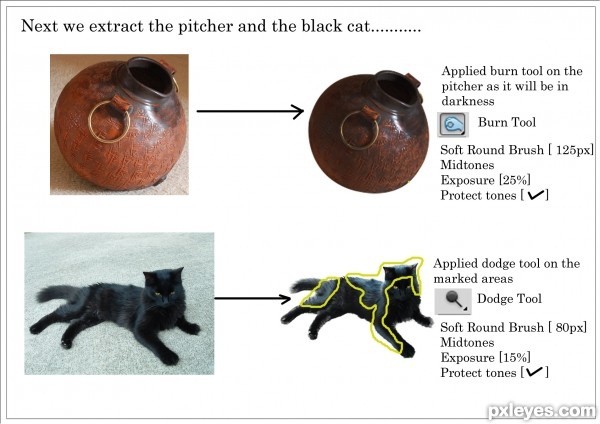
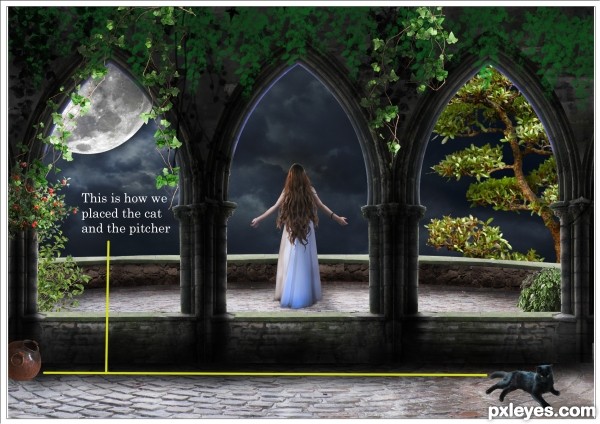
Now we take our Source 2(pitcher) and Source 9(cat). We extract the two sources using the quick selection tool and do as shown below in the image. We name these two layers PITCHER and CAT.
Step 32
In this step I have shown position of the PITCHER and the CAT in our image.
Step 33
This is the most crucial step of all. In this step we paint the shadows and highlights. I have drawn the shadows and highlights of each and every object in separate layers and named them accordingly. Remember the shadow layers should be below our object layer and the highlight layers should be above our object layer. For painting the shadows and the highlights we take a SOFT ROUND BRUSH [black color] with following settings:- Blend Mode- Normal ; Opacity [25-30%] and Fill [70%] and paint the shadows in the areas marked in yellow as well as in black[for the lady].

Step 34
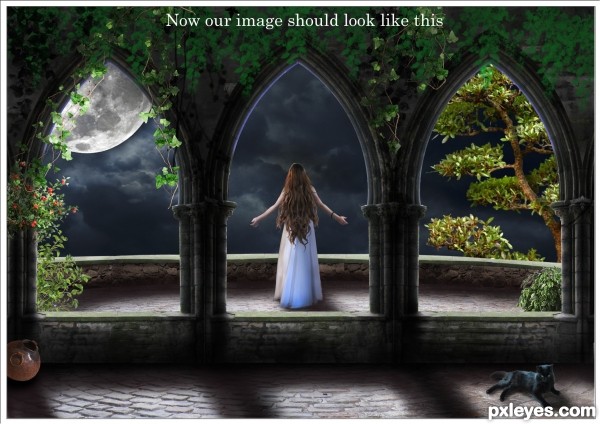
If your shadow painting is kind off what I did, then by now our image should look like this.
Step 35
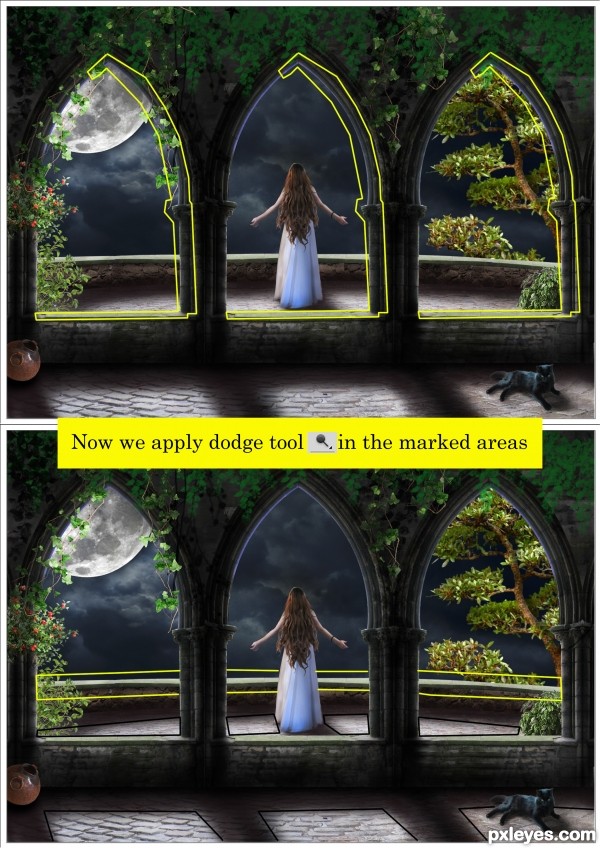
Now in this step we apply the dodge tool on the areas marked in yellow and black. If you notice all these marked sections are the places where our moon light falls.
The Dodge Tool settings are as follows:
Soft Round Brush [50px]
Range->Midtones
Exposure->30%
Protect Tones [ ticked ]
You can also apply a bit of dodge tool on the CAT’s eyes.
The Dodge Tool settings are as follows:
Soft Round Brush [50px]
Range->Midtones
Exposure->30%
Protect Tones [ ticked ]
You can also apply a bit of dodge tool on the CAT’s eyes.
Step 36
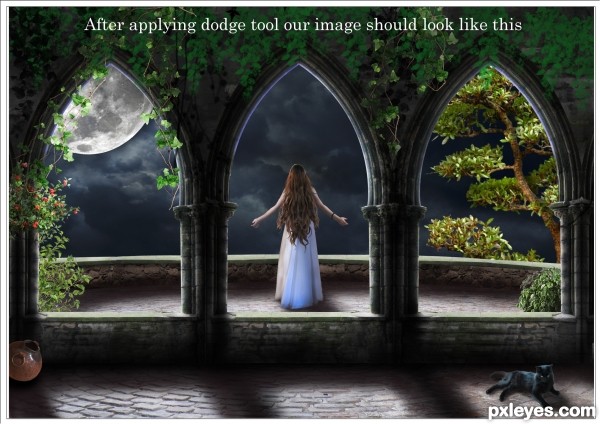
After we are finished applying the dodge tool our image should look like this.
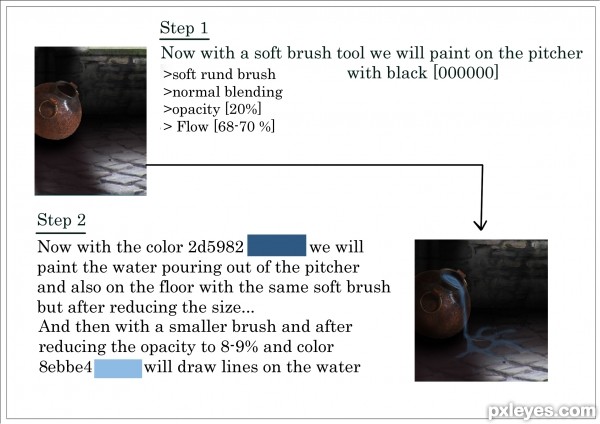
Step 37
In this step we darkened the pitcher and painted the water. The image below shows the process:-
Step 38
Now we add some further detailing to our image. As it is an old building the corners of the rock can’t be so smooth. So we make the edges a bit rough with some bumps and broken edges.
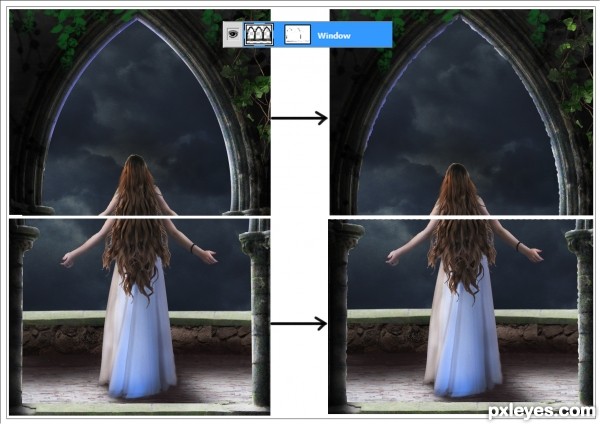
For this we added a layer mask to our WINDOW layer and with a hard edged round brush in Opacity->100% we paint with black color. Don’t make the edges too rough or too deep. Just subtle roughness and depth as shown in the image below would be perfect. In the image below I have shown detailing for just 1 window. We do this for all the 3 windows.
For this we added a layer mask to our WINDOW layer and with a hard edged round brush in Opacity->100% we paint with black color. Don’t make the edges too rough or too deep. Just subtle roughness and depth as shown in the image below would be perfect. In the image below I have shown detailing for just 1 window. We do this for all the 3 windows.
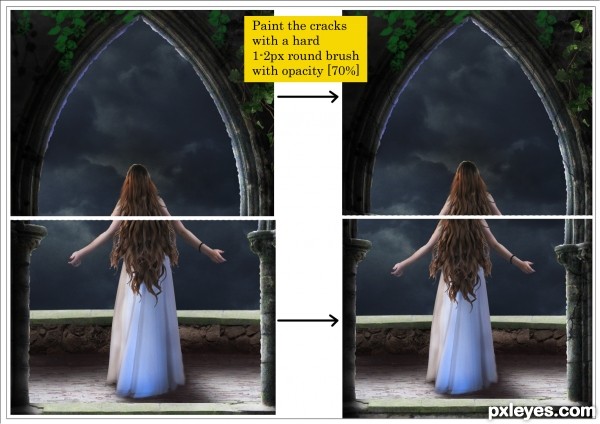
Step 39
Now we go into further detailing. We make a new layer above the window layer and name it CRACKS. Now with a hard round brush [1-2px] [ black color ] we draw the cracks very carefully. We vary the opacity as we draw, around the standard opacity shown in the image below i.e. 70%. I have shown these cracks for one window. We do this for all the 3 windows in 3 different layers.
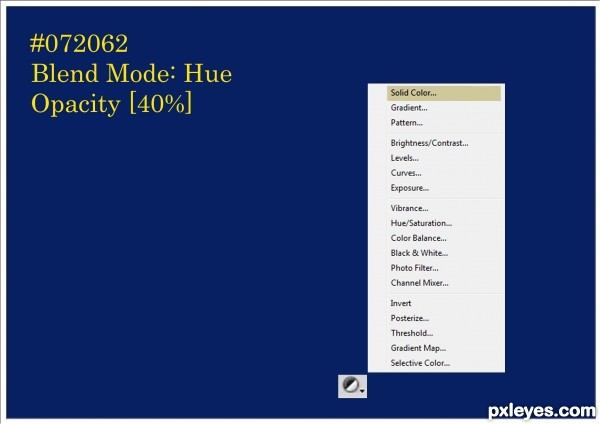
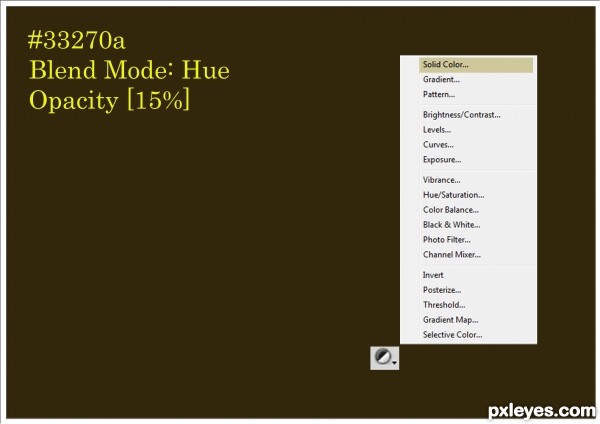
Step 40
Now above all the layers we add a Solid Color adjustment layer with the color and settings as given below:
Step 41
Now above the layer we made in step 40 we add another Solid Color adjustment layer with the color and settings as given below:
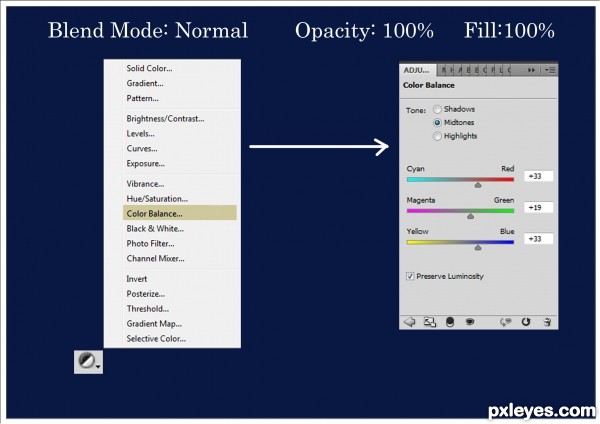
Step 42
Now above the layer we made in step 41 we add a Color Balance adjustment layer with the settings as given below:
Step 43
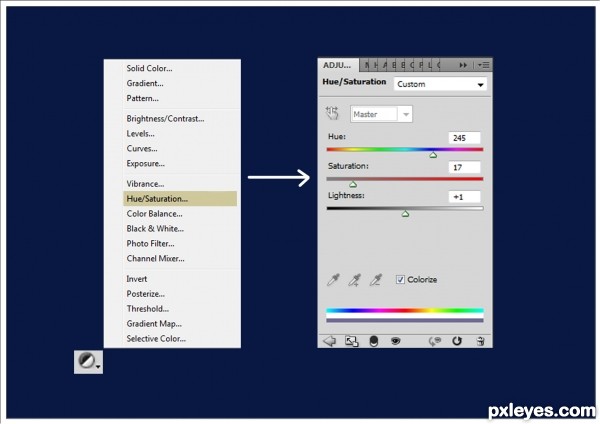
And finally to finish off the image we add a Hue and Saturation adjustment layer above the layer created in step 42 with the settings as given below:
Step 44
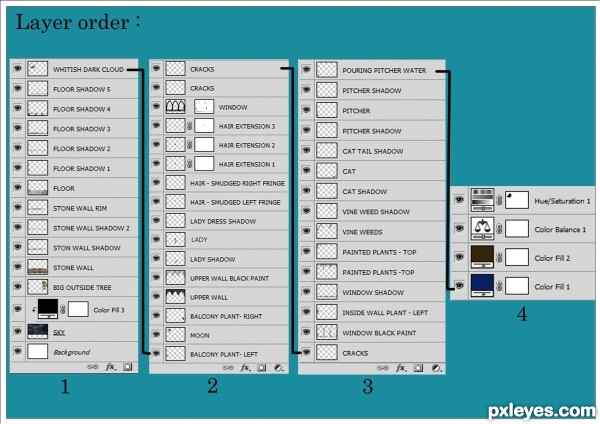
For your benefit and convenience in this step I have shown the order of the layers to be arranged one after another.
Step 45
Thank You for watching this tutorial. Hope each and every steps were clear and easy to follow.
After all these efforts, your image should resemble my final result
After all these efforts, your image should resemble my final result


0 comments:
Post a Comment