Step 1
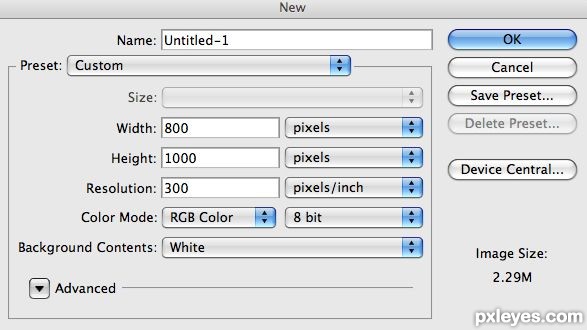
Step 1- Create a document at 800 pixels wide and 1000 pixels high at 300 dpi. The reason for this very large canvas is for 3 reasons.
The first reason is cause when you create something like this in photoshop and installing it into a project, you want it to be fairly large so th
at when you scale it, you wont lose the quality because it will most likely be larger than how you are using it. If it were smaller than how you plan on losing it, then when you scale it larger it will lose quality, where as if you scale down the quality pretty much stays the same. After all we are working with raster images, not vector.The first reason is cause when you create something like this in photoshop and installing it into a project, you want it to be fairly large so th
Secondly is that when you work on a large scale basis you can have more detail and more room to get creative, thus having less limits. When we are done here you will have your one letter.
The third is basically that we will have more space to work in and you wont have your type hanging off the side getting cut off by the boundaries of your document.
Step 2
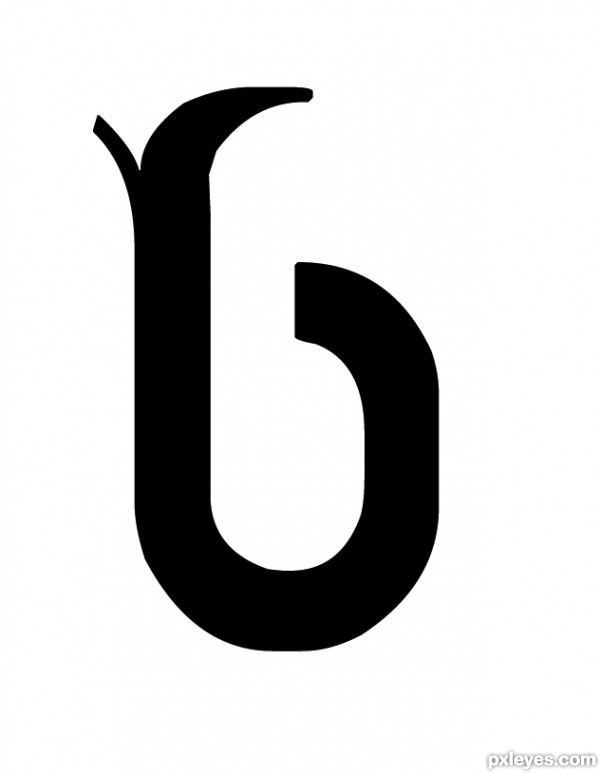
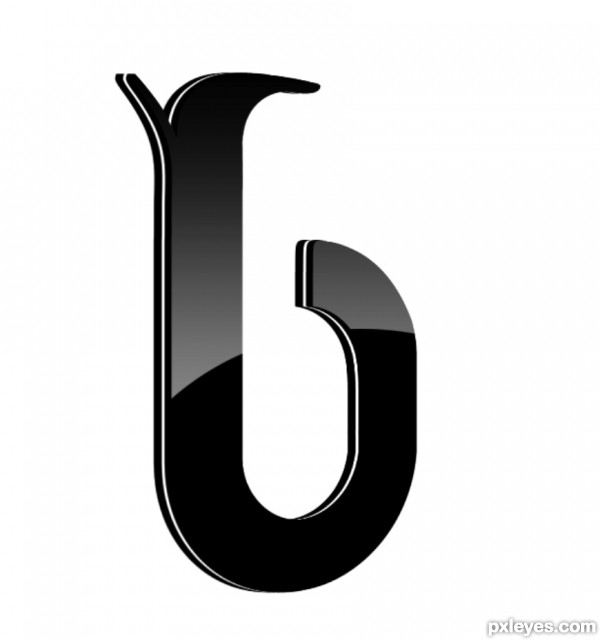
Step 2- First what we want to do is use a typeface that is easy to read, and fairly simple. For this tutorial I have decided to use a typeface called 'Defeqto' which you can download for free at www.dafont.com.
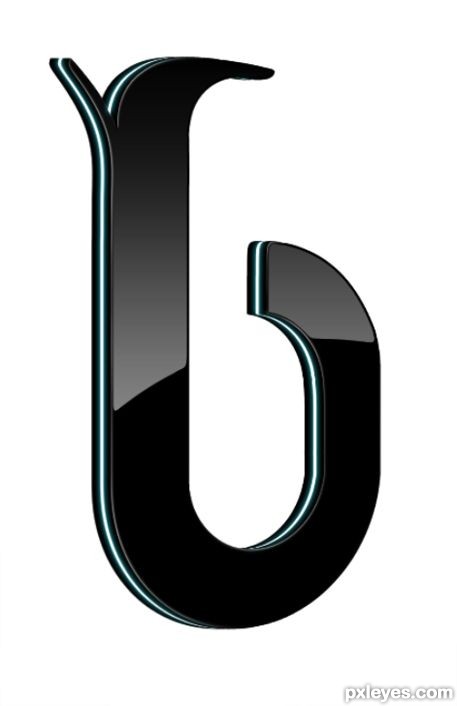
I will be working with the letter 'B' but you can use any typeface you like. I personally think it looks pretty cool with this typeface, and it works well with this technique, but feel free to use any typeface you like. Then right click on your type layer, and select "raterize type'. This will make it editable.
I will be working with the letter 'B' but you can use any typeface you like. I personally think it looks pretty cool with this typeface, and it works well with this technique, but feel free to use any typeface you like. Then right click on your type layer, and select "raterize type'. This will make it editable.
Step 3
Step 3-
(this part is just cleaning up your typeface as needed if you wish to. You can skip this step and go to step 6 and continue if you would rather just rush through this or if you don't need to clean up your type and learn the techniques more time-efficiently)
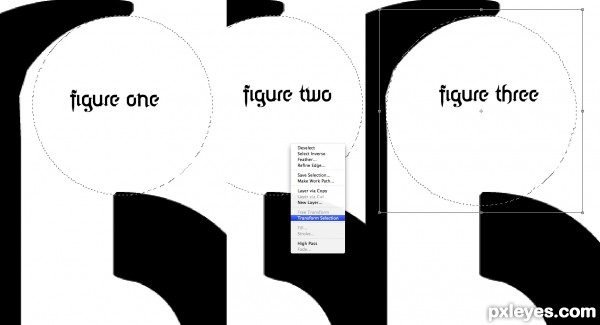
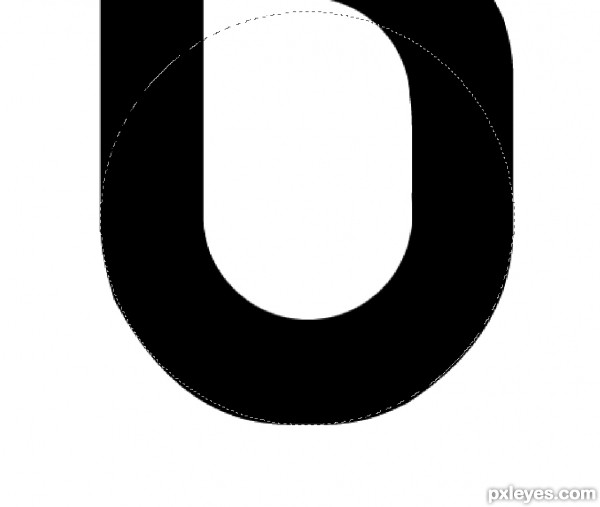
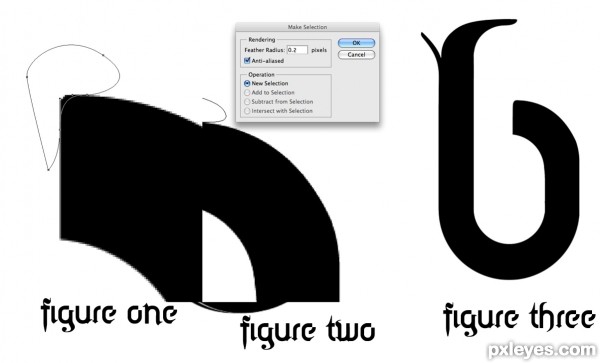
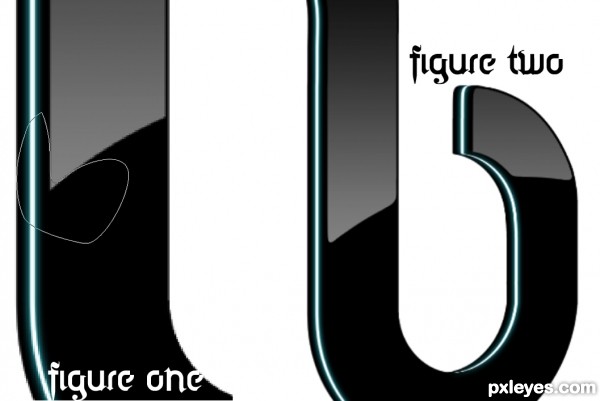
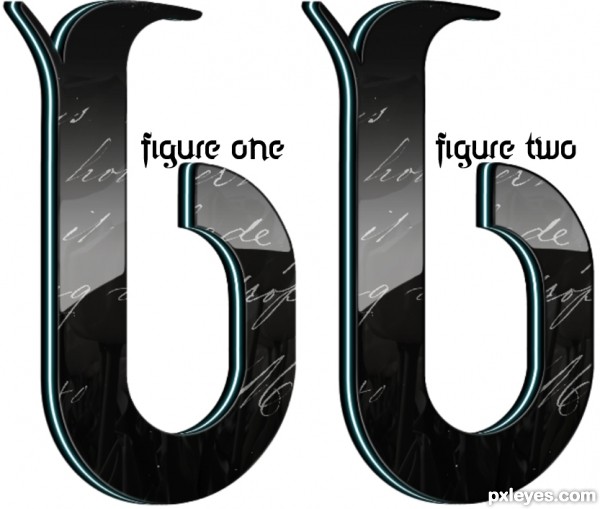
Now as cool as this typeface is, lets face it, when its blown up its obviously not that clean and a bit rough around the edges, so were going to clean that up. So I want to clean up the edges. Get out your circular marquee tool, or ks 'M'. Hold Shift+ Command to create a circle selection working from the center (where you initially click) outwards so that your selection is about the same as the curvature of the type. You can tell from figure 1 that I didn't really have the circle lined up quite right, so I want to right click, and select 'transform selection'. Then I will line up my selection with the type as shown in figure 2. Then resize your selection so that it works in to the type like figure 3. Then simply delete what you have selected. This will make the type smooth like we want. Apply this as needed.
(this part is just cleaning up your typeface as needed if you wish to. You can skip this step and go to step 6 and continue if you would rather just rush through this or if you don't need to clean up your type and learn the techniques more time-efficiently)
Now as cool as this typeface is, lets face it, when its blown up its obviously not that clean and a bit rough around the edges, so were going to clean that up. So I want to clean up the edges. Get out your circular marquee tool, or ks 'M'. Hold Shift+ Command to create a circle selection working from the center (where you initially click) outwards so that your selection is about the same as the curvature of the type. You can tell from figure 1 that I didn't really have the circle lined up quite right, so I want to right click, and select 'transform selection'. Then I will line up my selection with the type as shown in figure 2. Then resize your selection so that it works in to the type like figure 3. Then simply delete what you have selected. This will make the type smooth like we want. Apply this as needed.
Step 4
Step 4- If you need to get the outside edges, just make a selection like I have here, and simply inverse your selection by either going to menu tab 'SELECT/INVERSE' or ks 'Shift+Command+I'. Then grab your eraser tool both opacity and flow at 100%. Erase the edges that you want to disappear. once you have cleaned up all of that head on to the next step.
Step 5
Step 5- Pen tool time... lets round off some of these edges. take your pen tool and draw out a smooth path for your edge like I have shown in figure 1. Right click and select 'make selection'. Make sure the feather radius is 0.2 pixels. You don't want your edge to be too hard or is looks funny. Apply this to any other part of the type that may need 'treatment'. Figure 3 shows what I came up with.
Step 6
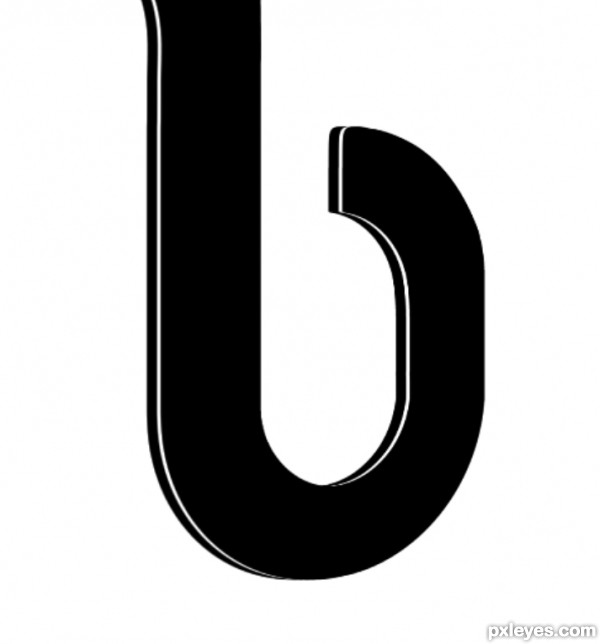
Step 6- Here is the part where we make the type 3D with that cool neon glow inside with a little bit of perspective. with your 'B' selection made, go to menu tab 'EDIT/FREE TRANSFORM' or ks 'Command+T'. With your free transform active, hold Shift+option+Command and drag the right corner (any corner) and move your curser towards the center of the outer edge between the two anchor points that you are effecting as shown in figure 1. Or you could drag outside but you will lose precious resolution...High res in work like this is key for quality.
Now, of course you can tell it looks a bit distorted... so what we want to do is grab the side anchor on the free transform box and pull it in like so in figure 2. Hit enter to finish your transformation.
Now, of course you can tell it looks a bit distorted... so what we want to do is grab the side anchor on the free transform box and pull it in like so in figure 2. Hit enter to finish your transformation.

Step 7
Step 7- Now to give it depth. A lot of this is up to eyeing what your working on when it comes to which direction you want your 3D view to be. You need to make sure that what you do looks real, and not some cheap 3D attempt. You don't want the depth of your object to look skewed like a messed up z axis. Haha!!! with that said, ill keep it simple.
Grab your move tool and with your 'B' layer selected (I dont know why it wouldnt) Hold 'Option+Command' and hit the RIGHT arrow key 18 times to make 18 copies of your B layer. After you do this, select the copied layers while holding either Shift or Command and get layers 'copy 8, 9, and 10' and Merge them by either right clicking on them and selecting 'MERGE LAYERS' at the bottom of the menu, or hitting ks 'Command+E'. Make sure that layers 'copy 8 thru 10' are now one single layer. Name this new merged layer "GLOW". Then go into 'IMAGE/ADJUSTMENTS/HUE AND SATURATION' or ks 'Command+U' and turn the lightness all the way up.
Grab your move tool and with your 'B' layer selected (I dont know why it wouldnt) Hold 'Option+Command' and hit the RIGHT arrow key 18 times to make 18 copies of your B layer. After you do this, select the copied layers while holding either Shift or Command and get layers 'copy 8, 9, and 10' and Merge them by either right clicking on them and selecting 'MERGE LAYERS' at the bottom of the menu, or hitting ks 'Command+E'. Make sure that layers 'copy 8 thru 10' are now one single layer. Name this new merged layer "GLOW". Then go into 'IMAGE/ADJUSTMENTS/HUE AND SATURATION' or ks 'Command+U' and turn the lightness all the way up.
Step 8
Step 8- Take layers 'copy 11-17' and merge them like in step 7 and name this layer "FRONT BODY". Then take layers 'copy 7 - B' (being layer 'B' all the way up to layer 'copy 7') and merge those as well and name this layer "BACK BODY". Then select your layer 'B copy 18' and rename this to "FACE". Make sure your layers look like mine.
Step 9
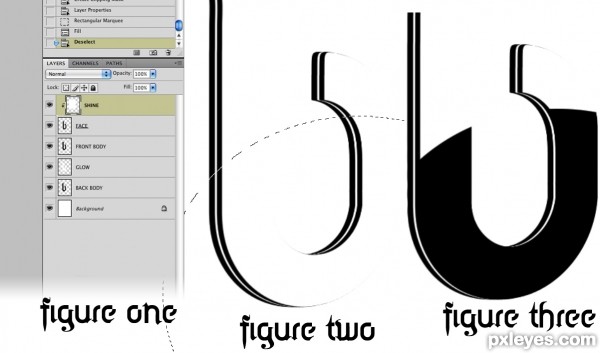
Step 9- Create a new layer above your "FACE" layer and call this "SHINE". Then you want to hit 'Option+Clicking between the FACE and SHINE layers so that you get funny looking 2 pancake icon' so that you get the little arrow pointing down like I have shown in figure 1. then take your square marquee tool and make a selection around the ENTIRE letter, and fill it with white by going to menu tab 'EDIT/FILL, USE-WHITE' or ks 'Option+delete'. This will make your letter face white. Now grab your circular marquee tool and make a selection about halfway down the letter as shown in figure 2. With your selection delete the white part out like in figure 3. Now create a mask of that layer. You can do this by clicking the strange mask icon on the bottom of your layers palette. It looks like a grey rectangle with a white circle in the middle of it. Make sure your mask is selected. click the second white box (the mask) on the "SHINE" layer so that you don't accidently mess things up.
Step 10
Step 10- Now get your gradient tool or ks "G" and make sure your gradient is from black to white, and that your gradient style is set to 'LINEAR GRADIENT', and that 'REVERSE' is not selected. Now drag your gradient from top to bottom, and reduce your "SHINE" layer's opacity to around 50%-60%. Make sure your letter looks like mine.
Step 11
Step 11- Now for the tricky stuff. We need to make that white line in the middle glow, but before we do that, we need just the white part on the top layer. So hold command and click on the "FRONT BODY" layer's thumbnail. You must click the thumbnail, because we are getting the selection of that layer, so that we can extract the white line. After you have done this select the "GLOW" layer (selecting the layer, not making a selection of the layer. just click on it) and hitting delete. this will get rid of anything below the body layer, so that when you move your "GLOW" layer to the top it will stay just the same (but the glow effect looks cleaner). De-select your layer by going to menu tab "SELECT/DESELECT" or by hitting 'Command+D'. Now move your "GLOW" layer all the way to the top. After you do this, make sure to select both "FRONT BODY" and "BACK BODY" layers and merge them by right clicking on the layer after both are selected and click on "merge layers" or hit 'Command+E', renaming them to "BODY".
Step 12
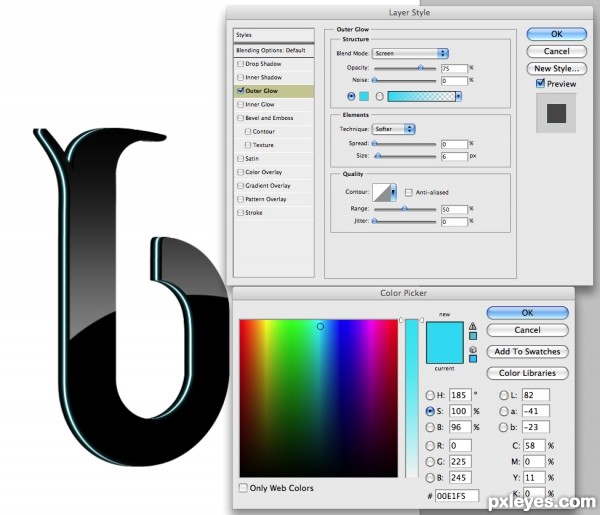
Step 12- With the "GLOW" layer selected, click the "FX" tab on the bottom of the layers palette and select "OUTER GLOW". I want to make my glow a turquoisey-blueish color. Don't mess the setting except make the size of the glow 6 instead of 5, and change the color of the glow to '00E1F5'
Step 13
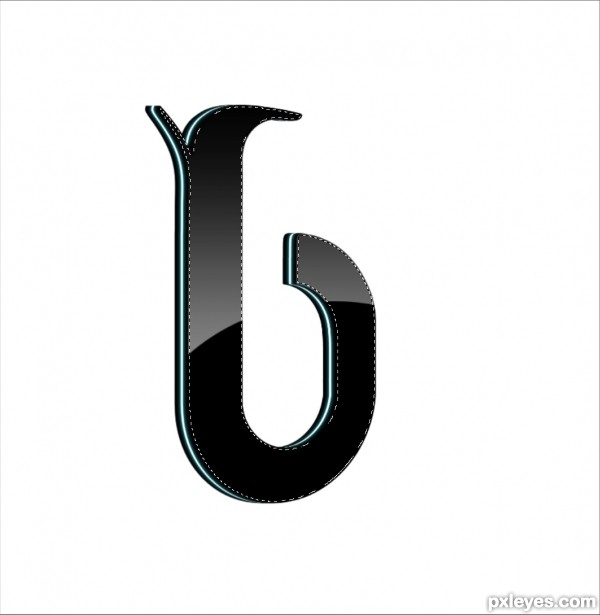
Step 13- now, we know that anything that has shape, or form doesn't have extremely hard edges, so we need to soften that up just a bit. first we need to make a selection of the "FACE" layer by hitting 'Command+Selecting the face layer thumbnail'. Now we need to contract that selection slightly like the tutorial picture. With the selection made, go to menu tab "SELECT/MODIFY/CONTRACT". Go for 2 pixels, and then invert your selection. Before you do ANYTHING make sure you have the "SHINE" layer selected. Now delete the outer part of the "SHINE" layer.
Step 14
Step 14- Now we need to make the reflections corners rounded off, so take your pen tool and make a very small rounded edge on the corners like I have done in figure 1. When you apply this to all corners, it should look more like figure 2.
Step 15
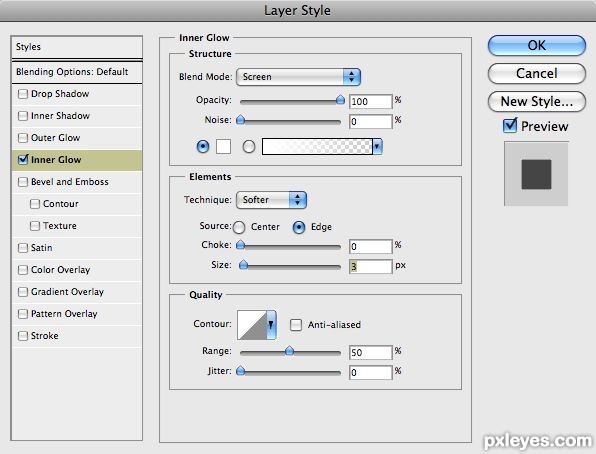
Step 15- Now we need to make the edges shine a bit so it has some definition. on the "FACE" layer, click the "FX" tab on the bottom of the layers palette and select "INNER GLOW".
Step 16
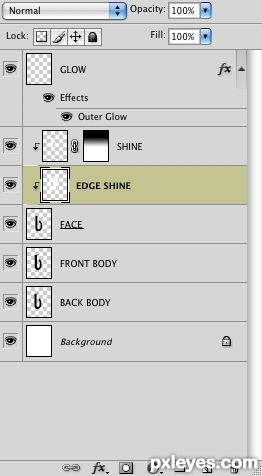
Step 16- With your "FACE" layer selected right click the little 'fx' icon on the right portion of the layer in the layers palette, and select "CREATE LAYER" and hit "OK". This will put the stroke FX on its own layer. with the "FACE INNER GLOW" layer selected, rename it to "EDGE SHINE". Make sure your layers look like mine.
Step 17
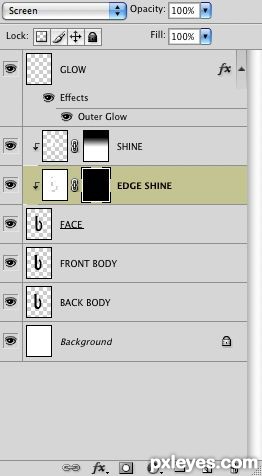
Step 17- Create a layer mask on the "EDGE SHINE" layer, and invert it making it black, masking out all of the shine on the edge. You can do this by having the mask selected and going to menu tab "IMAGE/ADJUSTMENTS/INVERT" or by using ks 'Command+I'. Make sure your layers palette looks like mine.
Step 18
Step 18- Get a medium-ish soft white brush (about 100 pixels) and set the opacity to 100% and the flow to 15%. White reveals the mask, and black erases it. Make sure your foreground and back ground are the default black and white, by hitting ks "D". If you need to switch from black to white really quickly just hit ks "X". DONT DRAG THE BRUSH, CLICK THE BRUSH!!! It is cleaner that way if you are a beginner. If you understand how masking and opacities behave, feel free to drag your brush. You probably wont be very sloppy. Do this only on parts that have curvature, and SLIGHTLY on the straight edges, like in the figure shown here. Remember that the shine comes from a light source, and because I made my B here turn away, the shine on the edge is only on the left parts on the front of the letter, so that is the only part I shine. Don't shine everything. it looks sloppy cause it doesn't look realistic.
Step 19
Step 19- Now we need to add some sort of reflection. With the "FACE" layer selected, go to menu tab "FILE/PLACE-find an image" and pick any image you want, preferably a high res image. I will use this image of flowers in figure 1. Then make the layer so it does that mask think with the arrow pointing down so it matches my layers palette in figure 2.
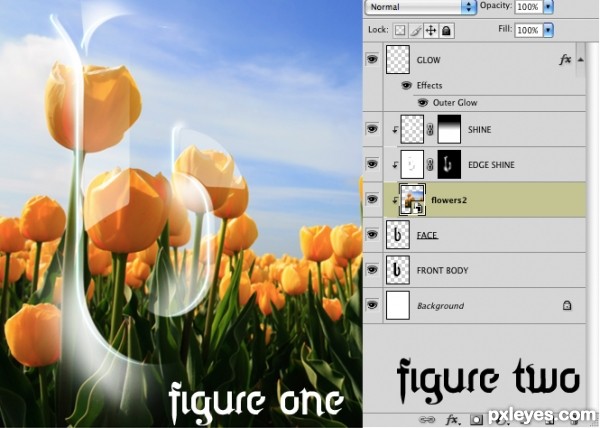
Step 20
Step 20- If your layer is placed as a smart object, simply rasterize it by right clicking and selecting "RASTERIZE LAYER". Now we can edit without using non-destructive adjustment layers, but dont worry, we are going to nearly fully desaturate this image, so it's going to be pretty difficult to mess this up! We need to open the "Hue and Saturation" window. "IMAGE/ADJUSTMENTS/HUE AND SATURATION" or ks 'Command+U'. Bring your saturation down to around -95% and -90% and hit OK. Now drop the opacity down to around 20%- 25%. It should look something like this example here.
Step 21
Step 21- Now we need to create a mask on the picture layer that you decided to use for the reflection. Use the gradient tool like before when you did the shine, but pull the gradient above the letter so that you dont mask out the top completely... This is only a subtle effect.
Step 22
Step 22- The tutorial is pretty much done now, but you can continue to follow along for even more details.
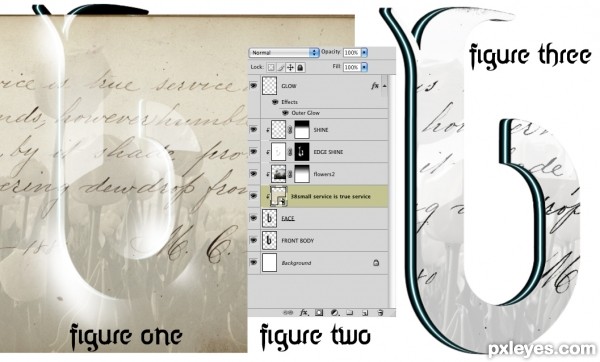
Now I'm going to add in a little effect which i think is pretty cool. I'll take some scripture from a book that i scanned in a while back. If your layer is a smart layer, rasterize it. Again, I want to select the "FACE" layer again and place my image as shown in figure 1. Now i need to mask it into the face layer like the 3 above it so that it looks like my layers palette. Now I need to completely desaturate my layer with the words on it. Do this in the "Hue and Saturation" adjustment, or simply apply the ks ''Command+Shift+U'. I now need to apply a levels adjustment to make this layer completely black and white... I dont want any gray in here, so I will open my levels adjustment by going to the menu tab "IMAGE/ADJUSTMENTS/LEVELS" and dragging the highlights slider (on the right) and the shadows slider (left) inwards until the image is truely only black and white, like I have shown in figure 3. Now inverse the layer like before so that it is mostly black, and then set the blending mode to screen. After you do that bring the opacity to around 70%.
Now I'm going to add in a little effect which i think is pretty cool. I'll take some scripture from a book that i scanned in a while back. If your layer is a smart layer, rasterize it. Again, I want to select the "FACE" layer again and place my image as shown in figure 1. Now i need to mask it into the face layer like the 3 above it so that it looks like my layers palette. Now I need to completely desaturate my layer with the words on it. Do this in the "Hue and Saturation" adjustment, or simply apply the ks ''Command+Shift+U'. I now need to apply a levels adjustment to make this layer completely black and white... I dont want any gray in here, so I will open my levels adjustment by going to the menu tab "IMAGE/ADJUSTMENTS/LEVELS" and dragging the highlights slider (on the right) and the shadows slider (left) inwards until the image is truely only black and white, like I have shown in figure 3. Now inverse the layer like before so that it is mostly black, and then set the blending mode to screen. After you do that bring the opacity to around 70%.
Step 23
Step 23- With my words layer selected, make a selection of the "FACE" layer and contract it by 2 pixels like before by going to menu tab "SELECT/MODIFY/CONTRACT". Next you want to go back where you contracted the selection but this time, select "FEATHER" and do 1 pixel. Now inverse your selection by either going to menu tab "IMAGE/ADJUSTMENTS/INVERSE" or by hitting ks 'Command+Shift+I', and hit delete twice. With the selection still active, select your image you chose for your reflection and hit delete twice on that as well. Observe the edge of the letter compared with figure 1 and figure 2.
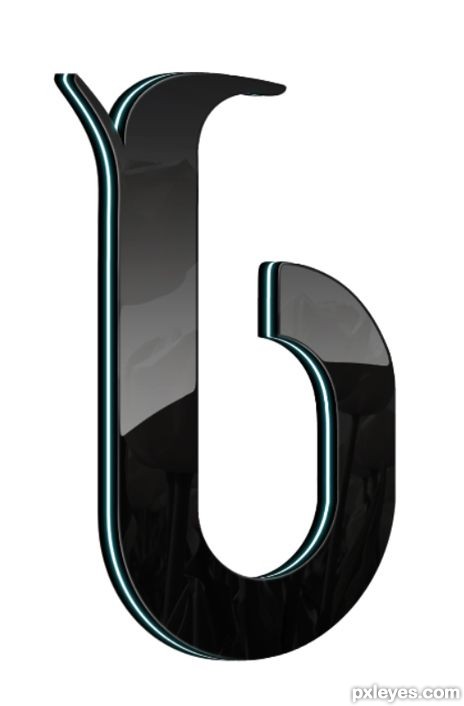
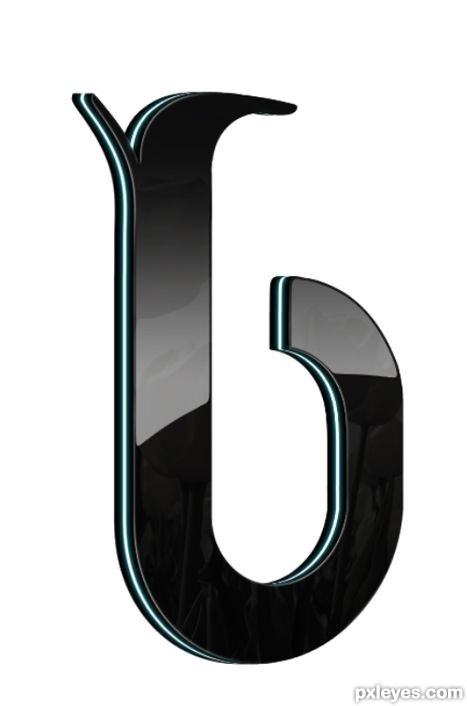
Step 24
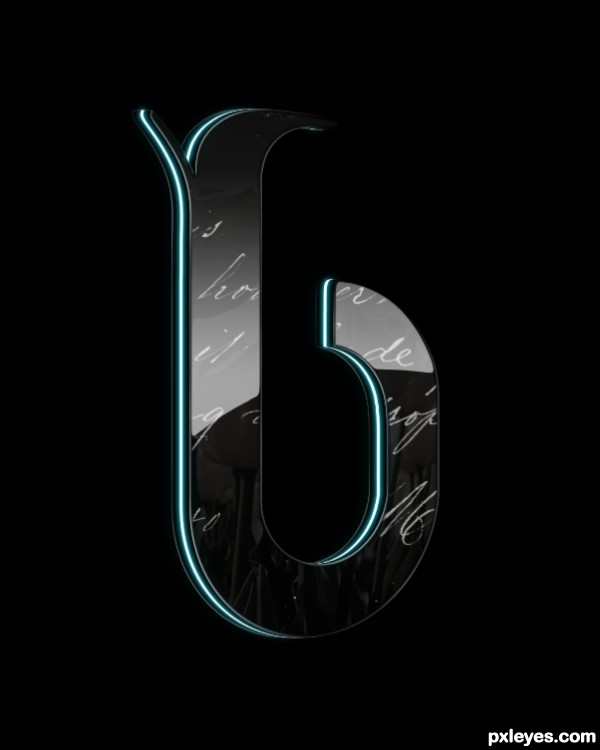
The rest is up to you! Put it on a black background and it looks really nice! But if you do that, you need to add some shine on the back part which is what I did here... Same rule of application, inner glow with white at 2 pixels, create its own layer, etc, etc... Refer back to steps 15-17 but apply it to the "BODY" layer...


0 comments:
Post a Comment