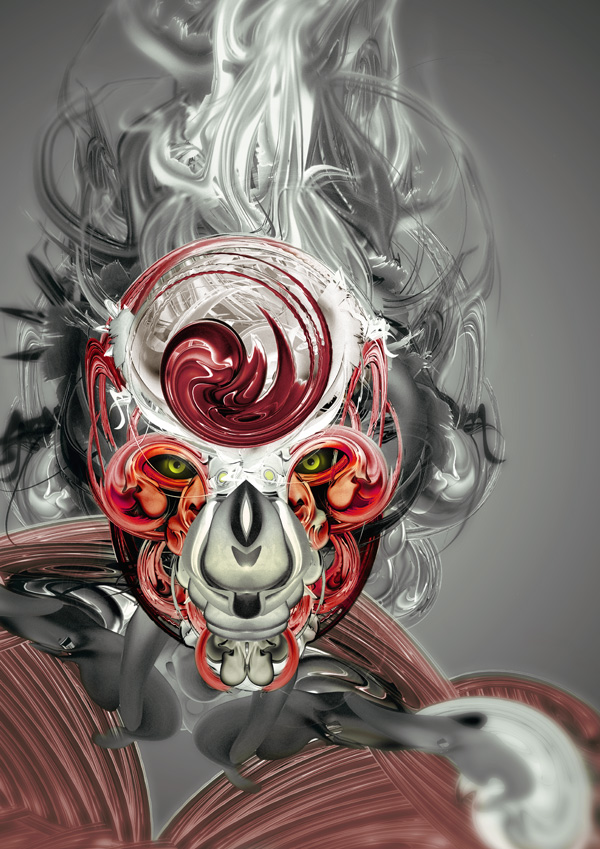
Final Product What You'll Be Creatin
Some people might not realize how fun and easy it can be to create an awesome illustration with just a
few pieces of stock art elements. In today’s tutorial we will demonstrate how to create an abstract
illustration using a few pieces of stock art from Visual Freaks’ Organic CG Art Pack and just some
basic knowledge of Photoshop. Let’s get started!
few pieces of stock art elements. In today’s tutorial we will demonstrate how to create an abstract
illustration using a few pieces of stock art from Visual Freaks’ Organic CG Art Pack and just some
basic knowledge of Photoshop. Let’s get started!
VisualFreaks is a high-end project started by a group of graphic designers who felt like there is room
for an alternative for the currently available stock and, therefore, decided that art can be packed and
delivered to suit your needs.
for an alternative for the currently available stock and, therefore, decided that art can be packed and
delivered to suit your needs.
The VisualFreaks are in for the long run, providing art-packs of unique elements designers and illustrators
can easily modify and blend into their artworks or designs for both commercial or personal use. The goal
is to make their work easier and make their artworks look awesome with just a few clicks.
can easily modify and blend into their artworks or designs for both commercial or personal use. The goal
is to make their work easier and make their artworks look awesome with just a few clicks.

Each pack has a distinct theme and its own personality and VisualFreaks have already launched two
art-packs: Organic CG Art Pack and FineCut CG Art Pack. The launch series will continue with a motion pack:LifeFlow.
art-packs: Organic CG Art Pack and FineCut CG Art Pack. The launch series will continue with a motion pack:LifeFlow.


Tutorial Assets
We will use only these four graphic elements from the Organic CG Art Pack focusing on a quick
demonstration of how to use our elements and make easy and quick awesome illustrations, having only
some basic Adobe Photoshop knowledge.
demonstration of how to use our elements and make easy and quick awesome illustrations, having only
some basic Adobe Photoshop knowledge.

Step 1
Ok, let’s get started! First step is to create a new document. The document we have created has the
following attributes: W: 3508px, H: 4961px (A3 size), color mode: RGB, @ 300 dpi. For the background
a light gray circular gradient was used, which allows light and dark shades to be visible.
following attributes: W: 3508px, H: 4961px (A3 size), color mode: RGB, @ 300 dpi. For the background
a light gray circular gradient was used, which allows light and dark shades to be visible.
In order for that to happen, you have to make a new layer and fill it with any color you want. Then,
double click somewhere near the layer’s name to open the Layers Style panel. Here you can overwrite
the color property by activating the Gradient Overlay effect. Set the gradient style to radial, choose the
gray shades you like and hit Enter.
double click somewhere near the layer’s name to open the Layers Style panel. Here you can overwrite
the color property by activating the Gradient Overlay effect. Set the gradient style to radial, choose the
gray shades you like and hit Enter.
Tip: As long as you have the Layer Properties panel open you can move the gradient registration point
by dragging it on the art board.
by dragging it on the art board.
Tip: If your gradient colors don’t blend nicely try to apply a noise filter. If you have a gradient
overlay you should first apply the effect by merging the layer down whit a new, empty one. This noise
filter will help blending, and give a more natural look to the gradient.
overlay you should first apply the effect by merging the layer down whit a new, empty one. This noise
filter will help blending, and give a more natural look to the gradient.

Step 2
We can now leave the background issue behind us, and start working on the graphics. We used a couple
of elements from the Visual Freaks CG Organic Art Pack. Number 3 for example is compact and has nice
highlights and details. We thus decided to use that one. Based on this element we wanted to generate some
brand new shapes, but following the same visual style that can be ultimately turned a more complex shape.
Now, you try it. Open the element, desaturate it by using the shortcut keys Shift + Command/Ctrl + U or go
to Image > Adjustments > Desaturate, then copy and paste it in your document.
to Image > Adjustments > Desaturate, then copy and paste it in your document.

Step 3
Now, for the desaturated shape we must adjust its brightness and contrast. We will use the Levels
adjustment tool. This helps us control not only the black and white points but also mid tones. This tool
provides more control than the actual brightness/contrast adjustment tool.
adjustment tool. This helps us control not only the black and white points but also mid tones. This tool
provides more control than the actual brightness/contrast adjustment tool.
Go to Image > Adjustments > Levels (Command/Ctrl + L) and adjust the sliders as you wish. Try
to achieve the correct exposure. Light, shadows and reflections are the main features that define a volume.
When you’re done adjusting it, hit ok.
to achieve the correct exposure. Light, shadows and reflections are the main features that define a volume.
When you’re done adjusting it, hit ok.
Tip: To correct the tonal values you can always use the Levels Adjustment Layer. Standard adjustments
are applied and embedded in the image. If you do this many times you’ll compromise the quality of the
image. Adjustment Layers provide a lot of flexibility in changing your adjustments later on in the editing
process. We’ll talk about Adjustment Layers later, when dealing with the finishing touches.

Step 4
Let’s now generate some new shapes based on our correctly exposed element. First of all, we need to
make some copies by right clicking on the layer in the layer panel, and choosing Duplicate Layer. Repeat
this step a few times to get some more copies. We’ll keep one as it is and modify the others.
make some copies by right clicking on the layer in the layer panel, and choosing Duplicate Layer. Repeat
this step a few times to get some more copies. We’ll keep one as it is and modify the others.

Step 5
Hide all copies of the element, except one. To completely change the appearance but preserve the
defining features of our element, use the Liquify Filter. You can create drastic or subtle distortions
while preserving great details. Go to Filter > Liquify, pick the Twirl Clockwise Tool, set the brush
size to closely match the shape dimension, set the density to 25 and give it a try. When you like what
you got, hit ok.
For the remaining copies try to use different brush settings, try to vary the end look of the shape and to
understand how the Liquify tool works.
understand how the Liquify tool works.
Tip: If you use the Twirl Clockwise Brush it will twirl your image clockwise, obviously. For
counterclockwise twirls use the same brush with the Alt key pressed.
counterclockwise twirls use the same brush with the Alt key pressed.
Tip: Try goofing around with portraits of your friends.

Step 6
We now have the shapes needed to get started. First, let’s make a backup of the elements created until
now. Select the layers and hit Command/Ctrl + G to make a group, duplicate it and we are good to go.
now. Select the layers and hit Command/Ctrl + G to make a group, duplicate it and we are good to go.

Step 7
This is where the fun part begins. We’ll try to mix these elements in order to get a face shaped composition.
Please keep in mind that we want just the overall shape, not an anatomically correct face.
Please keep in mind that we want just the overall shape, not an anatomically correct face.
Pick one shape, make a copy of it and flip it horizontally. Since faces are quite symmetrical we’ll use this
process a lot in this tutorial. To flip, select the Marquee Tool > Right Click > Free Transform >
and Right Click again. Here you have many transformation options: Scale, Rotate, Skew, Distort, Perspective…including Flip. Chose Flip Horizontal and press Enter. Add some more shapes and arrange them as you wish
but don’t forget what the main goal is.
Tip: You can enter in Free Transform mode simply by using the Command/Ctrl + T shortcut.
Tip: Don’t worry if our projects don’t quite match. It’s almost impossible to get the same result due to the
experimental nature of this project. And let’s be fair, there aren’t two faces that look alike in the real
world either. Go ask your twin brother .
.
experimental nature of this project. And let’s be fair, there aren’t two faces that look alike in the real
world either. Go ask your twin brother
To sum up a bit, let’s see what we’ve got so far. Well, if you use your imagination the graphic achieved
looks like a face. The eyes, the cheek bones, the upper jaw and the chin are in the right place. We’ve been
using 4 of our elements and, so far, we ended with a very detailed overall shape. A little too detailed, if
you ask me. So, for the cranial bones we need to create some new, simpler shapes.
looks like a face. The eyes, the cheek bones, the upper jaw and the chin are in the right place. We’ve been
using 4 of our elements and, so far, we ended with a very detailed overall shape. A little too detailed, if
you ask me. So, for the cranial bones we need to create some new, simpler shapes.


Step 8
One of the shapes that we created has a long simple curve. Let’s just copy that one and adjust it to
our needs. With the Polygonal Lasso Tool select the part you need, copy and then paste it. Photoshop
will automatically generate a new layer to paste it into. Make it a little wider/rounder. Use the scale tool
from the Free Transform menu (Command/Ctrl + T).
our needs. With the Polygonal Lasso Tool select the part you need, copy and then paste it. Photoshop
will automatically generate a new layer to paste it into. Make it a little wider/rounder. Use the scale tool
from the Free Transform menu (Command/Ctrl + T).

Step 9
We now have to define the temporal bones, the left and right sides of the head. This will help read the
volume as well. Let’s make a copy of the curve we made earlier and change its perspective a little.
volume as well. Let’s make a copy of the curve we made earlier and change its perspective a little.
With the curve layer selected, press Command/Ctrl + T to enter the Free Transform mode (Edit >
Free Transform). If you hold the Alt key pressed while dragging the corners of the bounding box, you
can change the perspective as you wish. There is a slight difference between how the Distort and the
Perspective transformation modes work (both available in the Free Transform mode). Give it a try!
Free Transform). If you hold the Alt key pressed while dragging the corners of the bounding box, you
can change the perspective as you wish. There is a slight difference between how the Distort and the
Perspective transformation modes work (both available in the Free Transform mode). Give it a try!

Step 10
Now, let’s add the new shapes to our composition.
To have the head well-proportioned we must keep the eyes in the middle of the face. So don’t make
it big headed. We must also balance the forehead area a little with the mouth and nose in order to
keep the eyes as the focus point of our composition. The overall shape already looks a little tangled,
so how about have him wear some kind of simple breathing mask, to straighten things up.
it big headed. We must also balance the forehead area a little with the mouth and nose in order to
keep the eyes as the focus point of our composition. The overall shape already looks a little tangled,
so how about have him wear some kind of simple breathing mask, to straighten things up.

Step 11
For the breathing mask we’ll use the same procedure as we did for the face. Search the Visual Freaks
CG Organic Art Pack to find an element with simple, clean surfaces like element01 has. Look inside the
element for parts you like, copy/paste them, distort, combine them to make sense. You can see below a
short step-by-step overview of the process we’ve chosen to perform.
CG Organic Art Pack to find an element with simple, clean surfaces like element01 has. Look inside the
element for parts you like, copy/paste them, distort, combine them to make sense. You can see below a
short step-by-step overview of the process we’ve chosen to perform.


Step 12
The face looks better now. Further on, we should take care of the neck and some of the bones that
link the head and torso. Every alteration we make on the figure from now on must be simple and
suggestive, since we still want the head to play the main part here.
link the head and torso. Every alteration we make on the figure from now on must be simple and
suggestive, since we still want the head to play the main part here.
Browse the Visual Freaks Organic CG Art Pack and find something bone looking. For us, one shape
from the element07 seems to be perfect. It may work as a Collar Bone, Scapula and even as the neck
muscles. With the Polygonal Lasso tool select the part you want to use. We have chosen the lower left
one and edited it a little. We’ve inverted it, removed the drips and cleared the overlapping from the left
side (see image below). When the shape is cleaned adjust its levels and proportions.

Step 13
Arrange the shapes in the same manner we did before. Command/Ctrl + T to enter Free Transform mode.
Resize, Flip the shapes and combine them as you wish. Try to capture the basic aspects: the
sternocleidomastoidian muscles for the vertical line and the clavicles for the horizontal line.
Resize, Flip the shapes and combine them as you wish. Try to capture the basic aspects: the
sternocleidomastoidian muscles for the vertical line and the clavicles for the horizontal line.
Tip: To simply duplicate an element just drag it with the Move Tool and hold the Alt key pressed.
Photoshop will automatically generate a new layer.
Photoshop will automatically generate a new layer.


Step 14
We have completed the head and the neck for now. The next step would be to build some muscles.
Let’s find some fiber structure in one of the shapes we made so far. With the Polygonal Lasso Tool
select the area you like copy-paste it, and adjust it as you wish.
Let’s find some fiber structure in one of the shapes we made so far. With the Polygonal Lasso Tool
select the area you like copy-paste it, and adjust it as you wish.

Step 15
Build some chest muscles by repeating and slightly overlapping the shapes made earlier. Rotate
bit-by-bit the fiber strip to match the flow of the lines.
bit-by-bit the fiber strip to match the flow of the lines.

Step 16
Head, neck and some muscles. We now have all the elements needed to start composing the figure.
Below you can find a step by step image illustrating the posture and the way we’ve composed this figure.
Below you can find a step by step image illustrating the posture and the way we’ve composed this figure.

Well the composition slowly takes shape. Let’s stop here for 1 sec. We want to add some muscles
around the shoulder and, in order to do that, we have to wrap a “chest shape” around it. A simple
way to do that is using the standard warp tool.
around the shoulder and, in order to do that, we have to wrap a “chest shape” around it. A simple
way to do that is using the standard warp tool.
To make it easier to follow we won’t explain this procedure on the actual composition.
Place the muscles shape under the shoulder element, select it, press Command/Ctrl + T to enter Free
Transform Mode, Right Click and choose Warp. (Or navigate to Edit > Transform > Warp).
The warp tool, whilst can be used to wrap text or images around other objects, it can also be used to
create dramatic changes to your elements. Once you enter the Warp Transformation Mode, Click over
the image and drag to warp or drag the handless for more control. When you’re done playing, hit
enter to apply the warping.


Step 17
The figure is almost ready. Before moving to the final stage, where we add some color and the finishing
details, we should take care of the background as well. We want to add some kind of windy looking hair
to lead the viewer’s eyes out of the composition, and of course to make it a little more interesting.
details, we should take care of the background as well. We want to add some kind of windy looking hair
to lead the viewer’s eyes out of the composition, and of course to make it a little more interesting.
Our suggestion is you do the background by yourself using the same techniques applied so far. Select
some elements from the Visual Freaks CG Organic Art Pack, transform and compose them as you like.
some elements from the Visual Freaks CG Organic Art Pack, transform and compose them as you like.
We’ve added the background, and inverted the shapes on the face, simply, by selecting the appropriate
layers and by pressing Command/Ctrl + I (or navigate to: Image > Adjustments > invert).
layers and by pressing Command/Ctrl + I (or navigate to: Image > Adjustments > invert).

Step 18
The basic composition is completed. We can now start adding some details to the eyes. The iris, the
pupil and some highlights.
pupil and some highlights.

To achieve this, you can use the standard Photoshop brush. Create a new layer, select a reasonable
brush size, a color you like (we chose green) and click. Then reduce the brush size, change the color
to black and click inside the green dot you made earlier. Now, to add a little sparkle, reduce the brush
size even more (to 5 pixels or so) and click somewhere to reach both the green and the black circles.
To add a little volume to the eyeball, create a new layer below, select a soft brush, set the same color
as the iris has. Reduce the layers opacity to 40% and merge all the eye layers. Select the layers and hit
Command/Ctrl + E, or navigate to Layer > Merge Layers. Place the eyes where they belong, then
clear the overlapping parts with the eraser. To add even more strength and to amplify the expression,
we should add a very light glow on the face. Make a new layer, select a big soft brush and paint the
area you want to emphasize. In the layer panel set the blending mode to multiply. You can adjust the
strength by decreasing the layer opacity.

Step 19
It’s high time to add some color to our model. We believe a color looks better when it’s contrasting
with at least another one. So first of all we have to set a mood in our scene by adding a Color Balance
adjustment filter. We’ve selected a bluish green color to match the eyes. The major advantage of using
the Adjustment Layers is that you can change their settings anytime you want, without doing any damage
to the image.

Step 20
Finally let’s color the muscles. The process is very simple and the changes are quite remarkable.
Pick a layer you want to color. Command/Ctrl + click on the layers thumb to make the selection.
Without deselecting create a new layer and fill it with orange, or any color you want. Set the layers
blending mode to Overlay and you are done. You can adjust the color intensity in many ways but in
this case the Opacity will do just fine.
Without deselecting create a new layer and fill it with orange, or any color you want. Set the layers
blending mode to Overlay and you are done. You can adjust the color intensity in many ways but in
this case the Opacity will do just fine.
On the image below you can see this process applied on our project. Since the process is repetitive
and the scene is pretty complex we’ll have to skip some in-between steps.
and the scene is pretty complex we’ll have to skip some in-between steps.

Step 21
Everything looks fine. We’ve added another adjustment layer to change the color and the mood a little.
This is the hardest part since you have to make a decision and then stick to it.
This is the hardest part since you have to make a decision and then stick to it.
Another thing you can do is make a copy of the entire project and add a little bit of noise to it.
That’s it! Also feel free to make and discover new shapes and feel free to make new and surprising
creatures or structures! There are infinite possibilities!
creatures or structures! There are infinite possibilities!


0 comments:
Post a Comment