Written By IT Conseltant
In a previous Photoshop text effects tutorial, we looked at how to place a single image
inside text. This time, we're going to take things further and learn how to place multiple
images in text. This is a popular effect that's often used in advertising and promotional
material but is also lots of fun just to play around with on your own. We're going to take a
word and place a different image inside each individual letter. It's very easy to do, and a lot
of it is just simple repetition.
I'll be using some images made freely available by the good folks at NASA, along with a font
that's also freely available online, but as always, the end result I come up with here is not what's
important. The point is learning how it's done so you can use the same techniques to bring your
own ideas to life. Having said that, he's the result I'll be working towards in this tutorial:
that's also freely available online, but as always, the end result I come up with here is not what's
important. The point is learning how it's done so you can use the same techniques to bring your
own ideas to life. Having said that, he's the result I'll be working towards in this tutorial:
Step 1: Open The Image You Want To Use As Your Background Image
Of course, you don't necessarily need to use an image. You could have a solid color background,a gradient, a pattern - whatever you like. I just happen to be using an image, and here's the one
I'll be using:The first thing we need to do is open our initial image, the one we'll be using as
the background
.

Images In Text: The original image that will be used as the background.
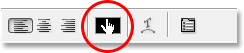
Step 2: Select Photoshop's Type Tool
Select the Type Tool from the Tools palette, or simply press the letter T on your keyboard to select it:

Images In Text: Select the Type Tool.
Step 3: Select Your Font In The Options Bar
With the Type Tool selected, go up to the Options Bar at the top of the screen and choose your font.
You'll want to use a font that will give you thick letters for this effect, otherwise it will be tough to see
the images inside them. Don't worry about the font size for now, since we can easily resize it as
needed later. I'm going to use a font called "Mathmos Original", a sci-fi font which I downloaded
for free from 1001 Free Fonts:

Images In Text: Select your font from the Options Bar at the top of the screen.
Step 4: Set Your Text Color To Something You'll Be Able To See
In Front Of Your Image
Before we begin typing, let's make sure our text color is something we'll be able to see.
My image is mostly black, and by default, my text color is also set to black, which will
make seeing it a bit difficult, so I'm going to change it to a different color. To do that, I'll
click on the color swatch in the Options Bar:
My image is mostly black, and by default, my text color is also set to black, which will
make seeing it a bit difficult, so I'm going to change it to a different color. To do that, I'll
click on the color swatch in the Options Bar:
Images In Text: Change the color of your text by clicking on the color swatch in the Options Bar
(with the Type Tool selected).
(with the Type Tool selected).
Then I'll choose a different color from Photoshop's Color Picker. It doesn't matter which
color you choose since you won't see it once we fill the text with images, so don't spend
too much time on your decision. I'll choose a shade of red:
color you choose since you won't see it once we fill the text with images, so don't spend
too much time on your decision. I'll choose a shade of red:
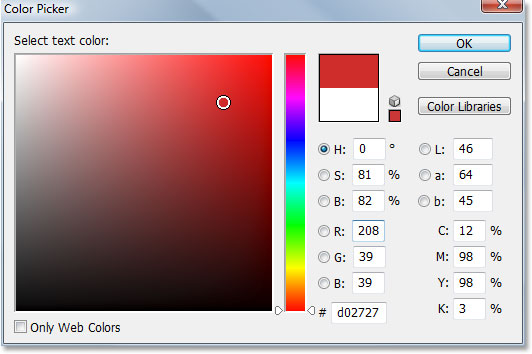
Images In Text: Choosing white from the Color Picker in Photoshop.
Click OK to accept the new color and exit out of the Color Picker. The color swatch in
the Options Bar now changes to show the color you selected. In my case, it's showing red:
the Options Bar now changes to show the color you selected. In my case, it's showing red:
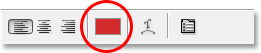
Images In Text: The color swatch in the Options Bar has changes to show the new text color.
Step 5: Type The First Letter Of Your Word
In order to add a different image inside each letter of a word, we'll need to work with each letter
individually, so let's create our word one letter a time. This way, each letter will appear on its own
layer in the Layers palette. Click approximately where you want your first letter to appear inside
your document and type the letter. I'm going to be using the word "SPACE", and since the first
letter of the word is "S", I'll type "S" (I know, it's all very complicated stuff):

Images In Text: Type the first letter of your word.
When you're done, click on the checkmark in the Options Bar to commit the text.

Images In Text: Commit the text by clicking on the checkmark in the Option Bar.
If we look at our Layers palette, we can see that we now have two layers - the Background
layer on the bottom which contains whatever you happen to be using as your background,
and the first letter of our word on its own layer above it:
layer on the bottom which contains whatever you happen to be using as your background,
and the first letter of our word on its own layer above it:

Step 6: Resize And Reposition The Letter If Needed With Free Transform
Holding down Shift prevents you from accidentally distorting the look of the letter as you drag.You can also hold down Alt(Win) / Option (Mac) to tell Photoshop to resize the letter from its
center, which is often helpful.
If, like me, you need to resize the letter and move it into a better position, press Ctrl+T
(Win) / Command+T (Mac) to bring up Photoshop's Free Transform box and handles
around the letter. Hold down your Shift key and drag any of the corner handles to resize it.
(Win) / Command+T (Mac) to bring up Photoshop's Free Transform box and handles
around the letter. Hold down your Shift key and drag any of the corner handles to resize it.
To move the letter, click anywhere inside the Free Transform box and drag the letter where
you need it. Just don't click on the small target symbol in the very center, otherwise you'll
move the target symbol, not the letter. As you're resizing the letter, keep in mind how many
other letters you'll need to add so you don't end up making the letter too big:
you need it. Just don't click on the small target symbol in the very center, otherwise you'll
move the target symbol, not the letter. As you're resizing the letter, keep in mind how many
other letters you'll need to add so you don't end up making the letter too big:

Images In Text: Resize and reposition the letter as needed using Photoshop's Free Transform command.
Press Enter (Win) / Return (Mac) when you're done to accept the transformation and exit
out of the Free Transform command.
out of the Free Transform command.
Step 7: Add A Stroke Around The Letter (Optional)
Depending on the images you'll be placing inside your letters, as well as the background
you're using, it may be difficult to make out the shapes of the letters when you're done. To
help keep things readable, I'm going to add a white stroke around my letters. I could wait until
the end to add the stroke around all the letters, but since I already know what I want to do, I'm
going to save myself some time by adding it to this first letter. That way, when I go to create
the rest of my letters by making copies of this first one, the stroke will be copied along with it.
To add a stroke, click on the Layer Styles icon at the bottom of the Layers palette:

Images In Text: Click on the Layer Styles icon.
Then select Stroke from the bottom of the list of Layer Styles that appears:

Images In Text: Select "Stroke" from the list of Layer Styles.
This brings up Photoshop's Layer Style dialog box set to the Stroke options in the middle
column. The first thing I'm going to do is lower the Size of the stroke down to 2 px. If you're
working in high resolution, you'll probably want to set your stroke size higher. I'm also going
to change the Position of the stroke to Inside. Finally, by default, Photoshop sets the color
of strokes to red, which makes no sense. I want my stroke color to be white, so I'll click on
the color swatch to the right of the Color option, which again brings up Photoshop's Color
Picker, and I'll change the stroke color to white:

Images In Text: The Stroke options in the Layer Style dialog box in Photoshop.
Click OK when you're done to apply the stroke to the letter and exit out of the dialog box.
Here we can see my white stroke applied to the letter "S":
Here we can see my white stroke applied to the letter "S":

Images In Text: The letter is now surrounded by a thin white stroke.
Step 8: Copy The Type Layer
Before I place an image inside my letter, I'm going to finish adding the rest of my letters to
create my complete word. To create my second letter, I'm simply going to press Ctrl+J (
Win) / Command+J (Mac) to duplicate my Type layer. Nothing seems to have happened
in my document window, but if I look at the Layers palette, I can see that I now have my
original Type layer containing the letter "S", as well as a copy of it, also currently containing
the letter "S", above it:

Step 9: Move The Second Letter Into Position
By making a copy of our initial letter, we've created our second letter. Of course, there's a
couple of problems at the moment. For one thing, both letters are sitting directly on top of
each other, and they're also set to the exact same letter. Let's take care of the first problem
by moving the second letter into position. To do that, we'll need the Move Tool. Now, you
could select the Move Tool from the Tools palette, but that's the "getting paid by the hour"
way. Here's a handy trick. To temporarily switch to the Move Tool from any other tool (except
the Hand Tool), just hold down your Ctrl (Win) / Command (Mac) key. This gives you quick
access to the Move Tool without having to select it. Then, while still holding down "Alt/Option",
hold down your Shift key to constrain your movements in a horizontal line and drag the second
letter to the right until it's in position:

Images In Text: Use the Move Tool to drag the second letter into position.
Step 10: Change The Letter
Now we need to change the letter itself. To do that, double-click directly on the Type
layer's thumbnail in the Layers palette:
layer's thumbnail in the Layers palette:

Images In Text: Double-click on the thumbnail of the Type layer.
This will highlight the letter in the document window:

Images In Text: The letter is now highlighted.
Change the letter to the second letter of your word. Since my word is "SPACE", I'll enter
"P" on my keyboard:
"P" on my keyboard:

Images In Text: Change the letter to the second letter of your word.
When you're done, click once again on the checkmark in the Options Bar to accept the
change and exit out of text editing mode:
change and exit out of text editing mode:
Images In Text: Click on the checkmark in the Options Bar to accept the change.
Step 11: Add The Remaining Letters
Repeat steps 8-10 to add the rest of your letters and complete the word. Use the Move
Tool to make any adjustments to the spacing between the letters until you have everything
looking the way you want it. Here's my completed word:
Tool to make any adjustments to the spacing between the letters until you have everything
looking the way you want it. Here's my completed word:

Images In Text: Repeat the previous three steps to complete your word.
Notice that the white stroke I added to my initial letter has been automatically added to every
letter in the word, since each letter is essentially a copy of the first one. And if I look in my
Layers palette now, I can see that each letter in the word is on its own separate layer, which
is going to make it very easy to place an image inside each one individually:
letter in the word, since each letter is essentially a copy of the first one. And if I look in my
Layers palette now, I can see that each letter in the word is on its own separate layer, which
is going to make it very easy to place an image inside each one individually:

Images In Text: The Layers palette in Photoshop showing each letter on its own layer.
We'll begin placing images inside our letters next!
Step 12: Select The First Letter In The Layers Palette
Now that we have our word with each letter on its own separate layer, we can begin placing
images inside the letters. We'll start with the first letter, which in my case is "S". Click on the
letter's layer in the Layers palette to select it. You'll know it's selected because it will be
highlighted in blue:
images inside the letters. We'll start with the first letter, which in my case is "S". Click on the
letter's layer in the Layers palette to select it. You'll know it's selected because it will be
highlighted in blue:

Images In Text: Select the first letter's layer in the Layers palette.
Step 13: Open The Image You Want To Place Inside The Letter
With the layer selected, open the image you want to place inside the first letter. If,
when you open the image, it appears in one of Photoshop's full screen modes, press the
letter F on your keyboard until the image appears in a document window. Here's the image I'll be using:
when you open the image, it appears in one of Photoshop's full screen modes, press the
letter F on your keyboard until the image appears in a document window. Here's the image I'll be using:

Images In Text: Open the image you want to place inside your first letter.
Step 14: Drag The Image Into The Main Document
With the image open in its own document window, simply click anywhere inside the
image and drag it into the main document:
image and drag it into the main document:

Images In Text: Click inside the image and drag it into the main document.
If we look in the Layers palette now, we can see that Photoshop has placed the image
on its own layer directly above the first letter of the word:
on its own layer directly above the first letter of the word:

Images In Text: The Layers palette showing the image now appearing on "Layer 1" directly above the
first letter in the word.
first letter in the word.
And if we look in our main document, we can see the image blocking the first letter,
as well as much of the background, from view:
as well as much of the background, from view:

Images In Text: The main document showing the second image now blocking the first letter and some of the background image from view.
Step 15: Create A Clipping Mask
To place the image directly inside the letter, or at least make it appear as if that's what we've
done, we're going to use a clipping mask. The letter is going to become a mask for the image
above it, which means that the only part of the image that will remain visible is the area directly
over top of the letter. The rest of the image will be hidden, creating the illusion that the image is
actually inside the letter!
To create the clipping mask, make sure that you have the image's layer ("Layer 1") selected in the
Layers palette, then go up to theLayer menu at the top of the screen
Layers palette, then go up to theLayer menu at the top of the screen

Images In Text: Choose "Create Clipping Mask" from the "Layer" menu.
You can also use the keyboard shortcut Alt+Ctrl+G (Win) / Option+Command+G (Mac).
Either way "clips" the image to the shape of the letter. If we look again in the Layers palette,
we can see that "Layer 1" now appears indented to the right with a small arrow pointing down
at the Type layer below it, telling us that we've successfully created our clipping mask:
Either way "clips" the image to the shape of the letter. If we look again in the Layers palette,
we can see that "Layer 1" now appears indented to the right with a small arrow pointing down
at the Type layer below it, telling us that we've successfully created our clipping mask:

Images In Text: The Layers palette in Photoshop showing "Layer 1" being "clipped" by the Type layer below it.
And if we look in our main document, we can see that sure enough, the image now
appears as if it's inside the letter:
appears as if it's inside the letter:

Images In Text: The image now appears inside the first letter of the word.
Step 16: Resize And Reposition The Image Inside The Letter
We have our first image inside our first letter. All we need to do now is resize and reposition
it so it looks the way we want it. To do that, with "Layer 1" still selected, press Ctrl+T (Win)
/ Command+T to bring up Photoshop's Free Transform box and handles around the image.
The Free Transform box and handles will appear around the entire image, even though the only
part of the image you can see is whatever's showing inside the letter.
If you can't see some of the Free Transform handles because they extend outside the viewable
area in the document window, pressCtrl+0 (Win) / Command+0 (Mac) to fit everything on the
screen. Then simply drag any of the corner handles to resize the image. Hold down your Shift
key as you drag to constrain the proportions of the image, and hold down Alt (Win) / Option
(Mac) to resize the image from its center if that makes it easier. Move the image around inside
the letter by clicking and dragging anywhere inside the Free Transform box:

Images In Text: Use Free Transform to move and resize the image inside the letter.
When you're done, press Enter (Win) / Return (Mac) to accept the changes and exit out of the
Free Transform command. Here's my image with the work on my first letter now complete:
Free Transform command. Here's my image with the work on my first letter now complete:

Images In Text: The first letter is done.
Step 17: Repeat The Same Steps With The Other Letters
To place images inside the remaining letters, simply repeat the same steps we used with our
initial letter. First, select the letter in the Layers palette. Then open the image you want to place
inside the letter, pressing F on your keyboard a few times if needed until the image appears in its
own document window. Click anywhere inside the image and drag it into the main document. The
image will appear on its own layer above the letter you had selected. Create a clipping mask to place
the image directly inside the letter, then finish things off by using Free Transform to resize and
reposition the image inside the letter as needed. It's all just a matter of repeating the same steps,
using different images for each letter, until you're done!
I'll go ahead and place images inside my remaining letters using the steps I just outlined. We can
see in my Layers palette now that each letter has a separate image on a layer directly above it, and
that each image is being "clipped" to the shape of the letter:
see in my Layers palette now that each letter has a separate image on a layer directly above it, and
that each image is being "clipped" to the shape of the letter:

Images In Text: The Layers palette showing a separate image on a layer directly above each letter. Each letter is being
used as a clipping mask for the image above it.
used as a clipping mask for the image above it.
After viewing my final effect, it seemed like the white stroke around the letters looked a little boring
by itself, especially for an outer space design. So to help give my letters more of a sci-fi look to them,
I've added an Outer Glow layer style around them, using a light blue/purple color similar to the galaxy
swirling around in the background. I won't bother outlining the steps for adding the Outer Glow layer
style, since it's not the subject of this tutorial and you may not need or want to use it with your design.
I've also cropped the image around the word to give the effect more focus. Here's my final result:
Images In Text: The final result.


0 comments:
Post a Comment