
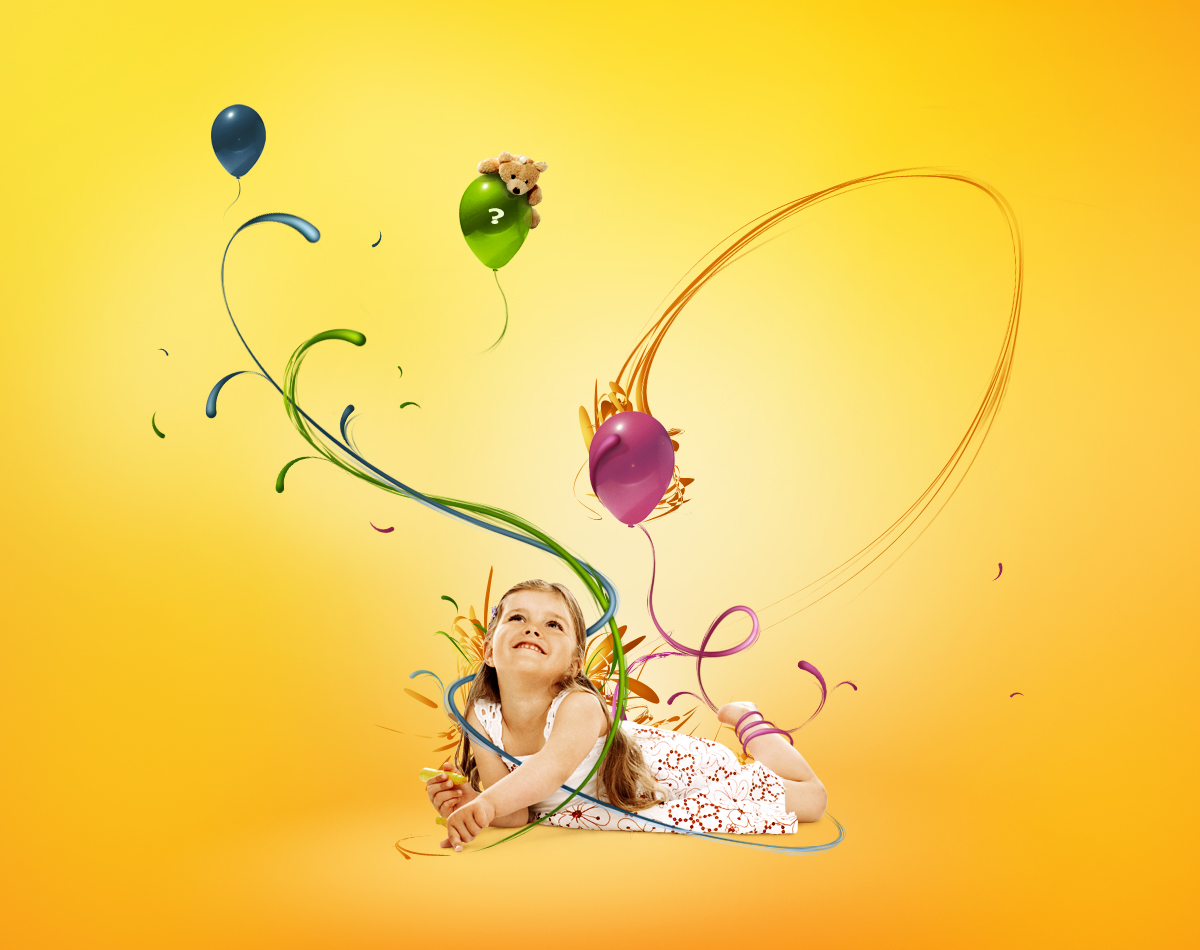
Step 18Save Small Picture and then See in Full Size Image
These days colorful lines are one of the most malleable effects you can easily create in Photoshop. They simply fit everywhere and can look really awesome. In this tutorial, you’ll learn how to create these fantastic colorful effects using only Photoshop. I’ll show you how to compose illustration with these effects. Let’s get to it!
Video Tutorial
Our video editor Gavin Steele has created this video tutorial to compliment this text + image tutorial.
Preparation
First let’s grab the photos we’ll be using in this tutorial: girl and teddy, which are taken from one of my favorite
Step 1
Start by opening the girl image, then grab the Pen Tool (P) and start extracting. When you’re done making the path, right-click and select Make Selection. Then use Command + C to copy the selected area.
While extracting, take a look at the arrows, they indicate shadows. Make sure you don’t include them with the girl. We’re gonna cast shadows on our own depending on the color of the background.

Step 2
Create a new document that is 1200 pixels by 950 pixels, with a of 300 px/inch. Make a new layer and name it "Background." change your Foreground Color to #f0ce46 and Background Color to #f78414. Grab the Gradient Tool (G), then in the upper bar set the gradient option to Radial. Now drag the gradient from the top left corner. Use Command + V to paste our extracted girl. Name this layer "Girl" and go to Image > Adjustments > Selective Color and experiment with the Red and Yellow values. I tried to give the girl some color correction to make her a better fit to this orange environment.
Tip: Your background colors are up to personal taste. I’ll show you the way I did this illustration, but if you choose some other colors (for example blue tones), then you should correct the girl’s color into colder rather than warmer tones.

Step 3
Now grab the Burn Tool (O), then set the Range to Midtones and Exposure to around 30%. Make sure the "Girl" layer is selected, and give some contrast to her hair by painting. And if other spots of her silhouette seem to be little dull, you can apply this process again.

Step 4
OK, we did some nice color and contrast corrections. But it’s still not enough. Now it’s something important because we need to make her look more vivid, and also cast some shadows under her body. I made a fast three-step guide below. Let’s take a look at what we’re going to do with this girl image and how.
First thing we wanna do is cast shadows. So take a look at point 1 below. This is the original image we are using. Zoom into the shadows under the girl, and as you see we have quite easy task. This picture already guided us on how the shadows were originally placed. So what you need to do now is reproduce the same shadow effect (as point 3 illustrates). Use point 1 as the guide for this process.
However, before you do anything, let’s move to the next step.
If you’re using some other picture than mine, and there is no standard shadow in yours, then I recommend seeing one of my plus tutorials with moving mannequins. There are tons of tips in that tutorial on how to place shadows when you have no base.

Step 5
Before we move forward, make new layer above the "Background" layer. Name it "Ground." Change your Foreground Color to #ffe07c, grab the Gradient Tool (G), then in the upper bar set the option to Radial. Drag the gradient to the middle of that screen. Now you should have a big yellow dot. Then go to Edit > Transform > Distort and give this big dot some perspective to make it look like there is ground there (second image below).
Create a new layer below the "Girl" layer. Name it "Shadow." Change the color to something around #8f4121 (brown). Grab the Brush Tool (B), set Hardness to 0%, Flow to around 10%, and keep your Master Diameter quite small. Then start painting under the girl – where the shadows should be. Make the diameter size very dynamic, and change it all the time for various results. Help yourself with the Eraser Tool (E), and set Hardness to 0% and Flow to 50%.
As I pointed in previous step, use the original image to see how the shadows look, and cast them the same way. It doesn’t have to be perfect, give this girl at least a touch of shadow to make it look more realistic. Also, if it’s necessary, change your color to darker and lighter brown. Casting shadows is always a tough part of art, but it pays off well. You need to work with patience.
Remember, every single color depends on the environment. I’m making everything in warm tones, so I mostly mix yellow and orange. As for the shadows, I darkened the yellow tone (which is our ground color) and I turned out with brown. The reason I did this is because every object’s shadow has a touch of color from the ground that it occupies.


Step 6
Now select the "Girl" layer. Go to Image > Adjustments > Levels, and add a little more contrast. Then go to Image > Adjustments > Hue/Saturation and lower the value of Saturation. We don’t want to make this girl too bright though. Next, go to balance the picture and give some nice color depth, duplicate (Command +J) the "Girl" layer, and name it "Color depth." Change this layer’s Blending Mode to Soft Light and then use Image > Adjustments > Gradient Map. Set the gradient from #1b130c to #969696.
Depending on what you want to achieve, your colors in the gradient mapping will be different. I recommend you experiment with these colors. There are many nice results that can be discovered. However, if you have no idea how to take care of gradient map settings, just set it to Black, White and lower the layers opacity just a touch. This always looks good.
The last image below is just a view of how this girl should look (with the background turned off).
Tip: Before you run the gradient map, make sure you changed the layer’s blending mode do Soft Light. Next you will get the final image preview while using the particular gradient.

Step 7
I turned the orange "Background" layer back on, though it needs to be brightened. So, let’s work on that now. We’ll also start working on adding our paths, which will become our malleable colored lines.
Make a new layer above the "Background" layer and name it "Back colors." Change the color to #efd8a5 (a nice bright yellow). Grab the Brush Tool (B), set Hardness to 0%, Flow around 20-40% and make one or several big dots behind this girl. Switch to the Pen Tool (P). Then start creating some nice paths surrounding this girl.
If you’re having some problems with the Pen Tool, you may check out this Comprehensive Guide to Photoshop’s Pen Tool to learn how to properly set the path curves properly.

Step 8
Create a new group above the "Girl" layer. Name it "Blue line" and create there a new layer called "b_line" as well. Then go back to the Brush Tool (B), change the settings to Hardness 100%, Flow 100% and the Master Diameter to 7-10px (depending on how big your image is). Next, go to the brush settings and set the Minimum Roundness to 25%. Then switch to the Pen Tool (P). Right-click and select Stroke Path.
Remember to make sure that the Simulate Pressure option is checked. We will be using this throughout this tutorial with every path stroke (be sure to keep this checked), so I will stop reminding from here forward.
It doesn’t matter what kind of color you stroke this path because we’re going to color it through blending options. So, if you don’t want to get confused, you can use white as the color to stroke this path.
Now press Command + right-click on the "Girl" layer’s thumbnail to load selection. Next, add a Layer Mask to the "b_line" layer, and select this mask. Grab the Brush Tool (B) with the color black selected, set all brush settings up to 100%, to make it hard. Then paint in spots indicated in the second image below. We need to create an effect that the line is surrounding this girl.
Issue: I don’t know what’s the cause of the Brush Options – Minimum Roundness option failure, but sometimes it’s not possible to turn it on. If you receive this problem just simply restart your Photoshop. The next thing to do is to open the brush options and make sure this is set to 25%.


Step 9
Now let’s play around with this line’s Blending Options. The standard blending options settings make everything very flat with an absolute lack of depth. Even though I’ve seen people applying custom settings, they still had problems with avoiding the flat look. So you need to be very accurate with this.
Depending on what color you want to make your line, the layer styles will be different. If you decide to colorize it with blue, you need play around with many various tones of blue.
Also, very important thing is the Gloss Contour in Bevel and Emboss setting (second image below). I customized the Mapping to fit my own needs. If you play around with these anchors you will get the idea how it works. Make sure you have the option Preview checked, then you can apply effects in real time.
Another important thing is the Angle and Altitude of Shading (the option above Gloss Contour – second image below). Spend some time while adjusting this little target. It’s the option that allows you to cast lights properly.


Step 10
Now grab Brush Tool (B), set Hardness to 0% change Master Diameter dynamically between 1px and 2px by making more paths and stroke them the same way. We will make some touch ups to make this blue line complete.
So create new layer above "b_line" name it "b_line fills", and create paths. Make many paths by starting and ending in different points. Looks images below. At 3rd and 4th image, those arrows indicate some spots, where I placed anchors. I did it dynamically setting various points and various brush size from 1px to 2px.
If you are bothered with some unwanted lines, just simply erase them using Eraser Tool (E) of 0% Hardness and 50% Flow.

Step 11
I assume you got the idea of making these fills. So make more lines, apply them to spots of your own choice.
Now let’s take care of coloring these small lines. Basically, I copied layer styles from the "b_line" layer and pasted it to the "b_line fills" layer. Then I entered the "b_line fills" layer Blending Options and just changed the color of Inner Glow to lighter blue #c1dbff. You may also change the Satin color to some other blue tone. I set the #54abbb color for Satin. It didn’t change a lot. The changes are barely visible, but now these fills aren’t just one color.
I didn’t play around with the "b_line fills" layer styles because these lines are very small and all effects would be hard to notice. It’s enough if you just change the color of inner glow (and if you want, for satin also) as said before.


Step 12
Let’s follow the same process as in Step 9. This new line will cross the blue line and we’ll fill it with green tones. So create a new group above the "Blue lines" group, name it "Green line." Create a new layer in it, and name it "g_line." Grab the Brush Tool (B) and change the Master Diameter size to 6-8px, set Hardness and Flow to 100%. Next grab the Pen Tool (P), draw a nice path crossing the blue line, then right-click and select Stroke Path. After this apply the same effects as previously, and play around with Shading in Bevel and Emboss. And this time use green colors for all options.
When your done, grab the Eraser Tool (E) and make sure the "g_line" layer is selected. Then erase some parts where both these lines cross to give some depth. You’re free to make this using a Layer Mask also. Either way is fine.

Step 13
Now, we’re just repeating Steps 10 and 11, but on the green line now. So make a new layer in this "Green line" group, name it "g_line fills." Now grab the Brush Tool (B), set Hardness and Flow to 0%, change Master Diameter dynamically between 1px and 2px and make many paths. Then stroke them. After this, copy the layer styles from "g_line" and paste it to "g_line fills", same way as you did previously.
And you don’t need to brighten the colors of "g_line fills" layer, they already look good. But if you want, make sure you brighten Inner Glow’s color. If you are bothered with some unwanted lines, just simply erase them using the Eraser Tool (E) with Hardness set to 0% and 50% Flow.

Step 14
OK, looking good. Now, we’ll make the next line a little more interesting. So create a new group above all and name it "Pink line." Create a new layer in it and name it "p_ring." Grab the Pen Tool (P) and draw a curvy path around girl’s leg (instead of drawing a path you can use the Ellipse Tool (U) and create a circle instead). Then right-click and select Stroke Path. Next, apply some nice layer styles the same way as previously. You can use my settings or experiment with your own.

Step 15
If your ring needs some touch ups, select the "p_ring" layer, duplicate this layer (Command + J), go to Edit > Transform > Flip Vertical and adjust it to make an ellipse. Then grab the Eraser Tool (E) and erase some parts to make it look like it was surrounding her leg.
When you’re done, select the "p_ring" layer again, duplicate it (Command + J) 3-4 times, and using Edit > Free Transform make those rings fit the girl’s leg.

Step 16
Create a new layer, name it "p_line," grab the Pen Tool (P) and draw a nice curvy path. This will be our third line.
Go to Blending Options and apply same effects as previously. In this case, you need to play around with Bevel and Emboss > Shading. Make sure the Angle and Altitude fit your needs. Depending on what direction your line is going and what kind of shape it has, the shading will be different. You need to adjust it while you start getting something satisfying.

Step 17
This is another process to repeat. Use the same directions as in Steps 10 and 11, but for the pink line. In a shortcut: create a new layer called "p_line fills," draw some paths around the main line using the Pen Tool (P), and stroke them with 1px or 2px soft brush. Next, copy the layer style from the "p_line" layer and paste it to the "p_line fills" layer.
Now let’s play around creativity. Select the "p_line fills" layer, then grab the Lasso Tool (L) and draw a selection around some cool looking torn lines (first image below). Then right-click, and select Layer Via Copy. This will copy the piece we selected with its layer styles included. Now right-click on this copied layer and select Convert to Smart Object. After this, make around 4-5 duplicates (Command + J) and spread them around this pink line. Make some rotations using Edit > Free Transform.
The reason we used Convert to Smart Object option, is not to let these pieces pixelize. Since they are smart objects, you are able to resize this piece down and rotate it as many times as you want without losing quality. But don’t resize it up, as it is not a vector object.

Step 19
Go back to the "Blue line" group and apply the same effects as in the previous step. And you can do this to each line that you’ve created. I recommend playing around with colors of these line fills, you may achieve some cool results. Try to make them fit to the lines that they are connected to.

Step 20
Now we’ll create some more great effects. People used to make these kind of shapes with Illustrator, and export them to Photoshop. Well, not everyone knows how to properly use Illustrator, so I’ll show you how to create these shapes in Photoshop. The only disadvantage is that shapes will remain raster objects, but it’s OK, as they’re very easy to recreate.
First create a new group above all, name it "blue drops." Inside this group, create a new layer called "b_drop." Go to the Brushes Palette (Window > Brushes). Select Shape Dynamics and apply the settings shown below. Then make sure your brush is set to 100% Hardness and 100% Flow. In the Brushes Palette select Brush Tip Shape (second image below) and apply the settings again. Make sure that the Spacing is set to 1%. About the Diameter size, it depends how big you want your shapes to look like. But for this tutorial, I recommend following all the settings shown below.
Next, select the Ellipse Tool (U), while holding Shift, draw a circle, around the same size as you see in the third image below. Then select the Pen Tool (P), right-click, and select Stroke Path.

Step 21
Go to "b_drop" layer’s Blending Options and play around with these settings. This is important because standard layer styles give a very flat look. To avoid this make sure your shape has proper colors, highlights and shading.

Step 22
Now that you have created the 3D shape, it’s time to duplicate it (Command + J) a few times and fit to the main blue line. Remember, always have one shape as a backup, so make one of these duplicates invisible (you never know when you may need it). As for the rest of the copies, depending on what you want to do, we’ll leave some shapes as regular objects and turn some of them into smart objects.
In the previous steps, I’ve explained how you can use smart objects. And I used it only in one shape here (layer right-click > Convert to Smart Object) because I searched for a good spot for this shape and I rotated (Edit > Transform > Rotate) it many times. As for the rest rest of the objects, I didn’t convert them into smart objects, because I wanted them to retain their layer styles. And as you resize down these normal objects, the layer styles stay untouched, and they stay connected. You can see in the image below that the small shapes are darker. For example, the Inner Glow has the same value, but the object got smaller.
And the point of all this is that you need to rotate these shapes to make them look like they where in motion, while dropping little pieces. It’s good to make each one look different then the others.

Step 23
As you remember, we named this layer "b_drop" (the b letter stands for blue). And I mentioned that you’re supposed to backup one "b_drop" layer. So make a copy of this untouched layer and rename it "g_drop." Create a new group, name it "green drops" and drag the "g_drop" layer into this group. Then change this layer’s Blending Options. Set all the colors for various green tones. Also, play around with Bevel and Emboss > Shading (second image below).
Then repeat the same process as the previous step. Make a few duplicates (Command + J) of this green drop and make them look dynamic (use Edit > Transform > Rotate).

Step 24
Same thing here. As we made three lines, and each in different colors, we need to make their drops in pretty much the same colors. So repeat the previous steps of creating drops and apply this technique creating now pink drops.
You always need to find the right colors. Start experimenting with them, and you will see which setting in Blending Options is more important then the other. Try to spend as much time as you need to get this right.

Step 25
After you’re done with all the lines and drops it’s time to touch up the background. Simply grab the Brush Tool (B), set the Master Diameter to a fairly large brush, change the Hardness to 0%, and Flow to around 12-15%. Create a new layer above the "Background" layer and name it "background color." Change your colors as shown below, and just paint.
Apply a very light brushing, the Flow option reacts to pressure. If you brush in one place too much, the color will be more intensive, so brush with single light clicks. Don’t hold the mouse button as you brush.
Tip: you can make each color on a new layer and then play around with their opacities.

Step 26
OK, the background looks fantastic, it’s deep and balanced. Now we can move further. Open the balloonimage, and extract it using the Magic Wand Tool (W). We can use this tool, as this balloon is easy extractable. It was probably cut out before and saved on the white background. Place it into your main project, resize it down and flip it horizontally (use Edit > Transform to do this). Rename it to "green balloon" and apply some color adjustments. You can find them under:
- Image > Adjustments > Hue/Saturation
- Image > Adjustments > Brightness/Contrast
- Image > Adjustments > Selective Color
- Image > Adjustments > Levels

Step 27
Drag the "red balloon" to our main project again, and make a duplicate of it (Command + J). Name the first "pink balloon" and the second "blue balloon." For the "pink balloon" use only Image > Adjustments > Hue/Saturation because it’s red, and we want to get something in between purple and pink. For the "blue balloon" use:
- Image > Adjustments > Hue/Saturation
- Image > Adjustments > Selective Color
- Image > Adjustments > Brightness/Contrast

Step 28
Now bring back the brush settings from Step 8. Create two new layers, then name them "blue rope" and "green rope." Next, draw some curvy paths on each layer below the balloon. Make sure your brush size is 1px big and it’s 100% Flow. Right-click and select Stroke Path. Use blue and green colors to stroke the paths. You can also copy the layer styles from previous lines/drops and paste them into these rope line layer styles.

Step 29
Now, this is my favorite part of the tutorial. You probably will enjoy this too. Create a new group above the "Background" layer, name it "Effects" and work in this group now. Grab the Custom Shape Tool (U), set its options to Shape Layers, and pick a shape of your own choice (the settings are shown in the first image below).
Find some empty spot on our illustration and work there. Create this path (you can hold Shift to get a perfect shape). It should automatically be filled with your Foreground Color, which can be white. Name this layer "Orange," the go to Blending Options and apply some nice effects to it.
I tried to get some tones of orange color, from brown to yellow. And it doesn’t really matter where the shading is. The only thing you need is to have some nice one-color variety here (using different tones).

Step 30
Now we have a nice vector shape, and it’s editable. Go to Edit > Transform > Warp, then bend and twist this shape to get a satisfying result. I simply love this step, you can be very creative with these shapes. After each transform hit enter and go again with Edit > Transform > Warp.
The whole bending below is done this way, warp / enter / warp / enter, and so on, to achieve better results. The best thing about this is that this shape remains vector, even though it’s getting bent to the max.

Step 31
What we came up with here is an awesome shape (still vector!), and we can now position it everywhere. While repeating thing process, we can cover the whole back of this girl using various shapes. Now, using this technique make more shapes like this, then place them behind this girl and make them fit. Use the Copy/Paste Layer Styles option every time you make a new shape. Do not adjust each one manually because you’re gonna waste time.
Here is something you need to remember: although this is vector, it may get sharpen sometimes. If you twist this shape so much to get a very thin line, some jagged edges may occur. So be aware, if you receive something like this, start again with a new shape. Or you can rasterize the vector object (right-click on the layer, select Rasterize Layer). Next, use the Eraser Tool (E) with the Hardness of 0% and Flow of 80-100% to erase some bad looking spots.

Step 32
That’s all for the small shapes. Now, let’s take care for the bigger lines. I used the same technique to create the line that you see in first image below. Next, I rasterize this layer (right-click and Rasterize Layer), and the using Eraser Tool (E), I erased some spots. There is a small case study in images below:
- In second image below, I made this line fit the back of balloon.
- In third image below, I created a new shape using the same technique.
In the next images, I just duplicated (Command + J) this curvy line. I rasterized the layer when needed (layer right-click > Rasterize Layer), and used the Eraser Tool (E). To place these lines use Edit > Transform > Rotate. The whole process of positioning these lines took me around 30 minutes because I changed this like ten times. So don’t give up, the more effort you put in this, the better it will look.

Step 33
OK, now just simply repeat Steps 29, 30, and 31, but in green. Using the same technique, create several green shapes and place them behind this girl and mix them with orange shapes.

Step 34
At this moment I thought, I would show you something cool. As you have created some thin, green shapes like you see in the first image below, use Edit > Transform > Warp again. Now try to stretch it to create a nice curve (second image below).
Now go to Edit > Transform, and rotate this shape to make it fit some parts of the green line (third image below). Run Edit > Transform > Warp again and perfectly adjust it with the line. After this you can right-click on this layer, select Rasterize Layer, grab the Eraser Tool (E) and erase some unwanted parts.
Also, if some edges got jagged, use the Smudge Tool (R) with a Strength of 12%. Now smudge the edges towards the line (you can see it in the 5-6 images below).

Step 35
OK, now let’s do some final touch ups. Grab the Brush Tool (B), set Hardness to 0% and Flow to around 10%. Change your Foreground Color to #481e39, create a new layer above the "pink balloon" layer and name it "p_drop shadow." Then start painting below this drop to create a nice touch of shadow.
Next, select the layer of this drop (that is shown in images below) use Command + J to duplicate it. Work with this copy now. Take a look at the third image below: in Blending Options change the size of Inner Glow for the drop copy. Next lower its Opacity and place it below the "p_drop shadow" layer to create a reflection.

Step 36
To give this illustration some meaning I decided to put here some funny thing like this Teddy. I thought, there’s a little girl, lots of colors, so let’s give it a touch of cuteness.
So, cut the bear out of its original image using the Pen Tool (P). Drag it to our main project document. Name this layer "Teddy" and place it above all the layers. Now let’s do some color adjustments using Image > Adjustments > Hue/Saturation and then Image > Adjustments > Levels.
Duplicate the "Teddy" layer using Command + J and select this copy now. Change its Blending Options to Soft Light. Go to Image > Adjustments > Black and White, and give this teddy some nice deep colors and a touch of contrast.
I still thought this teddy needs some more color. So I held down Command and left-clicked on the "Teddy" layer’s thumbnail to bring the selection. Then I created a new layer above all layers. Changed its Blending Mode to Overlay. Next, I set my Foreground Color to #fbc83a, grabbed a Brush Tool (B) with a very soft brush and painted inside this selection just a little.

Step 37
As you still have this selection on, hit Command + Shift + C (copy merged) and then press two times Command + V (paste). Place these teddies the way you see in the first image below. Next, take one of them and place behind the "Green balloon," and make his arm look like a leg.
Now create a reflection with the second teddy. So select another copy of teddy and go to Edit > Transform > Distort and make this bear more flat (second image below). Place it below the original "Teddy" layer to make it look like a reflection. If you get some outgoing edges of this reflection – erase them using the Eraser Tool (E). Apply the same technique to make a reflection of his leg (as you can see in fourth image below).
Next, bring the selection of the "Green balloon" layer (hold Command and left-click on the "Green balloon" layer’s thumbnail). Now create a new layer below the "Teddy" layer and change your Foreground Color to #212b04. Grab the Brush Tool (B), make the brush settings very soft with Hardness 0%, Flow 10-15%, and paint under teddy to create some shadow. Hit Command + D to deselect selection.

Step 38
So we are heading to the end. Hit Command + A to select the whole canvas, then press Command + Shift + C (copy merged). Go to the top of the Layers Palette and hit Command + V to paste this whole piece. Name this layer "final colored" and set it’s Blending Mode to "Soft Light." Now go to Image > Adjustments > Gradient Map, and find some nice satisfying colors to balance this illustration. There are my colors written below. I added them and lowered the Opacity of this layer just a touch.

Conclusion
So here it is, the cool colorful illustration covered with lines and shapes. You have to be very careful while creating your own colorful piece. The colors are something that separates good art from weak art. When you understand how it works, all your designs will start to look professional. Always remember to keep the overall balance. Everything needs its own place in a quality illustration. Also, don’t forget about the shading. Objects look good when they are based on reality.
Thanks for reading the tutorial. You can view the final image below or view a larger version here.


0 comments:
Post a Comment