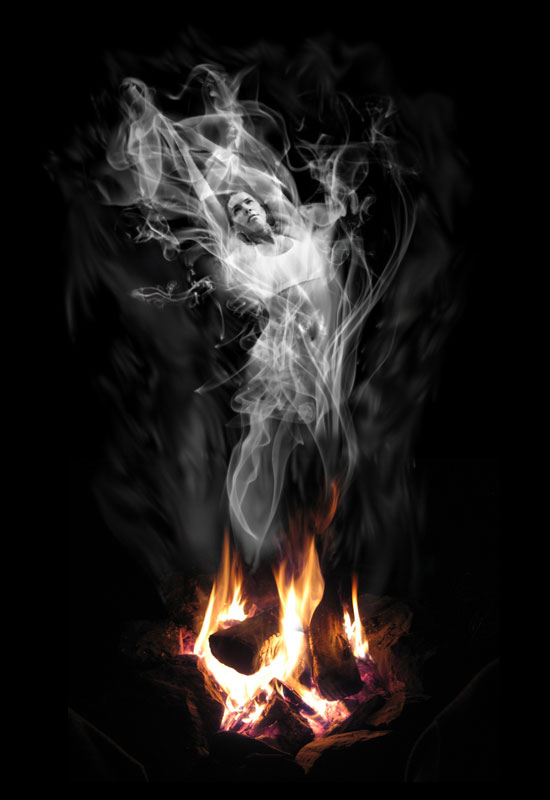
In this tutorial I will show you how to take a regular picture of a pretty woman and turn her into smoke coming from a fire.
First save this picture on your computer or just drag it into photoshop.
Picture of the Woman
Cut the background out from around her and between her arms. I won’t go over
this step because i’m sure most of you have your own technique to cut
pictures out. I used the pen tool.
Now that you have her cut out grab this picture
Picture of the Campfire
Open that picture in photoshop as well.
Ok that is all the materials so start a new document with the size of
550X800px or whatever size you like.
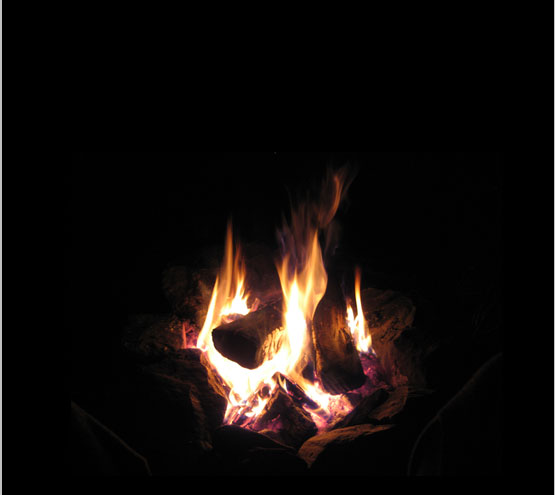
Drag your fire into the photo, resize and center it toward the bottom like so
Now drag your other picture of the woman in the picture and position her
so that her feet are in the fire a bit.
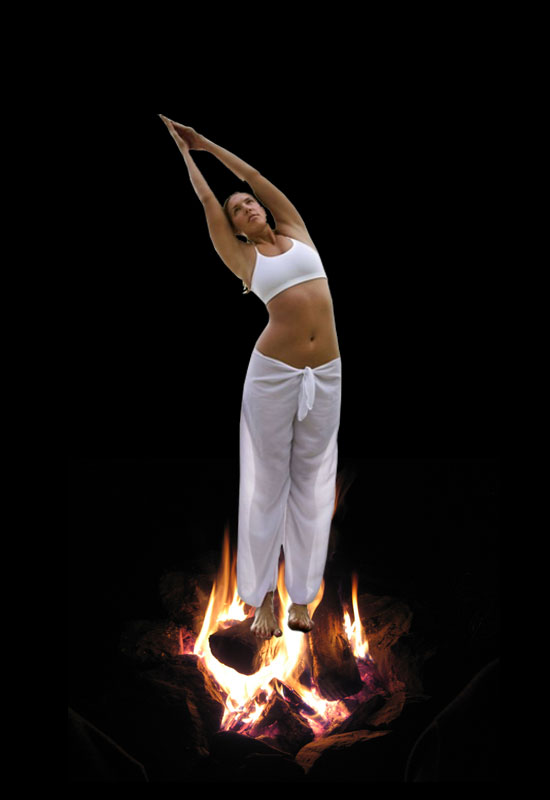
Duplicate that image and hide it because we are going to use it later.
We want to make her black and white so go to image>>adjustments>>desaturate.
Now she should be black and white.
First I am going to take some soft eraser brushes and erase the feet so that
she blends in with the fire.
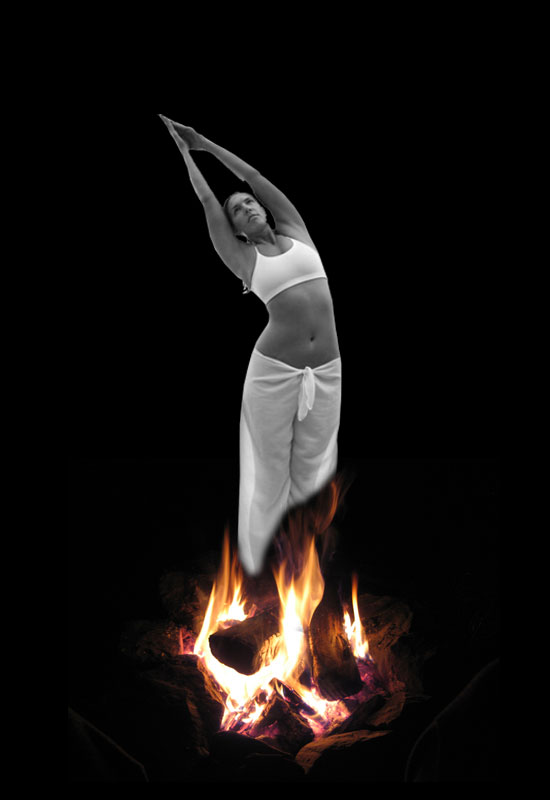
Also I am going to take a soft eraser brush and blend in some of the harsh
edges on the picture left from cutting it out.

Before I start adding some smoke I am going to take my pen tool and cut her
legs off from her stomach down.
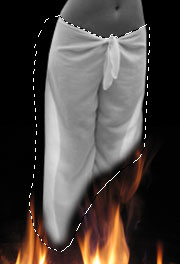
Position the legs back in their regular position and hide them.I am going to add some smoke with a brush pack I downloaded but first
I will add some smoke by just using the brush tool for her legs.
So first on a windows keyboard ctrl+click on the little icon beside
your legs layer so it makes a selection where the legs were.


Time to choose some brush settings.
Click on your brush in your tools palette and pick about a 5px sized one.
Then click on the brush palette icon to choose settings. It should be on
your main bar at the top and when you mouse over it a little popup will
say,”Toggle the brushes palette”.

Chose these settings for your brush:
scattering:

And that is it other than choose the color for your brush to be the same
as the bottom of her stomach.


The color is #3f3f3f
Now for the smoke. Start a new layer and in your highlighted area use your scatter
brush to partially fill in the area.

Click on the canvas to get rid of your selected area. Grab your smudge tool
from your tools palette. Make its strength about 53% and choose a 27px soft
brush. On the dots we made smudge upward and zigzag your mouse to make a
smoke effect.

Do the same thing on the picture of the girl with her stomach. Except drag
downwards to make it blend in with the smoke we made.

Ok I think that looks pretty good so far.Now I will go ahead and start adding some smoke. So I downloaded a brush pack and I can’t remember where I got it so I will link to the actual brush on here.
BRUSH PACK Download
Right click and save as on that link.. install your brush.
If you don’t know how to install brushes check out THIS
LINK
Start a new layer and pick the 3rd smoke brush down from the top one in the set. Set its size to 282px.
The brush should look like this

Click once anywhere on your canvas then transform the smoke by using ctrl+t on a windows keyboard then right clicking on it and click “flip horizontal”.
Once you do that position the smoke like this

Set its opacity to about 70% and then use the soft eraser brush to blend the smoke in with the fire better.

Start another new layer above all the others and use the same ctrl+click technique to make a selection around the body of the woman.

Grab your 4th smoke brush and set its size on 322px and click a couple times
on the woman.

Then set that layer on overlay.
Now choose the 5th brush and set it to 261px and click once and position it
over her arms and face.

Set its opacity on about 70%.
Use some more brushes to add some smoke to the arms in a couple new layers.
Here is my result

Next I am going to duplicate our woman layer so we have a backup in case we mess her up too much. So after that hide one of the woman layers for backup.
Grab a soft eraser brush and start erasing around her arms and body to blend it in more with the smoke.
The layer we duplicated a second ago, un-hide it and move it above the one we just erased on. Set it on color dodge with 40% opacity.

I am going to continue using my smoke brushes to add more smoke detail to
our image.
For my final touch I am going to grab a 3px brush and set it to scatter like we did previously and make small batches of dots all round the canvas using a mid-dark gray color.

Now use a smudge tool set pretty much like earlier and smudge all of the dots to look like smoke

For the final final touch, remember the color image we kept at the beginning? Well un-hide that and set its blending mode to hue for a cool effect.

Thanks for reading this tutorial!

First save this picture on your computer or just drag it into photoshop.
Picture of the Woman
Cut the background out from around her and between her arms. I won’t go over
this step because i’m sure most of you have your own technique to cut
pictures out. I used the pen tool.
Now that you have her cut out grab this picture
Picture of the Campfire
Open that picture in photoshop as well.
Ok that is all the materials so start a new document with the size of
550X800px or whatever size you like.
Drag your fire into the photo, resize and center it toward the bottom like so

Now drag your other picture of the woman in the picture and position her
so that her feet are in the fire a bit.

Duplicate that image and hide it because we are going to use it later.
We want to make her black and white so go to image>>adjustments>>desaturate.
Now she should be black and white.
First I am going to take some soft eraser brushes and erase the feet so that
she blends in with the fire.

Also I am going to take a soft eraser brush and blend in some of the harsh
edges on the picture left from cutting it out.

Before I start adding some smoke I am going to take my pen tool and cut her
legs off from her stomach down.

Position the legs back in their regular position and hide them.I am going to add some smoke with a brush pack I downloaded but first
I will add some smoke by just using the brush tool for her legs.
So first on a windows keyboard ctrl+click on the little icon beside
your legs layer so it makes a selection where the legs were.


Time to choose some brush settings.
Click on your brush in your tools palette and pick about a 5px sized one.
Then click on the brush palette icon to choose settings. It should be on
your main bar at the top and when you mouse over it a little popup will
say,”Toggle the brushes palette”.

Chose these settings for your brush:
scattering:

And that is it other than choose the color for your brush to be the same
as the bottom of her stomach.


The color is #3f3f3f
Now for the smoke. Start a new layer and in your highlighted area use your scatter
brush to partially fill in the area.

Click on the canvas to get rid of your selected area. Grab your smudge tool
from your tools palette. Make its strength about 53% and choose a 27px soft
brush. On the dots we made smudge upward and zigzag your mouse to make a
smoke effect.

Do the same thing on the picture of the girl with her stomach. Except drag
downwards to make it blend in with the smoke we made.

Ok I think that looks pretty good so far.Now I will go ahead and start adding some smoke. So I downloaded a brush pack and I can’t remember where I got it so I will link to the actual brush on here.
BRUSH PACK Download
Right click and save as on that link.. install your brush.
If you don’t know how to install brushes check out THIS
LINK
Start a new layer and pick the 3rd smoke brush down from the top one in the set. Set its size to 282px.
The brush should look like this

Click once anywhere on your canvas then transform the smoke by using ctrl+t on a windows keyboard then right clicking on it and click “flip horizontal”.
Once you do that position the smoke like this

Set its opacity to about 70% and then use the soft eraser brush to blend the smoke in with the fire better.

Start another new layer above all the others and use the same ctrl+click technique to make a selection around the body of the woman.

Grab your 4th smoke brush and set its size on 322px and click a couple times
on the woman.

Then set that layer on overlay.
Now choose the 5th brush and set it to 261px and click once and position it
over her arms and face.

Set its opacity on about 70%.
Use some more brushes to add some smoke to the arms in a couple new layers.
Here is my result

Next I am going to duplicate our woman layer so we have a backup in case we mess her up too much. So after that hide one of the woman layers for backup.
Grab a soft eraser brush and start erasing around her arms and body to blend it in more with the smoke.
The layer we duplicated a second ago, un-hide it and move it above the one we just erased on. Set it on color dodge with 40% opacity.

I am going to continue using my smoke brushes to add more smoke detail to
our image.
For my final touch I am going to grab a 3px brush and set it to scatter like we did previously and make small batches of dots all round the canvas using a mid-dark gray color.

Now use a smudge tool set pretty much like earlier and smudge all of the dots to look like smoke

For the final final touch, remember the color image we kept at the beginning? Well un-hide that and set its blending mode to hue for a cool effect.

Thanks for reading this tutorial!
0 comments:
Post a Comment