Now choose #ff0000 as our Foreground color and type some text with the Horizontal Type Tool (T) using the settings shown below and the font we previously downloaded. We're using a red color just to create some contrast with the black background and the white effects that will come next.

Step 2
Now double-click on the Layer thumbnail (or go to Layer > Layer Style > Stroke...) and choose #ff0000 for the color and set the Stroke at 15 pixels. This way we're making the text more rounded and fatty to avoid rough edges.
Step 3
Create a New Layer by clicking Command + Shift + N, then pick the Brush Tool (B), right-click with your mouse and finally load the new sets of Brushes by clicking on the little black arrow (look below). After choosing Load Brushes... browse to your Presets folder and then to the Brushes folder to load the Brushes. Load all the three sets we previously downloaded, as we're going to need some variety to create the ice effect.
Step 4
Before beginning the work with Brushes, let's see how to modify the Angle of the Brush selected because it's essential for the next steps. Press F5 to open the Brushes Window: using the Angle option you can rotate the Brush you're using. Allow the Smoothing option for a softer Brush.
Step 5
Now click near the red area of the letters, everything which happens outside of that area is not important, and we can erase it later. Use your creativity to make something which should look like cracks in the ice - you have a lot of Brushes available to work with.
Step 6
The Angle and Size settings allow you to set and rotate the Brushes; uncheck the Spacing box to have more control when you're painting the ice cracks. For every letter create a new Layer hiding the one you've already made, so it's easier to look at what's happening in the red area.
Step 7
Always give a name to layers, as it's easier to keep them organized. During the making of the ice effect it's important to use more linear Brushes to create the main shape of the letters and some bigger ones for the deeper cracks.
Step 8
Convert the "ICE" Layer (the red one) into a Smart Object (Right-click > Convert to Smart Object). Then Command-click on this Layer's thumbnail to select it completely and apply a Layer Mask to the other Layers.
Step 9
Create a New Layer, call it "extra" and with a tree brush draw some extra ice into the red letters using the settings below (F5).
Step 10
Use the Brushes near the borders to make it look more three-dimensional. Help yourself by selecting the three letters so you can paint directly where you need to.
Step 11
Now go to the Blending Options of every ice layer (the white ones) and apply the settings shown below. These features are very useful also to colorize layers. We'll use a very light blue color (#c9eaf1) in the Outer Glow options to create some halo around the letters and inside to make it look frozen.
Step 12
Using the Inner Glow option we'll create a glow effect. Apply a value around 10% of noise to make it look more crispy.
Step 13
Select the "I" letter of the "ICE" layer, then go to Select > Modify > Contract... > 25 pixels. Then click OK. Create a new layer ("Layer 1") and press Alt + Delete to fill the selected area; use full black (#000000). Then Deselect and go to Filter > Blur >> Gaussian Blur... 15 pixels. Do the same for the other letters applying always the same Blur.
Step 14
Name these black Layers with "black E, C, I" and set their Opacity to 40%. Then create a New Adjustments Layer and go to Levels. Applying the settings shown below, from here they will influence the whole image.
Step 15
Command-click on the "ICE" layer to select it and then create a new layer and call it "gradient." With a white to transparent gradient draw the bottom to the top. We're drawing some light from the bottom. Set the Opacity to 40%.
Step 16
Hide the "Background" layer (which is black) and select one letter with the Rectangular Marquee Tool. Go to Edit > Copy Merged then Press Command + V. Do the same also for the other two letters and name the layers with the corresponding letter. Then you can hide all the other layers because from now on we'll work on these new ones, but keep the old ones because they can always be useful.
Step 17
Right-click on the thumbnail layers and Covert them to Smart Objects. Now Command-click on the "ICE" layer and go to Select > Modify > Contract... by 35 pixels. Apply this Selection as a Layer Mask to every letter. Don't worry if the masking is covering all three letters.
Step 18
Select the Layer Mask thumbnail and go to Filter > Blur > Gaussian Blur... 25 pixels. Do this to all the "I," "C," and "E: layers. This process is useful to create some darker areas inside.
Step 19
Below is how it should look like.
Step 20
Press Command + L on the Layer Mask to Open the Levels and reduce the darkness (value 30). This way the Layer Mask become lighter showing more of the ice inside.
Step 21
Duplicate the "I," "C," and "E" Layers, Right-click on the Layer Mask > Apply Layer Mask. Finally Merge them. Hide all the rest and create a new layer. Let's start making the snow now.
Step 22
Pick the Brush Tool (B) and choose a normal circle brush. Then apply the settings shown below in the Brush Windows (F5).
Step 23
Create a new layer and paint the snow increasing and decreasing the brush size.
Step 24
Select the "Ice" layer and press Command + T. Then click on the Warp icon and choose the Shell Upper with Bend set to 11%.
Step 25
Change the settings of the brush with these new ones. Start to paint the snow leaving some slightly darker areas.
Step 26
Paint the snow on top of the letters. We can work on one single layer now.
Step 27
After you've done this, retouch the corners and edges with the Eraser Tool (E) using a soft brush.
Step 28
Create a new layer on top and begin to paint some snow near the base of the letters using the same brush, with the same settings as before.
Step 29
Leave some little darker areas.
Step 30
Clean the edges using the Eraser Tool (E) with a soft brush.
Step 31
Create a New Layer above the snow on the letters and start painting with a black (#00000) Brush to create shadows. Let's suppose the light comes from the top.
Step 32
Make some bigger shadows where there are humps.
Step 33
Create a new layer on top and paint some shadows using the same brush. These are the shadows of the letters.
Step 34
Apply this Inner Glow to the shadows just made.
Step 35
Add some more falling snow on a new layer on top.
Step 36
Now select the snow on the top and Duplicate it by dragging the thumbnail to the New Layer Icon.
Step 37
Do the same with the letters and the snow on top of them. Merge these two layers to make the reflection. Press Command + T, then Right-click > Flip Vertical.
Step 38
With the Gradient Tool (G) draw on the Layer Mask a vertical black to transparent gradient. Hold the Shift key to keep it vertical. Then apply some Motion Blur: Angle 0° and Distance 20 pixels.
Step 39
Do the same as before for the falling snow layer: Duplicate, Flip Vertical, add a Gradient Mask, and apply a Motion Blur.
Step 40
Create a new layer behind the letters and draw a horizontal white line with a brush (always holding the Shift key). Set the Size to 15 pixels and the Hardness to 80%. Set the Opacity of the layer to 90%.
Step 41
Create a new layer behind the reflections and draw a white to transparent Gradient starting from the line drawn in the previous step. Also add 70% Gaussian Noise by going to Filter > Noise > Add Noise.
Step 42
This is the actual situation: every effect on his own layer. Now Create a new layer, then go to Image > Apply Image... and click OK.
Step 43
Call this new layer "ICE IMAGE" and Duplicate it. Now we can hide all the rest, we'll be working a bit on sharpening and increasing the definition.
Step 44
Duplicate this layer again and apply a Gaussian Blur of 0,3 pixels just to smooth everything.
Step 45
Then go to Filter > Other > High Pass and apply the following settings.
Step 46
Again, create a new layer by going to Image > Apply Image... and click OK. Set it to Overlay and 30% for Opacity.
Step 47
Draw a circle on a new layer with the Elliptical Marquee Tool. Fill it with black, then Deselect with Command + D. Now go to Filter > Blur > Gaussian Blur, and set it to 25 pixels. This gives some sort of vignetting effect.
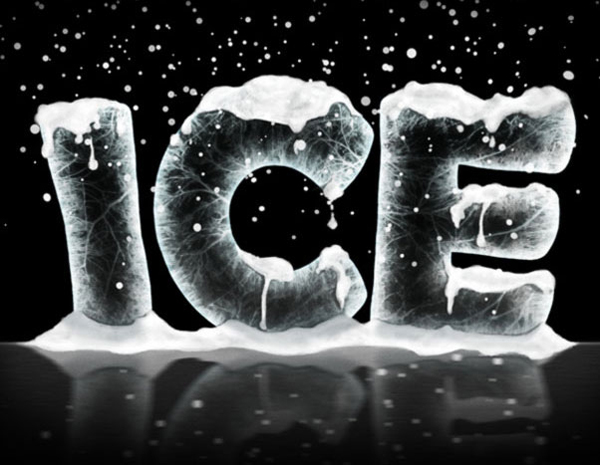
Final Result
And here's the final outcome! It could be very nice to add some Christmas decorations! Well it's not that time yet!


0 comments:
Post a Comment