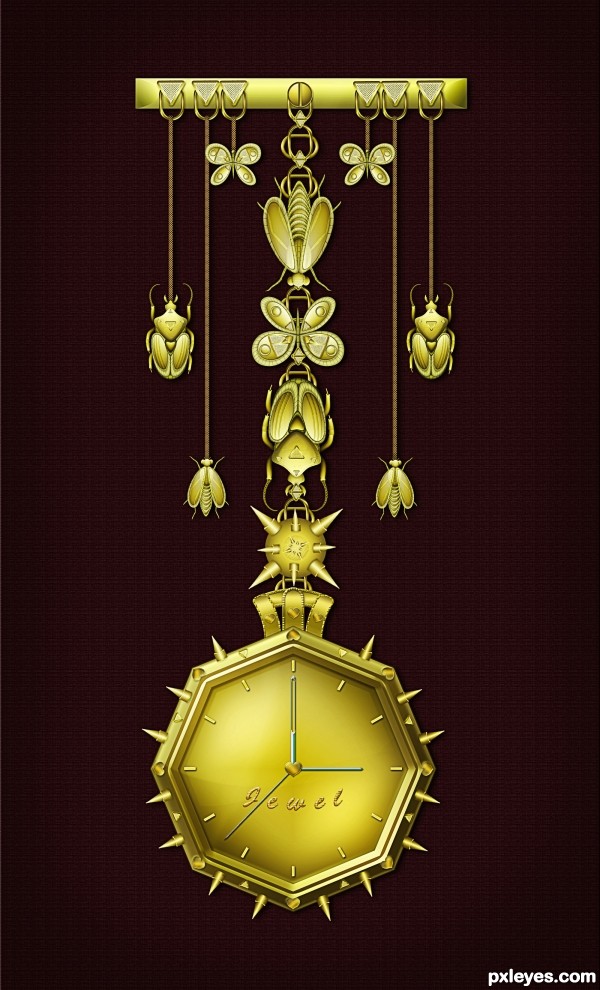
Step 1
Create a new .psd file of 2000px width and 3300px height, 72dpi.
Click twice on the Background to make an ordinary layer of it as you’ll need to apply layer style later. Rename this Layer 0 as Background again for your convenience.
Click twice on the Background to make an ordinary layer of it as you’ll need to apply layer style later. Rename this Layer 0 as Background again for your convenience.
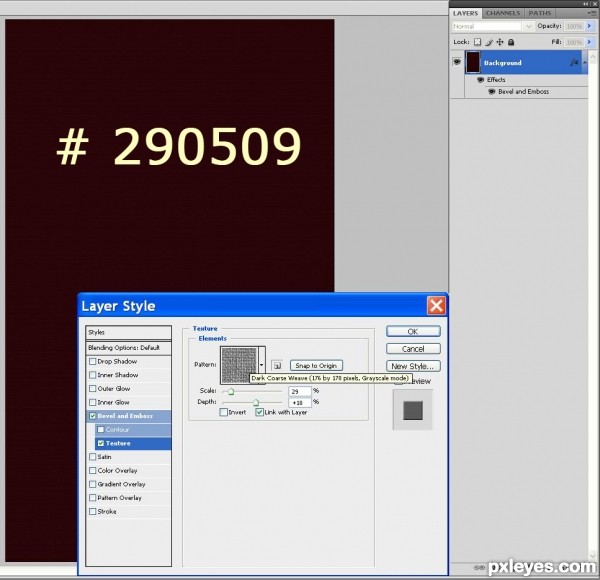
Navigate to your Tool Bar and set Foreground color to # 290509, go to Edit menu and choose Fill. When Fill dialog box appear, choose Foreground Color from Use drop down menu and click OK button.
Now you have a nice dark background for the clock design. Let us give it some slight scarcely visible relief.
Right click on Background layer, select Blending Options and check Texture. In Texture box click on the tiny down arrow to open Pattern Picker, select Artist Surfaces and when the program asks you to Replace the Current Patterns with Patterns from Artist Surfaces, click on Append button. In the opened Pattern Picker select Dark Coarse Weave pattern from the chosen Artist Surfaces set, set Scale option to 20% and Depth to 18%.
Step 2
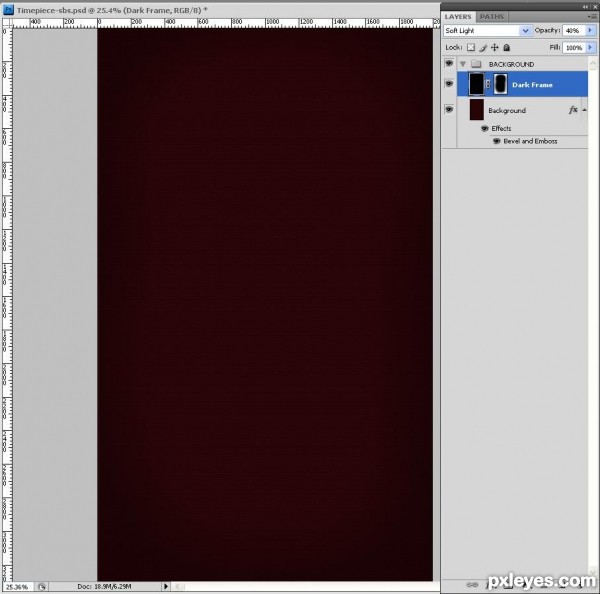
Create a new layer above the background and name it Dark Frame. Fill with black color, change Blend Mode to Soft Light and reduce Opacity to 40 %. Add Layer Mask (Layer, Layer Mask, Reveal All), take soft black brush of about 800-1000px size and brush while the mask is selected. Erase most parts of this black layer, leave only the borders untouched.
When satisfied with the result, highlight both layers- Background and Dark Frame, go to Layer, Group Layers and call the group Background.
Save your Timepiece file for now. We are going to work with CorelDraw in the next steps.
When satisfied with the result, highlight both layers- Background and Dark Frame, go to Layer, Group Layers and call the group Background.
Save your Timepiece file for now. We are going to work with CorelDraw in the next steps.
Step 3
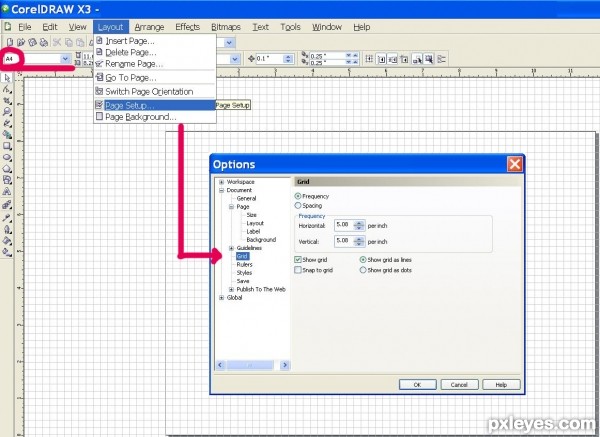
Open CorelDraw X3 (Version 13) and create a new A4 graphic (from Paper Type/Size drop down menu in Property Bar select A4). You’ll need to switch on the grid in order to make your work easier. Go to Layout menu, select Page Setup and when Options dialog box appears, select Grid: check Frequency, leave Spacing unchecked, set Horizontal and Vertical Frequency to 5.08, check Show Grid and Show Grid as Lines. When ready press OK button.
Step 4
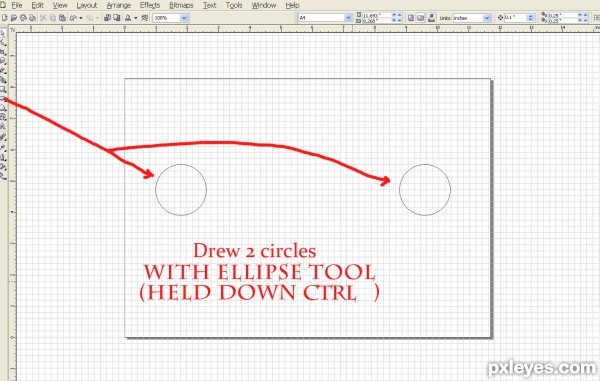
In this step your task is only to draw two circles with Ellipse Tool. Hold down Ctrl while drawing in order to make perfect circles.
Step 5
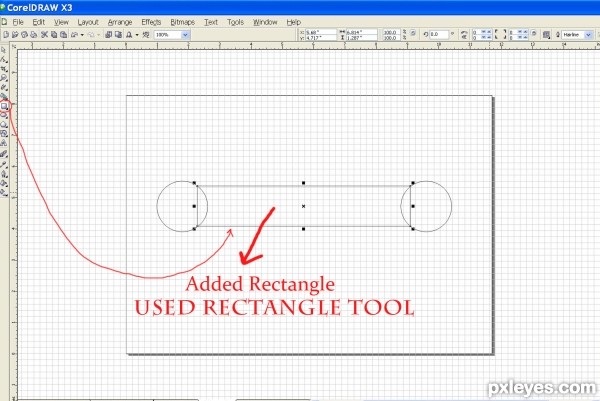
Take Rectangle Tool and draw a long rectangular shape. Its four angles must intersect the ellipses.
Step 6
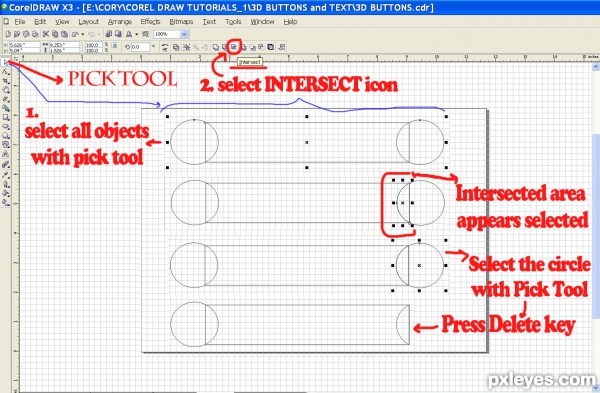
Now grab Pick Tool and select all objects you have drawn so far. Press Intersect Icon on the Property Bar and you’ll see how the first intersected area appears selected (it is the right ellipse). Click with Pick Tool outside the objects to deselect everything, then click with the same tool on the right ellipse and press Delete key. The superfluous parts of the ellipse will disappear and you’ll have only the intersected part of it in the rectangle.
Deselect all objects again.
Deselect all objects again.
Step 7
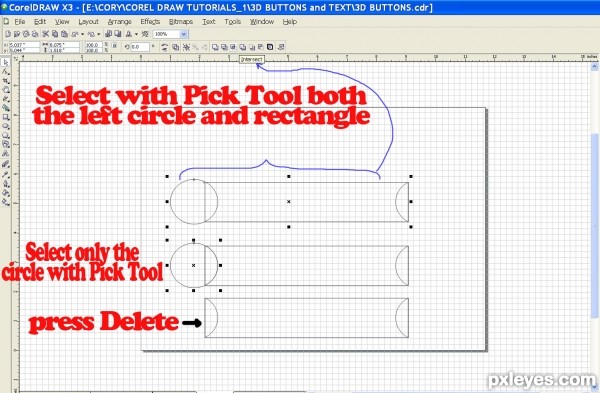
Take Pick Tool and this time holding down Shift, select only the left circle and the rectangle. Press Intersect Icon again. Deselect everything by clicking with Pick Tool out of the objects. Use Pick Tool again to select only the left circle and press Delete.
Step 8
Now click on Fill Tool (the paint bucket icon) in order to appear the fly- out menu of fill tools. Select the second one from left to right- Fountain Fill Dialog (hot key- F11). Our task here is to fill each of the three parts with a lovely golden gradient. On the screenshot given for this step, you see the final result. Next three steps will give you detailed description of the whole color fill process.
Step 9
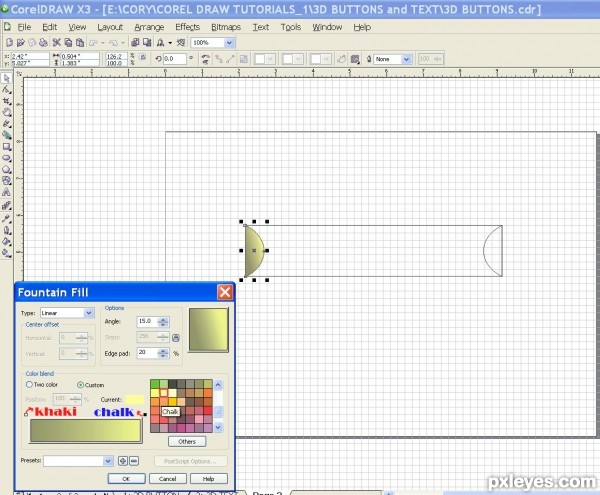
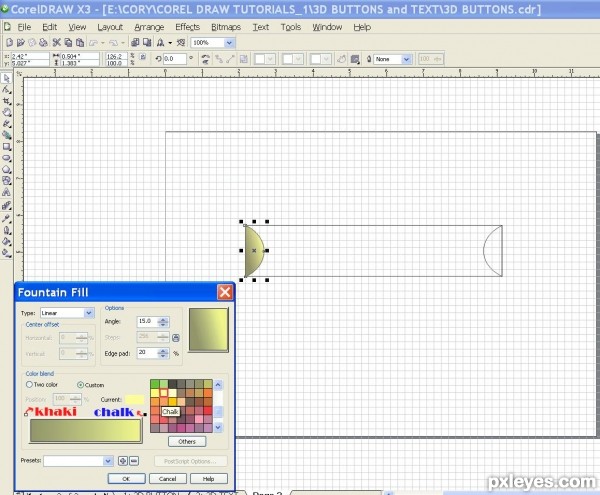
Select with Pick Tool the left part of our rectangular shape, from Fill Tool fly- out menu choose Fountain Fill Dialog or press F11 key. When Fountain Fill dialog box appears, set Angle at 15 degrees and Edge Pad to 20%, leave Type to Linear. To change the colors of the gradient, firstly click on the left marker, go to the color swatches to the right and choose Khaki (when you point at any color swatch its name appears). Then click on the right marker and select Chalk from the swatches.
Deselect the shape.
Deselect the shape.
Step 10
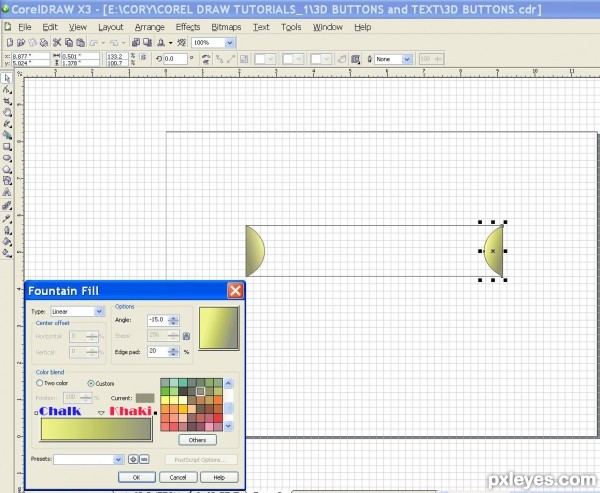
Select the right shape with Pick Tool, go to Fountain Fill Dialog, set Angle at -15 degrees, Edge Pad to 20% and this time select Chalk color for the left swatch and Khaki color for the right one.
Step 11
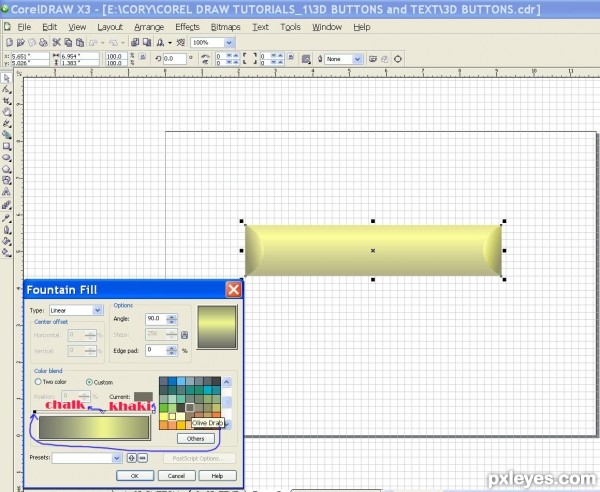
Select the rectangle with Pick Tool. Press F11 to open the Fountain Fill Dialog box. For the left swatch choose Olive Drab color, select Khaki for the right swatch and to add a third color, double click between the two swatches to add a new one. Move it so that in Position box to appear 58%. Choose Chalk color for this swatch.
As you can see, all black outlines are missing in the screenshot given for this step. In the next step you will learn how to remove them.
As you can see, all black outlines are missing in the screenshot given for this step. In the next step you will learn how to remove them.
Step 12
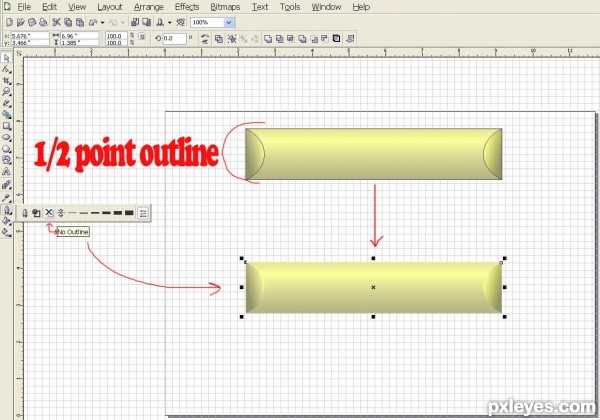
For the purpose of this tutorial you should get rid of the black outlines which spoil the smooth and dainty look of our golden rectangle.
Select the whole rectangle with Pick Tool, click on Outline Tool and from the fly-out menu choose No Fill.
Now our golden rectangle is ready and all the work in CorelDraw completed.
All you have to do it is to export the shape in .png type. Go to File, Export to call the Export dialog box. Click on the Save In drop down menu and find the folder with your Timepiece .psd file. In File Name enter Rectangle and from Save As Type drop down menu choose PNG (Portable Network Graphics). Click on Export button. Now you can close the CorelDraw .cdr file.
Step 13
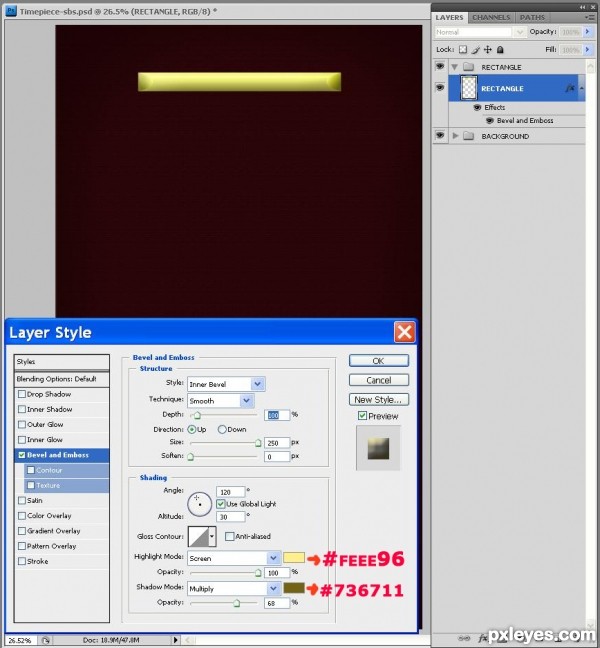
Move the .png rectangle shape created in CorelDraw into your Photoshop document, place its layer above Background group. Resize the shape with Edit, Free Transform to look as on the screenshot to this step. Call the layer Rectangle and while highlighted go to Layer menu, select Group Layers and name the new group Rectangle.
Right click on Rectangle layer, select Blending options and check Bevel and Emboss layer style. Change the settings in Bevel and Emboss box like this:
Style: Inner Bevel
Technique: Smooth
Depth: 100 %
Direction: Up
Size: 250px
Soften: 0px
Angle: 120 degrees
Use Global Light- checked
Altitude: 30 degrees
Gloss Contour: linear
Anti- aliased: unchecked
Highlight Mode: Screen
Highlight Color: # feee96
Opacity: 100%
Shadow Mode: Multiply
Shadow Color: 736711
Opacity: 68%
Step 14
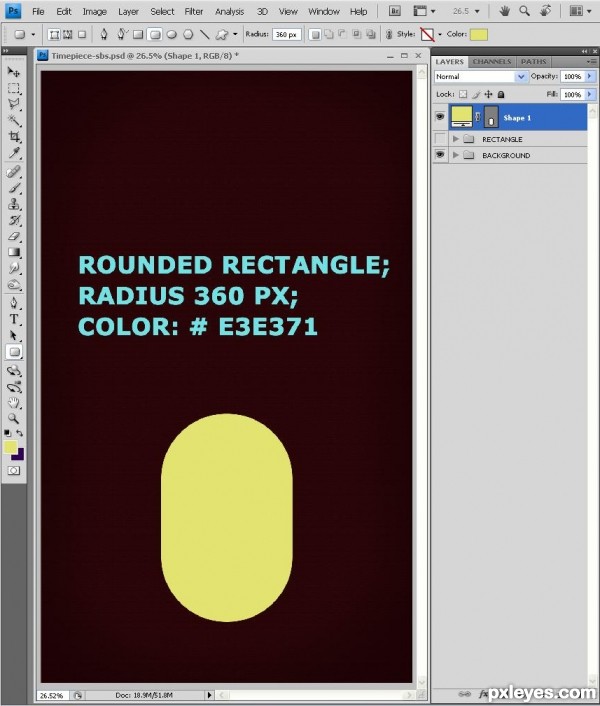
Take Rounded Rectangle Tool from the Tools Bar, navigate to the Options Bar and set Radius to 360 pixels, choose Shape Layers Mode. Change Foreground Color to a lovely light yellow # e3e371 and draw the rounded rectangle shape. You should have Shape 1 layer in Layers Palette. Leave it above the previously created Rectangle group.
Step 15
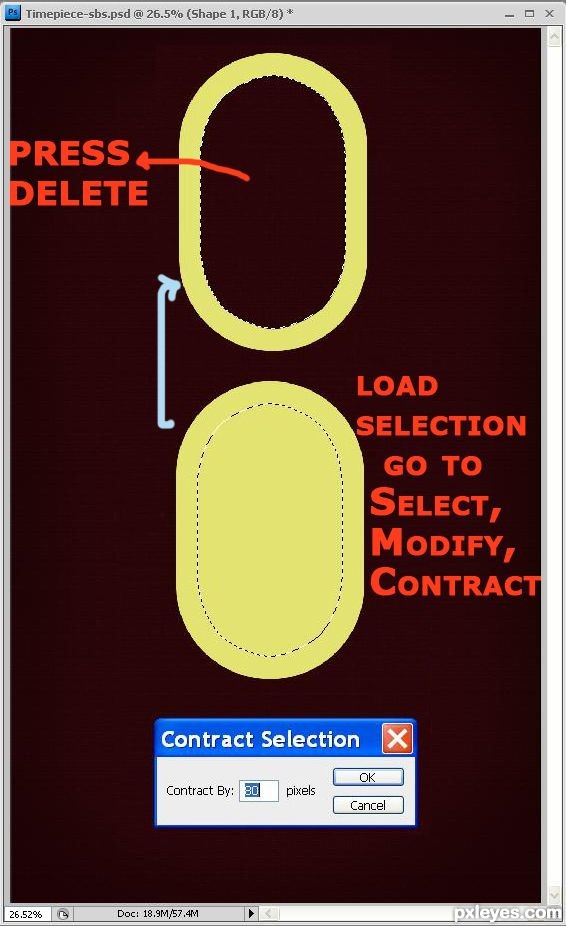
While Shape 1 layer is highlighted, right click on it and select Rasterize Layer. Hold down Ctrl key and click on the layer thumbnail to load a selection. When the rounded rectangle appears selected, go to Select menu, choose Modify, Contract. In Contract Selection box enter 80px and press OK. Press Delete in order to make a chain segment shape. Keep its layer highlighted as we’ll continue to process the shape in the next steps.
Step 16
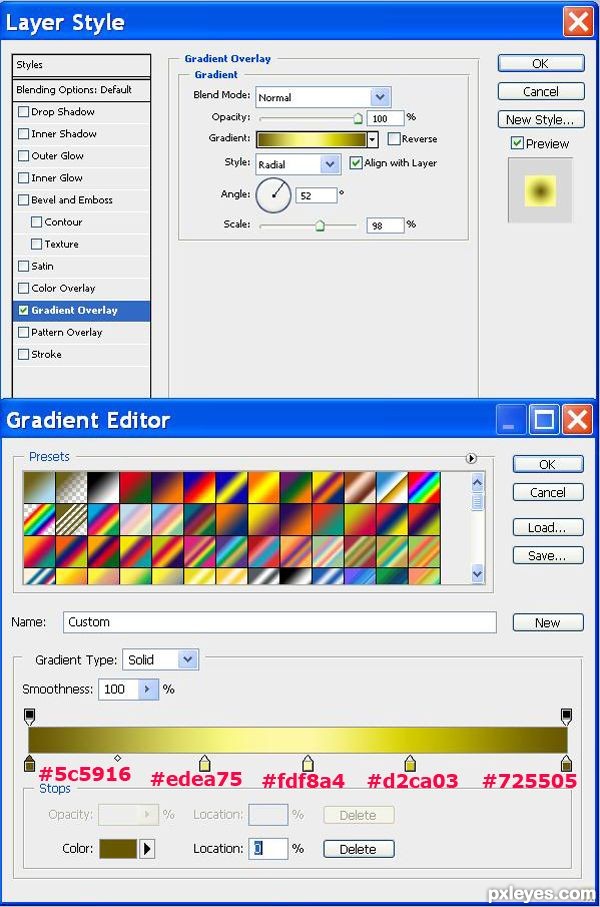
As our purpose is to add a metal glow look to the chain segment, it is time for layer styles again. Right click on the chain segment layer, select Blending Options and check Gradient Overlay.
In Gradient Overlay box leave Blend Mode to Normal and Opacity to 100% (default). Click on the Gradient Swatch to open Gradient Editor. Change the color of the first slider to #5c5916, click also on the last slider and change its color to #725505. Add another three sliders in between and set the colors as following: #edea75; #fdf8a4; #d2ca03 (see my screenshot to see the row of sliders and colors used). After you have finished with Gradient Editor, in Gradient Overlay box change the Style to Radial, Angle to 52 degrees and Scale to 98%.
Don’t close the Layer Style box as we are going to add more styles in the next step.
Step 17
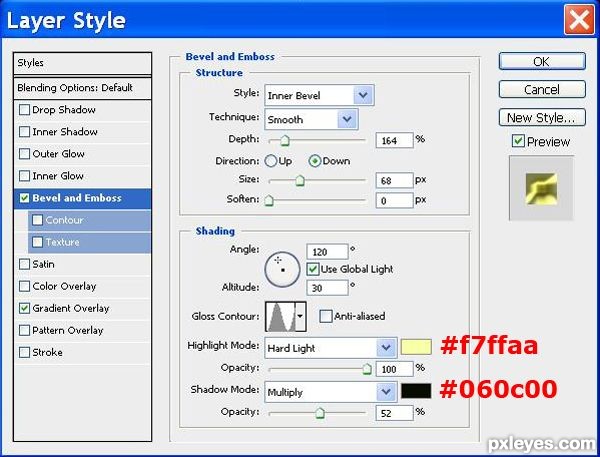
The second layer style we have to apply to the chain segment is Bevel and Emboss. Change the settings like this:
Style: Inner Bevel
Technique: Smooth
Depth: 164%
Direction: Down
Size: 68px
Soften: 0px
Angle: 120 degrees
Use Global Light: checked
Altitude: 30 degrees
Gloss Contour: Ring
Anti-aliased: unchecked
Highlight Mode: Hard Light
Color: #f7ffaa
Opacity: 100%
Shadow Mode: Multiply
Color: #060c00
Opacity: 52%
In order to apply the layer styles, create a new layer below the chain segment, highlight both layers and merge them (right click on them and select Merge Layers).
Step 18
STEP_18
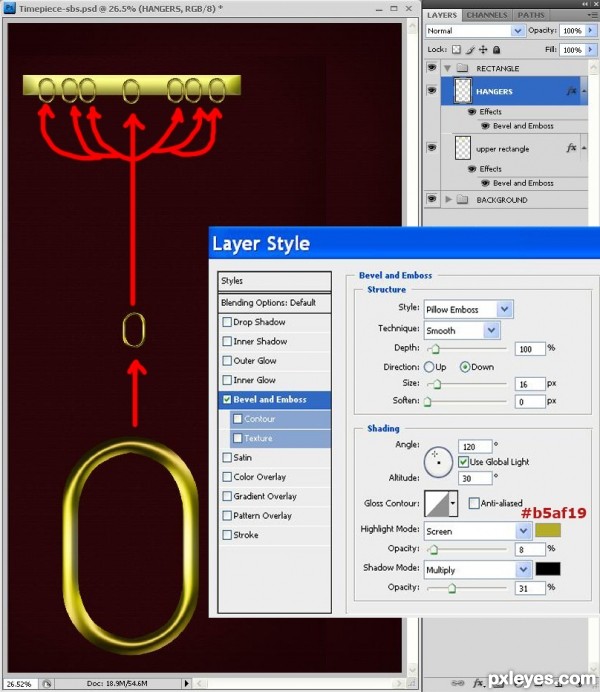
With the chain segment layer selected, go to Edit, Free Transform and scale down the shape. Duplicate the segment six more times and arrange them on the rectangle layer as you see on the screenshot. Merge all seven layers, name the new one Hangers and leave it above Upper Rectangle layer in Rectangle group.
You see these elliptical hangers still look flat and unnatural on the rectangle shape. To improve their look, go to Layer, Layer Style, Bevel and Emboss, and change the settings:
Style: Pillow Emboss
Technique: Smooth
Depth: 100%
Direction: Down
Size: 16px
Soften: 0px
Angle: 120 degrees
Use Global Light: checked
Altitude: 30 degrees
Gloss Contour: Linear
Anti-aliased: unchecked
Highlight Mode: Screen
Color: #b5af19
Opacity: 8%
Shadow Mode: Multiply
Color: #000000 (black)
Opacity: 31%
Step 19
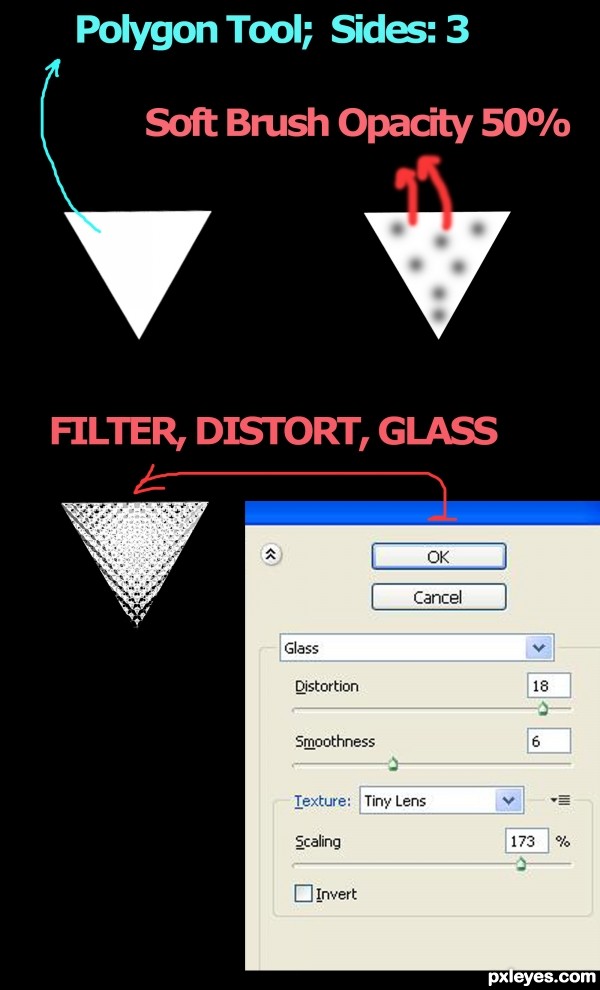
Create a new layer called Triangle diamond and place it below Rectangle group. Change foreground color to white (#ffffff). Take Polygon Tool in Fill Pixels Mode, enter 3 for Sides in Options Bar and holding down Shift draw a triangular shape.
Now change the foreground color to black (#000000), take a Soft Brush, 50% Opacity and make a few dabs on the white rectangle.
Go to Filter, Distort, Glass, set Distortion to 18, Smoothness to 6, from Texture drop down menu choose Tiny Lens, change Scaling to 173%, don’t tick Invert option.
Now change the foreground color to black (#000000), take a Soft Brush, 50% Opacity and make a few dabs on the white rectangle.
Go to Filter, Distort, Glass, set Distortion to 18, Smoothness to 6, from Texture drop down menu choose Tiny Lens, change Scaling to 173%, don’t tick Invert option.
Step 20
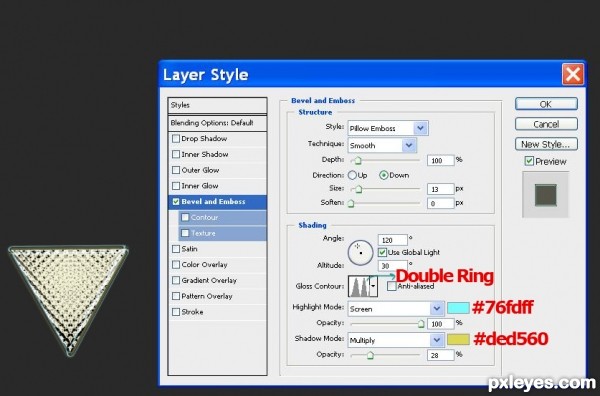
Right click on the Triangle Diamond layer, choose Blanding Options, Bevel and Emboss:
Style: Pillow Emboss
Technique: Smooth
Depth: 100%
Direction: Down
Size: 13px
Soften: 0px
Angle: 120 degrees
Use Global Light: checked
Altitude: 30 degrees
Gloss Contour: Ring-Double
Anti-aliased: unchecked
Highlight Mode: Screen
Color: #76fdff
Opacity: 100%
Shadow Mode: Multiply
Color: #ded560
Opacity: 28%
Don’t click on OK button to close Layer Style box. We need to add one more layer style.
Step 21
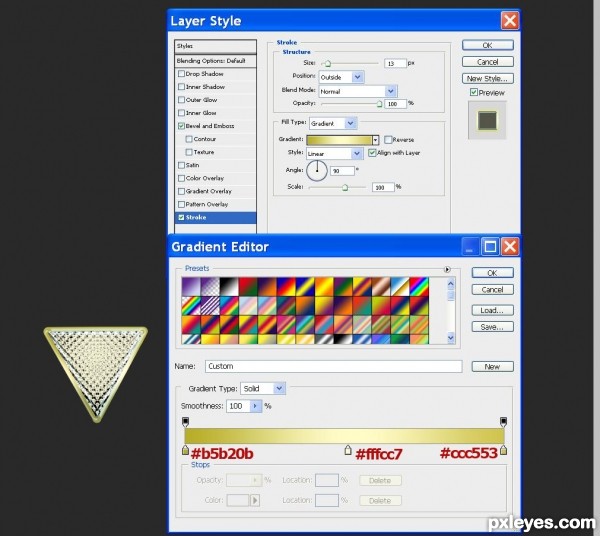
Select Stroke in Layer Style box and change its settings:
Size: 13px
Position: Outside
Blend Mode: Normal
Opacity: 100%
Fill Type: Gradient
Gradient: #b5b20b, #fffcc7, #ccc553
Reverse: unchecked
Style: Linear
Align with Layer: checked
Angle: 90 degrees
Scale: 100%
Click OK button to close Layer Style box.
Size: 13px
Position: Outside
Blend Mode: Normal
Opacity: 100%
Fill Type: Gradient
Gradient: #b5b20b, #fffcc7, #ccc553
Reverse: unchecked
Style: Linear
Align with Layer: checked
Angle: 90 degrees
Scale: 100%
Click OK button to close Layer Style box.
Step 22
Duplicate Triangle Diamond layer and move it into Rectangle group- place it on top of all its layers. Create a new layer below Triangle Diamond then highlight both Triangle Diamond layer and the new one, right click and select Merge Layers. With the new merged layer selected go to Edit, Free Transform and holding down Shift make the triangle a bit shorter in height than the Rectangle layer. When ready, duplicate the resized triangle five times and arrange the shapes above the six hangers on the left and right. Leave the middle hanger without triangular diamond.
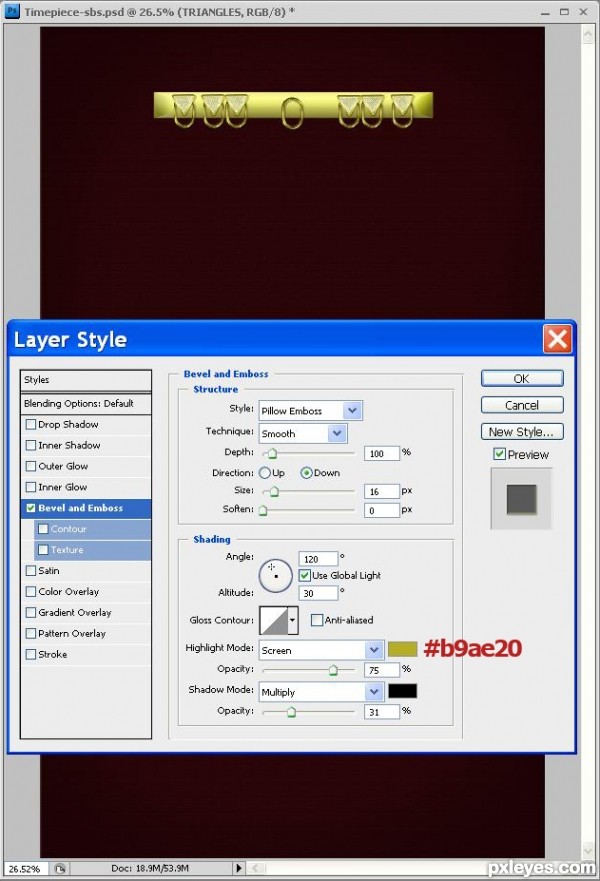
Select all triangle layers, merge then and rename the new layer Triangle. Right click on it, select Blending Options, Bevel and Emboss:
Style: Pillow Emboss
Technique: Smooth
Depth: 100%
Direction: Down
Size: 16px
Soften: 0px
Angle: 120 degrees
Use Global Light: checked
Altitude: 30 degrees
Gloss Contour: Linear
Anti-aliased: unchecked
Highlight Mode: Screen
Color: #b9ae20
Opacity: 75%
Shadow Mode: Multiply
Color: #000000
Opacity: 31%
Press OK to close Layer Style box.
Keep the original Triangle Diamond layer switched off and below Rectangle group. We’ll need it later.
Step 23
In this step we’ll start to make a nice golden bolt for our vintage timepiece design.
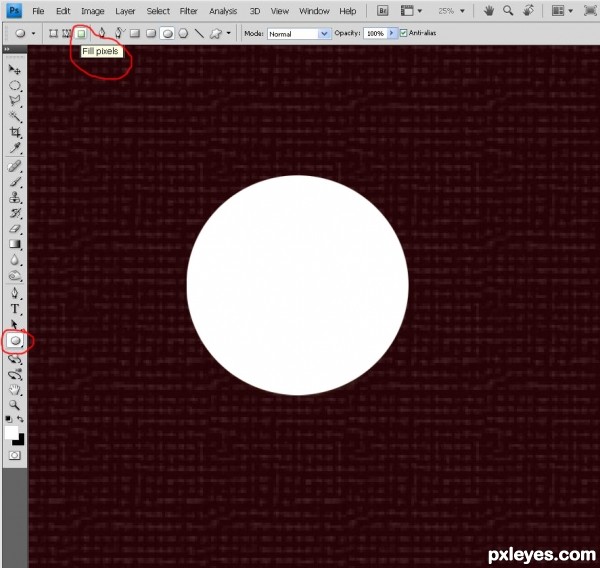
Create a new layer named Bolt and place it above Rectangle group. Select Ellipse Tool in Fill Pixels Mode (set foreground color to white) and holding down Shift key draw a circular shape.
Create a new layer named Bolt and place it above Rectangle group. Select Ellipse Tool in Fill Pixels Mode (set foreground color to white) and holding down Shift key draw a circular shape.
Step 24
Right click on the white circle layer, select Blending Options and check Gradient Overlay. Leave the Blend Mode and Opacity as by default- Normal and 100% respectively. Click on the gradient to open Gradient Editor Box and change the colors to #726a29 and #e8d763. Leave Reverse option unchecked, Style: Linear, set Angle to 99 degrees and Scale to 71%.
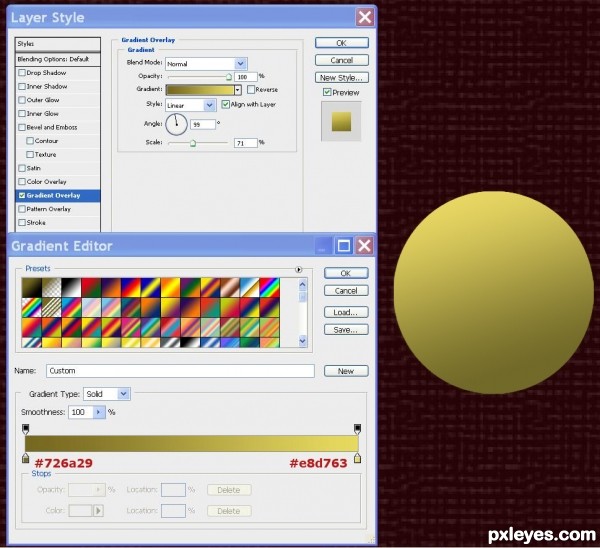
Step 25
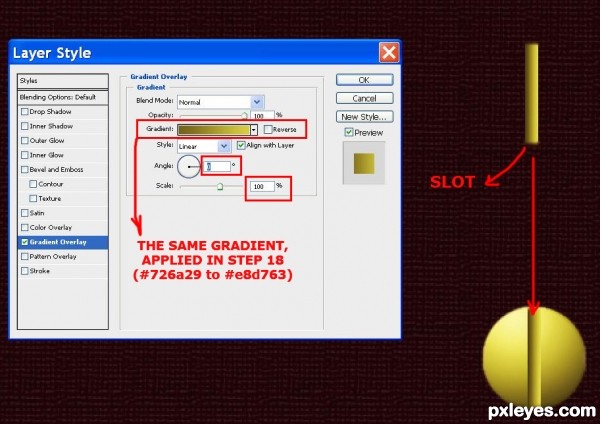
Let us create the bolt’s slot. Create a new layer named Slot, take Rectangular Marquee Tool and draw a thin rectangle, almost as high as the diameter of the previously created bolt circle. Fill the rectangle with white and deselect. Right click on the Bolt layer, select Copy Layer Style, then go back to Slot layer, right click on it and highlight Paste Layer Style. Now the Slot layer has the same Gradient Overlay applied. We have to adjust it a bit now, so right click on Slot layer, select Blending Options and click on Gradient Overlay style. Only change the Angle to 0 degrees and Scale to 100%.
Keep the Layer Style box opened as we are going to add Bevel and Emboss in the next step.
Keep the Layer Style box opened as we are going to add Bevel and Emboss in the next step.
Step 26
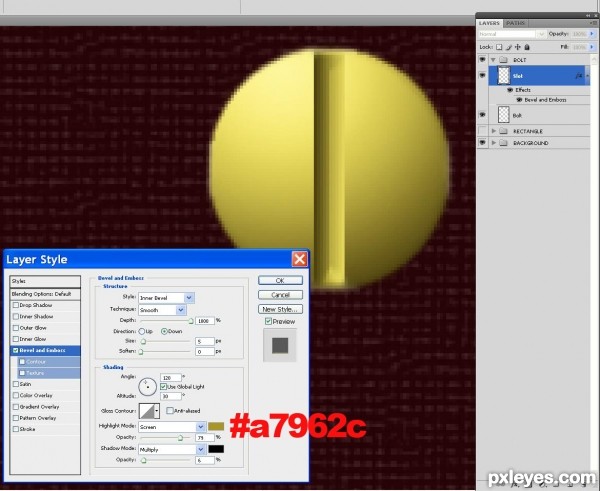
In Layer Style box check Bevel and Emboss and set as following:
Style: Inner Bevel
Technique: Smooth
Depth: 1000%
Direction: Down
Size: 5px
Soften: 0px
Angle: 120 degrees
Use Global Light: checked
Altitude: 30 degrees
Gloss Contour: Linear
Anti-aliased: unchecked
Highlight Mode: Screen
Color: # a7962c
Opacity: 79%
Shadow Mode: Multiply
Color: #000000 (black)
Opacity: 6%
It is time to highlight both Bolt and Slot layers. Go to Layer, Group Layers and name the new group Bolt. Leave it above Rectangle group.
Step 27
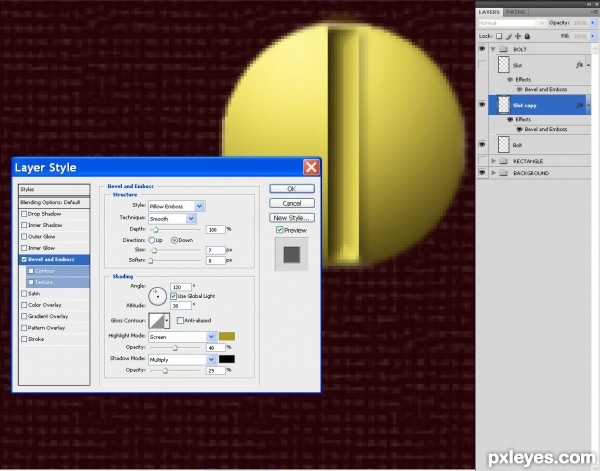
We’ll continue to shape the bolt in this step. Duplicate the Slot layer and place the copied one below the original. Right click on it and make the Following changes in Bevel and Emboss layer style:
Style: Pillow Emboss
Technique: Smooth
Depth: 100%
Direction: Down
Size: 7px
Soften: 0px
Angle: 120 degrees
Use Global Light: checked
Altitude: 30 degrees
Gloss Contour: Linear
Anti-aliased: unchecked
Highlight Mode: Screen
Color: # a7962c
Opacity: 48%
Shadow Mode: Multiply
Color: #000000 (black)
Opacity: 29%
Looks better, isn’t it? Pillow Emboss gives shadow and volume.
Step 28
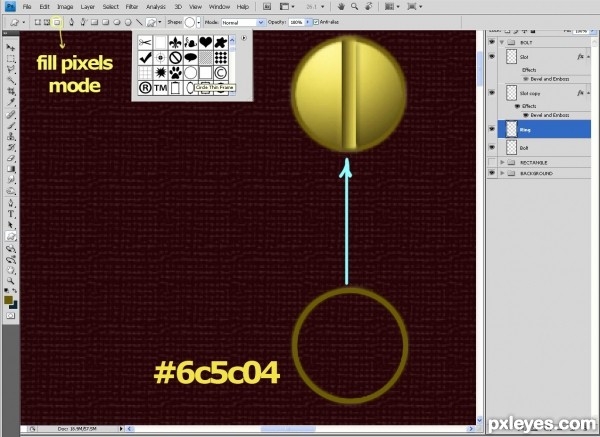
Create a new layer called Ring above Bolt layer. Change foreground color to #6c5c04, select Custom Shape tool (in Fill Pixels mode) and from Shape drop down menu on the Options Bar choose Circle Thin Frame. Holding down Shift, draw a circle frame as big as the bolt- it should perfectly fit the bolt border.
Step 29
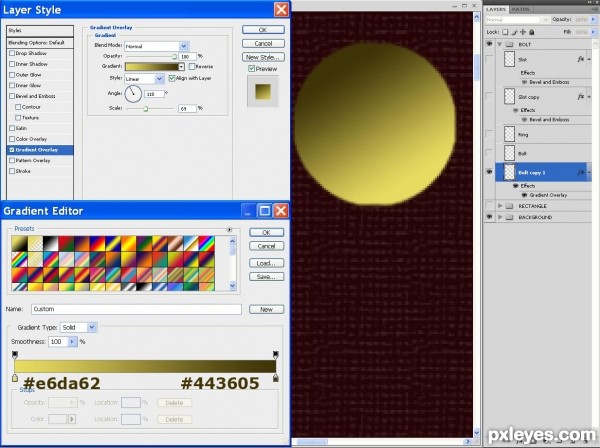
Select Bolt layer and duplicate it. Place the duplicate Bolt Copy 1 below the original. Right click on the duplicated layer, select Blending options and click to change the Gradient Overlay settings:
Blend Mode: Normal
Opacity: 100%
Gradient: #e6da62 to #443605
Reverse: unchecked
Style: Linear
Align with Layer: checked
Angle: 118 degrees
Scale: 69%
When finished with the layer style, create a new empty layer below Bolt Copy 1, highlight and merge both layers to apply the Gradient Overlay style. Rename the new layer Bolt Copy 1 again, as when you merge two layers you’ll see that the new layer automatically takes the name of the bottom layer.
Step 30
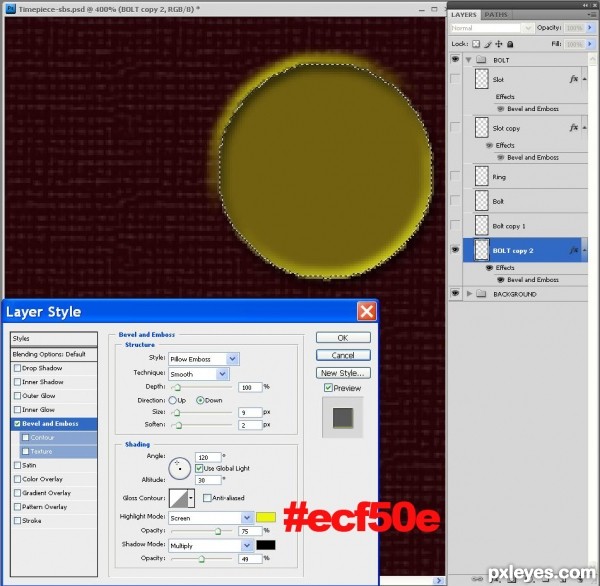
Duplicate Bolt Copy 1 layer we created in the previous step and place the duplicate at the bottom of Bolt group. With the new layer selected, press twice Bottom and Right Arrow key to move slightly the duplicated layer.
It is time for layer style again. From all Blending Options, choose Bevel and Emboss and use these settings:
Style: Pillow Emboss
Technique: Smooth
Depth: 100%
Direction: Down
Size: 9px
Soften: 2px
Angle: 120 degrees
Use Global Light: checked
Altitude: 30 degrees
Gloss Contour: Linear
Anti-aliased: unchecked
Highlight Mode: Screen
Color: # ecf50e
Opacity: 75%
Shadow Mode: Multiply
Color: #000000 (black)
Opacity: 49%
Step 31
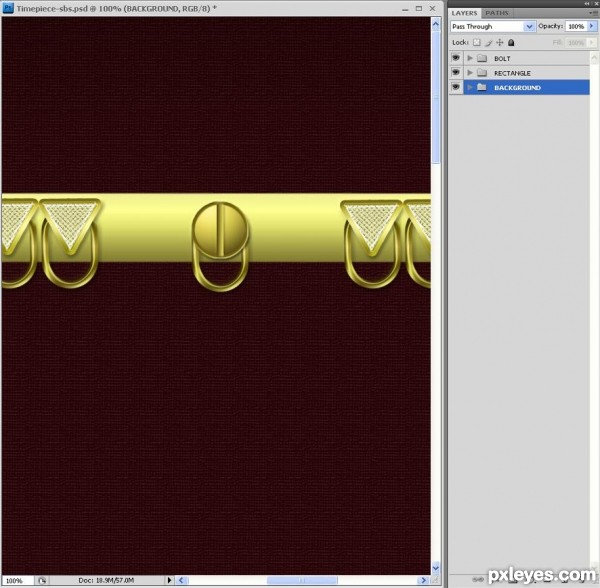
Place the big golden bolt in the middle of the rectangle as you see it on the following screenshot.
Step 32
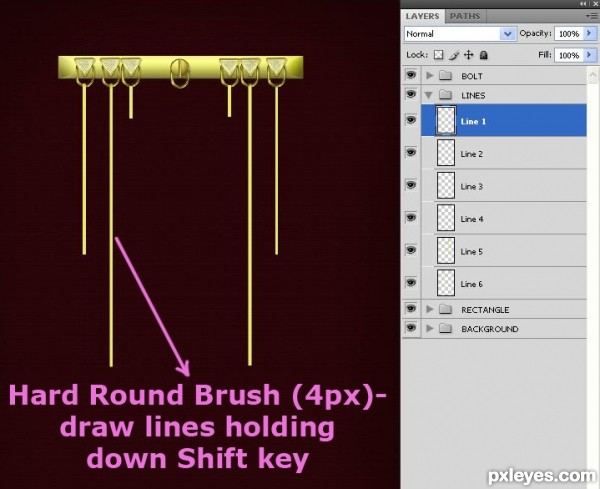
Change the foreground color to # ebe972, take a Hard Round Brush of 4px size and holding down Shift key, draw 6 lines, each one on a separate layer. These are intended to be the golden chains on which we are going to hang some of the timepiece pendants. Name their layers from Line 1 to Line 6 respectively and place them in a new group called Lines (between Bolt and Rectangle group).
Step 33
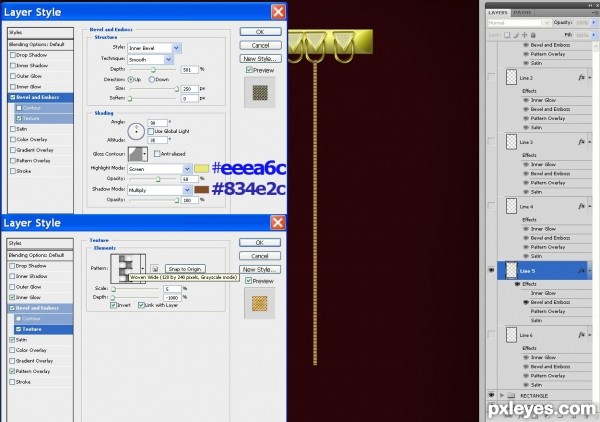
Select one of the Line layers, no matter which one as later we are going to paste the applied layer styles on the other layers in Lines group.
Right click on the layer, highlight Blending Options, check Bevel and Emboss and change the settings:
Style: Inner Bevel
Technique: Smooth
Depth: 501%
Direction: Up
Size: 250px
Soften: 0px
Angle: 90 degrees
Use Global Light: unchecked
Altitude: 35 degrees
Gloss Contour: Cove-Shallow
Anti-aliased: unchecked
Highlight Mode: Screen
Color: # eeea6c
Opacity: 60%
Shadow Mode: Multiply
Color: # 834e2c
Opacity: 100%
Check also Texture option, which is below Bevel and Emboss in Layer Style box. Apply the following settings:
From the Pattern swatch menu select Woven Wide texture
Scale: 5 %
Depth: -1000%
Invert- checked
Link with Layer: checked
Keep the Layer Style box opened.
Step 34
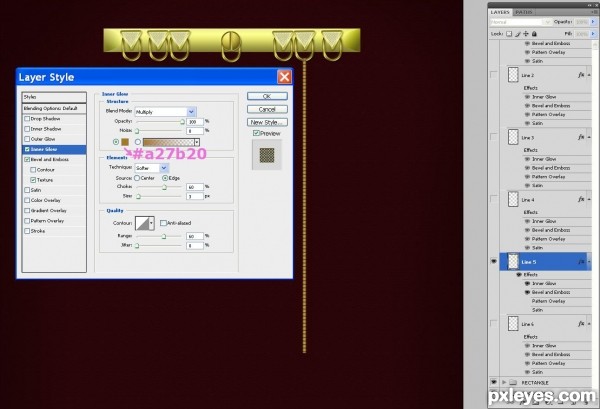
Now check Inner Glow blending option in Layer Styles box:
Blend Mode: Multiply
Opacity: 100%
Noise: 0%
Color: # a27b20
Technique: Softer
Source: Edge
Choke: 60%
Size: 3px
Contour: Linear
Anti-aliased: unchecked
Range: 60%
Jitter: 0%
Still don’t close the Layer Styles Box. We’ll continue adding Blending Options in the next step.
Blend Mode: Multiply
Opacity: 100%
Noise: 0%
Color: # a27b20
Technique: Softer
Source: Edge
Choke: 60%
Size: 3px
Contour: Linear
Anti-aliased: unchecked
Range: 60%
Jitter: 0%
Still don’t close the Layer Styles Box. We’ll continue adding Blending Options in the next step.
Step 35
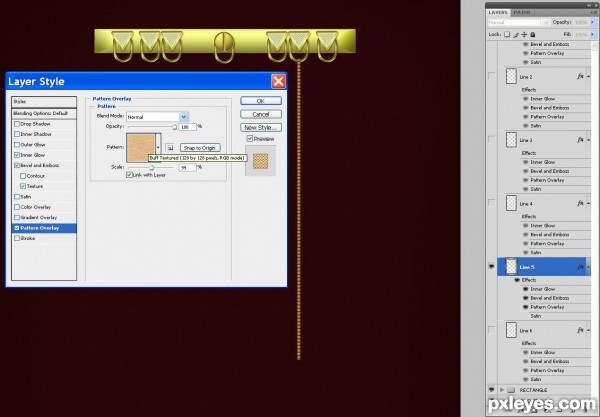
Check Pattern Overlay in Layer Style Box and from the Pattern swatches choose Buff Textured, set also Scale to 99% and click OK.
We have to add one more Blending Option in the next step so keep the Layer Style Box opened.
We have to add one more Blending Option in the next step so keep the Layer Style Box opened.
Step 36
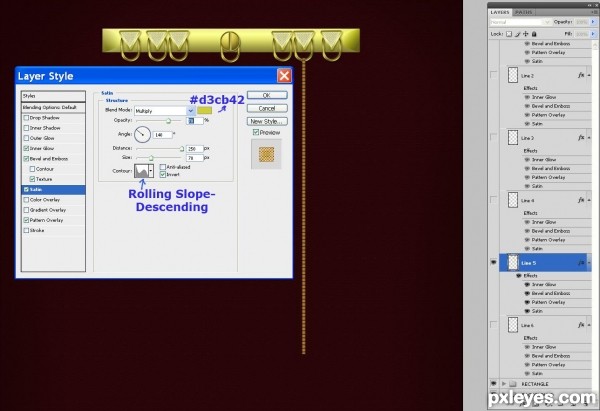
This time check Satin option in Layer Style box:
Blend Mode: Multiply
Color: #d3cb42
Opacity: 70%
Angle: 140 degrees
Distance: 250px
Size: 70px
Contour: Rolling Slope- Descending
Anti-aliased: unchecked
Invert: checked
Blend Mode: Multiply
Color: #d3cb42
Opacity: 70%
Angle: 140 degrees
Distance: 250px
Size: 70px
Contour: Rolling Slope- Descending
Anti-aliased: unchecked
Invert: checked
Step 37
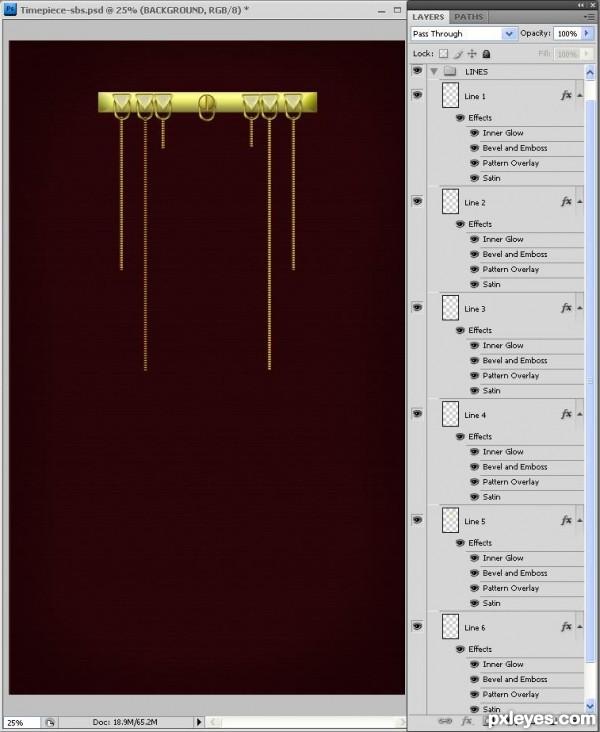
Copy the layer styles you applied on one of the Line named layers and paste them on the rest within the group. You should have six nicely textured chainlets.
Step 38
In this step we’ll start to prepare the main shape for golden insect’s wings. This shape we’ll be our base for making the glowing beetles and butterflies hanging from the chains of our unique timepiece.
Create a new layer above the Background group. For your convenience, switch off all groups above this new layer and leave only the dark background group switched on as it will increase the visibility when we make light colored shape.
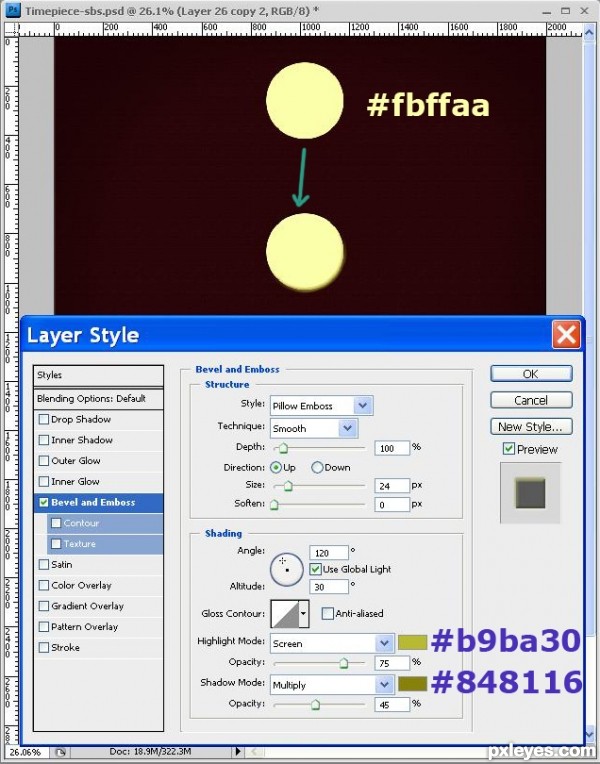
In Tools palette set the Foreground color to #fbffaa and holding down Shift draw a perfect circle with Ellipse Tool in Fill Pixels mode.
Right click on the circle layer, select Bevel and Emboss and change its settings:
Style: Pillow Emboss
Technique: Smooth
Depth: 100%
Direction: Up
Size: 24px
Soften: 0px
Angle: 120 degrees
Use Global Light: unchecked
Altitude: 30 degrees
Gloss Contour: Linear
Anti-aliased: unchecked
Highlight Mode: Screen
Color: # b9ba30
Opacity: 75%
Shadow Mode: Multiply
Color: # 848116
Opacity: 45%
Don’t close Layer Style box.
Step 39
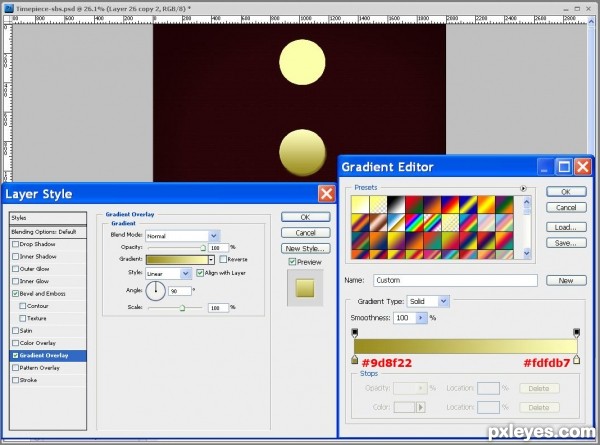
Now check Gradient Overlay blending option in Layer Style box:
Blend Mode: Normal
Opacity: 100%
Gradient: #9d8f22 to #fdfdb7
Reverse: unchecked
Style: Linear
Align with Layer- checked
Angle: 90 degrees
Scale: 100%
Blend Mode: Normal
Opacity: 100%
Gradient: #9d8f22 to #fdfdb7
Reverse: unchecked
Style: Linear
Align with Layer- checked
Angle: 90 degrees
Scale: 100%
Step 40
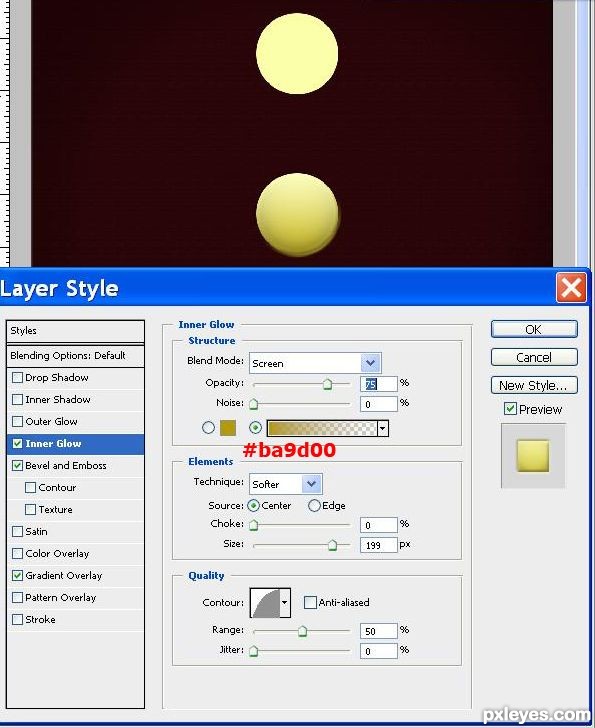
Check Inner Glow in Layer Style box:
Blend Mode: Screen
Opacity: 75%
Noise: 0%
Color: #ba9d00
Technique: Softer
Source: center
Choke: 0%
Size: 199px
Contour: Half Round
Anti-aliased: unchecked
Range: 50%
Jitter: 0%
Blend Mode: Screen
Opacity: 75%
Noise: 0%
Color: #ba9d00
Technique: Softer
Source: center
Choke: 0%
Size: 199px
Contour: Half Round
Anti-aliased: unchecked
Range: 50%
Jitter: 0%
Step 41
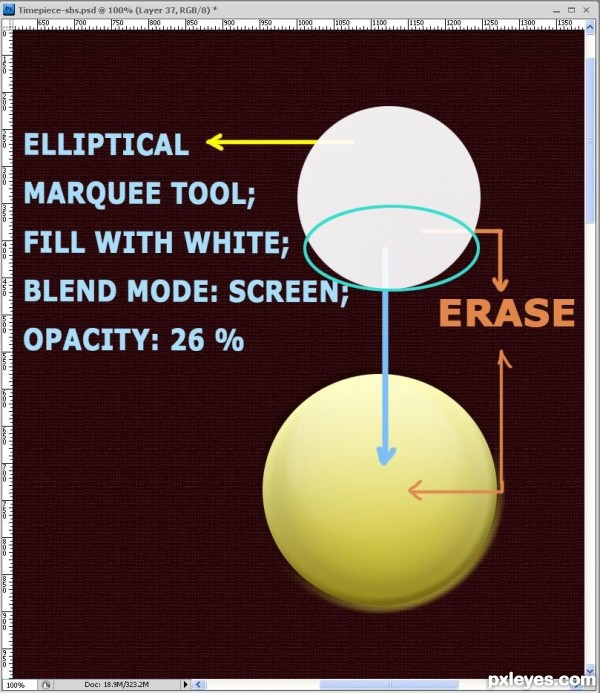
Create a new layer above the previous circle and draw a smaller size oval (holding down Shift) with Elliptical Marquee Tool. Fill the smaller circle with white color and place it at the upper part of the golden circle to make the glow. Change Blend Mode of glow layer to Screen and reduce Opacity to 26%.
Step 42
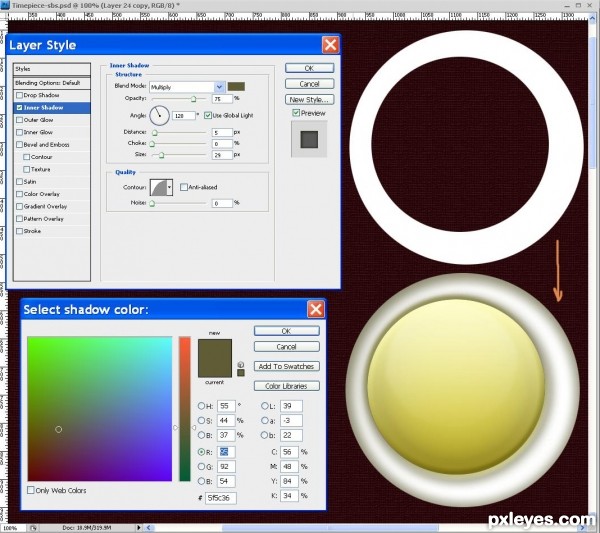
Draw another white circle, this time bigger than the golden circle, on a new layer below. Nudge the ellipse in down right direction using Down and Right Arrow keys. Keep its layer highlighted!
Press Ctrl and click on the golden circle layer’s thumbnail to load a selection, then press Delete key.
Right click, select Blending Options and check Inner Shadow in Layer Style box. Change the settings:
Blend Mode: Multiply
Color: #5f5c36
Opacity: 75%
Angle: 120 degrees
Use Global Light: checked
Distance: 5px
Choke: 0%
Size: 29%
Contour: Half Round
Anti-aliased: unchecked
Noise: 0%
Keep the Layer Style box open as more Blending Options are to be applied in the next steps.
Step 43
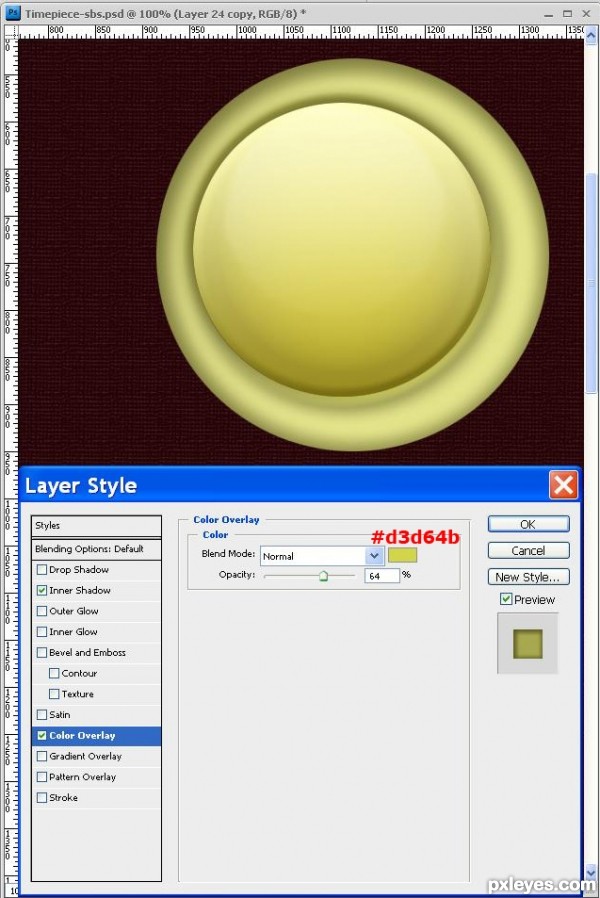
Check Color Overlay blending option:
Blend Mode: Normal
Color: #d3d64b
Opacity: 64%
Blend Mode: Normal
Color: #d3d64b
Opacity: 64%
Step 44
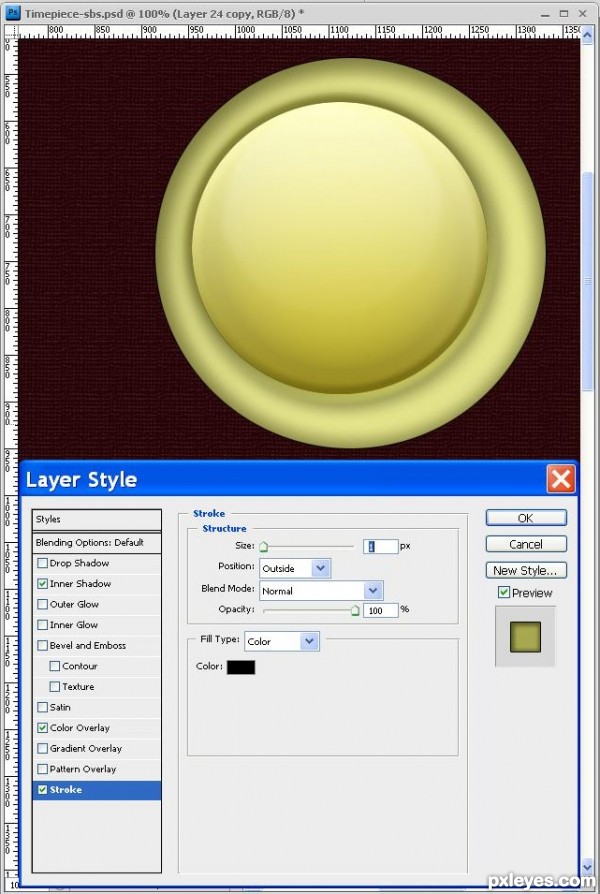
In the same Layer Style box check Stroke:
Size: 1px
Position: Outside
Blend Mode: Normal
Opacity: 100%
Fill Type: Color
Color: Black
Size: 1px
Position: Outside
Blend Mode: Normal
Opacity: 100%
Fill Type: Color
Color: Black
Step 45
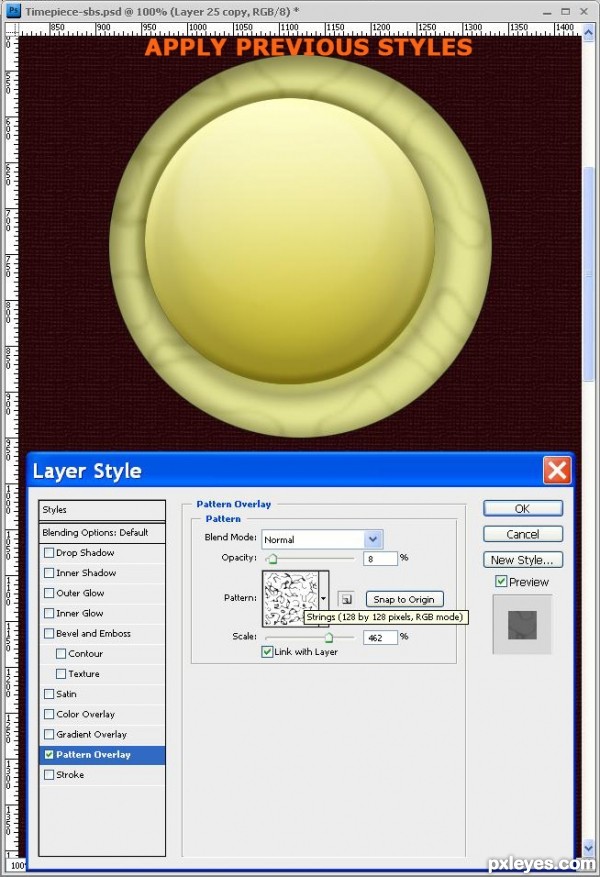
We have plenty of layer styles added to the white ring shape. Create a new layer below it and merge both layers- the ring and the new empty layer to apply the styles added so far. Right click on the merged layer, go to Blending Options and this time check Pattern Overlay:
Blend Mode: Normal
Opacity: 8%
Pattern: Strings
Scale: 462%
Link with Layer: checked
Blend Mode: Normal
Opacity: 8%
Pattern: Strings
Scale: 462%
Link with Layer: checked
Step 46
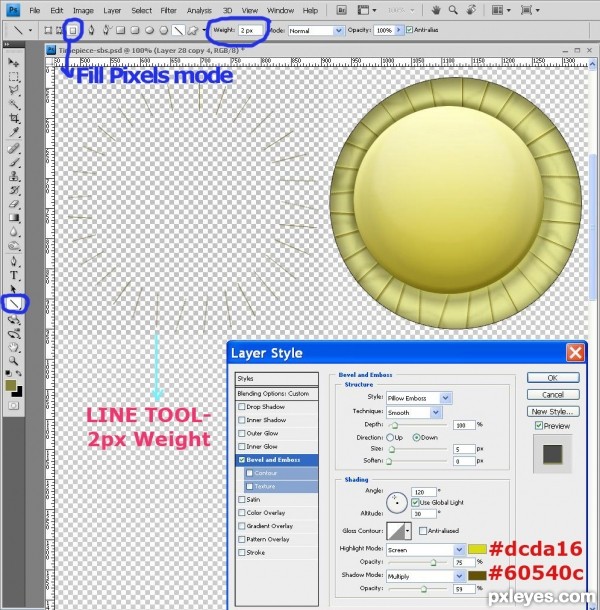
We overlaid with pattern the ring shape. Let us add more relief to it. Create a new layer above the ring, take Line Tool in Fill Pixels Mode and 2px Weight then start drawing random lines intersecting the ring shape. Note that all lines, in spite of their direction, should not be shorter than the distance between the ring borders. When satisfied with the result, keep the lines layer highlighted, Ctrl+left click on the ring layer to load selection on it, go to Select, Inverse and press Delete key. Thus you’ll erase the parts of the lines which exceed the ring borders.
Right click on the lines layer, highlight Blending options and tick Bevel and Emboss:
Style: Pillow Emboss
Technique: Smooth
Depth: 100%
Direction: Down
Size: 5px
Soften: 0px
Angle: 120 degrees
Use Global Light: unchecked
Altitude: 30 degrees
Gloss Contour: Linear
Anti-aliased: unchecked
Highlight Mode: Screen
Color: # dcda16
Opacity: 75%
Shadow Mode: Multiply
Color: # 60540c
Opacity: 59%
Step 47
Select all layers (those created in steps 38- 46) which will be used to shape wings and other insects parts and place them into one group. Name it Wing for your convenience. From now on we are going to duplicate this group or some of its layers many times when necessary to modify their shape.
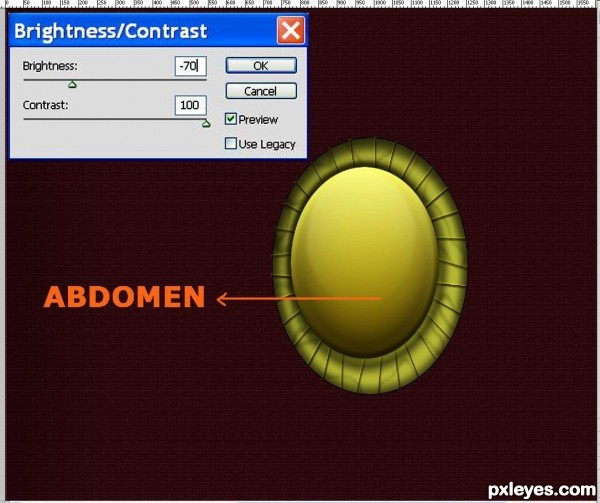
So duplicate Wing group now, merge the copied one and rename the new layer Abdomen. Our purpose here is to create the first golden insect- a beetle resembling Scarab.
Increase the size of the shape using Free Transform Tool, go to Image, Adjustments, Brightness and Contrast and change Brightness option to -70 and Contrast to 100.
No bother if your shape looks asymmetric. We need it as a base and only a small portion of its bottom part will be visible.
Step 48
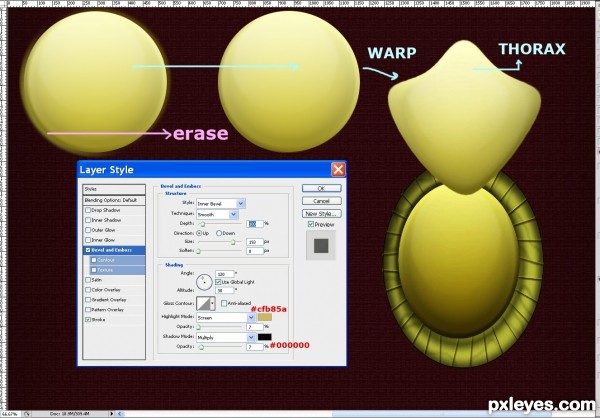
Go back to Wing group, select the inside circle layer and its glow, duplicate and merge them. Move the new layer out of the group and place it above Abdomen layer. Erase the left bottom part of the circle where the Pillow Emboss Effect is visible and warp the shape as you see it on the screenshot (Edit, Transform, Warp).
Right click on the Thorax layer, highlight Blending options and check Bevel and Emboss:
Style: Inner Bevel
Technique: Smooth
Depth: 100%
Direction: Up
Size: 193px
Soften: 0px
Angle: 120 degrees
Use Global Light: unchecked
Altitude: 30 degrees
Gloss Contour: Linear
Anti-aliased: unchecked
Highlight Mode: Screen
Color: # cfb85a
Opacity: 7%
Shadow Mode: Multiply
Color: # 000000
Opacity: 7%
Step 49
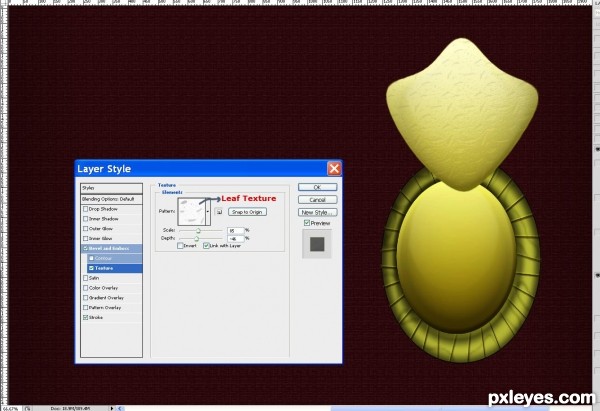
Right click on Thorax layer, select Blending Options, Texture:
Pattern: Leaf
Scale: 85%
Depth: -46%
Invert: unchecked
Link with Layer: checked
Pattern: Leaf
Scale: 85%
Depth: -46%
Invert: unchecked
Link with Layer: checked
Step 50
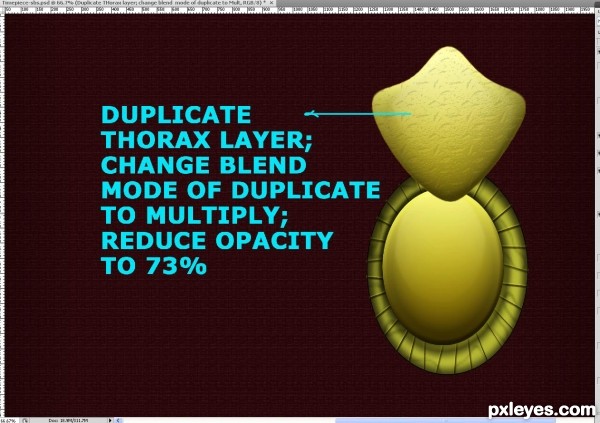
While the Thorax layer is still selected, duplicate it and change the Blend Mode of the duplicated layer to Multiply. Decrease its Opacity to 70-73%.
It is time to organize these first beetle parts layers into a group. Select Abdomen, Thorax and Thorax copy layer, go to Layer, Group Layers and call the new group Golden Beetle. Leave it for now above our reserve Wing group- the source of all golden insects.
It is time to organize these first beetle parts layers into a group. Select Abdomen, Thorax and Thorax copy layer, go to Layer, Group Layers and call the new group Golden Beetle. Leave it for now above our reserve Wing group- the source of all golden insects.
Step 51
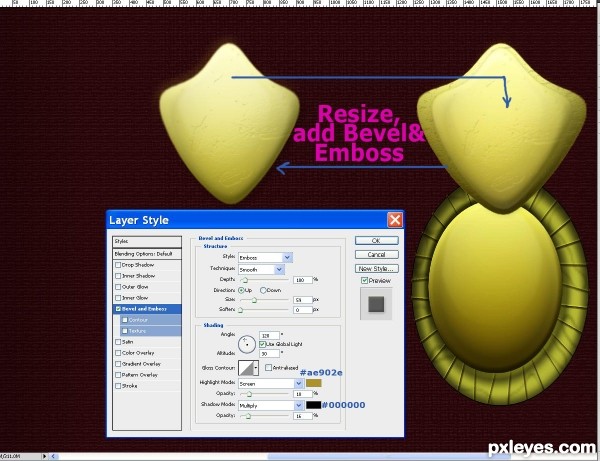
Duplicate again the original Thorax layer and place this second duplicate on top of Golden Beetle group. Create a new layer below and merge it with the duplicated one to apply the previously created layer styles as we are going to add another one. Call the layer Thorax Glow, go to Edit, Free Transform and holding down Shift key slightly move one of the nodes to the middle of the image to make it smaller.
Right click on Thorax Glow layer, select Blending Options, Bevel Emboss:
Style: Emboss
Technique: Smooth
Depth: 100%
Direction: Up
Size: 59px
Soften: 0px
Angle: 120 degrees
Use Global Light: unchecked
Altitude: 30 degrees
Gloss Contour: Linear
Anti-aliased: unchecked
Highlight Mode: Screen
Color: # ae902e
Opacity: 18%
Shadow Mode: Multiply
Color: # 000000
Opacity: 16%
Step 52
To make the beetle’s “armour” more attractive, place a bigger rectangle diamond in the middle of its thorax then add three smaller rectangles on the three curved sides of the insect’s thorax.
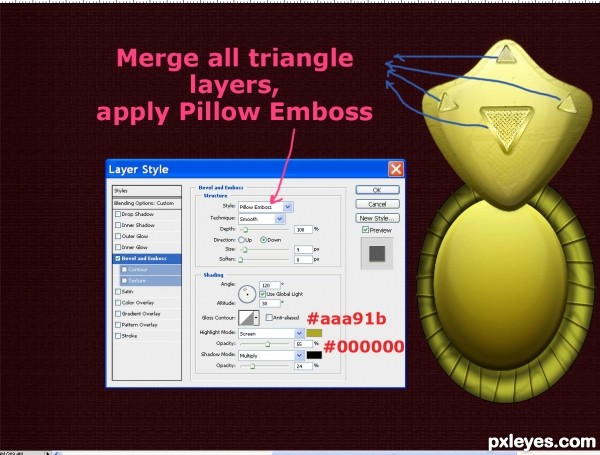
Merge all triangle layers, call the new layer Relief, right click on it and choose Blending Options, Bevel and Emboss:
Style: Pillow Emboss
Technique: Smooth
Depth: 100%
Direction: Down
Size: 9px
Soften: 0px
Angle: 120 degrees
Use Global Light: unchecked
Altitude: 30 degrees
Gloss Contour: Linear
Anti-aliased: unchecked
Highlight Mode: Screen
Color: # aaa91b
Opacity: 55%
Shadow Mode: Multiply
Color: # 000000
Opacity: 24%
Step 53
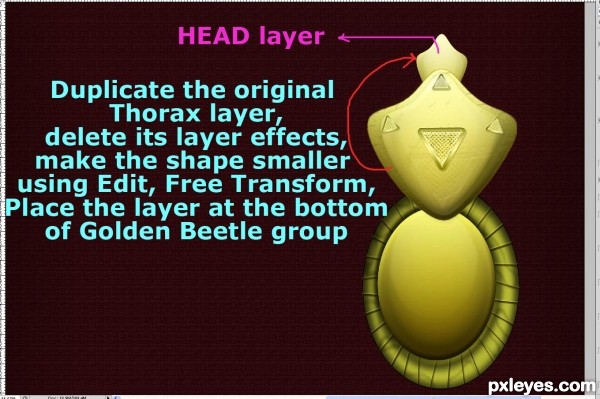
In this step duplicate the original Thorax layer again, delete its layer effects (Move the small fx symbol on the right part of the layer to the litter bin icon at the bottom of Layers palette), also make the shape smaller using Edit, Free Transform.
Place the layer at the bottom of Golden Beetle group and call it Head.
Place the layer at the bottom of Golden Beetle group and call it Head.
Step 54
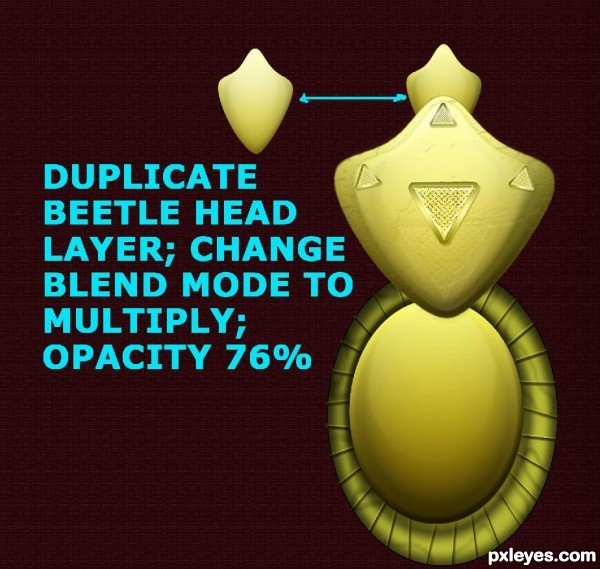
This step is optional. If you prefer to make the head a bit darker, you can duplicate the Head layer then change to Multiply the Blend mode of the duplicated layer and reduce its Opacity to 76%. The other way to achieve the same effect avoiding duplicating the layer is simply to increase Contrast and Reduce Brightness of the original Head layer.
Step 55
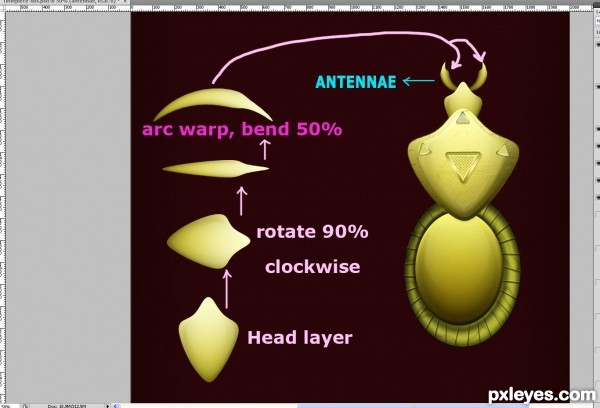
Let us now create antennae for the beetle’s head. Duplicate the Head layer again, rotate it 90 degrees clockwise (Edit, Free Transform, enter 90 degrees for angle of rotation in the Options bar then squish the shape by pressing the upper middle node). To shape the antenna, go back to Edit option in the Menu Bar, but this time choose Transform, Warp and select Arc from the Warp drop down menu. Leave Bend as by default- 50% and press Enter twice to apply the transformation. When the shape is ready, go to Image, Adjustments, Brightness and Contrast, set Contrast to 100 and Brightness to 115.
Use Free Transform option again to make the antenna smaller, duplicate its layer, transform the duplicate horizontally (Edit, Transform, Flip Horizontal) and fit both antennae to the head. When ready, merge their layers and call the new layer Antennae. Place below Head layer.
Use Free Transform option again to make the antenna smaller, duplicate its layer, transform the duplicate horizontally (Edit, Transform, Flip Horizontal) and fit both antennae to the head. When ready, merge their layers and call the new layer Antennae. Place below Head layer.
Step 56
It’s time to add three pairs of legs. Duplicate the Head layer again, make it longer and thinner by means of Free Transform, then apply Warp transformation to curve it as it is shown on the screenshot.
Erase a small triangle from the upper part of the shape, duplicate it five times (as the insects have 6 legs) and arrange them to provide the beetle with golden legs. In order to change the look of the second pair of legs, select and duplicate any leg you choose then resize it using Edit, Free Transform. When ready with the smaller leg shape duplicate it three times and add two shapes to each of the third and fourth leg. This will make them look nodulous.
To avoid overloading your .psd file with too many layers, select and merge all legs layers into one layer called Legs. Its place is below Abdomen layer in Golden Beetle group.
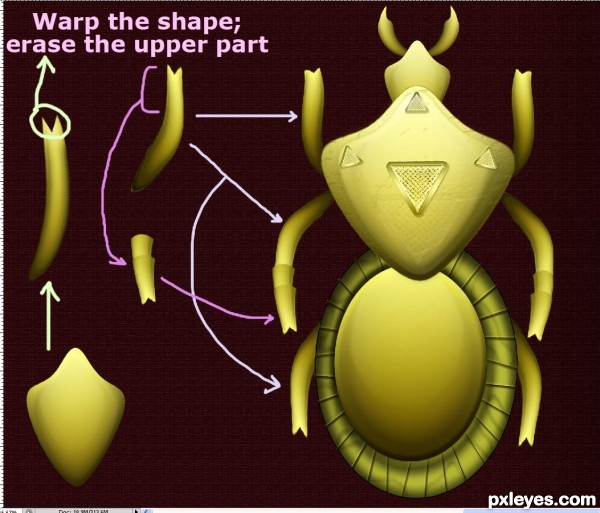
Step 57
We continue to shape the beetle’s body. Duplicate Abdomen layer, resize it with Free Transform then use Warp transformation to give it triangular shape with concave base. Place the shape above Abdomen layer, duplicate and flip it horizontally (Edit, Transform, Flip Horizontal) and place both triangular shapes in the same manner as you see it on the screenshot. Merge their layers into one and call it Wing Bonds.
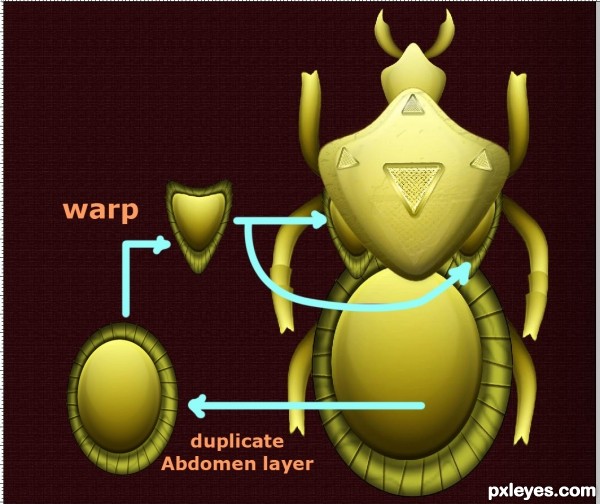
Step 58
Duplicate Wing group (the same group we created in Step 41 and merge it. Go to Edit, Transform, Warp and shape the insect’s wing. When ready, duplicate and flip the wing horizontally. If you are satisfied how the wings fit to beetle body, merge their layers in one, named Wings and place above Wing Bonds layer.
Select one of the Wing Bonds we created in the previous step, resize and place between the wings. I called the layer Thorax Edge.
Select one of the Wing Bonds we created in the previous step, resize and place between the wings. I called the layer Thorax Edge.
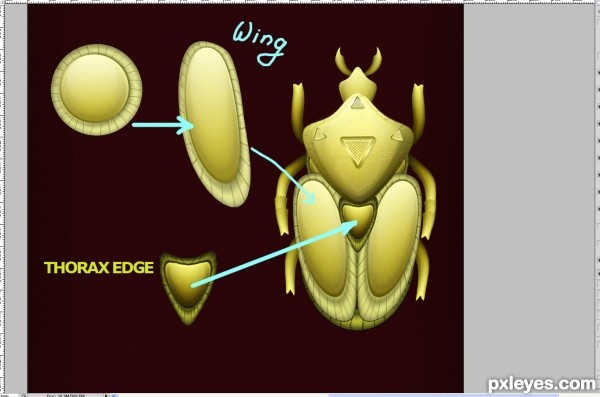
Step 59
You see that the middle part of Thorax edge layer resembles little golden heart. Select it and make it smaller by means of Edit, Free Transform.
Duplicate the small Heart shape, go to Edit, Free Transform, firstly make the duplicate a bit smaller, also nudge it 10 times with Upper Arrow key and 5 times with Left Arrow key and in Option Bar set Angle of Rotation to 5.5 degrees. Press twice to apply the transformation, then immediately hold down CTRL+ALT+SHIFT and press T key as many times as many duplicates of the smaller heart you would like. Highlight and Merge all layers created in this step except the first small heart shape and call the new layer Forelegs ends. Duplicate and flip it horizontally to add the same end to the other foreleg. Resize Foreleg Ends if you find them too big.
Take the first small heart shape and add it to one of the front legs to make the node connecting the foreleg end with the front leg. Duplicate the shape, flip horizontally and place it on the opposite leg. Merge both layers and name them Foreleg Nodes- the place of their layer is beneath Foreleg Ends layer.
Add edges also to second and third pair of legs- for the purpose duplicate any of the legs and make it thinner with Free Transform. Duplicate three more times and arrange those edges on a layer beneath the legs layers. Merge down those edges layers into one when ready.
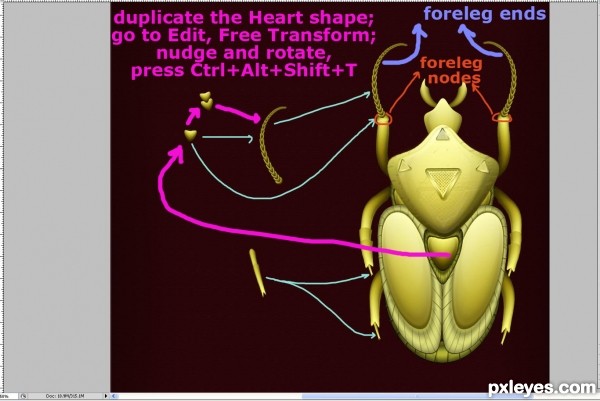
Step 60
The golden beetle is almost ready. Let us beautify its wings. To implement this select one of the forelegs duplicate it five times and arrange all shapes in a line order. Merge the layers and call the new layer Wing Line.
Use Edit, Free Transform to make the wing line thinner (see the screenshot) and darken it by gong to Image, Adjustments, Brightness and Contrast- change Brightness to 105, contrast 25. Change the Blend Mode to Overlay.
Use Edit, Free Transform to make the wing line thinner (see the screenshot) and darken it by gong to Image, Adjustments, Brightness and Contrast- change Brightness to 105, contrast 25. Change the Blend Mode to Overlay.
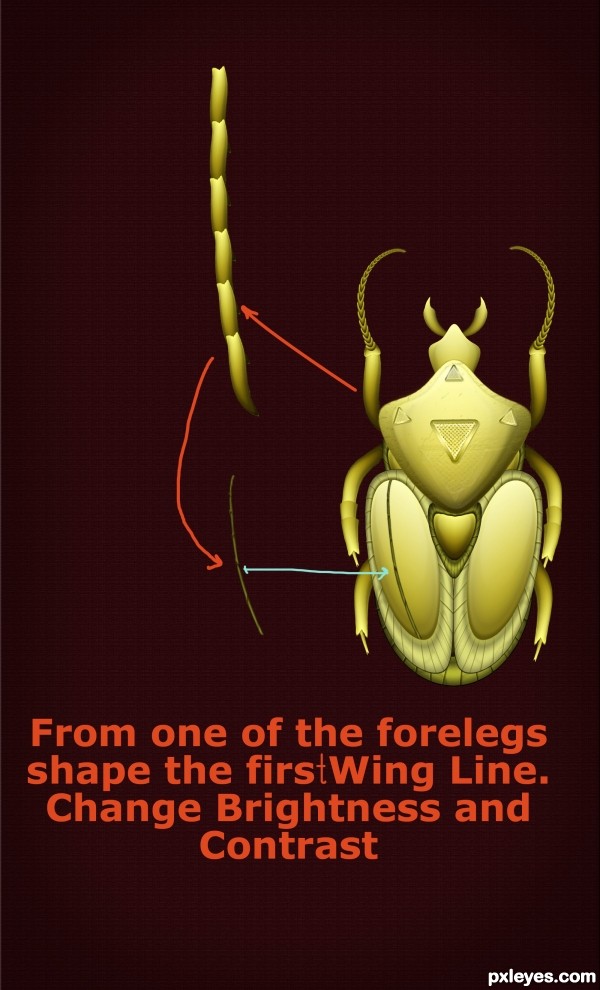
Step 61
Duplicate twice the previously created Wing Line layer. Use Free Transform to make the three lines fit the wing. Highlight the three Wing Lines layers, duplicate them and while the three duplicates are selected together, apply Edit, Transform, Flip Horizontal. Use Move Tool to fit the three duplicated Wing Lines to the other wing. Keep the Blend Mode of all six Wing Line layers to Overlay.
Now select any of the Wing Line layers, right click on it and choose Blending Options, Bevel and Emboss:
Style: Pillow Emboss
Technique: Smooth
Depth: 100%
Direction: Down
Size: 215px
Soften: 0px
Angle: 120 degrees
Use Global Light: checked
Altitude: 30 degrees
Gloss Contour: Linear
Anti-aliased: unchecked
Highlight Mode: Screen
Color: # 998838
Opacity: 86%
Shadow Mode: Multiply
Color: # 010101
Opacity: 22%
Click OK button in Layer Style box when ready with the Bevel and Emboss settings. Right click on the layer and select Copy Layer style. Then select the other five Wing Lines together, right click on them and choose Paste Layer Style.
The golden beetle is ready.
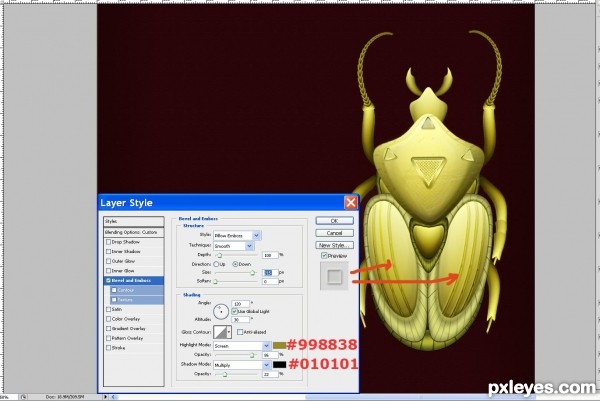
Step 62
Create a new group named Golden Fly. The placement is still not important, you can put the group above Golden Beatle.
Shape the fly in the same manner as on the following screenshot.
Go back to the Wing group and duplicate it twice. Merge the first duplicate and call it Abdomen Part. From the second duplicated group leave only the middle golden circle and its glow and clean the other parts. Merge the group again and call it Head. Now move both Head and Abdomen Part layers into Golden Fly group.
From the Head layer make also Eyes and Thorax (each part should be on a separate layer). Use Free Transform and Warp to shape the insect’s body parts.
By means of the same transformations shape the Abdomen- create it from Abdomen Part layer, duplicated 7 times- each part bigger than the previous and the last parts warped to give them triangular shape.
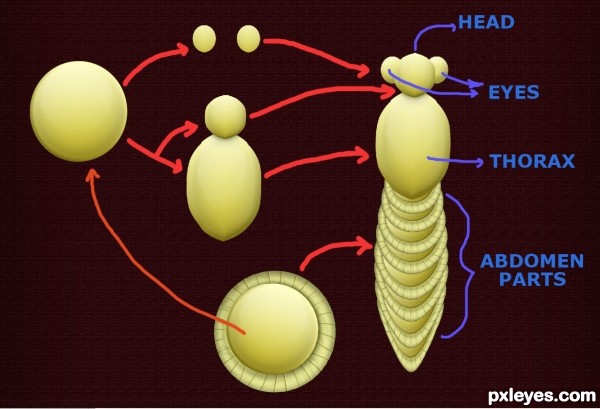
Step 63
Right click on Thorax layer in Golden Fly group, select Blending Options, Bevel and Emboss:
Style: Inner Bevel
Technique: Smooth
Depth: 100%
Direction: Up
Size: 16px
Soften: 0px
Angle: 120 degrees
Use Global Light: checked
Altitude: 30 degrees
Gloss Contour: Linear
Anti-aliased: unchecked
Highlight Mode: Screen
Color: # faff99
Opacity: 50%
Shadow Mode: Multiply
Color: # 000000
Opacity: 10%
Still don’t close the Layers Style box, check Texture option instead and enter these settings:
From Pattern drop down menu choose Oil Pastel on Canvas
Scale: 425%
Depth: -38%
Invert: unchecked
Link with Layer: checked
When ready, right click on Thorax layer, select Copy Layer Style, then highlight Head layer, right click on it and select Paste layer style.
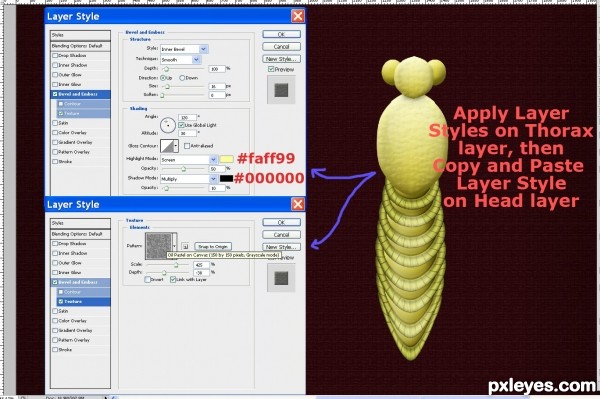
Step 64
Let us add legs to the Golden Fly. We’ll go back again to the Wing group. Duplicate it and merge the copied one. Select only the striped border of the circle, duplicate, flip it horizontal, fix both shapes to each other and merge the two layers (use Warp to better fit both shapes one another). After you are ready with the base shape for legs, use it to make the three pairs of insect’s legs.
I created the forelegs from two segments and the other two pairs of legs- from three segments.
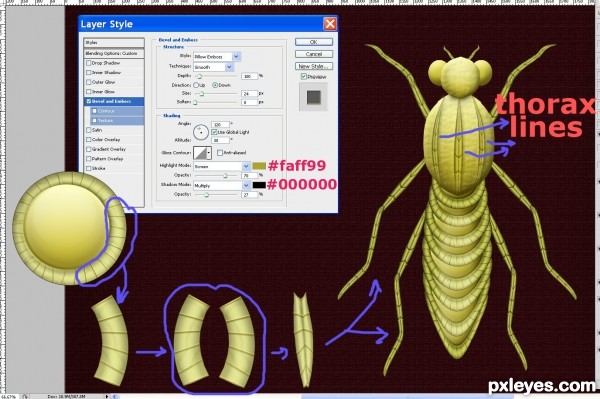
To add more relief to the fly’s body, from the same part we used to create legs, make three lines and place them on the thorax. Merge their layers, right click on the new one named Thorax lines and select Bevel and Emboss:
Style: Pillow Emboss
Technique: Smooth
Depth: 100%
Direction: Down
Size: 24px
Soften: 0px
Angle: 120 degrees
Use Global Light: checked
Altitude: 30 degrees
Gloss Contour: Linear
Anti-aliased: unchecked
Highlight Mode: Screen
Color: # faff99
Opacity: 70%
Shadow Mode: Multiply
Color: # 000000
Opacity: 27%
Step 65
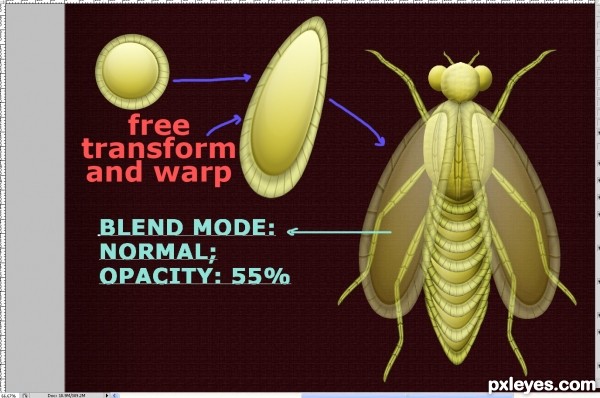
In this step we are going to create the Golden Fly wings. Go back again to Wing group, duplicate and merge it. Apply Edit Free Transform to make the shape longer and thinner, then go to Edit, Transform, Warp to form the wing. Duplicate the wing, flip it horizontally and place on the other side of the insect’s body. When satisfied with the way the wings fit to the body, merge their two layers and call the new one Wings, lower its Opacity to 55%. The Wings layer should be placed above Thorax Lines layer in Golden Fly group.
Step 66
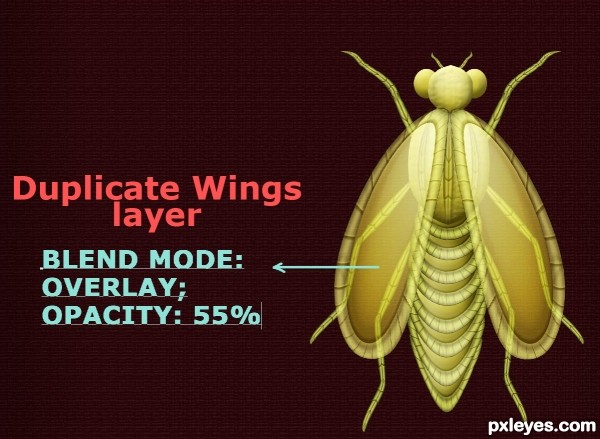
This is a very short and simple step. Only duplicate the Wings layer. Keep its Opacity to 55%, only change the Blend Mode to Overlay.
The Golden Fly is ready.
Our task in the next steps will be to create one more insect- a lovely golden butterfly.
The Golden Fly is ready.
Our task in the next steps will be to create one more insect- a lovely golden butterfly.
Step 67
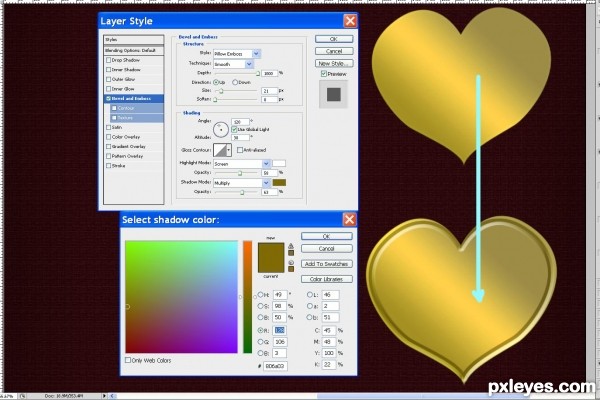
In this Step we are going to prepare a golden heart shape to be used as an ornament for the butterfly wings and also for the clock frame later.
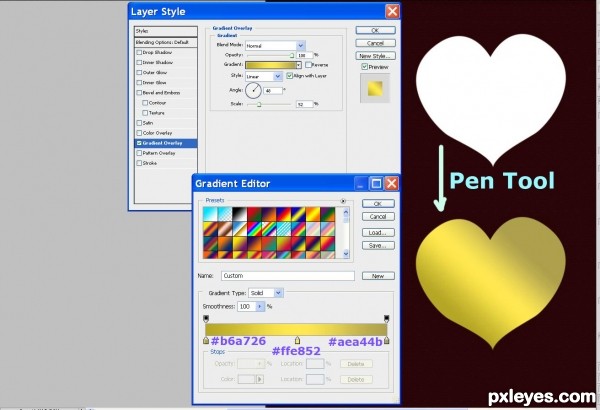
Create a new group of layers called Heart Shape and place it above Golden Fly group. Create a new layer in Heart Shape group, call it Heart Base, take Pen Tool in Shape Layers mode and draw a heart with white color. If you are not keen on using Pen Tool, choose Custom Shape Tool and take Heart Card shape from Custom Shape Picker. Don’t forget to rasterize the shape layer.
When the heart is ready, right click on its layer, select Blending Options, Gradient Overlay:
Blend Mode: Normal
Opacity: 100%
Gradient: #b6a726, #ffe852, #aea44b
Reverse: unchecked
Style: Linear
Align with Layer: checked
Angle: 48 degrees
Scale: 52%
Step 68
Duplicate the Heart Base layer, use Edit, Free Transform to resize slightly the duplicate then right click on its layer and select Blending Options. Call the layer Heart 1. In Layer Style dialog box check Bevel and Emboss:
Style: Pillow Emboss
Technique: Smooth
Depth: 1000%
Direction: Up
Size: 21px
Soften: 0px
Angle: 120 degrees
Use Global Light: checked
Altitude: 30 degrees
Gloss Contour: Linear
Anti-aliased: unchecked
Highlight Mode: Screen
Color: # ffffff (white)
Opacity: 58%
Shadow Mode: Multiply
Color: # 806a03
Opacity: 63%
Step 69
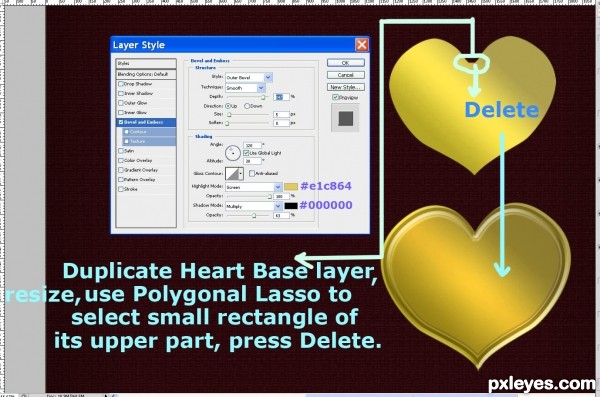
Duplicate the original Heart Base layer again and call the duplicate Heart 2. Place it on top of all layers in Heart Shape group. Go to Edit, Free Transform and resize the duplicate so it is smaller than the heart below. With Polygonal Lasso Tool select a tiny rectangle from the upper part of Heart Base copy layer and press Delete. Right click on the layer and choose Blending Options, Bevel and Emboss:
Style: Outer Bevel
Technique: Smooth
Depth: 847%
Direction: Up
Size: 5px
Soften: 0px
Angle: 120 degrees
Use Global Light: checked
Altitude: 30 degrees
Gloss Contour: Linear
Anti-aliased: unchecked
Highlight Mode: Screen
Color: # e1c864
Opacity: 100%
Shadow Mode: Multiply
Color: # 000000
Opacity: 63%
Change the Blend Mode of Heart 2 layer to Multiply and reduce Opacity to 37%.
Step 70
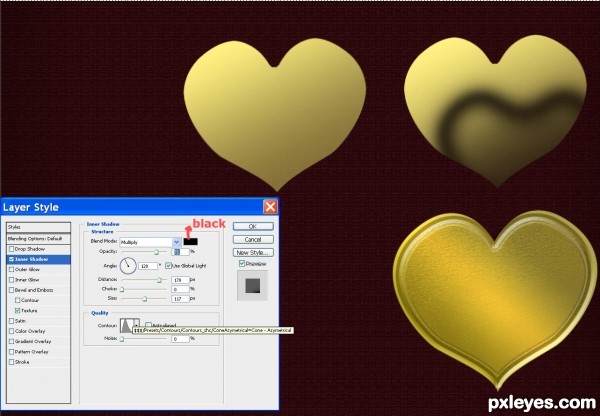
Duplicate Heart 1 layer and move the duplicate above all layers in Heart Shape group. Call it Texture, change its Blend Mode to Hard Light and lower Opacity to only 10%.
Right click on Texture layer, go to Blending Options and firstly select Inner Shadow:
Blend Mode: Multiply
Color: Black
Opacity: 75%
Angle: 120 degrees
Use Global Light: checked
Distance: 178px
Choke: 0%
Size: 117px
Contour: Cone Asymetrical
Noise: 0%
Don’t close Layer Style dialog box as more Blending Options will be changed in the next two steps.
Step 71
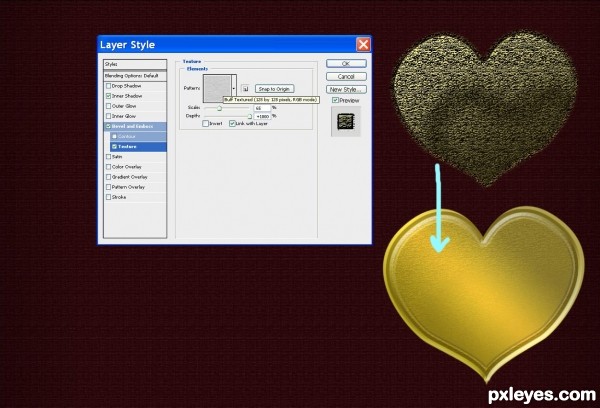
Now select Texture option in Layer Style box, from Pattern Picker choose Buff Textured, move Scale slider to 65% and Depth to +1000%.
Step 72
In the still opened Layer Style box select Bevel and Emboss:
Style: Pillow Emboss
Technique: Smooth
Depth: 1000%
Direction: Up
Size: 40px
Soften: 0px
Angle: 120 degrees
Use Global Light: checked
Altitude: 30 degrees
Gloss Contour: Linear
Anti-aliased: unchecked
Highlight Mode: Screen
Color: # f6eb33
Opacity: 66%
Shadow Mode: Multiply
Color: # 000000
Opacity: 100%
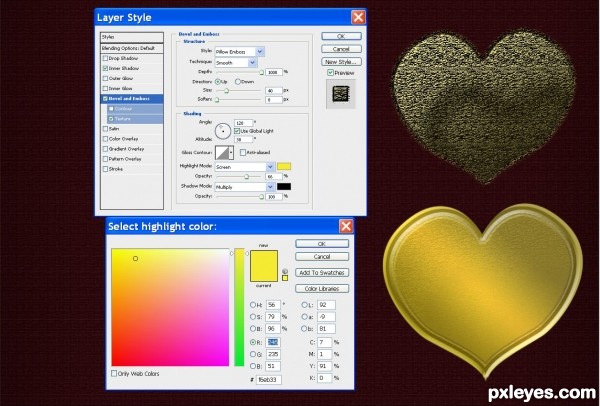
Step 73
Duplicate Heart Base layer and make it a few pixels bigger using Edit, Free Transform. Name the layer Heart Frame and place above Texture layer in Heart Shape group. Keep Heart Frame layer highlighted. To turn it into a frame, load a selection on Texture layer (Ctrl+click on its layer’s thumbnail) then press Delete. Don’t change the already applied Gradient Overlay and add another Layer Style- Bevel and Emboss:
Style: Inner Bevel
Technique: Smooth
Depth: 1000%
Direction: Up
Size: 32px
Soften: 0px
Angle: 120 degrees
Use Global Light: checked
Altitude: 30 degrees
Gloss Contour: Linear
Anti-aliased: unchecked
Highlight Mode: Screen
Color: # f6f050
Opacity: 100%
Shadow Mode: Multiply
Color: # 7a7801
Opacity: 75%
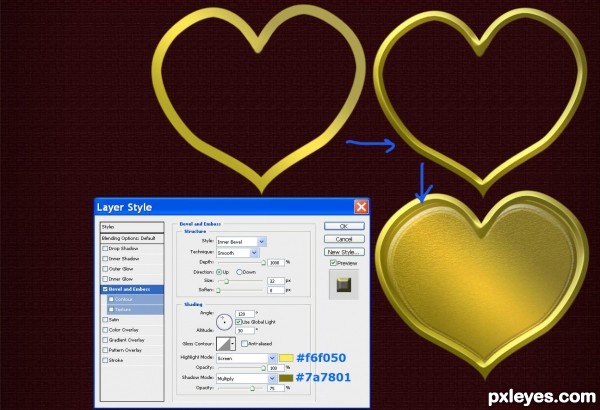
Step 74
To add a little glow to the upper side of the golden heart, load a selection on Heart Frame layer (Ctrl+click on its layer’s thumbnail), create a new layer above and using soft brush tool of 50% Opacity fill only the upper part of the selection with #fcf9d3. Name the layer Heart Glow, change its Opacity 37% and Blend Mode to Overlay.
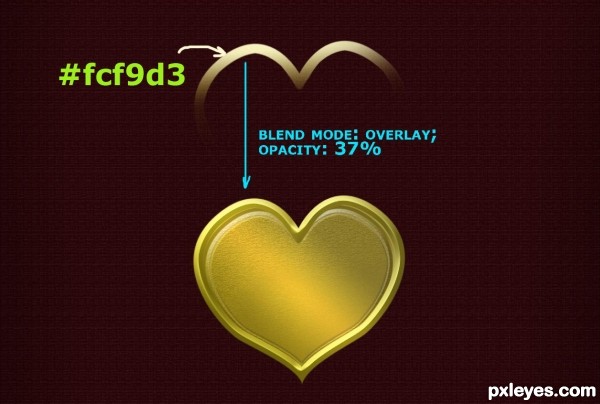
Step 75
Duplicate Heart 2 layer twice and move the two duplicates on top of Heart Shape group. Erase the bottom half of the first duplicate using Soft Eraser, change Blend Mode to Color Dodge and reduce Opacity to 8%. Call the layer Heart Glow.
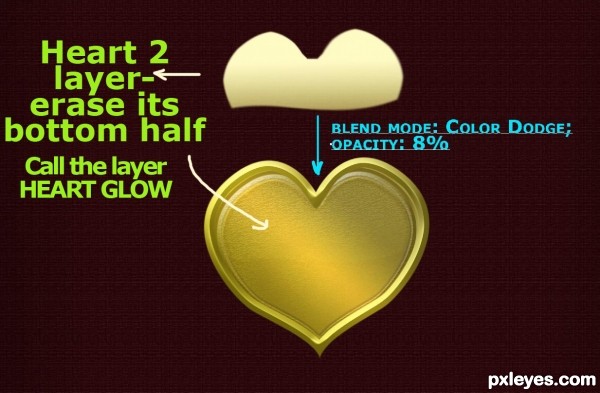
Step 76
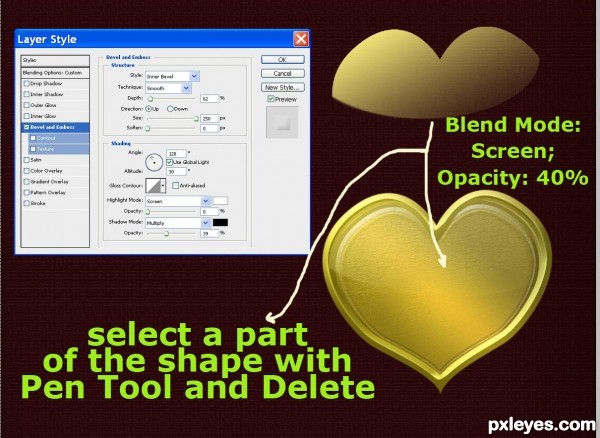
Highlight the second duplicate of Heart 2 layer which should be above all layers in Heart Shape group. Select the bottom half of the shape with Pen Tool in Paths mode, draw the path, right click, choose Make Selection and press Delete. Set the Blend Mode to Screen and Opacity to 40%.
Now the golden heart pendant is ready. We’ll need the shape to decorate additionally the timepiece.
Now the golden heart pendant is ready. We’ll need the shape to decorate additionally the timepiece.
Step 77
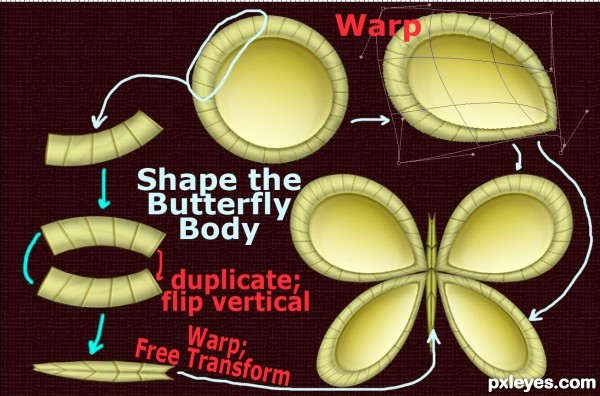
Create a new group named Golden Butterfly and place it above Heart Shape group. Duplicate again Wing group, merge the duplicated one, name its layer Butterfly Wing and move it into the newly created Golden Butterfly group.
On the following screenshot you see all actions done to create the butterfly. Firstly shape its four wings from the Butterfly Wing layer then use a part of the striped border of the elliptical shape to make the body. All you need to do this is to go to Edit, Free Transform; Edit, Transform, Warp, and of course, Flip Vertical and Rotate Transformations to make the body.
On the following screenshot you see all actions done to create the butterfly. Firstly shape its four wings from the Butterfly Wing layer then use a part of the striped border of the elliptical shape to make the body. All you need to do this is to go to Edit, Free Transform; Edit, Transform, Warp, and of course, Flip Vertical and Rotate Transformations to make the body.
Step 78
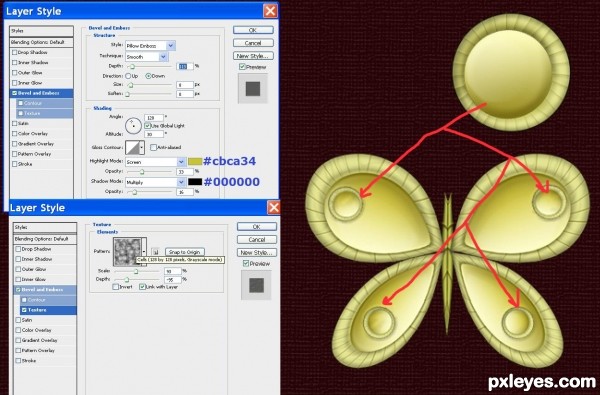
From the merged Wing group create also the circles on the butterfly’s wings. Merge their four layers into one called Wings Circles and placed above the Butterfly Wings layers. Right click on it, select Blending options and choose the following two layer styles:
Bevel and Emboss:
Style: Pillow Emboss
Technique: Smooth
Depth: 113%
Direction: Down
Size: 8px
Soften: 0px
Angle: 120 degrees
Use Global Light: checked
Altitude: 30 degrees
Gloss Contour: Linear
Anti-aliased: unchecked
Highlight Mode: Screen
Color: # cbca34
Opacity: 33%
Shadow Mode: Multiply
Color: # 000000
Opacity: 16%
Check Texture option below Bevel and Emboss:
Pattern: Cells
Scale: 93%
Depth: -95%
Step 79
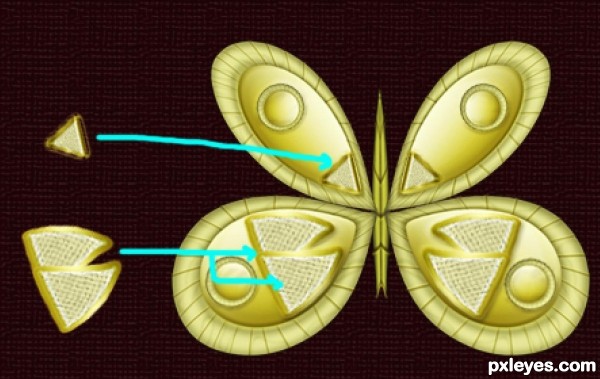
Use the diamond triangle (you’ll need 4 duplicates of it) to add more glowing decoration to the butterfly wings. See the screenshot to get the idea how I have done it. You might prefer another arrangement of the triangles.
Highlight Golden Butterfly group and go to Edit, Transform, Flip Vertical to turn the insect upside down.
Highlight Golden Butterfly group and go to Edit, Transform, Flip Vertical to turn the insect upside down.
Step 80
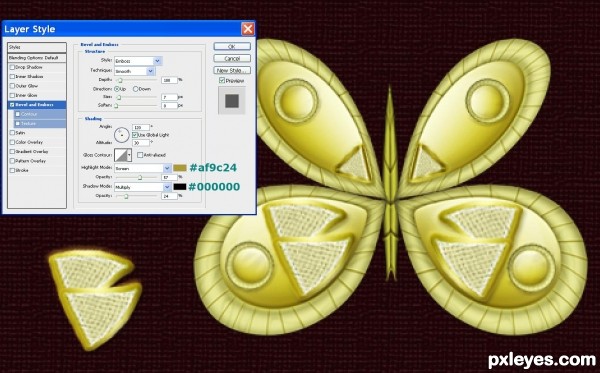
Merge all four diamond triangles layers on the butterfly wings and call the layer Triangles. Right click on it, select Blending Options, Bevel and Emboss:
Style: Emboss
Technique: Smooth
Depth: 100%
Direction: Up
Size: 7px
Soften: 0px
Angle: 120 degrees
Use Global Light: checked
Altitude: 30 degrees
Gloss Contour: Linear
Anti-aliased: unchecked
Highlight Mode: Screen
Color: # af9c24
Opacity: 57%
Shadow Mode: Multiply
Color: # 000000
Opacity: 24%
Style: Emboss
Technique: Smooth
Depth: 100%
Direction: Up
Size: 7px
Soften: 0px
Angle: 120 degrees
Use Global Light: checked
Altitude: 30 degrees
Gloss Contour: Linear
Anti-aliased: unchecked
Highlight Mode: Screen
Color: # af9c24
Opacity: 57%
Shadow Mode: Multiply
Color: # 000000
Opacity: 24%
Step 81
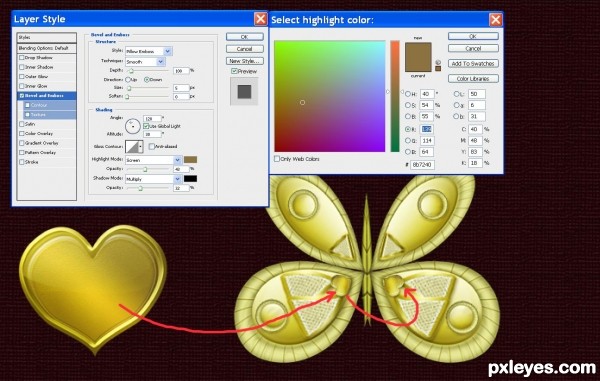
Duplicate Heart Shape group and merge the new one. Move Heart Shape copy layer into Golden Butterfly group above all layers. Use Edit, Free Transform (hold down Shift to keep the proportions) to resize the golden heart. Move it to the inner part of the wing (see the screenshot) then duplicate it, flip horizontally and place the second heart on the other wing. Merge both layers and name the new one Heart Shapes. Right click on it, select Blending Options, Bevel and Emboss:
Style: Pillow Emboss
Technique: Smooth
Depth: 100%
Direction: Down
Size: 5px
Soften: 0px
Angle: 120 degrees
Use Global Light: checked
Altitude: 30 degrees
Gloss Contour: Linear
Anti-aliased: unchecked
Highlight Mode: Screen
Color: # 8b7240
Opacity: 43%
Shadow Mode: Multiply
Color: # 000000
Opacity: 32%
Step 82
Create a new group of layers called Spike and place it for now above Golden Butterfly group. In this step we are going to make the pointed shape which will give the really alternative look to our timepiece.
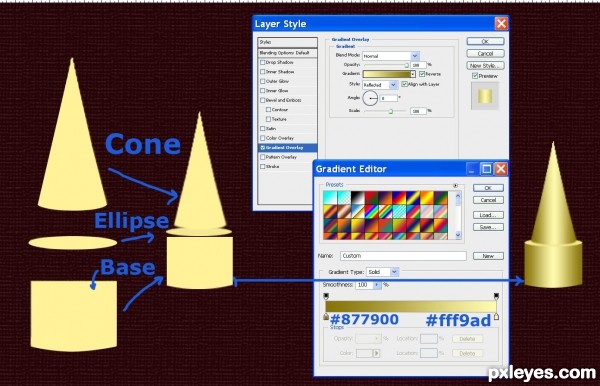
In Spike group create a new layer called Base. Above it create another layer and name it Ellipse and on top of all layers in the group create a new one named Cone.
Take Pen Tool in Shape Layers Mode, firstly select Base layer and draw the same shape you see on my screenshot. I used light yellow color # fff299. Rasterize the layer when ready.
Go to Ellipse layer, take Ellipse Tool in Fill Pixels mode and draw a flattened ellipse with the same color # fff299. Try to draw the ellipse as wide as the Base shape below it or use Free Transform to achieve the result.
Select Cone layer and with the help of Pen Tool in Fill Pixels mode and the same yellow color draw a cone with arc lower shaped bottom side. The cone base should be narrower than the ellipse.
Use Move Tool to fit the parts of the spike.
Right click on Base layer, select Blending Options and check Gradient Overlay:
Blend Mode: Normal
Opacity: 100%
Gradient: #877900 to #fff9ad
Reverse: checked
Style: Reflected
Align with Layer: checked
Angle: 0 degrees
Scale: 100%
Press Ok button to close Layer Style window. Right click on Base layer, select Copy Layer Style, go to Cone layer, right click on it and select Paste Layer style.
The spike shape is ready.
Step 83
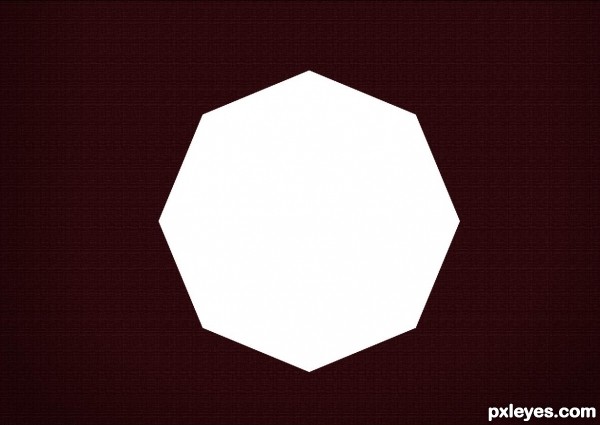
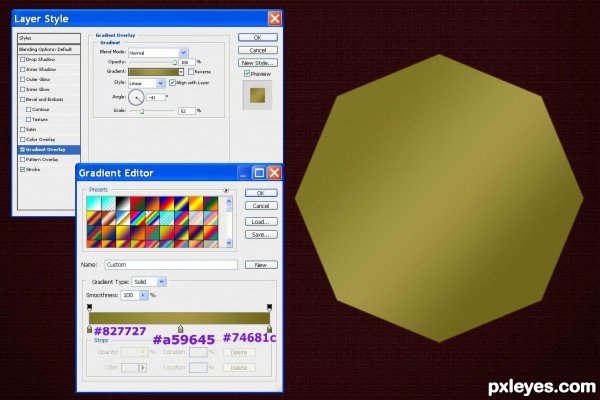
Create a new layer on top of layers palette and call it Timepiece Base. Take Polygon Tool in Fill Pixels mode, in Options Bar enter 8 for Sides and holding Shift draw Octagon with white color.
We are starting to create the main part of our timepiece image.
We are starting to create the main part of our timepiece image.
Step 84
Right click on Timepiece Base layer, select Blending Options, Gradient Overlay:
Blend Mode: Normal
Opacity: 100%
Gradient: #827727 - #a59645 - #74681c
Reverse: unchecked
Style: Linear
Align with Layer: checked
Angle: -41 degrees
Scale: 52%
Keep the Layer Style dialog box opened.
Blend Mode: Normal
Opacity: 100%
Gradient: #827727 - #a59645 - #74681c
Reverse: unchecked
Style: Linear
Align with Layer: checked
Angle: -41 degrees
Scale: 52%
Keep the Layer Style dialog box opened.
Step 85
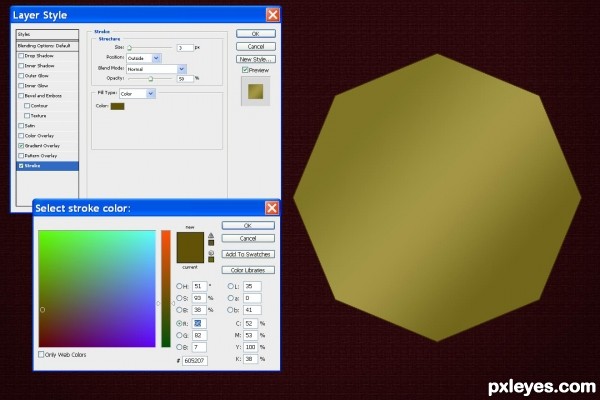
Check Stroke in Layer Style box:
Size: 3px
Position: Outside
Blend Mode: Normal
Opacity: 50%
Fill Type: Color
Color: # 605207
Size: 3px
Position: Outside
Blend Mode: Normal
Opacity: 50%
Fill Type: Color
Color: # 605207
Step 86
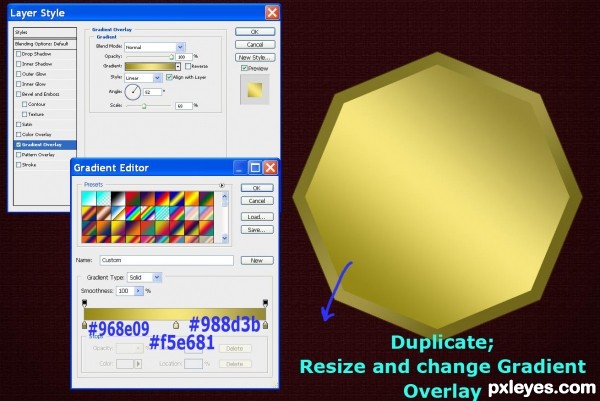
Duplicate Timepiece Base layer, go to Edit, Free Transform and holding Shift resize the duplicated octagon to make it a bit smaller. Rename the layer Octagon, select Blending Options and change Gradient Overlay settings:
Blend Mode: Normal
Opacity: 100%
Gradient: #968e09 - #f5e681 - #988d3b
Reverse: unchecked
Style: Linear
Align with Layer: checked
Angle: 52 degrees
Scale: 68%
Blend Mode: Normal
Opacity: 100%
Gradient: #968e09 - #f5e681 - #988d3b
Reverse: unchecked
Style: Linear
Align with Layer: checked
Angle: 52 degrees
Scale: 68%
Step 87
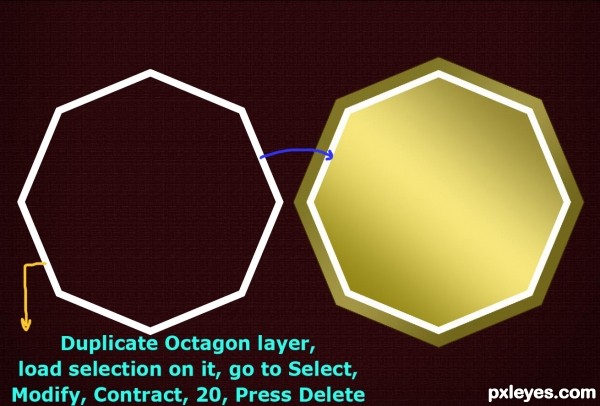
Duplicate Octagon layer and delete its layer styles. Ctrl+click on its layers thumbnail to load a selection. Go to Select, Modify, Contract and set Contract to 20. Press Delete. Now you have a nice white octagon border. Name the layer Octagon 2.
Step 88
Right click on Octagon 2 layer, go to Blending Options, Bevel and Emboss:
Style: Pillow Emboss
Technique: Smooth
Depth: 1000%
Direction: Down
Size: 6px
Soften: 0px
Angle: 120 degrees
Use Global Light: checked
Altitude: 30 degrees
Gloss Contour: Linear
Anti-aliased: unchecked
Highlight Mode: Screen
Color: # fbff6d
Opacity: 100%
Shadow Mode: Multiply
Color: # 9d9832
Opacity: 100%
Keep the Layer Style box activated.
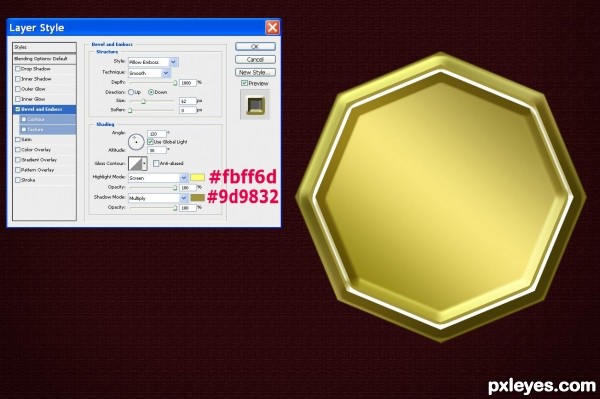
Step 89
Check Gradient Overlay in Layer Style box:
Blend Mode: Normal
Opacity: 100%
Gradient: #968919 - #f7e67c - #9d873b
Reverse: unchecked
Style: Linear
Align with Layer: checked
Angle: 52 degrees
Scale: 68%
Blend Mode: Normal
Opacity: 100%
Gradient: #968919 - #f7e67c - #9d873b
Reverse: unchecked
Style: Linear
Align with Layer: checked
Angle: 52 degrees
Scale: 68%
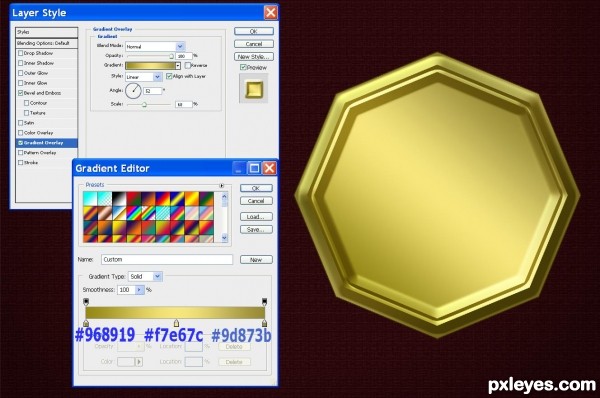
Step 90
Go back to Octagon layer, duplicate it and place above Octagon 2 layer. Resize with Edit, Free Transform so that its sides to fit the Octagon 2 inside borders and change Blend Mode of the layer to Multiply. Call the layer Octagon Glass, right click on it and check Blending Options, Gradient Overlay:
Blend Mode: Normal
Opacity: 100%
Gradient: #b9b353 - #f3df66 - #ccc046 - #c4b423
Reverse: unchecked
Style: Diamond
Align with Layer: checked
Angle: 90 degrees
Scale: 138%
Still don’t close the Layer Style box.
Blend Mode: Normal
Opacity: 100%
Gradient: #b9b353 - #f3df66 - #ccc046 - #c4b423
Reverse: unchecked
Style: Diamond
Align with Layer: checked
Angle: 90 degrees
Scale: 138%
Still don’t close the Layer Style box.
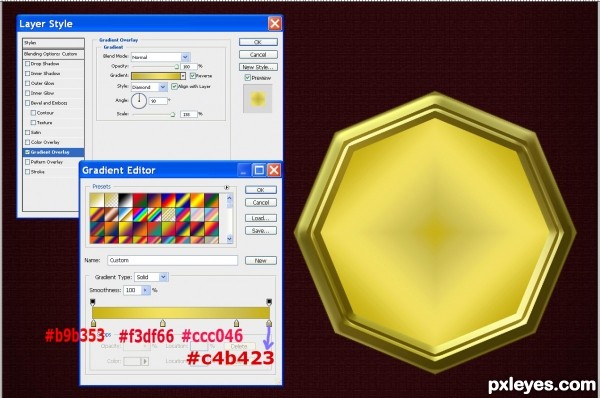
Step 91
Select Inner Shadow:
Blend Mode: Multiply
Color: #7a6e10
Opacity: 100%
Angle: 120 degrees
Use Global Light: checked
Distance: 5px
Choke: 0%
Size: 136px
Contour: Linear
Anti-aliased: unchecked
Noise: 0%
If you are still not satisfied with the shadows and volume effect provided by Inner Shadow layer Style, make the Octagon layer darker with the help of Burn Tool.
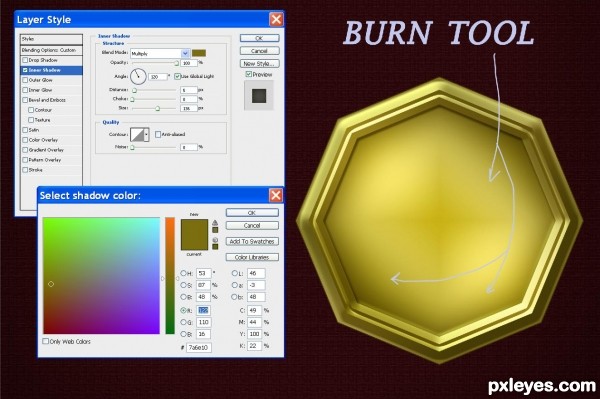
Step 92
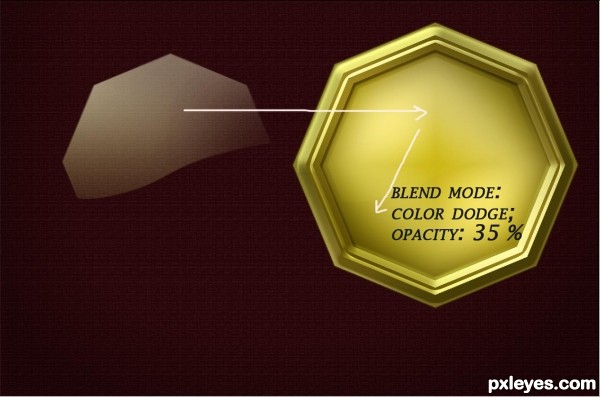
Duplicate Octagon layer again and move the copied one above Octagon Glass layer. Go to Edit, Free Transform and holding Shift make this octagon shape slightly smaller than the dark octagon glass. Draw a wave shaped path with Pen Tool in Path mode taking in the bottom half of the shape, right click on the path, choose Make selection, press OK, then press Delete. Call the layer Glow, change its Blend Mode to Color Dodge and reduce Opacity to 35%.
Step 93
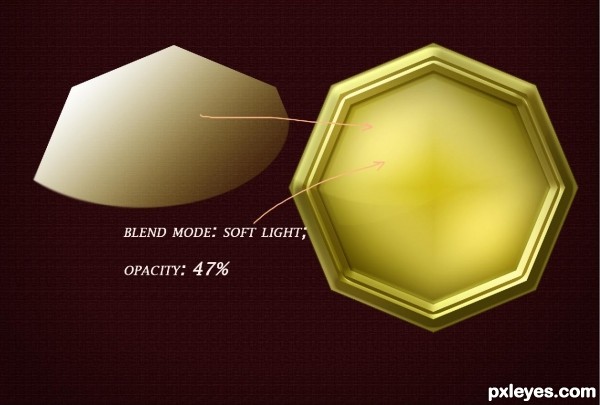
Duplicate again Octagon layer and place the duplicated one above the previously created Glow layer. Name the new layer Glow 2 and this time don’t resize it. Only make a path with Pen Tool, right click, choose Make Selection and press Delete. Change Blend Mode of this Glow 2 layer to Soft Light and reduce Opacity to 47%.
Highlight all layers created from Step 83 to Step 93, go to Layer, Group Layers and call the new group Timepiece.
Step 94
From now on we’ll start with the most important part of this tutorial- making the timepiece design and decorations.
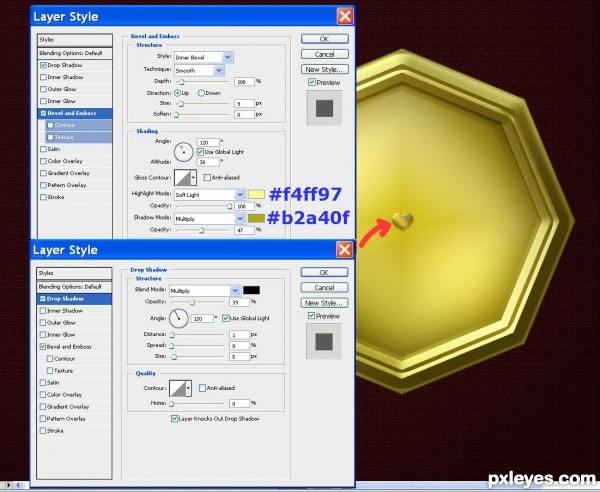
Duplicate Heart group and merge the duplicated one. Move the golden heart above Timepiece group, rename the layer Timepiece Center, go to Edit, Free Transform and holding down Shift make the heart small- it will be used as the timepiece hands center. Place it in the middle of the clock. Right click on Timepiece Center layer, select Blending Options, Bevel and Emboss:
Style: Inner Bevel
Technique: Smooth
Depth: 100%
Direction: Up
Size: 9px
Soften: 0px
Angle: 120 degrees
Use Global Light: checked
Altitude: 30 degrees
Gloss Contour: Linear
Anti-aliased: unchecked
Highlight Mode: Soft Light
Color: # f4ff97
Opacity: 100%
Shadow Mode: Multiply
Color: # b2a4of
Opacity: 47%
Select also Drop Shadow in Layer Style Box:
Blend Mode: Multiply
Color: Black
Opacity: 39%
Angle: 10 degrees
Use Global Light- checked
Distance: 1px
Spread: 0%
Size: 5px
Contour: Linear
Anti-aliased: unchecked
Noise: 0%
Step 95
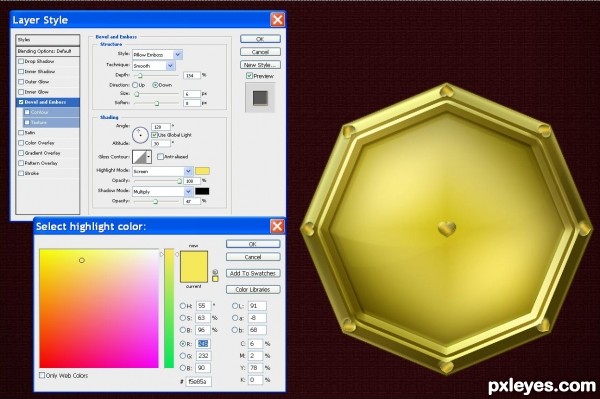
In this step you’ll need eight more small hearts of equal size to be placed on each of the angles of the octagonal shaped timepiece frame. Merge all side hearts layers, name the new one Frame Hearts, right click on their layer, select Blending Options, Bevel and Emboss:
Style: Pillow Emboss
Technique: Smooth
Depth: 134%
Direction: Down
Size: 6px
Soften: 8px
Angle: 120 degrees
Use Global Light: checked
Altitude: 30 degrees
Gloss Contour: Linear
Anti-aliased: unchecked
Highlight Mode: Screen
Color: # f5e85a
Opacity: 100%
Shadow Mode: Multiply
Color: # 000000
Opacity: 47%
Step 96
Go to Spike group, duplicate it, right click on the duplicated group and choose Merge Group. Move Spike layer above Frame Hearts layer, duplicate it 13 times and arrange each spike on the timepiece frame as on the screenshot. When ready, select all spikes layers, merge them and call the new one Frame Spikes.
Use Burn Tool to darken the base part of each spike.
Use Burn Tool to darken the base part of each spike.
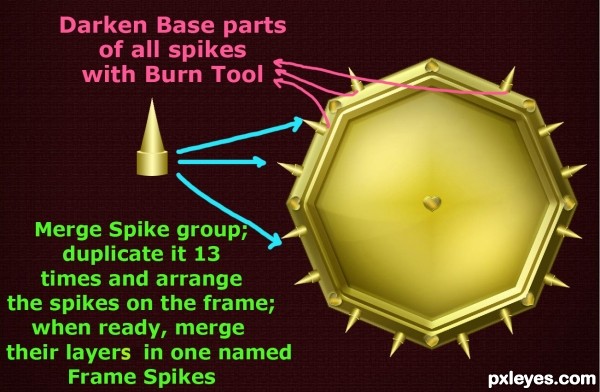
Step 97
Now create a new layer called Spikes Shadows and place it above Frame Spikes layer. Take a Soft Brush of 30% Opacity and Size 8px, paint at the base of each spike- this will add shadows.
Right click on Spikes Shadows layer, select Blending Options, Drop Shadow:
Blend Mode: Multiply
Color: black
Opacity: 75%
Angle: 120 degrees
Use Global Light: checked
Distance: 3px
Spread: 0%
Size: 6px
Contour: Linear
Anti-aliased: not checked
Noise: 0%
Take Line Tool from Tools palette (in Options Bar select Fill Pixels mode and change Weight to 6px) and set Foreground color to # faf297. Draw a short line while holding Shift. Duplicate it 11 times and place each line on the clock face to make the minutes and hours signs. Merge all lines layers and name the new one Minutes and Hours.
Copy Drop Shadow blending option applied on Spikes Shadows and paste it on Minutes and Hours layer.
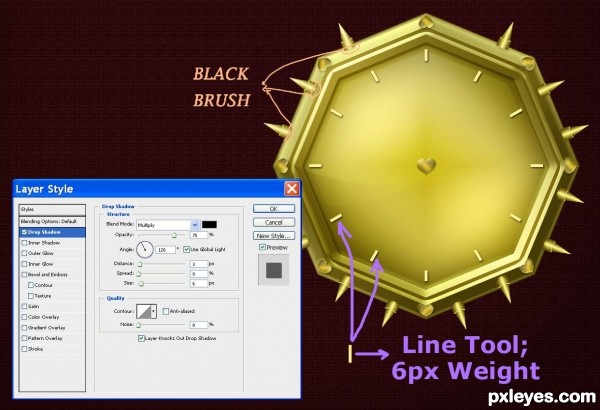
Step 98
Let us add more relief to the timepiece face. Right click on Minutes and Hours layer, select Blending Options, Bevel and Emboss:
Style: Inner Bevel
Technique: Smooth
Depth: 72%
Direction: Up
Size: 10px
Soften: 0px
Angle: 120 degrees
Use Global Light: checked
Altitude: 30 degrees
Gloss Contour: Sawtooth 1
Anti-aliased: unchecked
Highlight Mode: Screen
Color: # fefed8
Opacity: 100%
Shadow Mode: Multiply
Color: # e1d436
Opacity: 75%
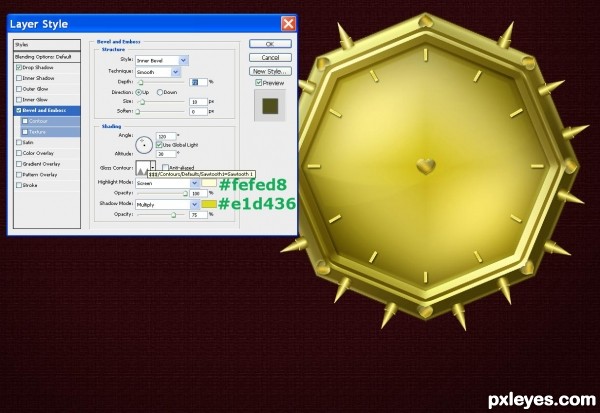
Step 99
Create a new layer placed below Timepiece Center and call it Hour Hand. Take Hard Round Brush, 6px size, black color and holding Shift draw a straight line. I preferred my hour hand to point at 9o’clock.
Optional- to make the hour hand top pointed, use Eraser Tool (Hard Round Brush) to sharpen the edge.
Optional- to make the hour hand top pointed, use Eraser Tool (Hard Round Brush) to sharpen the edge.
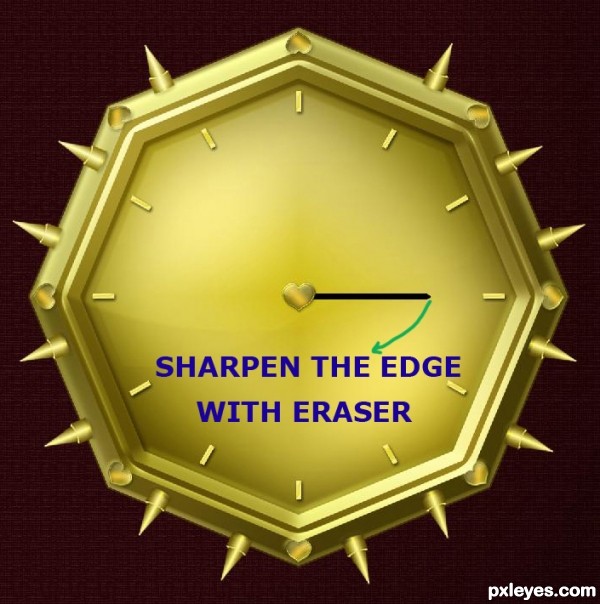
Step 100
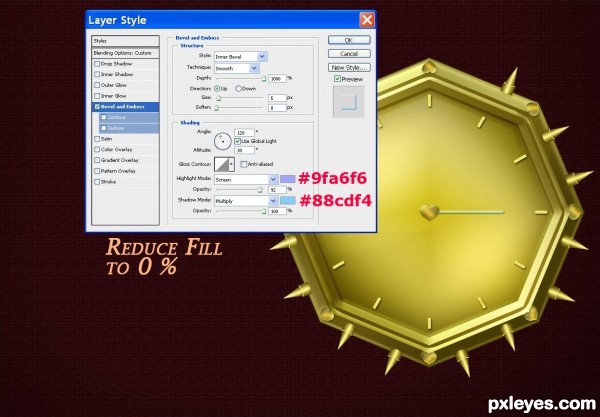
Reduce Fill of Hour Hand layer to 0%, right click on it, select Blending Options, Bevel and Emboss:
Style: Inner Bevel
Technique: Smooth
Depth: 1000%
Direction: Up
Size: 5px
Soften: 0px
Angle: 120 degrees
Use Global Light: checked
Altitude: 30 degrees
Gloss Contour: Linear
Anti-aliased: unchecked
Highlight Mode: Screen
Color: # 9fa6f6
Opacity: 92%
Shadow Mode: Multiply
Color: # 88cdf4
Opacity: 100%
Keep the Layer Style box open.
Step 101
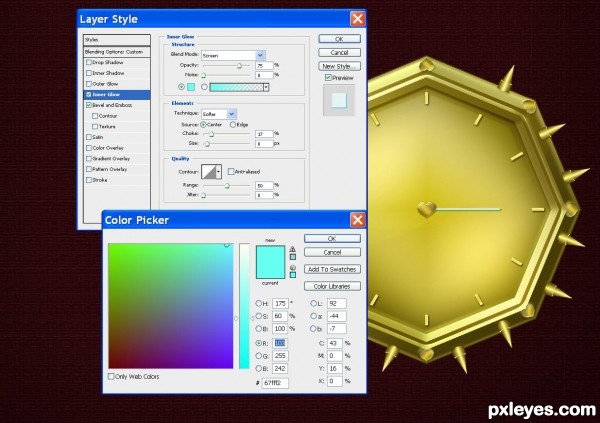
To make the Hour Hand shinier, check Inner Glow in Layer Style box:
Blend Mode: Screen
Opacity: 75%
Noise: 0 %
Color: #67fff2
Technique: Softer
Source: Center
Choke: 17%
Size: 8px
Contour: Linear
Anti-aliased: unchecked
Range: 50%
Jitter: 0%
Don’t close the Layer Style dialog box, we are going to add another two layer styles.
Blend Mode: Screen
Opacity: 75%
Noise: 0 %
Color: #67fff2
Technique: Softer
Source: Center
Choke: 17%
Size: 8px
Contour: Linear
Anti-aliased: unchecked
Range: 50%
Jitter: 0%
Don’t close the Layer Style dialog box, we are going to add another two layer styles.
Step 102
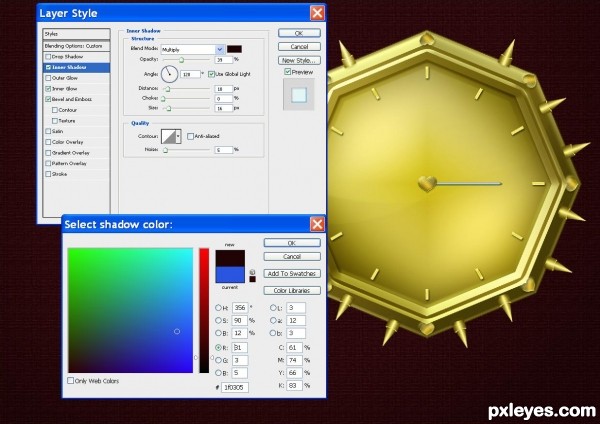
Check Inner Shadow in Layer Style box and enter the following settings:
Blend Mode: Multiply
Color: #1f0305
Opacity: 39%
Angle: 120 degrees
Use Global Light: checked
Distance: 10px
Choke: 0%
Size: 16px
Contour: Linear
Anti-aliased: unchecked
Noise: 5%
Blend Mode: Multiply
Color: #1f0305
Opacity: 39%
Angle: 120 degrees
Use Global Light: checked
Distance: 10px
Choke: 0%
Size: 16px
Contour: Linear
Anti-aliased: unchecked
Noise: 5%
Step 103
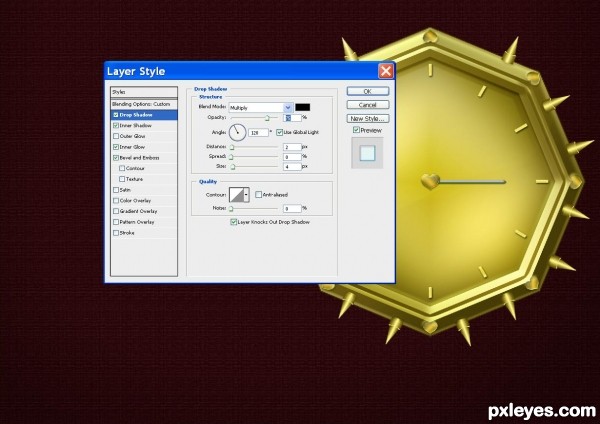
The last blending option we have to add to Hour Hand layer before closing Layer Style box is Drop Shadow:
Blend Mode: Multiply
Color: #Black
Opacity: 75%
Angle: 120 degrees
Use Global Light: checked
Distance: 2px
Spread: 0%
Size: 4px
Contour: Linear
Anti-aliased: unchecked
Noise: 0%
Blend Mode: Multiply
Color: #Black
Opacity: 75%
Angle: 120 degrees
Use Global Light: checked
Distance: 2px
Spread: 0%
Size: 4px
Contour: Linear
Anti-aliased: unchecked
Noise: 0%
Step 104
Create a new layer named Seconds Hand. To draw the hand take a Hard Round Brush, 4px sixe and this time make the line longer. Sharpen the edge using Eraser Tool. Copy the layer styles applied on Hour Hand layer and paste them on Seconds Hand.
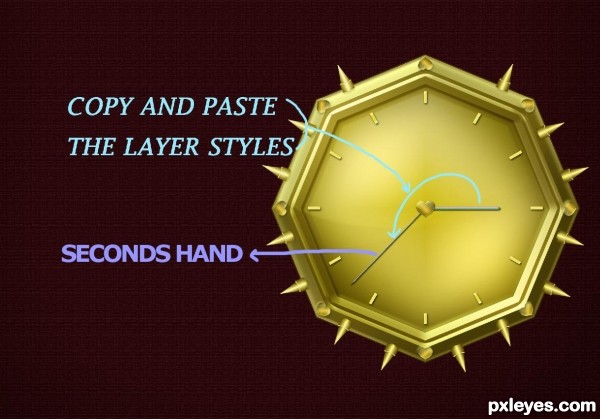
Step 105
Let us not forget to add the Minutes Hand too. Create a new layer called Minutes Hand and place it above Hour Hand layer. Using Rectangle Tool in Fill Pixels mode, draw a black rectangle slightly longer and wider than the Hour Hand. When ready, take Rectangular Marquee Tool and draw a rectangular selection smaller than the black rectangle. Press Delete. Reduce Fill of Minutes Hand layer to 0%, right click on it, select Blending Options, Bevel and Emboss:
Style: Inner Bevel
Technique: Smooth
Depth: 1000%
Direction: Down
Size: 8px
Soften: 0px
Angle: 120 degrees
Use Global Light: checked
Altitude: 30 degrees
Gloss Contour: Cone Inverted
Anti-aliased: unchecked
Highlight Mode: Screen
Color: # 9fa8eb
Opacity: 100%
Shadow Mode: Multiply
Color: # 7fd0fd
Opacity: 100%
Keep the Layer Style box active.
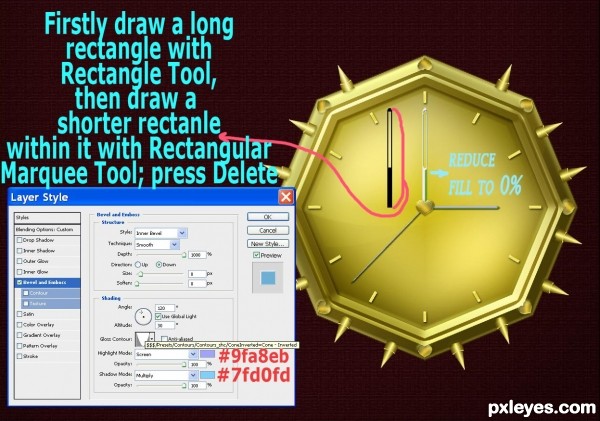
Step 106
Check Inner Glow in layer Style Box:
Blend Mode: Screen
Opacity: 75%
Noise: 0%
Color: #67fff2
Technique: Softer
Source: Center
Choke: 17%
Size: 9px
Contour: Linear
Anti-aliased: unchecked
Range: 50%
Jitter: 0%
Blend Mode: Screen
Opacity: 75%
Noise: 0%
Color: #67fff2
Technique: Softer
Source: Center
Choke: 17%
Size: 9px
Contour: Linear
Anti-aliased: unchecked
Range: 50%
Jitter: 0%
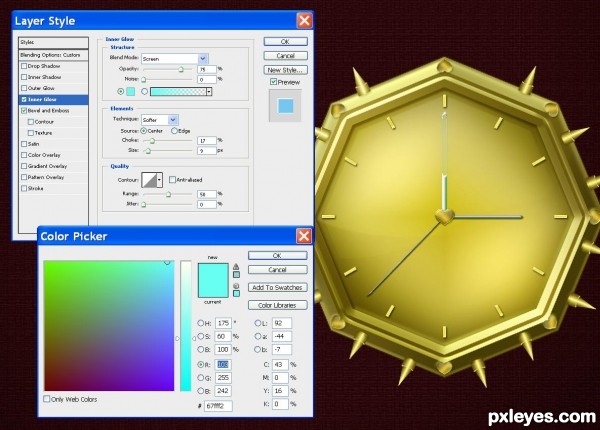
Step 107
Now add Inner Shadow layer style to Seconds Hand layer:
Blend Mode: Multiply
Color: #2a55df
Opacity: 39%
Angle: 120 degrees
Use Global Light: checked
Distance: 10px
Choke: 0%
Size: 16px
Contour: Linear
Anti-aliased: unchecked
Noise: 5%
Blend Mode: Multiply
Color: #2a55df
Opacity: 39%
Angle: 120 degrees
Use Global Light: checked
Distance: 10px
Choke: 0%
Size: 16px
Contour: Linear
Anti-aliased: unchecked
Noise: 5%
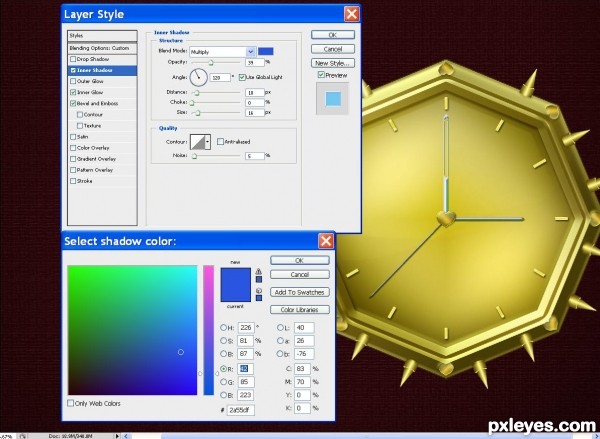
Step 108
The last Layer style we have to apply to Seconds Hand Layer is Drop Shadow:
Blend Mode: Multiply
Color: #Black
Opacity: 75%
Angle: 120 degrees
Use Global Light: checked
Distance: 2px
Spread: 0%
Size: 4px
Contour: Linear
Anti-aliased: unchecked
Noise: 0%
Blend Mode: Multiply
Color: #Black
Opacity: 75%
Angle: 120 degrees
Use Global Light: checked
Distance: 2px
Spread: 0%
Size: 4px
Contour: Linear
Anti-aliased: unchecked
Noise: 0%
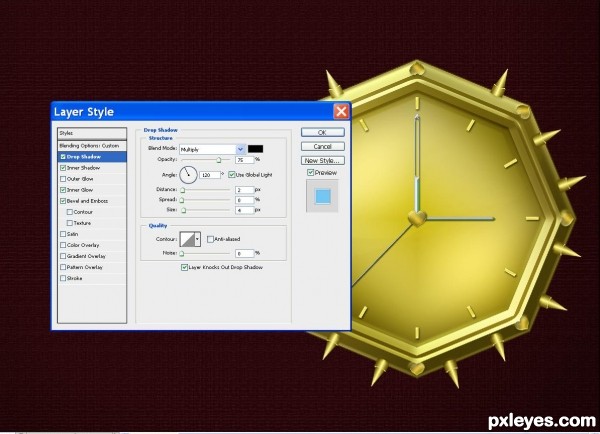
Step 109
Without brand name our vintage timepiece will look unfinished. What brand name and font to choose is entirely up to you. In this step I’ll show you the name which I made up but you are free to change it or to use another font.
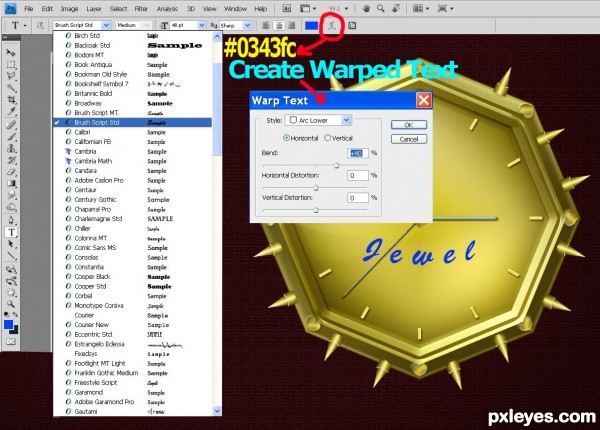
Select Horizontal Type Tool, choose Brush Script Std font (default), set the font size to 48pt and write Jewel. I chose blue #0343fc for text color.
Straight text doesn’t look that nice so with the text highlighted, go to Create Warped Text icon to call the Warp Text dialog box. From Style drop down menu choose Arc Lower and set Bend to plus 40%. Press OK button. Right click on the text layer and select Rasterize Layer. If you find the brand name bend too strong, you can slightly reshape using Free Transform.
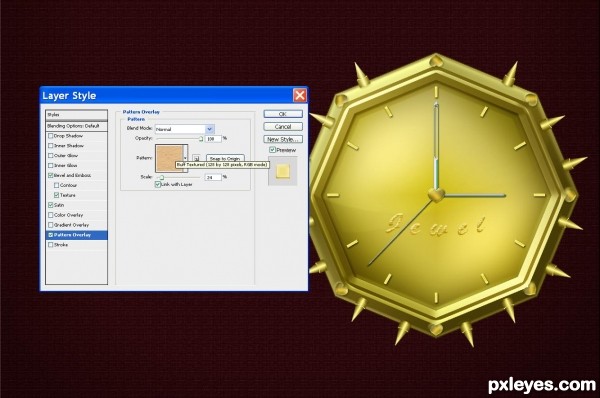
Step 110
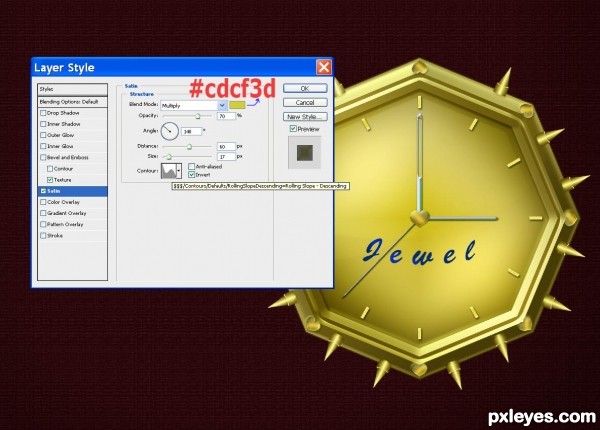
Right click on the rasterized text layer, go to Blending Options, Satin and enter the following settings:
Blend Mode: Multiply
Color: #cdcf3d
Opacity: 70%
Angle: 140 degrees
Distance: 60px
Size: 17px
Contour: Rolling Slope- descending
Anti-aliased: unchecked
Invert: checked
Keep Layer Style box opened as we should add more relief and texture to the brand layer.
Blend Mode: Multiply
Color: #cdcf3d
Opacity: 70%
Angle: 140 degrees
Distance: 60px
Size: 17px
Contour: Rolling Slope- descending
Anti-aliased: unchecked
Invert: checked
Keep Layer Style box opened as we should add more relief and texture to the brand layer.
Step 111
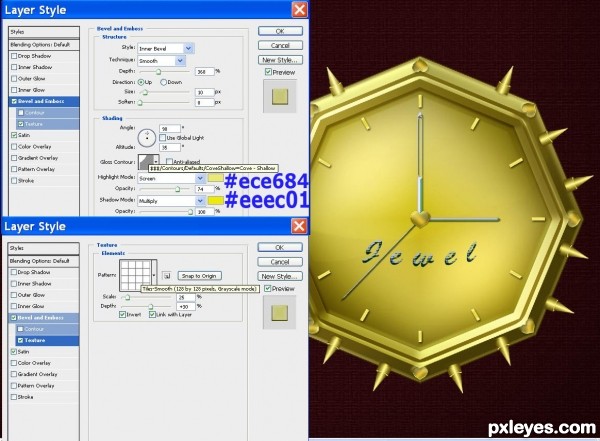
Check Bevel and Emboss to make the brand name more convex:
Style: Inner Bevel
Technique: Smooth
Depth: 368%
Direction: Up
Size: 10px
Soften: 0px
Angle: 90 degrees
Use Global Light: unchecked
Altitude: 35 degrees
Gloss Contour: Cone Shallow
Anti-aliased: unchecked
Highlight Mode: Screen
Color: # ece684
Opacity: 74%
Shadow Mode: Multiply
Color: # eeec01
Opacity: 100%
Check Texture option:
Pattern: Tiles Smooth
Scale: 25%
Depth: +30%
Invert and Link with Layer: both options are checked
Still don’t close Layer Style box.
Step 112
As the brand name of our timepiece started to look a bit rough, let us make it smoother and add golden luster to it. Check Pattern Overlay blending option:
Blend Mode: Normal
Opacity: 100%
Pattern: Buff Textured
Scale: 24%
Link with Layer: checked
Keep Layer Style opened as in the next step we are going to add two more styles.
Blend Mode: Normal
Opacity: 100%
Pattern: Buff Textured
Scale: 24%
Link with Layer: checked
Keep Layer Style opened as in the next step we are going to add two more styles.
Step 113
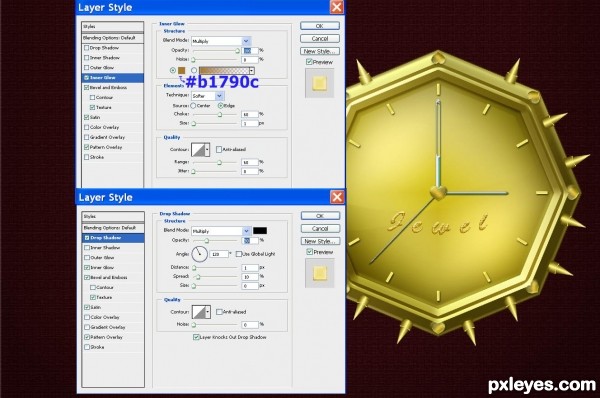
Now select Inner Glow layer style:
Blend Mode: Multiply
Opacity: 100%
Noise: 0%
Color: #b1790c
Technique: Softer
Source: Edge
Choke: 60%
Size: 0px
Contour: Linear
Anti-aliased: unchecked
Range: 60%
Jitter: 0%
The last layer style we have to apply to Jewel text is Drop Shadow:
Blend Mode: Multiply
Color: #Black
Opacity: 30%
Angle: 120 degrees
Use Global Light: checked
Distance: 1px
Spread: 10%
Size: 0px
Contour: Linear
Anti-aliased: unchecked
Noise: 0%
Blend Mode: Multiply
Opacity: 100%
Noise: 0%
Color: #b1790c
Technique: Softer
Source: Edge
Choke: 60%
Size: 0px
Contour: Linear
Anti-aliased: unchecked
Range: 60%
Jitter: 0%
The last layer style we have to apply to Jewel text is Drop Shadow:
Blend Mode: Multiply
Color: #Black
Opacity: 30%
Angle: 120 degrees
Use Global Light: checked
Distance: 1px
Spread: 10%
Size: 0px
Contour: Linear
Anti-aliased: unchecked
Noise: 0%
Step 114
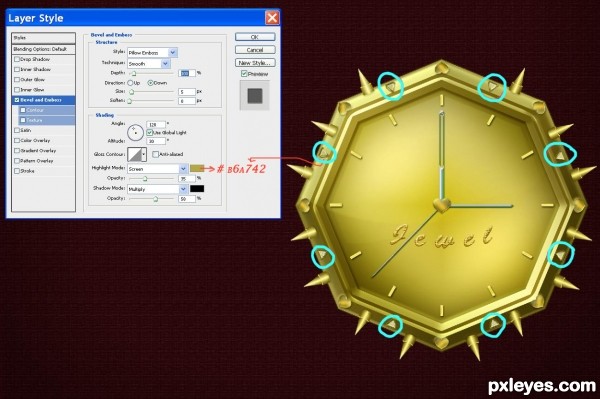
Take the Triangle Diamond you kept above Rectangle group and duplicate it. Create a layer below it, highlight both diamond and the new layer and merge them to apply the layer styles. Resize it using Free Transform (hold down Shift) to make it fit the timepiece frame. Duplicate it seven times and distribute the eight glowing rectangles on the frame as you see them on the screenshot. When ready, merge these eight layers and name the new layer Frame Rectangles. Place it on top of Timepiece group. Right click on it, select Blending Options, Bevel and Emboss:
Style: Pillow Emboss
Technique: Smooth
Depth: 100%
Direction: Down
Size: 5px
Soften: 0px
Angle: 120 degrees
Use Global Light: checked
Altitude: 30 degrees
Gloss Contour: Linear
Anti-aliased: unchecked
Highlight Mode: Screen
Color: # b6a742
Opacity: 35%
Shadow Mode: Multiply
Color: # 000000
Opacity: 58%
Step 115
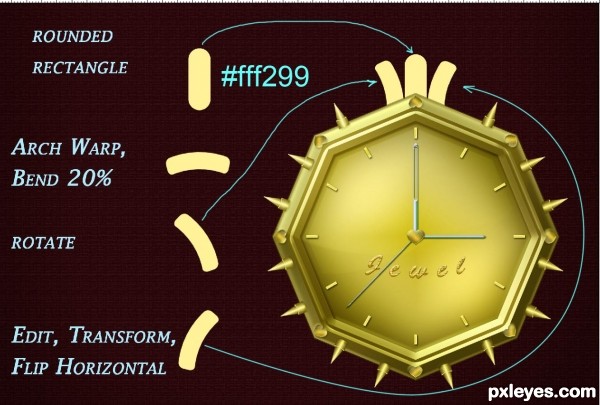
Create a new layer below Timepiece group, take Rounded Rectangle Tool (80px Radius) and draw a small rectangle with color #fff299. Fix the shape behind the upper angle of the timepiece octagonal frame.
Duplicate the rounded rectangle layer, rotate the shape at 90 degrees clockwise, go to Edit, Transform, Warp, Arch Warp and set Bend to 20%. Move the warped shape next to the original rounded rectangle layer. Duplicate the arch warped layer then apply Edit, Transform, Flip Horizontal and place on the other side of the original rounded rectangle layer. Now you should have something resembling a crown behind the timepiece. Select the three layers, merge them and call the new layer Base.
Duplicate the rounded rectangle layer, rotate the shape at 90 degrees clockwise, go to Edit, Transform, Warp, Arch Warp and set Bend to 20%. Move the warped shape next to the original rounded rectangle layer. Duplicate the arch warped layer then apply Edit, Transform, Flip Horizontal and place on the other side of the original rounded rectangle layer. Now you should have something resembling a crown behind the timepiece. Select the three layers, merge them and call the new layer Base.
Step 116
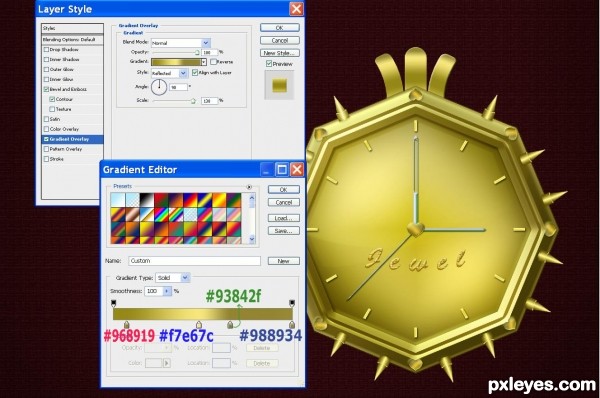
As the base layer looks flat and lacks light and shade effects, right click on it, select Blending Options, Gradient Overlay:
Blend Mode: Normal
Opacity: 100%
Gradient: #969919, #f7167c, #93842f, #988934
Reverse: unchecked
Style: Reflected
Align with Layer: checked
Angle: 90 degrees
Scale: 138%
Don’t close the Layer Style box.
Blend Mode: Normal
Opacity: 100%
Gradient: #969919, #f7167c, #93842f, #988934
Reverse: unchecked
Style: Reflected
Align with Layer: checked
Angle: 90 degrees
Scale: 138%
Don’t close the Layer Style box.
Step 117
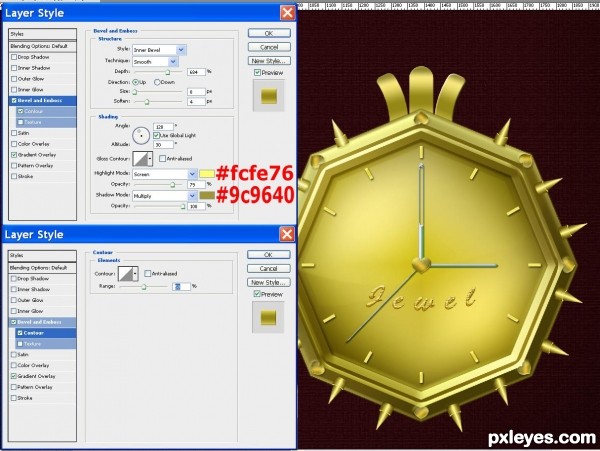
Now select Bevel and Emboss in Layer Style box and change its settings:
Style: Inner Bevel
Technique: Smooth
Depth: 684%
Direction: Up
Size: 0px
Soften: 4px
Angle: 120 degrees
Use Global Light: checked
Altitude: 30 degrees
Gloss Contour: Linear
Anti-aliased: unchecked
Highlight Mode: Screen
Color: # fcff76
Opacity: 79%
Shadow Mode: Multiply
Color: # 9c9640
Opacity: 100%
Select also Contour in Layer Style box:
Contour: Linear
Anti-aliased: unchecked
Range: 50%
Step 118
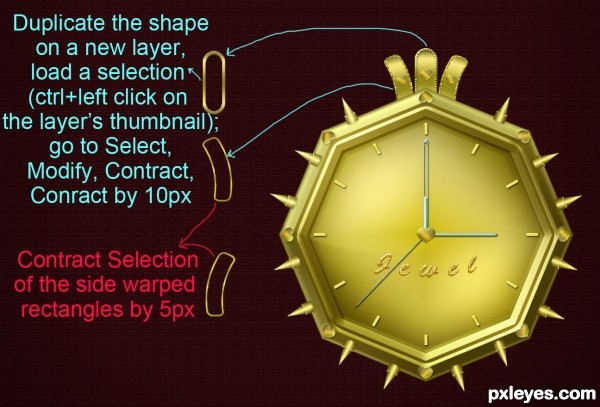
We have to add decoration and more relief to Base shape in this step. Select the middle rounded rectangle and press Ctrl + J to copy the shape separately on a new layer. Press Ctrl and click on the rounded rectangle layer’s thumbnail to load a selection. Go to Select, Modify, Contract and enter 10px in Contract Selection box. Press Delete.
Repeat the same on the other two arch warped shapes. The only difference is that you should contract their selections by 5px to make the relief borders thinner.
Repeat the same on the other two arch warped shapes. The only difference is that you should contract their selections by 5px to make the relief borders thinner.
Step 119
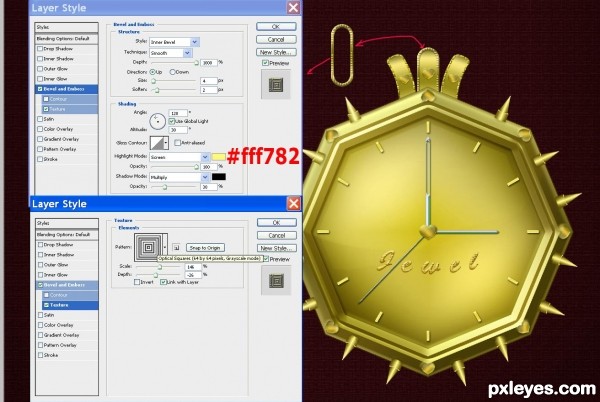
Right click on the middle rounded rectangle border shape, select Blending Options, Bevel and Emboss:
Style: Inner Bevel
Technique: Smooth
Depth: 1000%
Direction: Up
Size: 4px
Soften: 2px
Angle: 120 degrees
Use Global Light: checked
Altitude: 30 degrees
Gloss Contour: Linear
Anti-aliased: unchecked
Highlight Mode: Screen
Color: # fff782
Opacity: 100%
Shadow Mode: Multiply
Color: # 000000
Opacity: 30%
Check also Texture option in Layer Style box:
Pattern: Optical Squares
Scale: 146%
Depth: -26%
Invert: unchecked
Now you can close the Layer Style box.
Step 120
Right click on the right side rounded rectangle and select Blending Options, Bevel and Emboss:
Style: Inner Bevel
Technique: Smooth
Depth: 1000%
Direction: Up
Size: 16px
Soften: 0px
Angle: 120 degrees
Use Global Light: checked
Altitude: 30 degrees
Gloss Contour: Linear
Anti-aliased: unchecked
Highlight Mode: Screen
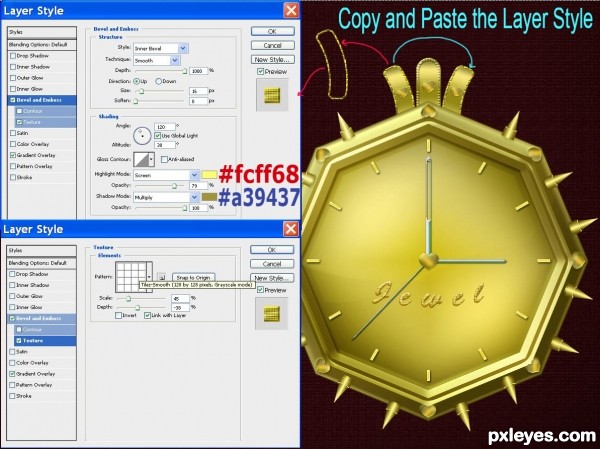
Color: # fcff68
Opacity: 79%
Shadow Mode: Multiply
Color: # a39437
Opacity: 100%
Click Texture option:
Pattern: Tiles-Smooth
Scale: 45%
Depth: -38%
Invert: unchecked
When ready with these two layer styles, right click on the layer, select Copy Layer Style, then select the layer of the warped rounded rectangle on the other side, right click on it and select Paste Layer Style.
Step 121
Duplicate the right side rounded rectangle once again. Rotate and place it transversely below all rounded rectangles shaping the Base. Load a selection on it (Ctrl+click on its layer thumbnail) then go to Select, Modify, Contract and contract the selection by 10px. Press Delete.
Right click on the layer, select Blending Options, Bevel and Emboss:
Style: Inner Bevel
Technique: Smooth
Depth: 1000%
Direction: Up
Size: 3px
Soften: 0px
Angle: 120 degrees
Use Global Light: checked
Altitude: 30 degrees
Gloss Contour: Linear
Anti-aliased: unchecked
Highlight Mode: Screen
Color: # d8c463
Opacity: 80%
Shadow Mode: Multiply
Color: # 000000
Opacity: 31%
Tick Texture option in Layer Style box:
Pattern: Oil Pastel on Canvas
Scale: 425%
Depth: -38%
Invert: unchecked
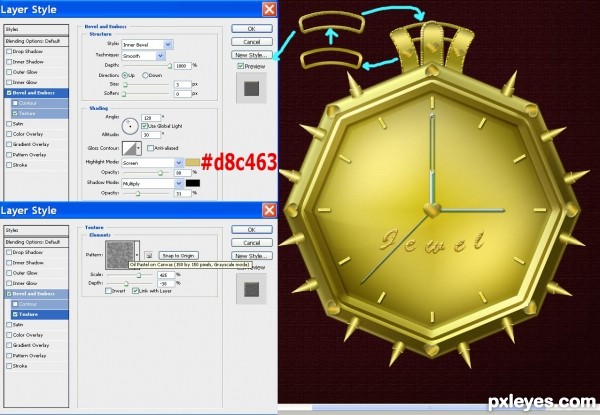
Step 122
Create a new layer, take Ellipse Tool in Fill Pixels mode and holding down Shift draw a perfect circle with color #fff299. Name the layer Circle, right click on it, select Blending Options, Gradient Overlay:
Blend Mode: Normal
Opacity: 100%
Gradient: #fff795, #ded056, #403508
Reverse: unchecked
Style: Radial
Align with Layer: checked
Angle: 90 degrees
Scale: 150%
Blend Mode: Normal
Opacity: 100%
Gradient: #fff795, #ded056, #403508
Reverse: unchecked
Style: Radial
Align with Layer: checked
Angle: 90 degrees
Scale: 150%
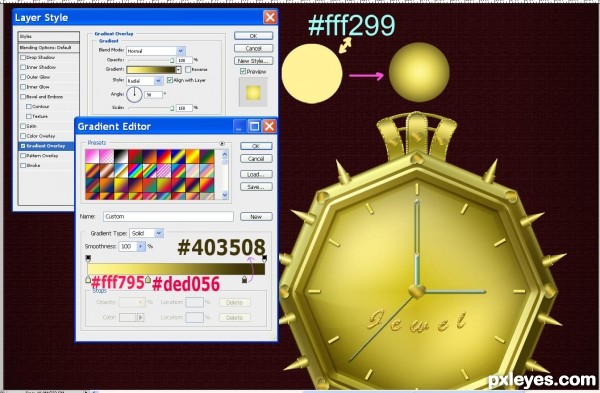
Step 123
Duplicate the Spike group and merge the duplicated one. Call it Circle Spikes and place above the big circle. Firstly duplicate Circle Spikes layer three times and arrange all four layers to make a wreath around the circle. Merge the layers when ready. Duplicate the new one and apply Edit, Free Transform to reduce the size. Rotate the layer so that each of its spikes is between two bigger spikes of the previous layer.
Repeat this action two more times, each time resizing more the spikes. You should achieve a result as on the screenshot.
Repeat this action two more times, each time resizing more the spikes. You should achieve a result as on the screenshot.
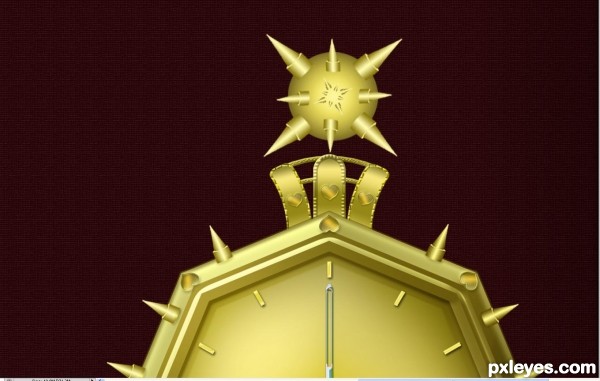
Step 124
Create a new group named Timepiece Chain, placed between Timepiece and Rectangle group. Merge all insects groups, resize the beetle, fly and butterfly with the help of Free Transform and duplicate twice each of them. Arrange the insects so that six of them to fit to the chains and also place bigger beetle, fly and butterfly vertically above the Timepiece.
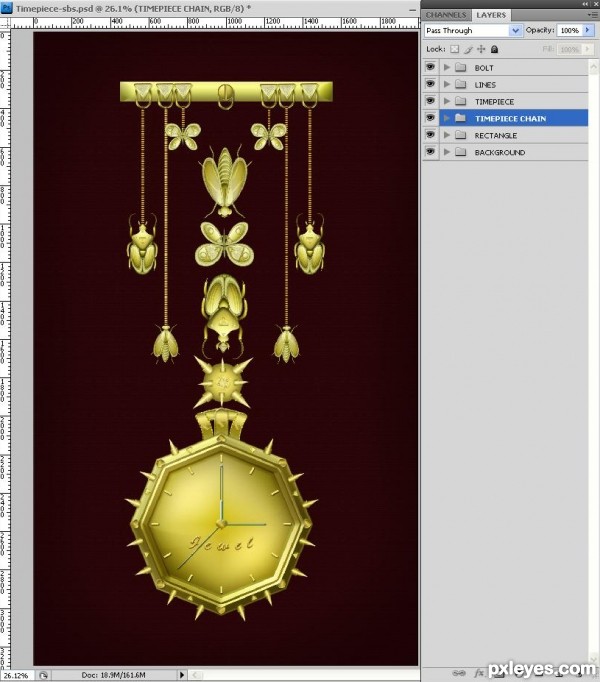
Step 125
In order not to leave the golden insects above the Timepiece hanging in the air, select one of the hangers created in step 18, duplicate it, rotate at 90 degrees and fit it to the down side of the vertical hanger. Apply the layer styles to each of the two shapes then merge them. Move the layer to Timepiece Chain group, duplicate it five times and arrange them between the timepiece and its chain parts like on the screenshot.
As a final touch add triangle diamonds as connections between five of the chain segments. I used two resized triangles with contiguous base sides (to make rhomb).
As a final touch add triangle diamonds as connections between five of the chain segments. I used two resized triangles with contiguous base sides (to make rhomb).
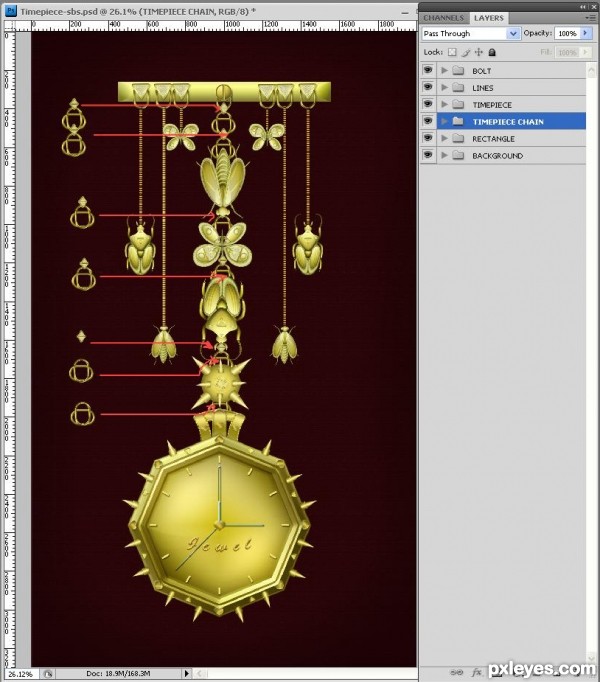
Step 126
After all these efforts, your image should resemble my screenshot of the final result. Thank you for reading and good luck.

0 comments:
Post a Comment