Learn how to create a coffee shop advertisement using Photoshop and iClone4. The first part of this tutorial will show you how to create a swirling milky coffee. The second part will show you how to use iClone to put a 3D model in the coffee. You’ll finish the artwork in Photoshop where you’ll combine the 3D model and coffee together and apply the finishing touches.
Preview of Final Results
Tutorial Details
Resources
Preface
When graphic designers need an image to work with, they usually search through thousands of image libraries to find that one unique impression that will speak their message. But chances are, that they won't find the exact image, pose or camera angle that they have in mind. This is the most difficult and frustrating part of the job, not to mention the most time consuming one. In this Photoshop tutorial, we will introduce a new and clever way of creating your own 3D character with the exact pose and identity you need.
In the following figure-posing tutorial, we will learn how to create an advertising message by first combining primary image layers in Photoshop for an initial background. Then we will use a 3rd Party tool, known as iClone4, to pose a 3D figurine with the exact pose and camera perspective we need. Later we will bring everything back into Photoshop for the finishing touch.
Step 1 - Create your Message and Collect your Images
As simple as it may sound, the first thing to do is to lay out the message you wish to convey and collect the necessary images for the background, foreground and other. In this example, we will bring in a coffee cup image for the background, a pouring cream image for the foreground and an auxiliary towel image to use as an accessory.
Step 2 - Compose your background image in Photoshop
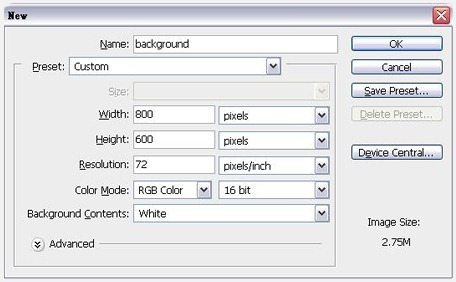
Set your Ad image size to 800 x 600. Set the background color to white.
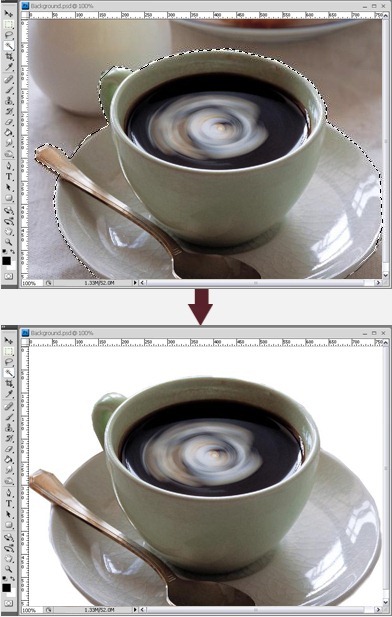
Open picture01 (coffee cup), and use the Polygonal Lasso Tool to select the coffee cup image on the picture. Press Ctrl+C to copy the selected image and paste it in the Ad image file. Adjust the position of the cup.
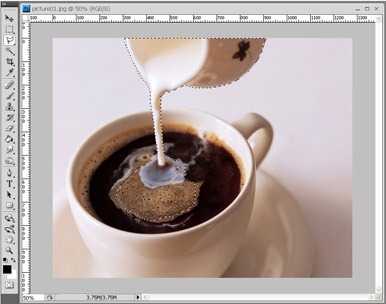
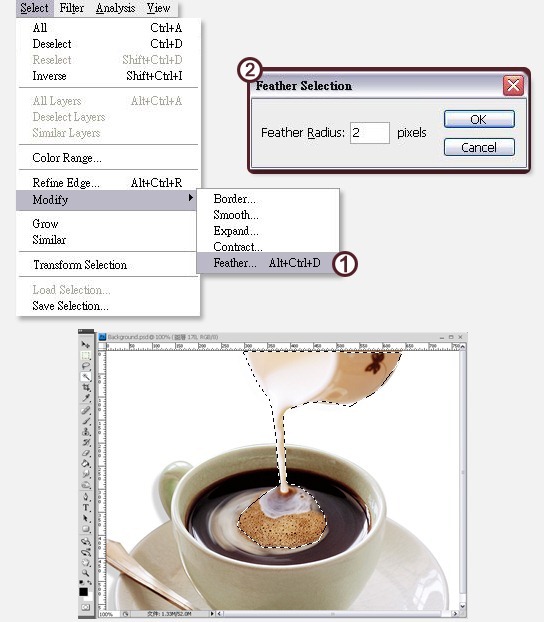
Open picture02 (pouring cream) and use the Polygonal Lasso Tool to select the image of the pouring cream. Go to Select/Feather and set to 2 pixels. Press Ctrl+C to copy the image and paste it in the AD image file. Adjust the position.
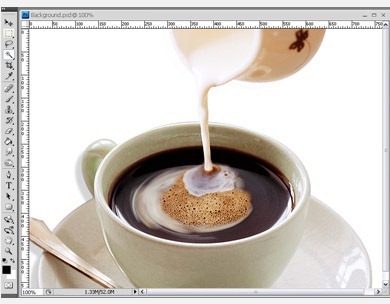
Save the Ad image as “Background.jpg”. Now you have your background image ready.
Step 3 - Pose your 3D Figurine in iClone4
Here we introduce an easy-to-use 3D animation tool known as iClone. No need to have any previous knowledge in animation or modeling as iClone is a 3D environment application that allows you to easily drag and drop ready-made 3D props to later animate and adjust camera perspectives. You can create videos and images for further repurposing in Photoshop. Just open iClone and make sure you have installed the Mr. Pose & Friends add-on content pack I found below.
Step 4 - Set up an iClone Environment
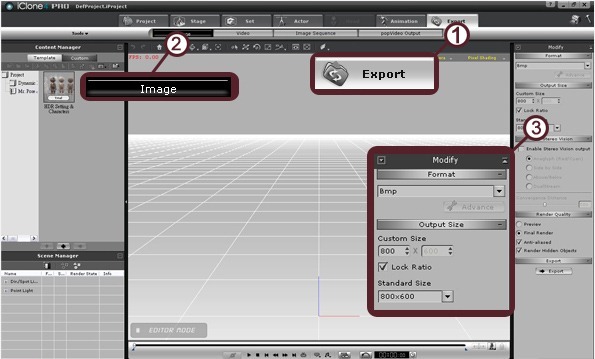
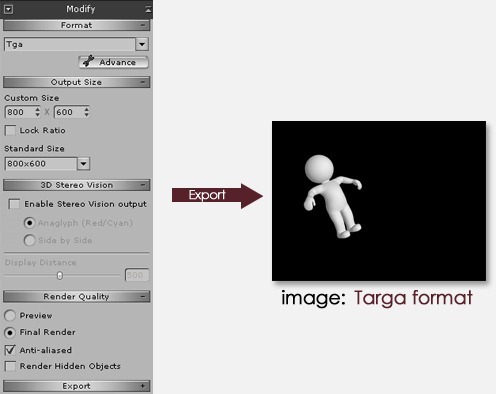
Open iClone and select the Export tab on top, then go to the Image Tab on the Menu Bar just below. After that, go to the Modify panel on the right of the application and choose the Output Size. Set the size to 800 x 600 (Custom Size).
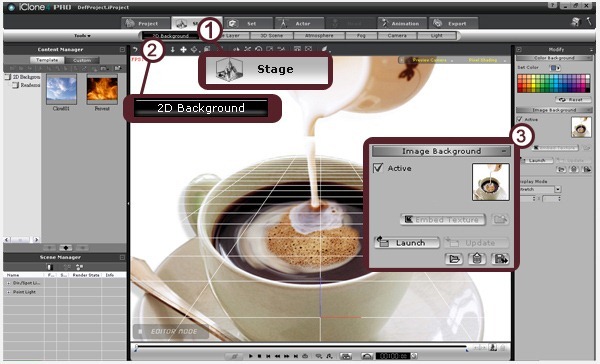
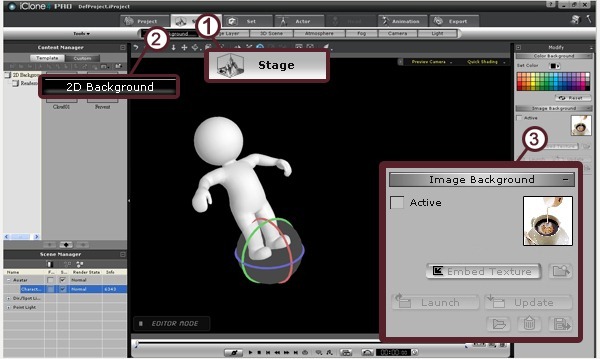
Now we select the Stage tab and then 2D Background on the Menu Bar. We go again to the Modify panel on the right side and check the “Active” box. This is to open the background image we just created in Photoshop. Take note that we are bringing this background image into iClone in order to use it as a reference, and not as part of the final project. We will use the background image later again in Step 7.
For Your Information (FYI)
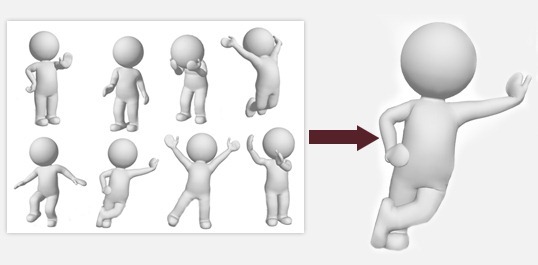
In iClone you may import an infinite amount of props, buildings, plants, sceneries, special effects, animals, characters and figurines to work with. In this example we will work with an iClone add-on content pack that includes a figurine named Mr. Pose. You may also import other 3D models from different sources but just make sure the formats are compatible with iClone. Remember that you may apply preset motions from the motion library by selecting the Animation tab and then Motion in the Menu Bar. You may also choose to freely pose any way you want. (see picture below)
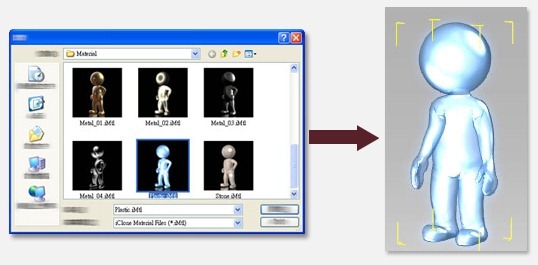
If you need a different look or identity for your prop or character, then you may easily change the Material and Texture maps. You may choose: Porcelain, Metal, Marble, Crystal, Frosted Glass or any other options you like. To do so, load a Material in Actor/Skin/Material & Texture Settings and then choose the desired Material. (see picture below)
Step 5 - Pose your 3D Figurine and Adjust Lighting
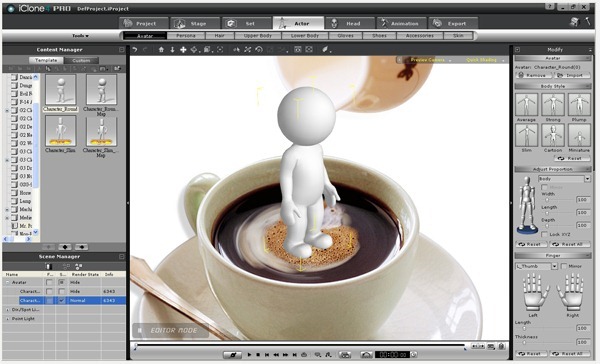
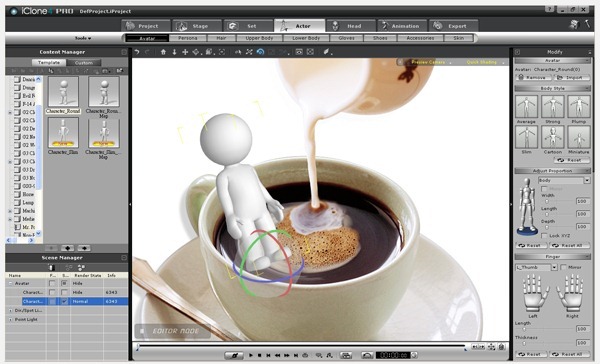
Select your character in the Actor tab above, then choose Avatar on the Menu Bar and find Mr. Pose in the template folder on the left side of the application. (You will need to acquire the Mr. Pose & Friends add-on pack and install it in advance). Apply Mr. Pose by double-clicking on the thumbnail or by drag and dropping the thumbnail into the iClone 3D viewer.
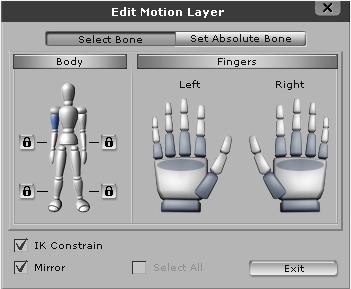
Use the Pan tool (Press 'X' Key) to move the character into the desired position. Make sure you select the character first. Now use the Rotate tool (Press 'E' Key) to adjust the character to the desired angle. While the character is selected; right-click on the mouse and a menu will appear, then select Motion Menu\Edit Motion.
In the Edit Motion Layer panel that pops up, pick the body part (bone) you wish to adjust/pose.
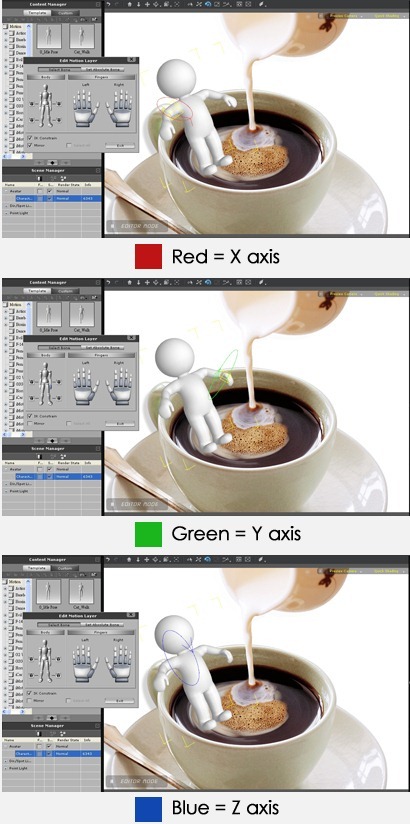
You may toggle the bone rotation by right-clicking in the 3D viewer and then either dragging inside it, or rolling the mouse wheel to rotate the selected bone. Right-click to change the axis and drag, or roll the mouse wheel to adjust the offset position.
Adjust Lighting
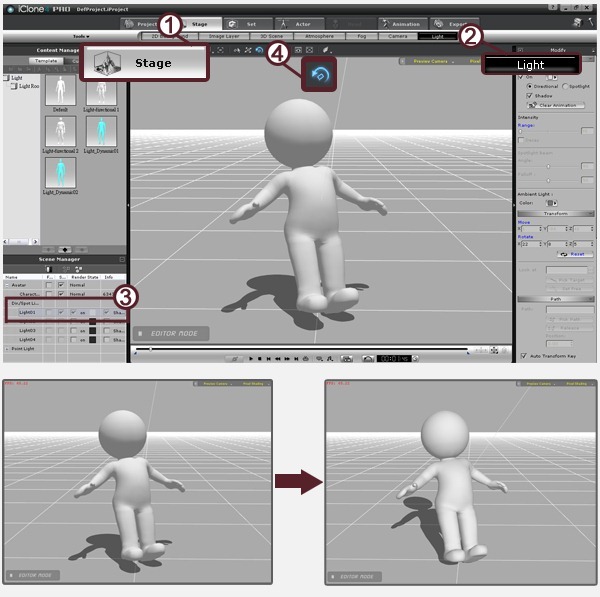
For the lighting, we select the Stage tab on top and then the Light tab on the Menu Bar. Then we use the Rotate Tool (Press 'E' Key) and with your right or left mouse buttons, adjust the lighting in order to make Mr. Pose fit in seamlessly with the background image lighting. Make sure that your shadow angles also match those of your background.
Step 6 - Export your Scene into Targa Format
Select the Stage tab and go to 2D Background on the Menu Bar. Under the Modify Panel on the right side, go to Image Background and uncheck the 'Active' box. The imported background will then disappear. Remember that we brought the background image in as a reference in iClone, and not as a final piece to the Ad. Now select the Export tab, and go to the Image tab on the Menu Bar just below.
Once that is selected, go again to the Modify Panel on the right side and choose Format. Select TGA format and click on the Export button below to export your image into a Targa format. Save your Mr. Pose image file.
Step 7 - Return to Photoshop for Final Compositing
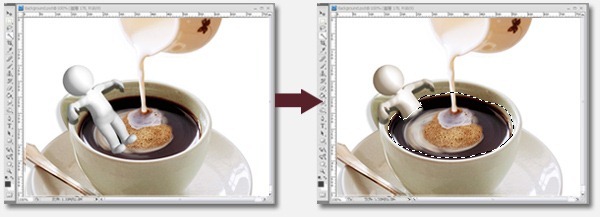
Open Photoshop and bring in the Background image we first created. Open your Mr. Pose Targa file and copy the desired area onto the Background image. Move your Mr. Pose image file into the desired position. Since we want Mr. Pose to look like he is laying back in the cup, we need to do some adjustments here. First we merge the coffee cup layer and the pouring cream layer into one. Then we use the Lasso tool to select the area where we want to cover Mr. Pose's lower body (as seen in the illustration below).
Create a new layer for the selected image. Make sure this layer is on top of Mr. Pose. Review and adjust any small tweaks. Done! Now you have Mr. Pose sitting back in the coffee cup.
Step 8 - Add the Final Touch to your AD
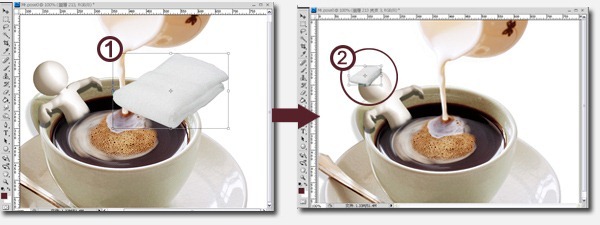
Open picture03 (folded towel). Use the Lasso Tool to select the towel. Press Ctrl+C to copy and then paste the selected image onto the Ad image. Adjust the towel’s position to Mr. Pose’s forehead. Press Ctrl+T to activate the free transform in order to rotate the towel to a suitable position. Then adjust the size of the towel.
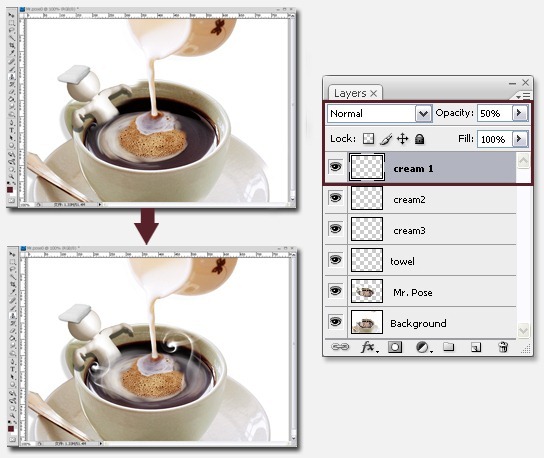
In order to make Mr. Pose look natural inside the coffee cup, we need to emphasize the cream layer. First, we use the Lasso Tool to select the outline of the cream layer. Then we go to Select/Feather and set to 2 pixels. Copy the selected image to three new layers. Select first layer and move it to a higher position. Set the opacity to 50%. Select the second layer and move it to an even higher position. Set the opacity to 66%. Finally, we select the third layer and go to Transform/Flip Horizontal and flip the image. We then move the image to the right in order to create a more balanced and realistic look.
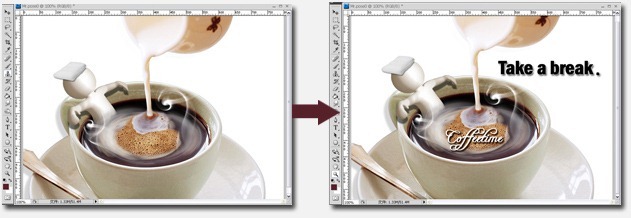
Now the Ad is almost finished. Just add the logotype “Coffeetime” and the slogan “Take a Break” with the font style you choose. Voila! Pretty good considering that we knew nothing about animation or 3D modeling.



1 comments:
Best Corporate Video Production Company in Bangalore and top Explainer Video Company in Bangalore , 3d, 2d Animation Video Makers in Chennai
In fact, as a professional video maker, we can say that corporate videos make the business brand in a different way!
Post a Comment