There are very few simple steps need to follow if you want to have
fade out kind of effect which makes the edges look soft using Adobe
Photoshop. This is a very popular effect when you want to merge an image
to another background so that the new image fits or adapts to it’s new
environment resulting a WOW effect.
I have tried all my best to keep this post simple so that even a guy
who has no experience of Photoshop can do the trick. What you need to do
is to walk through the procedure step by step.
Tools Needed : :) You are right ! Adobe Photoshop
Skills Needed : :( You are wrong ! Nothing
Now, without twisting the story much, let’s get started with step 1.
STEP 1:
Choose 2 Images. For this demo I have picked following two images, first
is a simple one with a beautiful quote and the sweet smiling kid.


STEP 2: Open Image 1 with Photoshop.
STEP 3: Drag Image 2 and place just on the Image 1 opened with Photoshop.
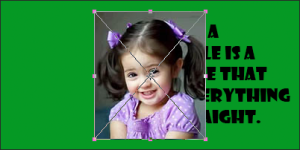
STEP 4: Drag/Move this image to your preferred location on the Image 1 . You can resize the image too by stretching the corners of the Image 2 (with shift key to maintain the aspect ratio) . Then press Enter key to place the image.

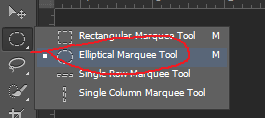
STEP 5: Select the Elliptical Marquee Tool .
STEP 6: Create a marquee selection by dragging around the area of the Image 2 you want to keep which will be visible above the Image 1.

STEP 7: Click on the Add layer mask button at the bottom of the layers palette.


STEP 8: Go to Filter Menu and select Blur and then Gaussian Blur .
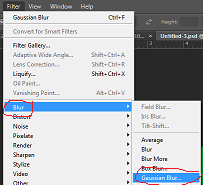
STEP 9: You can use the slider to increase or decrease the intensity of blur .

STEP 10: WAIT ! Are you seriously waiting to follow the 10th step ? :D :D Okay. Just click the Save from File menu and save the file to the format you want.
And yes, don’t forget to drop few lines for me regarding how you liked :) or disliked :( the post.
Thanks a lot for reading !


0 comments:
Post a Comment