Showing posts with label photoshop design. Show all posts

Jill Greenberg Look using Photoshop

 Jill Greenberg look Photoshop tutorial before and after
Jill Greenberg is a famous photographer best known for her recognizable portraits look which is achieved with sophisticated lighting and intensive Photoshop post-processing. In many of Greenberg’s photos you see a simple single colored background with a vignette of light coming from the center. It is possible to create Jill Greenberg effect solely with Photoshop tools outside a controlled lit studio and this Photoshop tutorial will guide you through all steps needed. This is tutorial for intermediate/advanced Photoshop users. I intentionally do not include beginner level details to make a workflow simple and straightforward.
Read More

Outer Glow layer style in photoshop

Photoshop layer styles are a popular way to add effects, such as drop shadows and strokes, to layers in a non-destructive way. With the right knowledge and experience, any effect can be achieved. To achieve these effects, however, you need to understand what each setting does and how they can be combined to achieve a certain look. we will explain every aspect of Photoshop's layer styles feature and show you how to unlock their potential.

The Uses For an Outer Glow When you hear the name "Outer Glow" you automatically assume that this effect is limited to just that, an Outer Glow. The truth is that there is much more you can do with it than a simple glowing effect.
On top of creating a glowing effect, Outer Glow can also be used to create faux drop shadows as well as add outer strokes to your designs.
Below you will see an example of how an Outer Glow can not only make an object look like it is emitting light, but how it can also be used to create a shadow effect. Keep in mind that only the Outer Glow settings were changed between the two different looks.
Read More

Incredible 3D Text Effect

3D Text Effects are a vital part of any Photoshop user’s. With that being said, it’s important to learn how to implement them into your images and learn how to assemble them in general. With the step by step instructions below, you’ll not only learn how to create effective 3D Text Effects but you’ll also learn how to use them. In other words, we’re going to basically hold your hand from beginning to end and teach you everything you need to know.
So, if you’re ready to get started with this example tutorial and are ready to learn how to create stunning 3D Text Effects, scroll down and take a look. This is just one example but the process can be replicated for virtually any type of 3D Text that you want to make. Now, what are you waiting for? Scroll down and take a look!

final Incredible 3D Text Effect
Read More

How To Create Cool Text effect in Photoshop

Today, I will show you the steps I took to create this Cool Liquid Text Effect with Feather Brush Decoration in Photoshop. This is an intermediate level tutorials and some steps can be a bit tricky, but why not have a try!
We will be heavily using the liquid filter (which in my opinion is one of the most versatile tools in Photoshop) in this tutorial. I won’t be going through each command of the liquify filter (there will be a basic tutorial here on PSD Vault very soon about this topic), however, I want you to have a go at it regardless and see how far you can go.
We will also be making a feather-like brush and create some ink effect, so there is a lot to learn in this tut :)
Have a try!
Here is a preview of the final effect I have for this tutorial: (click to enlarge)

cool text effect flatten 500x321 Create a Cool Liquid Text Effect with Feather Brush Decoration in Photoshop
Read More

Photoshop CS6 Lens correction Designing

Here I have opened an image that was shot with a DJI Phantom 2 Vision Quadcopter camera. Notice the fisheye distortion?

Choose Filter>Lens Correction
Screen Shot 2014-11-11 at 5.11.23 PM
Simply turn on the Geometric Distortion open and the Fish eye is removed because the Filter has access to the metadata of the photograph and matches it with presets from the Adobe Lens Correction database of cameras and lenses.Â
Read More

Photoshop Actions Tutorial

This tutorial will teach you how to create duotones, tritones and quadtones inside of Photoshop. At the end of the tutorial you'll find a link to 8 custom duotone/tritones as a complimentary download.

One of the main purposes behind Gavin's creative action sets is to free up photographers time and give them more creative ideas. He has invested thousands of hours developing his programs so that you do not have to. At the click of a button, or watching a 3 minute movie, you'll have many more creative options and ways to distinguish yourself from the competition. All this for around $100. Find all the details, including special pricing at Gavin's PhotoEffects website.

Toning With Duotones, Tritones And Quadtones
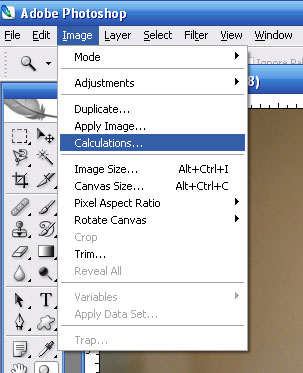
In order to tone with duotones, your photograph must first be converted to black and white. One of my favorite methods to convert to BW is using ‘calculations’.

Open your photograph and click on image, then calculations.

Photoshop Actions Tutorial - Toning With Duotones, Tritones And Quadtones

The calculations dialogue box opens. There are four areas to focus on in the ‘calculations’ dialogue box. The two channels, the blending mode and opacity settings.

Read More

Improve Type Compatibilities of Photoshop

Photoshop 7 adds several major new capabilities, such as the File Browser, the Healing Brush, and Tool Presets. But you’ll also be quite pleased with the dozens of little tweaks in the program, including some long-awaited improvements in the type department.
Photoshop is an image editing program, not an illustration or page layout program. The fact tat it does so much with type continues to be a blessing. Rather than bemoaning the fact that type on a path and text wrapping aren’t possible (yet), let’s celebrate what is new in Photoshop 7.
Read More